1
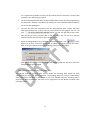
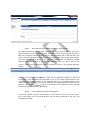
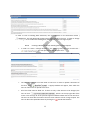
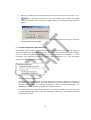
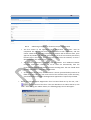
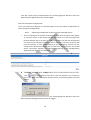
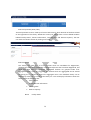
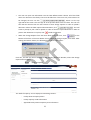
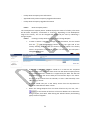
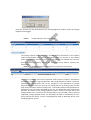
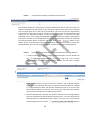
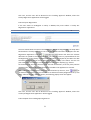
Independent Market Operator
MPR User Guide [DRAFT]
September 2011
2
Table of Contents
1.
Accessing MPR for the first time (Summary) ................................................................................... 5
2.
System Functionality ....................................................................................................................... 5
3.
Applications/Change Requests........................................................................................................ 6
3.1.
Pending Approval ..................................................................................................................... 6
3.1.1.
3.2.
History ..................................................................................................................................... 7
3.2.1.
4.
Participant Information (View / Edit) ........................................................................................ 8
4.1.1.
Current Effective and Future Approved Participant Information Data ............................... 8
4.1.2.
Current Participant Information Data ............................................................................... 9
4.1.3.
Creating a Participant Information Change Request ........................................................ 10
4.2.
Market Customer Standing Data (View / Edit) ........................................................................ 11
4.2.1.
Approved Information Market Customer Standing Data ................................................. 12
4.2.2.
Current Market Customer Standing Data ........................................................................ 12
4.2.3.
Creating a Market Customer Standing Data Change Request .......................................... 13
Participant Registration Application Forms ................................................................................... 14
5.1.
Rule Participant Registration .................................................................................................. 14
5.1.1.
5.2.
Submitting an Application for Rule Participant Registration ............................................ 15
Rule Participant De-Registration............................................................................................. 16
5.2.1.
6.
Searching For Historical Change Requests/Applications .................................................... 7
Participant Registration .................................................................................................................. 8
4.1.
5.
Searching For Pending Change Requests/Applications ...................................................... 6
Submitting an Application for Rule Participant De-Registration....................................... 16
Facility Registration....................................................................................................................... 17
6.1.
Facility Summary Table .......................................................................................................... 17
6.2.
Facility Details (View / Edit) .................................................................................................... 18
6.3.
Facility List ............................................................................................................................. 18
6.3.1.
Facility Status ................................................................................................................. 18
6.3.2.
Facility General Information ........................................................................................... 19
6.3.2.1.
6.3.3.
Approved Facility General Information.................................................................... 19
Current Facility General Information .............................................................................. 19
6.3.3.1.
Creating a Facility General Information Data Change Request ................................. 19
3
6.3.4.
Standing Data ................................................................................................................. 21
6.3.4.1.
Approved Facility Standing Data ............................................................................. 21
6.3.4.2.
Current Facility Standing Data ................................................................................. 22
6.3.4.3.
Creating a Facility Standing Data Change Request ................................................... 22
6.3.5.
Reserve Capacity ............................................................................................................ 23
6.3.5.1.
Reserve Capacity Status .......................................................................................... 24
6.3.5.3.
Facility Capacity Credit Information........................................................................ 25
6.3.5.4.
Approved Facility Reserve Capacity Temperature Information ................................ 25
6.3.6.
Facility Reserve Capacity Upgrade Information ............................................................... 27
6.3.7.1.
7.
8.
Creating a Facility Reserve Capacity Upgrade Change Request ................................ 28
Facility Registration Application Forms ......................................................................................... 29
7.1.
Facility Registration ................................................................................................................ 29
7.2.
Facility De-Registration .......................................................................................................... 31
7.3.
Exemption from Funding Spinning Reserve ............................................................................ 31
7.4.
Facility Transfer Intention ...................................................................................................... 32
7.5.
Facility Transfer...................................................................................................................... 33
Email Subscriptions ....................................................................................................................... 34
4
In order to get access to the IMO Wholesale Electricity Market System (WEMS), the Market Participant
must submit an application in writing to the IMO.
Once their access to the WEMS has been approved, the IMO will grant the user a profile in WEMS.
1. Accessing MPR for the first time (Summary)
Go onto the WEM System homepage. The ‘Home’ page displays information on the Wholesale Electricity
market. There are four windows:
-
Real-time Load plotted against the Load Forecast.
-
STEM prices and quantities.
-
Market submission windows.
-
Market messages.
The name of the user signed into WEMS is displayed on the top-right of the screen. The user can exit
WEMS by clicking the ‘logout’ button. Along the top of the screen, there are tabs which will allow the
user to navigate to other section of the WEM system. To navigate to the registration section, select the
‘Registration’ tab at the top of the page.
2. System Functionality
5
The ‘Registration’ tab brings the user to the Market Participant Registration (MPR) System. The
Registration System is the central point for all of the Participant and Facility Registration related
activities related to operating in the Wholesale Electricity Market (WEM).
3. Applications/Change Requests
The first section on the Registration menu is the ‘Applications/Change Requests’ section. It has two
subsections: ‘Pending Approval’ and ‘History’.
3.1. Pending Approval
The ‘Pending Approval’ window shows all of the pending Applications associated with
Registration and Change Requests related to changing the data in the Registration System that
the user has made, that are pending action from the IMO. The requests pending approval are
listed in the main window. The user can also search for a particular pending Change Request or
application:
3.1.1.
•
Searching For Pending Change Requests/Applications
Select one or more categories from the scroll down menu at the top of the window:
-
Participant User
-
Facility Type
-
Application/Change Request Type
6
The user can also filter by the IMO Due Date. This filters pending applications/Change
Requests by the date that they are due to be approved by the IMO as per the Market
Rules. The Applications/Change Requests will already be filtered between the current
date and one week in the future. These due dates are not fixed dates as the IMO is able
to approve a date that the change can be facilitated, usually this will be within the Due
Date. Enter the start and end dates of the search period into the ‘From’ and ‘To’ boxes
by clicking on the calendar and selecting a date. Alternatively, the user can type the date
directly into the box in the format ‘dd/mm/yyyy’.
•
Once the categories and/or dates have been selected, click the search button:
. This
will list all of the pending requests matching the selected categories. In order to reset
the search parameters, click the ‘Reset’ button.
3.2. History
The History window shows all of the applications and Change Requests that have been
submitted by the user. This includes applications/Change Requests that are:
- Pending;
- those that have been accepted by the IMO;
- those that have been rejected by the IMO;
- those that have been Withdrawn by the user; and
- Applications/Change Requests which have been cancelled by the user.
The user can view the Applications/Change Requests by clicking the ‘Reference Number’ on the
far left of the application log.
3.2.1.
•
Searching For Historical Change Requests/Applications
Select one or more categories from the scroll down menu at the top of the window:
-
Participant User
Facility Type
Application/Change Request Type
Status
7
The user can also filter under the Submitted Date. This filters applications/Change Requests by the date
that they submitted to the IMO. The Historical Applications/Change Requests will already be filtered
between the current date and ten days in the past. Enter the start and end dates of the search period
into the ‘From’ and ‘To’ boxes by clicking on the calendar and selecting a date. Alternatively, the user
can type the date directly into the box in the format ‘dd/mm/yyyy’.
Once the categories and/or dates have been selected, click the search button:
. This will list all of
the applications/Change Requests matching the selected categories. In order to reset the search
parameters, click the ‘Reset’ button.
4. Participant Registration
The ‘Participant Registration’ section holds all the relevant information and processes concerned
with the Participant. This includes Registering as a Rule Participant in one or more of the Market
Participant Classes.
4.1. Participant Information (View / Edit)
The user can view their ‘General Information’, ‘Prudential Information’ and ‘Financial
Information’ in this window, and the user can also submit a Change Request for this
information, and view the Change Requests that have been submitted and approved.
4.1.1.
Current Effective and Future Approved Participant Information Data
The ‘Approved Participant Information’ window is above the ‘Participant Information’ window in
the centre of the screen. The Change Requests made are listed chronologically from most
recently approved change requests. The ‘Status’ of the Change Requests made is listed on the
right side of the Change Request form. The status of a Change Request in this window is always
listed as ‘Approved’, Change Requests which are rejected by the IMO or cancelled by the user,
8
will be listed in the ‘History’ section. Change Requests listed as ‘Received’ will be in the ‘Pending
Approval’ section. Sometimes, there may be a number of future Change Requests that can be
pending. In this case the user can browse through the Change Requests submitted by clicking on
the numbers below the table, or by pressing the ‘Next’ or ‘Last’ button.
The user can view the change request by clicking on the ‘Reference Number’ to the left of
the window. It will show the data submitted as part of the change request below in the
‘Participant Information’ window. If the ‘Effective Date’ for the Change Request to be
implemented is in the future, the user can withdraw the Change Request before it becomes
effective. Click on the ‘
’ button at the bottom of the ‘Participant Information’
window to cancel this Change Request.
4.1.2.
Current Participant Information Data
The section showing currently selected effective Participant Information is directly below
the ‘Approved Participant Information’ section. This window lists the currently selected
effective Participant Information approved by the IMO. Information is listed under the
following headings:
- Participant Information listing the status of the participant, their short name, the
organization name and the rule participant status.
-
General Information
-
Prudential Information
-
Financial Information
The Participant Information section will be partially completed when the user first gets
access to the WEMS. The user should check all information already in their profile and
add/change data by creating a change request.
It is the Market Participants responsibility to ensure that the information provided is up to
date and relevant for each of the respective sections.
9
4.1.3.
•
Creating a Participant Information Change Request
In order to submit a Change Request to change or add information, the user should click
the ‘
’ button on the top right side of the ‘Participant
Information’ window. This will open a Change Request form:
•
At the top of the form, the user should fill in a date for the ‘Proposed Effective Date’.
This is the date from which the Participant Information will be made effective in WEMS
10
if it is approved by the IMO. The user can pick a date from the calendar, or enter a date
manually in the ‘dd/mm/yyyy’ format.
•
The ‘Previous Effective Date Data’ shows the data that has been previously approved by
the IMO and is effective immediately preceding the new requested Effective Date for
the current Change Request.
•
The user can input new information into the ‘New Effective Data’ column. All of the
fields must be filled out. If there are only a few sections to be changed, the user can
click ‘
’, which is at the top right side of the screen.
This will copy all of the previous data to the new form. The user can then edit the
sections that are most relevant to their change request.
•
When the Change Request form has been filled out by the user, click ‘
’ at the
bottom of the form. If the user decides not to submit the change request, click ‘Back’.
After clicking the ‘Submit’ button, the following popup screen will appear:
Click ‘OK’, and the user will be directed to the ‘Pending Approval’ Window, where the
Change Request will be logged.
4.2. Market Customer Standing Data (View / Edit)
The Market Customer Standing Data section details the Standing Data which has been
submitted by the user as a Market Customer. The Standing Data is in the form of documents
which have been uploaded to the WEMS by the user. Market Customer Standing Data is
required for those participants that want to be registered into the Market Customer Rule
Participant Class.
11
4.2.1.
Approved Information Market Customer Standing Data
The ‘Market Customer Standing Data’ window has a log of ‘Current Effective and Future
Approved Market Customer Standing Data’ submissions, which have been approved by the
IMO. Each submission details the date which it was submitted and its effective date. The
‘Status’ of the Change Requests made is listed on the right side of the Change Request form.
The status of a Change Request in this window is always listed as ‘Approved’, Change
Requests which are rejected by the IMO or cancelled by the user, will be listed in the
‘History’ section. Change Requests listed as ‘Received’ will be in the ‘Pending Approval’
section.
The user can view the change request by clicking on the ‘Reference Number’ to the left of
the window. It will show the data submitted as part of the change request below in the
‘Participant Information’ window. If the ‘Effective Date’ for the Change Request to be
implemented is in the future, the user can withdraw the Change Request before it becomes
effective. Click on the ‘
’ button at the bottom of the ‘Market Customer Standing
Data’ window to cancel this Change Request.
4.2.2.
Current Market Customer Standing Data
The current ‘Market Customer Standing Data’ can be viewed in the centre of the screen.
This screen details all of the Standing Data that has been submitted by the user, and
accepted by the IMO:
12
In order to view a Standing Data document, the user can click on the document button (
). This will download the document to be viewed by the user. In order to change
the standing data or to add new standing data, the user can create a change request.
4.2.3.
•
Creating a Market Customer Standing Data Change Request
In order to create a Change Request to the Standing Data, the user should click ‘
’. This will open the Change Request form:
•
The user should fill out all of the fields on the form. In order to upload a document to
the form, click ‘
’. A popup window will appear, from which the
user can select a file to upload to the form.
•
All of the fields must be filled out. If there are only a few sections to be changed, the
user can click ‘
’, which is at the top right side of the
screen. This will copy all of the previous approved effective date data to the new form.
The user can then edit the sections that are most relevant to their change request. The
user can discard a copied document by clicking the ‘ ’ beside the filename.
13
•
When the Standing Data Change Request form has been filled out by the user, click ‘
’ at the bottom of the form. If the user decides not to submit the change
request, click ‘Back’. After clicking the ‘Submit’ button, the following popup screen will
appear:
Click ‘OK’, and the user will be directed to the ‘Pending Approval’ Window, where the
Change Request will be logged.
5. Participant Registration Application Forms
Once WEMS access has been granted by the IMO, the participant has no status with regard to
the Market Rules. The Application Process for becoming a Rule Participant is defined below.
Users can submit an application to Register as a Rule Participant or De-Register as a Rule
Participant. The application forms to Register (and De-Register) are in the Participant
Registration ‘Application Forms’ section:
5.1. Rule Participant Registration
The Application Form to register as a Rule Participant can be seen below. The majority of
the fields will automatically be filled out with the Participant Information and Market
Customer Standing Data. It is therefore important to have up to date information, and
Standing Data before submitting a Registration Application Form.
The MPR System will automatically populate the respective fields of the form with the
currently effective information from the ‘Participant Information’ and ‘Market Customer
Standing Data’ screens.
14
5.1.1.
•
Submitting an Application for Rule Participant Registration
•
The first section of the application form ‘Registration Information’ must be
completed. The user should tick the relevant boxes to their application, and also
choose a date which their Rule Participant Registration will be effective from, upon
approval by the IMO. The date will automatically set to the current date plus twenty
business days in the future. The user can pick a date from the calendar, or enter a
date manually in the ‘dd/mm/yyyy’ format.
•
The ‘Contact Information’, ‘Invoicing and Tax Details’ and ‘Additional Market
Customer Information’ sections will all be filled out automatically from the
Participant Information and Market Customer Standing Data. The user should check
that this information is accurate and up to date.
•
At the bottom of the form, the ‘Declaration’ section (pictured below) needs to be
filled out by the user. The user must tick all of the relevant boxes, and if necessary,
upload documents to support the Registration Application if required by the IMO.
When the Rule Participant Registration form has been filled out by the user, click ‘
’ at the bottom of the form. If the user decides not to submit the form, click
‘Back’. After clicking the ‘Submit’ button, the following popup screen will appear:
15
Click ‘OK’, and the user will be directed to the ‘Pending Approval’ Window, where the
Rule Participant Registration Form will be lodged.
5.2. Rule Participant De-Registration
If the user wishes to De-Register as a Rule Participant, they must submit an Application for
Rule-Participant De-Registration.
5.2.1.
Submitting an Application for Rule Participant De-Registration
•
The user should tick the relevant Participant Class(es) which they wish to de-register
as, and also choose a date which their De-Registration as a Rule Participant will
become effective after it has been approved by the IMO. The date will automatically
set to the current date plus ten business days in the future. The user can pick a date
from the calendar, or enter a date manually in the ‘dd/mm/yyyy’ format. The user
should tick the declarations at the bottom of the form. And, if relevant, they should
attach a document detailing any information pertaining to the De-Registration
Application that the IMO has requested.
•
When the Rule Participant De-Registration form has been filled out by the user,
click ‘
’ at the bottom of the form. If the user decides not to submit the
form, click ‘Back’. After clicking the ‘Submit’ button, the following popup screen will
appear:
Click ‘OK’, and the user will be directed to the ‘Pending Approval’ Window, where the
Rule Participant De-Registration Form will be logged.
16
6. Facility Registration
The ‘Facility Registration’ section is responsible for all facility registration issues. It includes:
o Facility Summary Table
o
Facility Details
o
Application Forms to:
Register a Facility
De-Register a Facility
Apply for Exemption from Funding Spinning Reserve
Submit an Intention to Transfer a Facility
Transfer a Facility
6.1. Facility Summary Table
The Facility Summary Table displays the current state of all of the Rule Participants facilities that
are Registered, Facilities that are Candidates for Registration (i.e. facilities that have been
created but not Registered), Facilities that have been De-Registered and Facilities that have
been transferred to other Rule Participants.
The facilities can be filtered by the date of commencement of the facility. To filter by
registration date, pick a date from the calendar, or enter a date manually in the ‘dd/mm/yyyy’
format. When the facility owner or registration date has been selected, click the ‘
to filter. In order to reset the search parameters, click the ‘Reset’ button.
17
’ button
6.2. Facility Details (View / Edit)
The Facility Details screen is made up of several sub-sections, which detail all of the data related
to the registration of the facility. Beside the ‘Facility List’ menu, there are four tabbed windows
labeled ‘Facility Status’, ‘General Information’, ‘Standing Data’ and ‘Reserve Capacity’. The user
can reach the relevant section by clicking on the tab.
6.3. Facility List
The ‘Facility List’ menu lists all of the facilities which are Candidates for Registration,
(facilities that have been created but not Registered) those that have been Registered, and
those that have been De-Registered. Aggregated facilities are grouped under their
Aggregated Facility name (e.g. Agg123). The facilities which are aggregated can be viewed
by clicking the ‘+’ button to expand the Aggregate menu. The individual facility can be
selected by clicking on its name on the facility list. This will display information about the
facility under the following tabs:
Facility Status
Facility General information
Standing Data
Reserve Capacity
6.3.1.
Facility Status
18
The ‘Facility Status’ window will display current information about the facility, its
Registration status, its Transfer status and its Aggregation status.
6.3.2.
Facility General Information
The ‘General Information’ tab features two sections:
6.3.2.1.
Approved Facility General Information
The ‘Current Effective and Future Approved Facility General Information’ window logs
Change Requests that have been submitted by the user and which have been approved by
the IMO.. The user can view the change request by clicking on the ‘Reference Number’ to
the left of the window. It will show the data submitted as part of the change request below
in the ‘Facility Information’ window. If the ‘Effective Date’ for the Change Request to be
implemented is in the future, the user can withdraw the Change Request before it becomes
effective. Click on the ‘
’ button at the bottom of the ‘Facility Information’ window
to cancel this Change Request.
6.3.3.
Current Facility General Information
The ‘Current Facility General Information’ window displays current facility information
under the following headings:
Facility Status
General Facility Information
Other Facility Registration Information
Commencement Information
This information can be updated and changed by the user by submitting a Change
Request.
6.3.3.1.
Creating a Facility General Information Data Change Request
19
•
In order to submit a request to change or add information, the user should click the
‘
’ button on the top right side of the ‘Facility General
Information’ window. This will open a Change Request form:
•
At the top of the form, the user should fill in a date for the ‘Proposed Effective
Date’. This is the date from which the Facility Information will be made effective in
WEMS if it is approved by the IMO. This date will automatically be set for one
business day from the current date. The user can pick a date from the calendar, or
enter a date manually in the ‘dd/mm/yyyy’ format.
•
The user can input new information into the ‘New Effective Data’ column. All of the
fields must be filled out. If there are only a few sections to be changed, the user can
click ‘
’, which is at the top right side of the
screen. This will copy all of the previous data to the new form. The user can then
edit the sections that are most relevant to their change request. In order to upload a
document where the field required documentation, click ‘
The user will then be prompted to pick a file to upload.
•
’.
When the Change Request form has been filled out by the user, click ‘
’ at
the bottom of the form. If the user decides not to submit the change request, click
‘Back’. After clicking the ‘Submit’ button, the following popup screen will appear:
20
Click ‘OK’, and the user will be directed to the ‘Pending Approval’ Window, where the
Change Request will be logged.
6.3.4.
Standing Data
The ‘Standing Data’ screen consists of two windows:
6.3.4.1.
Approved Facility Standing Data
The ‘Approved Facility Standing Data’ window logs Change Requests that have been
submitted by the user and which have been approved by the IMO. The ‘Status’ of the
Change Requests made is listed on the right side of the Change Request form. The status
of a Change Request in this window is always listed as ‘Approved’, Change Requests
which are rejected by the IMO or cancelled by the user, will be listed in the ‘History’
section. Change Requests listed as ‘Received’ will be in the ‘Pending Approval’ section.
The user can view the change request by clicking on the ‘Reference Number’ to the left
of the window. It will show the data submitted as part of the change request below in
the ‘Facility Information’ window. If the ‘Effective Date’ for the Change Request to be
implemented is in the future, the user can withdraw the Change Request before it
becomes effective. Click on the ‘
’ button at the bottom of the ‘Facility
Standing Data’ window to cancel this Change Request.
21
6.3.4.2.
Current Facility Standing Data
The ‘Current Facility Standing Data’ window displays current standing data relevant to
the respective facility. The types of facility which the facility can be classed are:
- Scheduled Generator
-
Non-Scheduled Generator (Including Intermittent Generators)
-
Interruptible Load
-
Curtailable Load
-
Dispatchable Load
-
Network
-
Non-Dispatchable Load
-
Demand Side Program
At the bottom of the window, there is a ‘Supporting Evidence Comment’ section, which will be
can be filled with supporting information for a data Change Request. If the Standing Data needs
to be changed, the user can create a ‘Facility Standing Data Change Request’.
6.3.4.3.
Creating a Facility Standing Data Change Request
•
In order to submit a request to change or add information, the user should click the
‘
’ button on the top right side of the ‘Facility Standing Data’
window. This will open a Change Request form:
•
At the top of the form, the user should fill in a date for the ‘Proposed Effective Date’. This is
the date from which the Facility Standing Data will be made effective in WEMS if it is
approved by the IMO. The date will automatically set to the current date plus three business
days in the future. The user can pick a date from the calendar, or enter a date manually in
the ‘dd/mm/yyyy’ format.
22
•
The user can input new information into the ‘New Effective Data’ column. All of the fields
which are relevant to the facility class must be filled out. If there are only a few sections to
be changed, the user can click ‘
’, which is at the top
right side of the screen. This will copy all of the previous data to the new form. The user can
then edit the sections that are most relevant to their change request. In order to upload a
document where the field required documentation, click ‘
’. This will
create a prompt to pick a file to upload. In order to discard a copied document in order to
place a new document in its place, click ‘
•
’ beside the filename.
When the Change Request form has been filled out by the user, click ‘
’ at the
bottom of the form. If the user decides not to submit the change request, click ‘Back’. After
clicking the ‘Submit’ button, the following popup screen will appear:
Click ‘OK’, and the user will be directed to the ‘Pending Approval’ Window, where the change
request will be logged.
6.3.5.
Reserve Capacity
The ‘Reserve Capacity’ screen displays the following sections:
-
Facility Reserve Capacity Status
-
Facility Capacity Credit Information
-
Approved Facility Reserve Capacity Year Information
23
-
Facility Reserve Capacity Year Information
-
Approved Facility Reserve Capacity Upgrade Information
-
Facility Reserve Capacity Upgrade Information
6.3.5.1.
Reserve Capacity Status
The ‘Facility Reserve Capacity Status’ window displays the status of a facility. This status
will be either ‘Proposed’, ‘Committed’ or ‘In-Service’, depending on the development
stage of the facility. This can be changed and updated by the user by submitting a
change request.
6.3.5.2.
Creating a Facility Reserve Capacity Status Change Request
•
In order to submit a request to change or add information, the user should
click the ‘
’ button on the top right side of the
‘Facility Standing Data’ window (this button will only appear if the facility
status is ‘Proposed’ or ‘Committed’, not if it is ‘In-Service’). This will open a
Change Request form:
•
At the top of the form, the user should fill in a date for the ‘Proposed
Effective Date’. This is the date from which the new Reserve Capacity Status
will be made effective in WEMS if it is approved by the IMO. The date will
automatically set to the current date plus five business days in the future.
The user can pick a date from the calendar, or enter a date manually in the
‘dd/mm/yyyy’ format
•
The user should then pick a new facility status from the drop-down list
below the ‘New Effective Data’ column.
•
When the Change Request form has been filled out by the user, click ‘
’ at the bottom of the form. If the user decides not to submit the
change request, click ‘Back’. After clicking the ‘Submit’ button, the following
popup screen will appear:
24
Click ‘OK’, and the user will be directed to the ‘Pending Approval’ window, where the Change
Request will be logged.
6.3.5.3.
Facility Capacity Credit Information
The ‘Facility Capacity Credit Information’ window displays information on the Capacity
Credits and Availability Class that these Capacity Credits are relevant to. The Capacity
Credit information in this table is relevant to the capacity year selected from the dropdown box ‘Reserve Capacity Year’ in the ‘Approved Facility Reserve Capacity Year
Information’:
6.3.5.4.
Approved Facility Reserve Capacity Temperature Information
The ‘Current Effective and Future Approved Facility Reserve Capacity Temperature
Information’ window is a log of applications and Change Requests made for a particular
Capacity Year. The Capacity Year can be changed to view applications or Change
Requests relevant to that year. The user can change the year by clicking a year from the
drop-down box beside ’Reserve Capacity Year’. The window displays Change Requests or
applications that have been submitted by the user and which have been approved by
the IMO. The ‘Status’ of the Change Requests made is listed on the right side of the
Change Request form. The status of a Change Request in this window is always listed as
‘Approved’, Change Requests which are rejected by the IMO or cancelled by the user,
will be listed in the ‘History’ section. Change Requests listed as ‘Received’ will be in the
‘Pending Approval’ section.
25
6.3.5.5.
Facility Reserve Capacity Temperature Information
This window displays the temperature recording method that will be used to monitor the
ambient temperature at the facility for the next three capacity years (these can be selected
from the drop-down box at the top of the window). The user can view the temperature
information for each capacity year by selecting a capacity year from the drop-down box and
clicking on the ‘Reference Number’ to the left of the window. It will show the data
submitted as part of the change request below in the ‘Facility Reserve Capacity Temperature
Information’ window. If the Change Request is not yet implemented, the user can withdraw
the Change Request before it becomes effective. Click on the ‘
’ button at the
bottom of the ‘Facility Reserve Capacity Temperature Information’ window to cancel this
Change Request. The user can change or update the data by creating a Change Request:
6.3.5.6.
•
Creating a Facility Reserve Capacity Year Information Change Request
In order to submit a request to change or add information, the user should click
the ‘
’ button on the top right side of the ’Facility
Reserve Capacity Temperature Information’ window. This will open a Change
Request form:
•
At the top of the form, the user should fill in a date for the ‘Proposed Effective
Date’. This is the date from which the new data will be made effective in WEMS
if it is approved by the IMO. The date will automatically set to the current date
plus five business days in the future. The user can pick a date from the calendar,
or enter a date manually in the ‘dd/mm/yyyy’ format
•
The user should pick the capacity year which is relevant to their Change Request
from the drop-down box beside ‘Reserve Capacity Year’. The user should fill out
all fields under the ‘New Effective Data’ column. If there are only a few sections
to be changed, the user can click ‘
26
’, which is
at the top right side of the screen. This will copy all of the previous data to the
new form. The user can then edit the sections that are most relevant to their
change request.
•
When the Change Request form has been filled out by the user, click ‘
’ at the bottom of the form. If the user decides not to submit the
change request, click ‘Back’. After clicking the ‘Submit’ button, the following
popup screen will appear:
Click ‘OK’, and the user will be directed to the ‘Pending Approval’ Window, where the
Change Request will be logged.
6.3.6.
Facility Reserve Capacity Upgrade Information
The ‘Current Effective and Future Approved Facility Reserve Capacity Upgrade
Information’ window is a log of Applications made to the Reserve Capacity Upgrade
Information. The Capacity Year can be changed to view applications or Change Requests
relevant to that year. The user can change the year by clicking a year from the dropdown box beside ‘Reserve Capacity Year’. The window displays Change Requests or
applications that have been submitted by the user and which have either been
approved by the IMO. The ‘Status’ of the applications made is listed on the right side of
the window. The status of an upgrade application in this window is always listed as
‘Approved’, Change Requests which are rejected by the IMO or cancelled by the user,
will be listed in the ‘History’ section. Change Requests listed as ‘Received’ will be in the
‘Pending Approval’ section.
6.3.7.
Facility Reserve Capacity Upgrade Information
27
The ‘Facility Reserve Capacity Upgrade Information’ window shows Reserve Capacity
Facility Upgrades relevant to a Capacity Year. Reserve Capacity Upgrade names are
placeholders used throughout the Reserve Capacity Certification and Capacity Credit
Assignment Process. In order to create a Reserve Capacity Upgrade name, the user can
submit a change request:
6.3.7.1.
•
Creating a Facility Reserve Capacity Upgrade Change Request
In order to submit a request to change information, the user should click the ‘
’ button on the top right side of the ‘Facility Reserve
Capacity Upgrade Information’ window. This will open a Change Request form:
•
At the top of the form, the user should fill in a date for the ‘Proposed Effective
Date’. This is the date from which the Facility Upgrade information will be made
effective in WEMS if it is approved by the IMO. The date will automatically set to
the current date plus five business days in the future. The user can pick a date
from the calendar, or enter a date manually in the ‘dd/mm/yyyy’ format
•
The user should pick the capacity year which is relevant to their Change Request
from the drop-down box beside ‘Reserve Capacity Year’. The user should fill out
all fields under the ‘New Effective Data’ column.
•
When the change request form has been filled out by the user, click ‘
’ at the bottom of the form. If the user decides not to submit the information
upgrade request, click ‘Back’. After clicking the ‘Submit’ button, the following
popup screen will appear:
28
Click ‘OK’, and the user will be directed to the ‘Pending Approval’ Window, where the
Change Request will be logged.
7. Facility Registration Application Forms
The ‘Facility Registration Application’ forms are grouped under ‘Application Forms’ in the
‘Facility Registration’ section of the menu on the left of the MPR screen:
The application forms can be viewed by clicking on the ‘Application Forms’ or the ‘+’ button. The
application forms that can be submitted are:
Facility Registration
Facility De-Registration
Exemption from Funding Spinning Reserve
Facility Transfer Intention
Facility Transfer
7.1. Facility Registration
The ‘Facility Registration’ form consists of thirteen sections. The sections are specific to the
facility type, so they will not all need to be filled out, only the sections relevant to the facility
type. The majority of sections will be automatically filled out from the ‘Facility Details’
section. The user should pick the ‘Facility Name’ from the drop-down box in the ‘Facility
Registration Information’ section. The facility names in the drop-down box are listed as
‘Candidates for Registration’. The IMO creates these facilities at the request of the user and
when the facility is created, the user must fill out information for the facility in the ‘Facility
Details’ section:
29
The information associated with that facility will populate the relevant fields in the form.
Once the user has checked that all of this information on the form is correct, at the bottom
of the form the ‘Commencement Information’ and the ‘Declaration’ must be filled out:
The ‘Proposed Date for Commencement of Operation (In Energy Market)’ must be included
in the application. The date will automatically set to the current date plus twenty business
days in the future. The user can pick a date from the calendar, or enter a date manually in
the ‘dd/mm/yyyy’ format. In the ‘Declaration’ section, the user must tick both declarations.
When the Facility Registration form has been filled out by the user, click ‘
’ at the
bottom of the form. If the user decides not to submit the Facility Registration form, click
‘Back’. After clicking the ‘Submit’ button, the following popup screen will appear:
30
Click ‘OK’, and the user will be directed to the ‘Pending Approval’ Window, where the
Facility Registration Application will be logged.
7.2. Facility De-Registration
If the user wants to De-Register a Facility in WEMS, they must submit a ‘Facility DeRegistration’ application:
The user should select the name of the facility they wish to De-Register from the drop-down
box beside the ‘Facility Name’ field. The user can upload information to support their DeRegistration Application. Click the ‘
’ button and select the relevant
document to upload to the application form. The user must enter a proposed date for the
De-Registration of the facility in WEMS if the application is accepted by the IMO. The date
will automatically set to the current date plus ten business days in the future. The user can
pick a date from the calendar, or enter a date manually in the ‘dd/mm/yyyy’ format.
At the bottom of the form, the user must tick both declarations, that they have paid the
application fee, and that all of the information included in the application is accurate.
When the Facility De-Registration form has been filled out by the user, click ‘
’ at
the bottom of the form. If the user decides not to submit the Facility Registration form, click
‘Back’. After clicking the ‘Submit’ button, the following popup screen will appear:
Click ‘OK’, and the user will be directed to the ‘Pending Approval’ Window, where the
‘Facility De-Registration Application’ will be logged.
7.3. Exemption from Funding Spinning Reserve
31
If a facility is eligible to be Exempted from Funding Spinning Reserve (refer to the Market
Rules), then they can lodge an application for ‘Exemption from Funding Spinning Reserve’:
The user should complete all of the required fields. Select the ‘Facility Name’ from the dropdown box, the ‘Facility Class’, the ‘Facility Sub-Type’ and the user must enter a ‘Proposed
Effective Date’ if the application is accepted by the IMO. The user can pick a date from the
calendar, or enter a date manually in the ‘dd/mm/yyyy’ format (this should be the first
trading day of the month). If relevant, the user can upload a document to support their
application. Click ‘
’ button and choose a document to upload.
When the Exemption from Funding Spinning Reserve form has been filled out by the user,
click ‘
’ at the bottom of the form. If the user decides not to submit the Facility
De-Registration form, click ‘Back’. Click ‘OK’, and the user will be directed to the ‘Pending
Approval’ Window, where the Exemption from Funding Spinning Reserve Application will be
logged.
7.4. Facility Transfer Intention
If a Rule Participant is transferring a facility into their ownership from another Participant,
they must lodge a ‘Facility Transfer Intention’ application to be approved by the IMO, before
they can lodge a ‘Facility Transfer’ application:
The user must select the Market Participant that they are transferring the facility from, and
the name of the facility. The user must enter a ‘Proposed Effective Date of Transfer’ if the
transfer intention application is accepted by the IMO. The date will automatically set to the
current date plus one business days in the future. The user can pick a date from the
calendar, or enter a date manually in the ‘dd/mm/yyyy’ format. The user must tick both
32
declarations that the application fee has been paid, and the information in the application is
accurate.
When the Facility Transfer Intention Form has been filled out by the user, click ‘
’
at the bottom of the form. If the user decides not to submit the Facility Transfer form, click
‘Back’. Click ‘OK’, and the user will be directed to the ‘Pending Approval’ Window, where the
Facility Transfer Intention Application will be logged.
7.5. Facility Transfer
Once the ‘Facility Transfer Intention’ application has been approved by the IMO, the user can
submit a ‘Facility Transfer’ application. Before starting this application, the user must submit
updated ‘General Information’ and ‘Facility Standing Data’ for the transfer facility in the
‘Facility Details’ section.
When these Change Requests have been submitted, the user can complete a ‘Facility
Transfer’ application and submit it to the IMO for approval:
When the ‘Facility Transfer’ form has been filled out by the user, click ‘
’ at the
bottom of the form. If the user decides not to submit the Facility Transfer form, click ‘Back’.
After clicking the ‘Submit’ button, the following popup screen will appear:
33
Click ‘OK’, and the user will be directed to the ‘Pending Approval’ Window, where the
‘Facility Transfer Application’ will be logged.
8. Email Subscriptions
The ‘Email Subscriptions’ section allows the user to manage which users are sent email
notifications and updates of their registration applications and change requests:
The user can change the email subscription settings by clicking the ‘
’ button. The user
can then select or unselect registered WEMS users to receive notifications on the form. When
the selections have been made, click ‘
not to submit the change, click ‘Back’
’ at the bottom of the form. If the user decides
34