Transcript
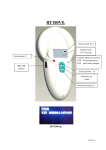
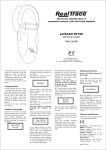
Electronic identification of companion animals
with microchip implants
petSCAN RT100 V5
Microchip reader
User guide
Congratulations, you are now
the owner of a petSCAN RT100
V5. This reader can read all
microchip implants of the FDXB type (conforming to the ISO
norm 11784) and the FDX A
widely used intended to pets
identification. As you can see the
product is easy to use.
By pressing the button another time
the reader will start to search for a
microchip.
The following message will be
displayed on the LCD screen:
Language choice
Keep the reader in your hand and
bring the reader's aerial near the
animal's body.
Scan slowly the area where a
microchip is expected to be found
while keeping the reader for a few
centimeter's distance from the
animal's skin.
The reader will be scanning for
about 18 seconds.
Once the reader has finished
searching, two situations can
arise:
Hold the petSCAN and press
(more than 5 seconds) with
thumb or index finger (right
handed or left handed person)
the blue button, located on the
left side of the reader. The
reader will display successively
different
languages,
English,
Français,
Espanol,
Italiano,
Portugues, Deutsch, Polski. When
your language is displayed,
release the button.
The reader will " beep "
confirming your choice.
Reading a transponder
Switch on the reader by pressing
the blue button (about 1
seconds). The reader will then be
activated.
After
shortly
displaying
the
language
choosen by the user, the
following message will appear on
the display:
Press SCAN
To read
Reading
1/ If a microchip has been found the
reader will « beep » and the unique
identication number is displayed:
Tag :
FDXB
826 068952123456
In the example shown, the reader
indicates that the chip found is of
FDX-B type. The identification
number will be 15 digits (FDX B) or
10digits (FDXA). With FDX B the
first three digit indicates either the
international country code or the
manufacturer code attributed by
ICAR (International Committee for
Animal Identification). In this case
826 is Great Britain code.
The idenfication number will remain
displayed on the LCD screen for
about 2 minutes before the reader
switches off automatically. While
displaying, a new press on the
button
re-activates
reading.
Warning : once the reader is
switch off, it will not be possible
to display the last identification
number read again
2/ If no microchip has been found
after 18 seconds searching, the
reader will beep three times and the
following message will be displayed
on the screen.
No tag
found
display every five readings the
following message:
Low
Low battery
battery
When the battery is too low
the reader displays this message
and switch off immediatly. To
replace the battery, open the
battery compartment situated
under the reader and replace the
used battery with a new one. Close
the battery compartment and check
that the locking mechanism is in
place.
Technical specifications
The LCD screen will stop displaying
the message after about 15
seconds.
If this situation arises, try finding the
microchip again. To do so you must
re-activate the reader by pressing
the button.
Scan the possible microchip
implantation area with as large a
sweeping movement as possible. If
necessary, repeat the operation
after having re-activated the reader
again.
Replacing the battery
Only use 9V alkaline batteries of
the PP3 type.
Conforming to CE norms and ISO
11784 (controlled by CETIM)
Dimensions: L15cm,W 8cm, H 3.5cm
Weight: 140 grams
Power : standard 9 Volt
alkaline (or lithium) battery PP3
Reading distance : FDX B (8 to
10 centimeters)
FDX A (5.5 to 6.5 centimeters)
Depending of the manufaturer
microchip.
HDX 20/25cm (ear tag)
Options : RS232 (cable) or Bluetooth
Temperatures:
Storage conditions: -10°C to + 60°C
Usages conditions: 0°C to + 50°C
Designed in France –
If the battery is running low the
reader will beep twice and will
Made in China