1
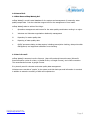
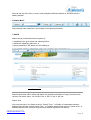
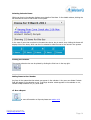
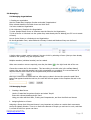
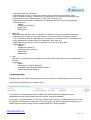
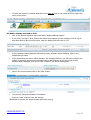
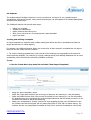
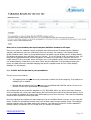
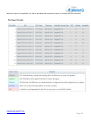
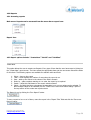
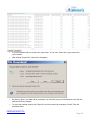
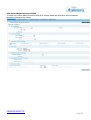
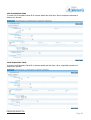
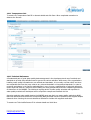
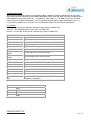
uniDap WaterQ
User Guide
Version 3.01 / 12.05.2011
Help Desk 07 3832 6699
[email protected]
Page 1
INDEX
1.0
2.0
3.0
4.0
5.0
6.0
7.0
8.0
9.0
10.0
11.0
12.0
13.0
14.0
15.0
16.0
General Info
1.1
What does uniDap WaterQ Do?
1.2
How is it used?
How does the solution hang together?
2.1
Entity Diagram
2.2
uniDap WaterQ Terms
Frequently Asked Questions
uniDap WaterQ Home Page
4.1
News and Announcements
4.2
My Favourites
4.3
My Last Items
4.4
My Responsibilities
4.5
Menu Bar 1
4.6
Menu Bar 2
Managing….
5.1
Managing Organisations
5.2
Managing People
5.3
Managing NRM Hierarchy
5.4
Managing Sites
5.5
Managing Sample Types
5.6
Managing Guidelines and Methods
5.7
Managing QA & QC BoM Quality Codes
BoM Reporting
Google Maps (Latitude & Longitude)
Equipment and Calibrations
8.1
Register of Sampling Equipment
8.2
Calibration
8.3
Calibration v Water Quality Sample Management
8.4
Entering Sample Data into the WaterQ Database
8.5
Made a mistake and need to fix it?
Importer
Reports
10.1 Accessing Reports
10.2 Report Options include…
10.3 Creating a New Report
Understanding History (Track and Trace)
System Administration
uniDap Dropdown List Management
13.1 General
13.2 Managed List
13.3 Multiples Management
13.4 Withdrawing Items
13.5 Deleting Items
13.6 Add New List Items
Optional Modules
Shortcuts and Hints
Notes
Pg 3
Pg 4
Pg 7
Pg 8
Pg 15
Pg 22
Pg 22
Pg 24
Pg 31
Pg 36
Pg 45
Pg 46
Pg 47
Pg 48
Pg 56
Pg 58
Help Desk 07 3832 6699
[email protected]
Page 2
1.0 General Info
1.1 What Does uniDap WaterQ Do?
uniDap WaterQ is a web-hosted database for the capture and management of community water
quality sample data. It is also a decision-support tool for the management of river health.
uniDap WaterQ seeks to achieve five things:
i.
Operations management and intranet for the water quality coordinators working in a region.
ii.
Volunteer and Volunteer-organisation relationship management
iii.
Repository for water quality data
iv.
Reporting of water quality data
v.
QA/QC processes relating to data capture, including transcription checking, data point outlier
management, and equipment calibration cross-checking.
1.2 How is it used?
uniDap WaterQ is accessed over the Internet. Users will need and internet browser (Microsoft
Internet Explorer version 8 or later, or Mozilla Firefox, or Google Chrome), and a Web connection.
The recommended browser is google Chrome.
It is primarily used for volunteer and water quality data management.
Volunteers are recorded as “people” in the system, and their basic personal information is recorded
in addition to extensive recording of skills and competencies.
Help Desk 07 3832 6699
[email protected]
Page 3
2.0 How does the solution hang together?
2.1 Entity Diagram
Help Desk 07 3832 6699
[email protected]
Page 4
2.2 uniDap WaterQ Terms
Term
Definition
uniDap
universal and adaptive
uniDap
Platform
Platform which the WaterQ solution resides
User
Someone using the WaterQ solution (you!)
Helpdesk
The uniDap WaterQ Helpdesk team are available Monday to Friday, 9am to 5pm (excluding public
holidays) for any training support. Contact details: [email protected] or (07) 3832 6699.
Module
Entity
The collection of all the instances of an entity Eg: The Site Module contains all of the Sites in the
System
Same as item
Item
Any object in the system. Eg: a Person, a Site or a Sample
Form
Shows the field labels and associated data for an entity
Tabs
Tabs are found at the top of a form and can be used to show different forms/fields for the same
entity.
Field
Data fields collected on an entity. E.g. “first name:”
Process
Button
The button or buttons at the bottom of a form used to move the entity from one process to another.
Each process can be tied to specific user roles such that different roles can have different editing and
ownership capabilities of an entity as it passes through various business processes.
Each process can be pointed to any number of future or past processes.
When processing backwards (for example, making an ‘inactive person’ active again), a reason is
required to be entered. This reason is stored against the process history of the entity.
Insertable
items
At the bottom of some entity forms there is an insert button. Clicking this shows a list of entities that
can be attached to the bottom of the entity form
List
Screen
A screen that lists all the instances of an entity. Eg: when a user navigates to Ambient waterQ sample
via the menu or browse dropdown, they are taken to a list screen of all the open Ambient waterQ
sample entities
Menu Bar
1
For more information please see section 4.5
Menu Bar
2
For more information please see section 4.6
Help Desk 07 3832 6699
[email protected]
Page 5
Row
A row of data linked together across a form. All the fields associated with the row will be displayed
beside each other
Dropdown
New
A dropdown list with a New Button beside it. If a user selects a blank field from the dropdown, then
presses the ‘New Button’, they have the option to type a new value into the blank text box. After
typing a value in the text box the user is given the option of pressing either the small ‘Save’ button or
‘Cancel’ button that appears beside the text box. If the small ‘Save’ button is pressed, the new value
will then be added to the dropdown list permanently. (Please note that this value will not save if the
blue ‘Save’ page button is pressed. To save the value in the dropdown list permanently, you will need
to press the small grey ‘Save’ button that appears beside the dropdown new).
Role
Roles are assigned to people on the “Roles and Access” tab. They control the users access and
permissions to modules in the system
Controlling
form Field
A field on a form that controls what appears in dropdown lists associated with other fields on the form.
E.g. In the sample there is a dropdown for Community Groups. When you select a Community Group
it is a controlling form field for the dropdown list for Site and only those Sites for the selected
Community Group appear.
Foreign
Field
This is an un-editable field which is actually part of another entity. E.g. On the sample form the site
code is a foreign field from the Site entity.
You are
Here
At the top of data forms is the ‘You are Here’ bar.
Services
layer
Buttons appearing below the “you are here” and above the tabs, on the right hand side of the page
are the services layer.
Sticky
Notes
When viewing a data field, a note can be attached to this field (see section 15.0)
Field
Alarm
For those fields which are dates, a field alarm can attached to the field (see section 15.0)
UCL and
LCL
Upper control limit and Lower Control Limit. Part of guidelines and graphs.
Help Desk 07 3832 6699
[email protected]
Page 6
3.0 Frequently Asked Questions
I have forgotten my Username and Password
The Helpdesk can retrieve your Username and/or reset your password. They are contactable Monday to
Friday, 9am to 5pm on: [email protected] or (07) 3832 6699.
How can I login?
Your NRM administrator will allocate you with a Username and Password. If you are unsure how to do this
please refer to section 5.2 of this Manual. If you are still unable to create a Login please phone the Helpdesk
on (07) 3832 6699.
Where can I find the WaterQ Solution?
www.unidapwaterq.com.au
What browser can I use with the WaterQ Solution?
• Google Chrome
• Mozilla Firefox
• Internet Explorer 8 and higher
I want to practise using the WaterQ solution, but have no data to enter
No problem! At www.unidapwaterq.com.au you will find the uniDap WaterQ demo site. It is similar to your
own solution, but you can enter ‘made-up’ information and it won’t affect your Sites and People. We suggest
using the Demo site for training, or to gain confidence in using your own solution. To obtain a login into the
uniDap WaterQ demo site, please contact the Helpdesk on (07) 3832 6699.
There isn’t a field to match data that I want to enter
The uniDap WaterQ solution is adaptive, meaning you can make feature requests. Simply call the Helpdesk
on (07) 3832 6699.
What are my Water Guidelines?
The uniDap WaterQ System will not allow you to create a Site without setting a Guideline; this is not set by
uniDap. Please contact your NRM Administrator to find out your Guidelines.
Help Desk 07 3832 6699
[email protected]
Page 7
4.0 uniDap WaterQ Home Page
The Home Page displays the following:
4.1 News and Announcements
News and Announcements within the sub-licensee User base
4.2 My Favourites
Items added by a User that they wish to quickly navigate to. You can select an Item to appear on
your Favourites List by using the ‘Add to Favourites’ button in the services layer.
4.3 My Last Items
Tracks the last ten items that a User has navigated to
4.4 My Responsibilities
Items which the current User has created and is registered as responsible for. We are currently
continuing to upgrade this feature.
4.5 Menu Bar 1
Help Desk 07 3832 6699
[email protected]
Page 8
Found at the top of the Form, you can easily navigate to different Modules or Groups across the
WaterQ Solution.
4.6 Menu Bar 2
Found directly under Menu Bar 1 and consists of the following functions:
i. Search
Search can be performed across the system by:
• navigating to the go-to menu and selecting Search
• clicking the magnifying glass icon, or
• typing something in the search box and clicking go
Note: All searches are not case sensitive
Searches performed within uniDap will match ALL possible combinations of upper and lower case
versions of a search string: 'Joe' will find 'Joe' or 'JOE' or 'joe' or 'jOe' etc.
Search Term
Any word you enter in the Search area is a “Search Term.” In Simple or Intermediate searches,
multiple words become a single Search Term. In Complex searches each word is a search term. In
Boolean searches, each word can be joined by a Boolean Expression (see below).
Help Desk 07 3832 6699
[email protected]
Page 9
Simple Search
Exact Phrase
This causes uniDap to 'Match the whole field' to your search term.
This will only return items where the entire field matches the search term. If any other characters
precede or follow your search term within a data field, it will not be returned
Starts with
Find a field that 'Starts with' your search term.
This will only return items where the start of the field matches the search term (please note 'case
insensitive above). If any other characters precede your search term within a data field, it will not be
returned.
Intermediate Search
Contains
Find a field that 'Contains' your search term.
This will only return items where a field contains the search term somewhere.
Ends with
Find a field that 'Ends with' your search term.
This will only return items where the end of the field matches the search term. If any other
characters follow your search term within a data field, it will not be returned.
Complex Search
Boolean
Find a field that matches a 'Boolean Expression'.
A boolean expression allows you to join search terms by one of the following expressions:
I.
II.
III.
IV.
and
and not
or
near
Brackets () can also be used to define the priority of each expression set.
The complexity of this search mode means that you may encounter errors. If an Error occurs, this is
displayed instead of the search results. The error message includes clues as to what caused the
error.
Examples of Boolean searches are:
I. Joe and not Bloggs
II. Millions near Dollars
Help Desk 07 3832 6699
[email protected]
Page 10
Free Text
Find a field that 'Is Like' your search term.
This will return items where they match any and all of the words in your search term.
ii. Browse
Browse accesses lists of items for each entity type. For example, by clicking “browse” and selecting
“people,” the following list appears:
From the browse list you can:
•
•
•
•
Click through to the item
Set the number of rows to display on a page
Enter filter criteria in the find and click “go” to find any matching items in the list
Check the “Include Closed” check box to display any items which have been marked as closed.
iii. Create New
Use this to create any new entity in the system. For example, from the “create new” dropdown, by
selecting “people”. Edit forms have a “save” button and display text boxes for editable data.
Help Desk 07 3832 6699
[email protected]
Page 11
iv. Search
See i.
v. Explore
The Explore window is similar to a Site Map for all of the Data in your Solution
vi. Calendar
The calendar is a very powerful way to look at data, and is accessed from the icon bar. Within
uniDap WaterQ, the data types that are programmed to display on the calendar are ambient water
quality samples, Catchment Scorecards and Macro Invertebrate Samples. By selecting the day,
week or month on the calendar, the items created within that period are listed. From this list you
can navigate to the item.
This is also a very fast and effective way for users to see if the samples they have entered have
been saved.
Accessing the Calendar
The calendar is accessible from the calendar icon in the top toolbar. It provides three options; “View
Day”, View Week” and “View Month”.
View Day
This view shows the calendar one day at a time.
Days are changed by clicking the forward and back arrows
The Today link returns to the current day.
Once in the calendar, week or month can be selected by using the “change to” links
Help Desk 07 3832 6699
[email protected]
Page 12
View Week
This view shows the calendar one week at a time.
Weeks are changed by clicking the forward and back arrows
The This Week link returns to the current week.
Once in the calendar, day or month views can be selected by using the “change to” links
View Month
This view shows the calendar one month at a time.
Months are changed by clicking the Month forward and back arrows
Years are changed by clicking the Year forward and back arrows
The This Month link returns to the current month.
Once in the calendar, day or week views can be selected by using the “change to” links
In month view the user can select which types of items appear on the calendar using the selector
option box:
Help Desk 07 3832 6699
[email protected]
Page 13
Selecting Calendar Items
Clicking an item in the calendar displays more details of that item. In the details window, clicking the
link will take the user to that record in the system.
In the case of more than one item in the same time slot or day in month view, clicking the items will
display a list of the items, which can then be selected to take the user to the record in the system.
Printing the Calendar
The current calendar view can be printed by clicking the Print icon in the top right.
Adding Items to the Calendar
Any item in the system that has a date can appear in the calendar. A key user can dictate if a date
field will appear in the calendar or not. To change whether a date appears in the calendar or not,
contact uniDap Solutions on (07) 3832 6699.
vii. Run a Report
For more information on Reports please see section 10.0
Help Desk 07 3832 6699
[email protected]
Page 14
5.0 Managing…
5.1 Managing Organisations
i. Creating an organisation
Use the ‘Create New’ dropdown function and select ‘Organisations’.
Enter relevant details in the Fields shown and click ‘Save’.
You have created an Organisation
ii. Link Volunteers / People to the Organisation
To enter Sample Data a Person or Volunteer must be linked to the Organisation.
To Link a Person or Volunteer into the system they must already exist in WaterQ (see 5.2 how to create
a Person)
How to Link a Person or a Volunteer to an Organisation:
On the Organisation Form, select Edit and a Primary Contact and Members Group can be found
A single primary contact must be entered. You can do this by selecting a Person (that you have already
created in the system) using the drop down field.
Multiple members (unlimited number) can be created.
When more member rows are required, press the plus button
on the right hand side of the row.
Choose the contact role for the member. This has nothing to do with roles in the uniDap WaterQ
system, they are roles this member has in their organisation e.g. president. If a new contact role is
required select a blank field from the dropdown and press the ‘New Button’.
Next type a value into the blank text box. After typing a value in the text box press the small ‘Save’
button that appears beside the text box, the new role will now appear in the dropdown list and in the
future.
5.2 Managing People
i.
Creating a New Person
Use the ‘Create New’ dropdown function and select ‘People’
Enter their relevant details and click ‘Save’
Using your tabs edit their Skills, Training and Competencies, and then their Role and Access.
ii. Assigning Roles to a Person
Assigning a Person their Roles and Access is very important as it allows or restricts their movements
across the WaterQ Solution. There is no limit to the amount of People you can have in a role, and there
is no limit of Roles one person can have.
Help Desk 07 3832 6699
[email protected]
Page 15
To have full access and no limitations to the WaterQ Solution you will need to assign yourself as a NRM
Administrator and a Community Water Quality Monitoring Officer.
The four current Roles and their Limitations in the WaterQ solution are:
Secchi Sampler
Can create new and edit secchi disk surveys.
Volunteer
Can create new and edit samples (including Ambient WaterQ, Secchi Disk, etc.)
Community Water Quality Monitoring Officer
Can do everything except:
Edit a Person (including training, login details, roles, and access)
Change their own roles and access
NRM administrator
Can do everything including; view, create, edit, delete, login history, page history, password change,
giving logins.
iii. Assigning a Person a Login
• Select a Person. Navigate to the bottom right corner of the Form and click the ‘Insert’ button
• Select Insert Login
• Type in a User Name (an easy one to remember is your first initial and your last name, for
example Joe Bloggs would be jbloggs)
• Type in your Password. This is your own Password that you choose, keep it safe and don’t give it
to other people
Help Desk 07 3832 6699
[email protected]
Page 16
• The Login Expiry Date can be used for People who require access until a certain date. It can be reactivated by an NRM Administrator at any time.
• Ensure that the Expiry Date Field is empty or has a correct date in it.
• Under ‘Database Access’ select which database the User has access to.
For Coordinators select ‘Coordinator Database’.
For Volunteers select ‘Volunteer Database’
• Click Save – you have created a Login
iv.
Resetting a Password
• Find the person in the system. Either use the search field or browse ‘People’ to do this.
• Navigate to the bottom left of the persons details page.
• The login is attached to the person in a tree view type structure.
• Click the Login, which is a hyperlink.
• Click the “Edit” button
• Type in a new password and repeat entry
Click “Save” and the password is changed.
5.3 Managing NRM Hierarchy
The NRM Hierarchy is about classifying data.
The hierarchy is Regions > Catchments > Waterways > Sites
i.
Region
A Political Boundary used to partition the NRM agencies total data set into areas owned by different
staff / co ordinations
• Can be located by Browse > Region
• New Regions are Created using the “Create New” drop down box
• Regions are the parent of a Catchment. A Region can have one or many Catchments.
• Regions have:
o A Name
o An Owner who is a Community Water Quality Monitoring Officer
o Graph Limits
o Attachments
ii. Catchment
This is a Watershed Area. Regions can have many Catchments and a Catchment can flow through
many regions
• A main river is generally synonymous with a Catchment
Help Desk 07 3832 6699
[email protected]
Page 17
•
•
•
•
•
•
iii
Users determine their Catchment
Catchments can be seen in a tree view structure on the bottom left of the Region Form.
Can be located by Browse > Catchment, or by navigating to the bottom left of a Region form.
New Catchments are Created using the “Create New” drop down box
Catchments are the parent of a Waterway. A Catchment can have one or many Waterways.
Catchments have:
o A Name
o A Region they belong to
o Graph Limits
o Attachments
Waterway
Many Waterways may flow within a Catchment. A Waterway must have a Catchment as parent.
• Waterways can be seen in a tree view structure on the bottom left of the Catchment Form
• Can be located by Browse > Waterway, or by navigation to the bottom left of a Catchment Form
• New Waterways are Created using the “Create New” drop down box
• Waterways are the parent of a Site. A waterway can have one or many Sites.
• Waterways have:
o A Name
o A Region they belong to
o A Catchment they belong to
o Graph Limits
o Attachments
iv. Sites
Sites exist on a Waterway, and one Waterway can have many Sites. Sites must have a Waterway as
a Parent.
• Sites have
o A Name
o A Dropdown to Select a Waterway
o An Ambient Water Quality Guideline Selection
o A Macro-Invertebrate selection
5.4 Managing Sites
Managing Sites is the critical thing which must be done correctly for uniDap WaterQ to work effectively.
Linking Sites to Organisations and Sample Types
The selection of an Organisation and the Sample Type as illustrated above determines which
Organisations can take which sample types for the Site, using what guideline.
If more than 1 Organisation and or more than 1 Sample Type collects or is collected at the site then use
the multiples management to create more rows in this group and add the additional Organisations and
sample types as required, along with the selected guideline for that organisation.
Help Desk 07 3832 6699
[email protected]
Page 18
5.5 Managing Sample Types
Create a New Sample by using the “Create New” dropdown box
Sample types that exist currently are:
• Ambient WaterQ Sample
• Macro-invertebrate Sample
• Riparian Assessment
• WaterQ Laboratory Analysis
• Catchment Scorecard
• Boat Ramp survey
• Event monitoring sample
• Event Stream heights
• Fishing trip survey
• Secchi Disk Survey
• Temperature Cat4
• Evaporation Cat4c
• Precipitation Cat4a
• Ground Water Resource Cat2ab
If you would like a New Sample type added to your Solution, please contact the Helpdesk or uniDap
Solutions on (07) 3832 6699.
5.6 Managing Guidelines and Methods
There is a complex relationship between Sample Type and the Guideline or Method relating to the
Sample Type. This relationship is once again managed via the Site entity.
It is an area of business within uniDap WaterQ which remains a work in progress and an area which is
receiving attention via the BoM project.
Each Sample type has its own idiosyncratic guideline or method.
Water Quality Guidelines
These guidelines are used in relation to Ambient Water Quality Samples. The purpose of these
guidelines is to place “control lines” on graphs.
Help Desk 07 3832 6699
[email protected]
Page 19
The guidelines can be found via the browse list.
Users can create as many Water Quality Guidelines as required. The first process of the Water Quality
Guideline entity is proposed. In this process the guideline cannot be selected against a Site. Guidelines
must be processed to active in order for them to appear in the select list on a site.
If you would like to use a graph in one of your own reports, you can right click the graph and click
‘Save’. It will open as a jPeg, which you can then right click and copy, and paste into your own report.
5.7 Managing QA & QC BoM Quality Codes
The Quality Code for a sample is determined by a combination of the Sample Taker, the Equipment and
the Technical Reference, where the lowest denominator is selected as the Sample Quality Code.
For the case where there are multiple sample takers in a sample, the highest Sample Taker Quality
Code is selected and this Quality Code is then combined with the Quality Code from the Equipment and
the Quality Code from the Technical Reference and from these three, the lowest quality code
denominator is selected for the Sample Quality Code.
Example: If there are two sample takers (one with a Quality Code A and one with a Quality Code C),
the Equipment is a Quality Code B and the Technical Reference is a Quality Code A, the Sample
Quality Code will be Quality Code B.
Explanation: For the case of two sample takers, the sample taker with the highest Quality code was
selected (Quality Code A). This was then combined with the Equipment (Quality Code B), and the
Technical Reference (Quality Code A). From these three the lowest denominator was selected:
Quality Code B.
Sample Quality Code (Determined by a combination of Sample Taker, Equipment and Technical
Reference which are all selected on the sample).
Help Desk 07 3832 6699
[email protected]
Page 20
Sample Taker Quality Code
Equipment Quality Code
Help Desk 07 3832 6699
[email protected]
Page 21
Method Quality Code
6.0 BoM Reporting
On the Site datasheet there is an option to select “BoM Reportable” under “Organisations that take Sample
Types.” If the Site does not have this reportable flag ticked, the data will not report to the BoM.
7.0 Google Maps (Latitude & Longitude)
From your Region, Catchment, Waterway and Site pages, within the WaterQ application, you will notice a
space provided for Latitude and Longitude.
A Lat/ Long should always be entered for a new Region. Once a Lat/Long is entered on a Region; the
Lat/Long for any new Catchments, Waterways and Sites belonging to that Region, will be automatically
populated with a Lat/Long (saving you the trouble of having to enter this each time). Once a Lat/Long is
entered and saved, an icon will appear on the map displaying the selected location. This icon can then be
dragged to the chosen location
When a new Catchment, Waterway or Site is created, it will look up the hierarchy to find the appropriate
Lat/Long.
A Catchment will look at a Region to see if it has a Lat/Long – if the Region does have a Lat/Long entered
the Catchment will be automatically populated with the Regions Lat/Long, if the Region does not have a
Lat/Long entered the Catchment Lat/Long will remain blank.
A Waterway will first look at the Catchment to see if it has a lat/long – if the Catchment does have a
Lat/Long entered the Waterway will be automatically populated with the Catchments Lat/Long, if the
Catchment does not have a Lat/Long entered the Waterway will look up the hierarchy to find the Regions
Lat/Long. If the Region does have a Lat/Long entered the Waterway will be automatically populated with
the Regions Lat/Long, if the Region does not have a Lat/Long entered the Waterway Lat/Long will remain
blank.
A Site will first look at the Waterway to see if it has a lat/long – if the Waterway does have a Lat/Long
entered the Site will be automatically populated with the Waterways Lat/Long, if the Waterway does not
have a Lat/Long entered the Site will look up the hierarchy to find the Catchments Lat/Long. If the
Catchment does have a Lat/Long entered the Site will be automatically populated with the Catchments
Lat/Long, if the Catchment does not have a Lat/Long entered the Site will look up the hierarchy to find the
Regions Lat/Long. If the Region does have a Lat/Long entered the Site will be automatically populated with
the Regions Lat/Long, if the Region does not have a Lat/Long entered the Site Lat/Long will remain blank.
Help Desk 07 3832 6699
[email protected]
Page 22
***Please note that if your Catchment/Waterway/Site already has a Lat/Long entered than this will not be
replaced by another Lat/Long in the hierarchy. The Lat/Long will only be changed on new Catchments/
Waterways/ Sites that do not already have a Lat/Long entered).
a. To enter a latitude/longitude select the edit button, fill in the latitude/longitude details and hit the
save button. (If you don’t know your latitude/longitude type in latitude of -25 and longitude of 135
to get the centre of Australia – from here you can drag the icon to the selected location.)
b. Once the Lat/Long has been saved, the icon will now appear on the map. If your want to move the
icon, press the edit button on the site page.
c. Hold down the Icon on the map and drag this to your chosen location. When prompted with the pop
up ‘Would you like to update the coordinates with these new coordinates’, press OK, then press the
save button at the top of the page. Your Icon will now appear at your chosen location and your
Latitude and Longitude will now be updated with the latest coordinates.
8.0 Equipment and Equipment Calibrations
8.1 Register of sampling equipment.
Calibrations and Equipment maintenance are created against Equipment. Equipment also has Quality Codes
which are combined with Sample Taker and Technical reference to determine a sample quality code.
Help Desk 07 3832 6699
[email protected]
Page 23
On the bottom right corner of the equipment page you will find an “Insert” button.
Clicking “Insert” allows you to insert items as children to this piece of equipment. You can insert
Calibrations, Equipment Service & Maintenance or Equipment Usage Schedule. Just click “Insert”.
Help Desk 07 3832 6699
[email protected]
Page 24
8.2 Calibration
The Calibration date is critical. The Calibration date determines which samples taken by the parent
Equipment will be attached to this calibration. Samples link to the closest calibration that is after the date
of the sample. If there are no calibrations after the date of the sample, then the sample will not link to any
calibrations (until a calibration is created after the date of the sample).
EXAMPLE: There are 3 samples taken; one on the 10th of March, one on the 11th of March and one on the
12th of March 2011. There is also a calibration taken on the 12th of March 2011.
The samples taken on the 10th and the 11th of March will both link to the calibration taken on the 12th of
March, but the sample taken on the 12th will not. The sample that was taken on the 12th of March will not
link to any calibrations until one is created after the 12th of March, as a sample will only link to calibrations
that are after the date of the sample (it will not link to calibrations taken before, or the same day of the
sample, only calibrations taken after the date of the sample).
Calibrating determines the accuracy of samples taken with this piece of Equipment since the last Calibration.
The proposed process is about allowing users to set up Calibrations into the future so that they appear on
Calendars and Responsibility Lists without creating links to samples. When a Calibration is being undertaken
it is moved by the user to the process of current by using the process bar at the bottom of the screen.
Help Desk 07 3832 6699
[email protected]
Page 25
By moving the Calibration to the current process, all calibration information including pre cal and post cal
Equipment readings against the standard for each parameter can be entered. The system then calculates
the tolerable Error Range % (TER%). uniDap WaterQ does not have any automatic process for determining
if Sample should be accepted or rejected based on the TER%. This is a decision for competent users.
What uniDap WaterQ does do is assemble all the Samples for this piece of Equipment and Calibration and
attach them to this Calibration. Samples are linked to the closest calibration that is after the date of the
sample. The following screen shot shows the PH samples assembled against this Calibration.
Help Desk 07 3832 6699
[email protected]
Page 26
8.3 Calibration v Water Quality Sample management
In this case the competent user can determine if they are going to accept or reject the Samples pH
parameter based on the Calibration. In the example above any alkaline samples of pH 10 would likely
likel be
rejected as the error of 11%
% is significant.
The Sample is Accepted or Rejected
ejected by clicking the radio button.
*NOTE WELL* on this screen
en the data is saved as soon as a radio button is clicked or a comment entered.
The Calibration accepted field is the same data field as found on the ambient sample,
sample therefore the Sample
is updated. If the parameter is rejected it does not show up on graphs.
grap
8.4 Entering Sample Data into the WaterQ Data base
• Use the Create New dropdown menu and select “Ambient WaterQ Sample”
•
Site Information: Click on the arrow at the end of the Community Group field – a dropdown list
will appear.
•
Choose the appropriate Community Group
•
Click on the arrow at the end of the Site field – a drop down list will appear
•
Choose the Site you are entering data for
Help Desk 07 3832 6699
[email protected]
Page 27
•
Sample Information: Put in the date. You can use the automatic Calendar, just click on the
Calendar button to the right of the field and then click on the day the Sample was taken.
•
Enter the time the Sample was taken. The sample time will default to 24hr format, ie 2pm is 14:00
•
Leave high tide date and time blank if in fresh water systems
•
Select the Method (Technical Reference). The Method (Technical Reference) must be created (via
the ‘Create New’ menu) before a Method (Technical Reference) will appear in the ‘Method’
dropdown list.
•
Time Spent Taking The Sample: To record who took the Sample click on the arrow at the end of
the Sample Taker field – a drop down list will appear
•
Choose a Person.
•
If more than one Person was involved then click on plus button that appears on the right hand side
of the row.
•
Enter the time spent on each area of sampling i.e. travel, sampling (at the site) other (nutrient
testing, cleaning of equipment, data entry etc). If no times have been recorded on the data sheet
just leave blank.
Help Desk 07 3832 6699
[email protected]
Page 28
•
BoM Coding: This field is automatically populated. The Quality Code for a sample is determined by
a combination of the Sample Taker, the Equipment and the Method (Technical Reference), where
the lowest denominator is selected as the Sample Quality Code. For the case where there are
multiple sample takers in a sample, the highest Sample Taker Quality Code is selected and this
Quality Code is then combined with the Quality Code from the Equipment and the Quality Code from
the Method (Technical Reference), and from these three, the lowest quality code denominator is
selected for the Sample Quality Code.
•
Equipment and Calibration Details: Click on the arrow at the end of the Equipment Name & ID
field– a drop down list will appear. Select the Equipment used.
•
Calibration: This field is automatically populated and links to the closest calibration that is after the
date of the sample.
•
Sample Readings/ Other Readings: To enter Data just type in the values recorded ensuring the
decimal points are in the correct place. To move from field to field use the tab key and or the mouse
to point and click. If you use the enter key it is like pressing the “Save” button -nothing bad will
happen, but each time the enter key is pressed you will have to press the edit button again to reload
edit screen.
•
Enter all Data collected, i.e. both or all three measurements if taken.
•
Weather Conditions: Using the mouse point and click on the correct weather observation
•
Rainfall History: If known enter the date of the last rainfall, (see above for automatic calendar
use) the amount in millimetres. If you do not know the date of the last rainfall then click on the
arrow at the end of the rainfall field to see a drop down list of options.
•
Stream Conditions: Using the mouse point and click on the correct stream conditions
•
Nutrient Results: Enter Data for nutrients using the same method as previous data.
•
Comments: Type any other observations or comments on the equipment or any other factors
which may affect water quality.
•
Guidelines: This field is automatically populated. Guideline Upper and Lower control limit
information for a sample is populated via the Site. On the Site a guideline is selected for each
community group that takes samples at the site. This information is then linked back to each
sample.
•
Check your entries: To save the data, Press the “Save” button at either the top or bottom of the
screen
•
If you are happy with your entry, use the process bar to advance the process of the sample.
•
To put another sample in just repeat the above steps.
Help Desk 07 3832 6699
[email protected]
Page 29
•
To finish your session in the data base click on the sign out next to your name at the top right hand
corner of the screen
8.5 Made a mistake and need to fix it?
• Click on the Browse dropdown menu and select “Ambient WaterQ Sample”
•
In the “Find” box type in all or some of the letters of the sample you are wanting to look at e.g. for
Ross River Dam 01-Nov-2010 06:44 pm, enter the letters Ross then click on “Go”
•
A list of Ambient WaterQ Samples with those grouping of letters will be displayed. Click on the
Sample that you want.
•
If the sample that you want to edit is already in the ‘Accepted Process’, you will have to scroll to the
bottom of the page, and process the sample back to data collection as you are unable to edit
accepted data (remember you have to enter a reason if you are processing back)
•
Once in the correct process, click on the “Edit” button
•
You can now change any details on the sample
• Press the “Save” button to save the changes.
(Remember to process the sample forward again after saving)
Help Desk 07 3832 6699
[email protected]
Page 30
9.0 Importer
The uniDap WaterQ Intelligent Importer is a very powerful tool, striving to do very complex imports.
Spreadsheets, with various layouts, using various terminologies, can be mapped to the uniDap WaterQ data
structures and relationships.
The Intelligent Importer has several major steps:
define your template
validate your spreadsheet
display reference and other errors
allow you to correct errors, fix mappings and create associated
import your data
•
•
•
•
•
Creating and defining a template
An import template is a structure within uniDap waterQ that defines and links a spreadsheet of data to a
target data structure in uniDap WaterQ.
For example, the intelligent importer allows you to take a list of sites entered in a spreadsheet, and import
them into the site entity, within the solution.
** Tip: before importing spreadsheets, ensure that all of the headings are recognizable to the system for
easier importing capability. For example, by copying headings directly from WaterQ datasheets into an excel
spreadsheet, users will avoid time consuming validation processes.
To use:
a. Use the ‘Create New’ drop down list and select “Data Import Templates”
•
•
•
•
Assign the import template a name
Select the Target Data Structure (this is the type of data your are importing i.e. Site information)
Select the Default Process (this is the process of the data you are importing i.e. for Site information
the default process for a monitored site would be Status Monitored and the default process for a non
monitored site would be Status Not Monitored)
Attach your spreadsheet by clicking “Choose File” and navigating through your PC/Network for the
file. (Please note that the importer will only accept Excel files 97-2003 with no hidden macros. The
importer will also only accept Dates formatted as 01/01/2011 and times formatted as 4:00:00 PM).
Help Desk 07 3832 6699
[email protected]
Page 31
b. To ensure easy importing, make sure that the first row of your spreadsheet contains
column headers (which many spreadsheets already do) and click the check box displayed
below:
***This is an important step and must not be forgotten***
c. SAVE YOUR DATA NOW
If you do not have column headings in your spreadsheet, you must manually create the import field
definitions by adding the equivalent amount of columns to the amount contained in your spreadsheet.
You will then have to map the column letter to the uniDap WaterQ target structure field followed by
clicking save.
When you have checked that the first row of your spreadsheet contains column headers, then the ‘Build
Mapping’ button will appear.
-
Clicking the build mapping button will then map the columns of your spreadsheet to uniDap WaterQ
target data fields. For those that cannot be matched, you can manually adjust them by clicking the
edit button and selecting the correct data fields
***Please note well that when creating a sample import you will need to set the correct
process for each sample reading i.e. if you are uploading PH information for an ambient
import, with the default process set to Accepted Data, you will need to make sure you
pick ‘Approved Sample Readings – Approved PH Units’ from the Target Data Structure
Field instead of selecting ‘Sample Readings – PH Units’ (as ‘Sample Readings – PH Units’
is only for Data Collection Process and if you select this your PH reading will show on
the Data Collection Tab, not the Accepted Tab, even though the sample will be in
Accepted Process).***
Help Desk 07 3832 6699
[email protected]
Page 32
-
Next you have to select ‘Which Fields Uniquely Identify the Record’. This can be a bit tricky, but this
is used as a way to identify existing records as the importer does not always create new information,
but can update information as well. Generally the unique identifier for a Site is its name as most
Sites will all have a slightly different name. If there is more than one Site with the same name (there
could be three sites named Site 1), then you would also select the Waterway as the unique identifier
as well (as these three sites would most likely all be a part of different waterways).
For an Ambient WaterQ Sample the unique identifiers would generally be the Site, the date and the
time as more than one sample could be taken at a site on the same day. If only the site and date
were selected it may pick up two samples as being taken on the same site, date and time, but since
only the site and date were selected as the unique identifiers it may only pick up one of the samples
information and leave out the other one out – that is why this step is very important. Press the Save
Button. If you have trouble with selecting the unique identifier please contact the Helpdesk on (07)
3832 6699.
Your template is now created. It can be used and reused as required for any additional spreadsheets
containing the same column names, and in the same order.
d. Move the process forward to ‘Advance to Validation’.
e. ‘Validate’ the spreadsheet data. Do so by clicking the “Validate” button.
Validating triggers the intelligent importer to check that all data, in all cells in the spreadsheet, it matches
data types and relationship links that uniDap WaterQ is expecting, based on the mapping you have done.
Any errors, such as number in a date field or text in a number column, will be identified.
A validation window will appear.
Help Desk 07 3832 6699
[email protected]
Page 33
Note: this is a new window; the import template definition window is still open.
If any errors exist, the validation window will display and reference them. Be aware that the validation
summary will assume a name for a field that it does not recognise. For example, if the Ambient Water
Quality Guideline name “Nosa” in the spreadsheet does not match any that already exist in uniDap WaterQ,
the adjacent dropdown menu will likely show you “Noosa.” If it is not “Noosa” that you meant to enter, you
must pick the appropriate name from the dropdown or create it as a new entity. Check the text box to
create “Nosa123” as a new entity. When the import runs, a new guideline entity will be created and saved
into uniDap WaterQ. Furthermore, if the name “Nosa” appears elsewhere in the spreadsheet during the
import, the data will use the identified mapping and save the updated name into the uniDap WaterQ
Database, for all instances.
Note: IT WILL NOT fix the data in your spreadsheet.
If many errors occur because:
─ move the process back to define and fix the mapping. Then advance to
•
The mapping was wrong
validation and re-validate
•
Because the spreadsheet has errors
open your spreadsheet ON YOUR file system, fix the errors
then RE-ATTACH your spreadsheet to the template.
─
We recommend that you contact the Helpdesk on (07) 3832 6699, before you import your data. Someone
from the Helpdesk can review your data mapping and confirm that your data will be imported cleanly. If you
do not contact the Helpdesk and import your data mapping proves to be incorrect. There may be substantial
time and effort required to correct your data.
Once the Helpdesk has checked your data mapping or you are confident that it is correct, you can now click
import. Should your spreadsheet contain many rows of data, expect a longer waiting period. The intelligent
importer analyses each cell of data against your mapping, your reference corrections, and the database’s
existing entities, to determine if it is a ‘create new’ or a ‘modify old’ situation.
Help Desk 07 3832 6699
[email protected]
Page 34
When the import is completed, you will be provided with a summary screen of results, like the one below:
Help Desk 07 3832 6699
[email protected]
Page 35
10.0 Reports
10.1 Accessing reports
Main menu: Reports can be accessed from the menu bar or report icon:
Report Icon
10.2 Report options include: “Create New” “List All” and “List Mine”
Create New
This option allows the user to create new Reports. Every type of item that the user has access to is listed on
the “Create New” report screen. The User selects the appropriate item and the next screen lists all the fields
for this item. The following options are available for selection with each field:
1.
2.
3.
4.
5.
6.
Show – show on the report
Total – count displays the number of rows when the report is run.
Sum – adds up the values in the column if the field is numeric
Order by – place numbers starting at 1 to order the report by as required
Search – limits this field based on the search criteria entered
Select – for fields that have a dropdown list associated, one or more values can be selected. To
allow multiple values to be selected, tick the “Check this to show multi-select dialogs” option in
the top section of the create new reports screen
The Report is run by clicking the “Run Report” button.
To save a report to be re-run in future, name the report in the “Report Title” field and click the “Save new
Report” button.
Help Desk 07 3832 6699
[email protected]
Page 36
The User is then given the option to save as a public report so that everyone can run it, by checking the
“Public Report” check box. If this is not checked, only the User who created the report will be able to re-run
it. Then click the “Save Report” button.
List All
Lists all public reports in the system.
Click “Run” to run the appropriate report.
List Mine
Lists all reports owned by the user, both public and private, and allows the User to edit and
delete them.
Click “Run” to run the appropriate report.
Click “Edit” to update a report.
10.3 Creating New Reports (using the uniDap Report Generator)
Selecting “Create New” from the menu lists all the modules in the system that can be reported on. Modules
won’t show up until there are records created against the module. For example: “Project” won’t show up in
the report generator until a project has been created in the system.
Clicking on the module that you want to report on takes, the User to the main report generator screen.
Module Filter group
The top group is the module filter group. For example: if the User is reporting on People, this group will be
titled “Person Filter”.
Help Desk 07 3832 6699
[email protected]
Page 37
Services
“Save new Report” button
Allows the User to save the report once they have set it up – the report
needs to be saved to show access all buttons.
“Default Values” button
Clears all the selected options on the report generator screen.
“Help” button
Displays the form help for the selected module, which shows the help for
each field on the module.
Report title
The name that the report will be saved as, if the User wants to save it so it can be run again
Report type
•
Table report – lays out the data across the screen in columns
•
Matrix report - allows the User to set an x and y axis to display a summary of results laid out as a
matrix with row and column totals
•
Matrix and Table report – shows results as a table and a matrix
•
Daily Aggregate report – When this report type is selected, a date column appears next to all fields.
The User selects which date field they want to run the report against. The resulting report displays a
bar graph data with a count of how many records match each day based on the selected date field
•
Weekly Aggregate report – the same as the daily report except data is summarized by week
•
Monthly Aggregate report - the same as the daily report except data is summarized by month
•
Yearly Aggregate report - the same as the daily report except data is summarized by year
Match All or Any
•
Show records where ALL filter criteria match – if more than one filter criteria is selected in the
report, then only records that match all filter criteria are displayed in the resulting report. For
example, you have chosen to show samples that have an “accepted Data” process, and you have
also chosen to show “Albert River Monitoring Group” as the community group. Since you have
selected ‘all’ the results will only show the samples that are ‘accepted data’ that come from ‘Albert
River Monitoring Group’ (which is a lot smaller list). This is because selecting ‘all’ will only show
results that match ‘all’ of the criteria you have selected.
•
Show records where ANY filter criteria match - if more than one filter criteria is selected in the
report, then records that match any of the filter criteria are displayed in the resulting report. For
example, you have chosen to show samples that have an “accepted data” process, and you have
Help Desk 07 3832 6699
[email protected]
Page 38
also chosen to show “Albert River Monitoring Group” as the community group. Since you have
selected ‘any’ the results will show every sample in the whole system that is accepted (from any
community group not just the ones from the “Albert River Monitoring Group”) and will show every
sample in the whole system from “Albert River Monitoring Group” (with any process not just the
ones processed to “accepted data”). This is because selecting ‘any’ will show every result of ‘any’
criteria that you have selected. Just remember that it defaults to ALL because 99% of the time this
is how people want their results to be matched.
Link to Item
•
Checking this will make the report results display as hyperlinks, which when clicked takes the User
directly to that record in the system
Multi-Select
•
This allows the User to select multiple values in the dropdown lists by holding down the ctrl key
whilst clicking them. This allows a report to be filtered by multiple dropdown values. For example:
selecting “male” and “female” will report on everyone, whereas only selecting “female” will only
report on females.
Hide blank rows
•
If checked, the report results will not show any rows that have no data in them
Summary Information
•
If checked, the report result will show information about the report on the output as shown:
Creation Date
•
Putting a “from” and “to” date will restrict the report to records created within the date range
specified.
Run Report button
•
Runs the report once the User has set it up
Field Show
•
This group lists all the fields for the selected module and allows the User to select which fields they
want to show on the report by checking the “Show” box next to the field. The following options are
also available for each field:
Help Desk 07 3832 6699
[email protected]
Page 39
Total
•
Any number or currency field (once the User clicks to show it on the report) has a corresponding
dropdown in the “Total” column with options “Sum” and “Count”. Sum will total all the fields in the
report result and display the total at the bottom. Count will count the number of times this field
appears in the report results and shows the count at the bottom
Order By
•
Allows the User to order the report based on any fields. For example: putting a “1” in a date field
and a “2” in a name field will order the report output by the date field and then alphabetically by the
name field within each date.
Search
•
Allows the User to put criteria against a field that the report results will be restricted by. For
example: Putting “Fred” in the search field against first name when reporting on the people module
will only show results of people who have a first name of Fred. Wildcards can be used. For example
“Fr%” will show all peoples who’s first name begins with “Fr”.
Select/Multi-Select
•
This column is called “Select” if the “Multi-Select” check box in the Filter group is not checked. It is
called “Multi-select” if the “Multi-select” check box is checked.
•
This field is used to select criteria to restrict the results by for fields that are dropdown lists. It works
the same way as the search column. If “Multi-select” is checked, the User can select multiple options
from the dropdown by holding the ctrl key and clicking them with the mouse.
Saving a Report
•
Once a report is saved, some new options become available:
Report Description
•
Allows the User to put a description against the report for their own reference. This is not shown
anywhere else in the system.
Public Report
•
Checking this option makes the report runable (under the “List All” menu option) for all Users
Related Item Filters Group
•
Allows the User to apply filter on related items and optionally displaying data from those items on
the report. E.g. for a given site, you can show all Ambient WaterQ Samples where “John” was the
sample taker
Help Desk 07 3832 6699
[email protected]
Page 40
A Filter Column appears beside the fields
•
This allows the User to check which fields can be set by the person running the report at the time it
is run. E.g. a report on Sites can have a filter on Waterway. When a User runs this report, they can
select a Waterway from the Filter Dropdown and the results will be restricted to this Waterway.
Report Results
When a report is run and results are shown, the User can:
•
Click any hyperlink shown on the Results and go directly to that record.
•
Click the “View Filter” button (if they own this report) which takes them to the Report Generator
Screen.
•
Click the “Export File” button to export the report results to Excel.
Exporting raw data out of the uniDap WaterQ Solution
Although the WaterQ application does not support all manipulations of data, you can use the report
generator and file exporter to manipulate data in excel.
Example:
For selected sites graph the median of all samples for pH, dissolved oxygen, and turbidity.
How to export the data:
•
From the menu bar at the top of the screen, click ‘reports’ and select ‘create new’ from the drop
down list
The screen is divided into two sections: “Module Reports” and “Other Reports”
•
From “Other Reports” click the “Ambient WaterQ Sample” link
•
Once you have given your report a “Report Title” and selected “Table Report” as your “Report Type.”
•
Under “Site Information”, locate “Site” and put a tick in the “Show” column.
•
Use the “Site” field drop-down list to choose a Site on the right-hand side of the page.
•
By ticking the box in the filter column of the “Site” field, you will be asked before the report is run to
select the site you want. This is helpful for pulling data out of many sites at one time.
•
Under “Sample Information” locate the “Date the Sample Was Taken” field, and tick the box in the
“Show” column. Select “Count” from the “Total” column dropdown menu if you’d like to know how
many samples are in the report table.
•
To filter your data by date, put a 1 in the “Order” column
•
Under “Approved Sample Readings”, tick the box in the “Show” column for “Approved pH,”
“Approved Turbidity,” and “Approved Dissolved Oxygen.”
•
Click on “Save New Report” at the top of the page
•
Finally, click on “Run Report” and you should see a table similar to the one below:
•
Help Desk 07 3832 6699
[email protected]
Page 41
•
If you are satisfied with the result, click “Export File.” If not, click “View Filter” to go back to the
report creator.
•
After clicking “Export File,” this screen will appear:
•
By clicking “Open” your data will be presented in an excel file, and you will be able to work with the
data and save any changes
•
To work with existing reports, click “Reports” on the top menu bar and select “List All” from the
dropdown menu.
Help Desk 07 3832 6699
[email protected]
Page 42
“New Person that can run this report” button
The “New Person that can run this report” button lets you choose who can see your report (you can still
make your report publicly available, but this button gives you more restriction on who can see your report).
Create a new ‘Report’.
Add a ‘Title’ to your report and press the ‘Save new Report’ button (your report must be saved to use this
function).
Click the “New Person that can run this report” button.
A ‘Not Set’ dropdown menu will appear
Select the name of the person that can run this report from the dropdown menu.
Press the “New Person that can run this report” button for each person that you want to run this report and
select the person from the dropdown menu.
Each Person selected can now run this report.
They can find this report by viewing ‘Public Reports’ (only people who were selected to run this report will
be able to find it in ‘Public Reports’).
Help Desk 07 3832 6699
[email protected]
Page 43
“New Role that can run this report” button
The “New Role that can run this report” button lets you choose what role can see your report (you can still
make your report publicly available, but this button gives you more restriction on who can see your report).
Create a new ‘Report’.
Add a ‘Title’ to your report and press the ‘Save new Report’ button (your report must be saved to use this
function).
Click the “New Role that can run this report” button.
A ‘Not Set’ dropdown menu will appear.
Select role that can run this report from the dropdown menu.
Press the “New Role that can run this report” button for each role that you want to be able to run this report
and select the role from the dropdown menu.
Each Role selected can now run this report.
They can find this report by viewing ‘Public Reports’ (only people who have one of the ‘Roles’ selected to
run this report will be able to find it in ‘Public Reports’).
Help Desk 07 3832 6699
[email protected]
Page 44
11.0 Understanding History (Track and Trace)
uniDap WaterQ tracks and traces all data creation, modification, entity processing and entity viewing against
an entity as a service to that entity and in terms of the user logged in at the time.
History is accessible in two ways:
•
History of an Entity. Click the history button in the services layer to display a history view like
this:
•
History of a field. Double click a field label to see this history.
Help Desk 07 3832 6699
[email protected]
Page 45
•
A note specific to this field can be added by pressing the ‘Create Note’ button.
•
•
History is often useful when problem solving user questions and queries.
History draws data off the database in real time; it does not draw from the cache. Therefore
performance of the history pages is directly related to how much history data there is
against the entity
12.0 System Administration
You can access System Administration from Menu Bar 1
Login History
Shows a history of who has logged into the system.
Select either:
1. Logged in today – shows users who have logged into the system today
2. Logged in since date – select a date and users who have logged in since that date are displayed
3. Logged in within # hours – enter a number of hours and users who have logged in within that
timeframe are displayed
4. Logged on Person – Select a person to view when they have logged on
Click the submit button to update the list when a different option is selected
Help Desk 07 3832 6699
[email protected]
Page 46
13. 0 uniDap Dropdown List Management
13.1 General
uniDap Lists can be Locked or Managed
When you first go to List Management and view a Dropdown List, it will be locked. While in this mode, you
cannot make changes to the list, but you also do not need to manage it.
If you do not need to make changes to the list, it is strongly recommended that you leave it locked.
If the list is unlocked, it becomes a managed list that cannot thereafter be locked.
13.2 Managed List
Once a list is managed you can:
•
•
•
•
•
Edit the List Names
Re order the list items
Withdraw list items
Delete list items
Add new list items
13.3 Multiples Management
Adding Rows
To add new rows, use the plus button on the right hand side of the page.
Deleting Rows
To delete rows, use the minus button on the right hand side of the page. A pop up screen will appear asking
“Are you sure you wish to delete this row”, to cancel press the ‘Cancel’ button, to continue deleting the row
press the ‘OK’ button.
Ordering Rows
To reorder rows, use the up and down arrows on the right hand side of the page. To move a record up,
press the up arrow. To move a record down, press the down arrow.
13.4 Withdrawing Items
Every list item can be withdrawn, meaning it will no longer appear in the edit form drop down lists. Items
currently referencing the item, however, will keep that reference, and report generators will show the item if
it is referenced. To withdraw an item, check the corresponding checkbox in the Withdraw column, and
then click update.
Help Desk 07 3832 6699
[email protected]
Page 47
13.5 Deleting Items
You can delete a drop down list item if no item is referencing it, in which case a delete checkbox becomes
available. To delete an item, check the corresponding checkbox in the Delete column. If you wish to
remove the option from drop down lists, use the withdraw checkbox, then click update.
13.6 Add New List Items
Single new entry:
Type the name and click “Update.”
Multiple entries
Type the name of each item followed by Enter, then click “Update.”
You can also paste a list from notepad or a column from Excel.
14.0 Optional Modules
As you by now know the uniDap platform is an adaptive solution that can be tailored to your needs. The
below modules were created for a particular catchment management authority but are available to all users.
As with the other modules they can be easily accessed using the Create New and Browse drop down boxes.
14.1 Event
An Event is something that happens out of the ordinary that will affect the water of a Site such as a cyclone,
flood, tsunami, etc. There are 3 parts to an event – the event itself, the event stream heights and the event
monitoring samples
To create a new Event
• Fill in the Event Details (check the boxes if you would like graphs)
• Save
You have created an Event!
Help Desk 07 3832 6699
[email protected]
Page 48
A site connects to an event, an event stream heights and an event moitoring sample. An event stream
heights and an event monitoring sample connect to an event and can be viewed by links on the event and
by graphs on the event.
Once event monitoring samples and event stream heights have been created they will appear on the event:
Once an event has two or more samples they will appear on either the Event Stream Heights graph or the
Event Monitoring Sample graph:
Help Desk 07 3832 6699
[email protected]
Page 49
14.2 Event Stream Heights
Event Stream Heights are the stream heights that are recorded during an event
To create a new Event Stream Height
• Fill in the Stream Height Details
• Save
14.3 Event Monitoring Sample
Creating a new Event Monitoring Sample is similar to creating an Ambient WaterQ Sample, but it is for an
event. When completed remember to Advance Process.
To create
•
•
•
a new Event Stream Height
Fill in the Stream Height Details
Save
Advance the Process
Help Desk 07 3832 6699
[email protected]
Page 50
14.4 Fish Species
A Fish Species are the different types of Fish in your Site. To create a new Fish Species fill out the detail and
click Save.
14.5 Fishing Trip Survey
A Fishing Trip Survey is conducted during a Fishing Trip. To create a Fishing Trip Survey you must first
create Fish Species. To Create a Fishing Trip Survey fill out the appropriate details and click Save.
Remember to Advance the Process.
Help Desk 07 3832 6699
[email protected]
Page 51
14.6 Boat Ramp Survey
This is a survey on a Boat Ramp. To create a new Boat Ramp Survey fill out the relevant details and click
Save. Remember to Advance the Process.
14.7 Secchi Disk Survey
To create a new Secchi Disk Survey fill in the relevant details and click Save. When completed remember to
Advance the Process.
Help Desk 07 3832 6699
[email protected]
Page 52
14.8 Ground Water Resource Cat2ab
To create new Ground Water Resource Cat2ab fill in relevant details and click Save. When completed
remember to Advance the Process.
Help Desk 07 3832 6699
[email protected]
Page 53
14.9 Precipitation Cat4a
To create new Precipitation Cat4a fill in relevant details and click Save. When completed remember to
Advance the Process.
14.10 Evaporation Cat4c
To create new Evaporation Cat4c fill in relevant details and click Save. When completed remember to
Advance the Process.
Help Desk 07 3832 6699
[email protected]
Page 54
14.11 Temperature Cat4
To create new Temperature Cat4 fill in relevant details and click Save. When completed remember to
Advance the Process.
14.12 Technical References
A fundamental part of good water quality data management is the development and use of methods and
standards to provide clear definitions and to govern the various activities. While many of the organisations
handling water quality information do use methods and standards, it is currently not clear which are these
are comparable and how they may relate to any relevant Australian or international standards. In order to
recognise equivalence in the various methodologies in use, a known, predefined list of technical references
must b kept and used as a reference when loading and using sample data and when establishing definitions
of determines in the NWQDS. The initial and ongoing advice of water quality scientists with expertise in
water quality methods and techniques will be required to compile and maintain this list.
Agencies supplying water quality data to the NWQDS must map their own water quality methods to NWQ
technical references and include the corresponding NWQ technical reference identifiers with supplied sample
data and when choosing the correct determined subclass to include with supplied result data.
To create new Technical Reference fill in relevant details and click Save.
Help Desk 07 3832 6699
[email protected]
Page 55
15.0 Shortcuts and Hints
Sticky Notes
You can attach a ‘Sticky Note’ to a field by double clicking the field.
For example, when entering an Ambient WaterQ Sample you might want to make a note on the Site. Simply
double click on ‘Site’ and a box will appear. Select Create Note.
If a field has a Sticky Note attached to it, this symbol
Note, simply select it.
will appear next to the field. To view the Sticky
Field Alarms
You can attach a ‘Field Alarm’ to a date field by double clicking the date field.
For example, when entering an Ambient WaterQ Sample you might want to make a Field Alarm on the Date
that the Sample was taken. Simply double click on ‘Date Sample was taken’ and a box will appear. Select
Create Alarm.
If a field has an Alarm attached to it, this symbol
simply select it.
will appear next to the field. To view the Alarm,
Help Desk 07 3832 6699
[email protected]
Page 56
Calendar Shortcuts
When using the calendar function in the WaterQ system, instead of selecting a date/ time you can enter
Date/ time shortcuts. Shortcuts use a Relative Date Name (RDN ) that may then be further combined with a
date calculation using Time Units (TU ). This takes the form: RDN +/- n TU. RDN is one of the character
names shown in the RDN Table Below. This can optionally be followed by a date computation using + or n (a number), followed by a TU which is one of the letters shown in the Time Units table below.
For example:
now+5d = get the current date-time and add 5 days (which is a RDN+5TU)
wed+1w = the Wednesday after next (which is a RDN+1TU)
lom-2m = the last day of the month,2 months ago (which is a RDN-2TU)
Relative Date Names (RDN)
now
Get the current date-time
dtm (date-time)
Get the current date-time (same as now)
dat (date)
Get the current date
yes (yesterday)
Get yesterdays date
tod (today)
Get the current date (same as date)
tom (tomorrow)
Get tomorrows date
fom (first day of
month)
Get the first day of the current month
lom (last day of
month)
Get the last day of the current month
mon (monday )
Get the date of the first Monday after today
tue (tuesday )
Get the date of the first Tuesday after today
wed (wednesday)
Get the date of the first Wednesday after today
thu (thursday)
Get the date of the first Thursday after today
fri (friday)
Get the date of the first Friday after today
sat (saturday)
Get the date of the first Saturday after today
sun (Sunday)
Get the date of the first Sunday after today
(fixed date) or (date
calc)
You can set RDN by placing a fixed date or a date
calculation in brackets ()
Time Units (TU)
d
Days
w
Weeks
m
Months
y
Years
Help Desk 07 3832 6699
[email protected]
Page 57
16.0 Notes
________________________________________________________________________________________
________________________________________________________________________________________
________________________________________________________________________________________
________________________________________________________________________________________
________________________________________________________________________________________
________________________________________________________________________________________
________________________________________________________________________________________
________________________________________________________________________________________
________________________________________________________________________________________
________________________________________________________________________________________
________________________________________________________________________________________
________________________________________________________________________________________
________________________________________________________________________________________
________________________________________________________________________________________
________________________________________________________________________________________
________________________________________________________________________________________
________________________________________________________________________________________
________________________________________________________________________________________
________________________________________________________________________________________
________________________________________________________________________________________
________________________________________________________________________________________
________________________________________________________________________________________
________________________________________________________________________________________
________________________________________________________________________________________
________________________________________________________________________________________
________________________________________________________________________________________
________________________________________________________________________________________
________________________________________________________________________________________
________________________________________________________________________________________
________________________________________________________________________________________
________________________________________________________________________________________
________________________________________________________________________________________
________________________________________________________________________________________
________________________________________________________________________________________
________________________________________________________________________________________
________________________________________________________________________________________
________________________________________________________________________________________
________________________________________________________________________________________
________________________________________________________________________________________
________________________________________________________________________________________
________________________________________________________________________________________
________________________________________________________________________________________
________________________________________________________________________________________
________________________________________________________________________________________
________________________________________________________________________________________
________________________________________________________________________________________
________________________________________________________________________________________
________________________________________________________________________________________
________________________________________________________________________________________
________________________________________________________________________________________
________________________________________________________________________________________
________________________________________________________________________________________
Help Desk 07 3832 6699
[email protected]
Page 58
________________________________________________________________________________________
________________________________________________________________________________________
________________________________________________________________________________________
________________________________________________________________________________________
________________________________________________________________________________________
________________________________________________________________________________________
________________________________________________________________________________________
________________________________________________________________________________________
________________________________________________________________________________________
________________________________________________________________________________________
________________________________________________________________________________________
________________________________________________________________________________________
________________________________________________________________________________________
________________________________________________________________________________________
________________________________________________________________________________________
________________________________________________________________________________________
________________________________________________________________________________________
________________________________________________________________________________________
________________________________________________________________________________________
________________________________________________________________________________________
________________________________________________________________________________________
________________________________________________________________________________________
________________________________________________________________________________________
________________________________________________________________________________________
________________________________________________________________________________________
________________________________________________________________________________________
________________________________________________________________________________________
________________________________________________________________________________________
________________________________________________________________________________________
________________________________________________________________________________________
________________________________________________________________________________________
________________________________________________________________________________________
________________________________________________________________________________________
________________________________________________________________________________________
________________________________________________________________________________________
________________________________________________________________________________________
________________________________________________________________________________________
________________________________________________________________________________________
________________________________________________________________________________________
________________________________________________________________________________________
________________________________________________________________________________________
________________________________________________________________________________________
________________________________________________________________________________________
________________________________________________________________________________________
________________________________________________________________________________________
________________________________________________________________________________________
________________________________________________________________________________________
________________________________________________________________________________________
________________________________________________________________________________________
________________________________________________________________________________________
________________________________________________________________________________________
________________________________________________________________________________________
Help Desk 07 3832 6699
[email protected]
Page 59