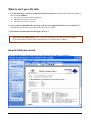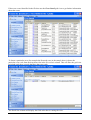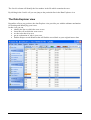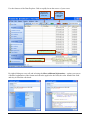
1
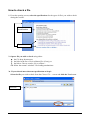
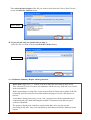
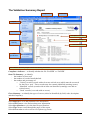
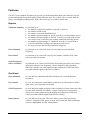
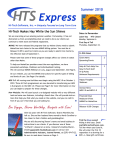
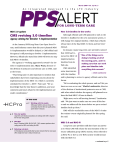
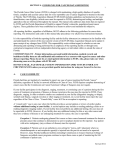
Casemix
Casemix
Information
Information
Systems
Systems
ms
Check-It 2
Data Checker
(AHCA, HCP, PHDB)
User Guide
Check-It 2 User Guide
Introduction
The Check-It 2 application has been developed by the Australian Government Department of Health
and Ageing to assist state and territory health departments to comply with the annual data
submissions required under the Australian Health Care Agreements.
The Check-It 2 application checks that data files are in the correct format and contain values that are
consistent with the National Health Data Dictionary.
In addition to the Validation Summary Report, which identifies whether the files pass or fail, the
application contains a number of reporting and viewing functions to identify any errors that are
occurring, their frequency, location and cause. State and territory officers are also able to check the
frequencies of field values against their previous year’s supply.
Check-It 2 will NOT modify or amend data but will assist in the early detection and correction of
any errors for more accurate and efficient data reporting.
Please note: Check-It 2 has been developed according to the agreed data supply
specifications and tested with sample data. However, issues may be identified as states and
territories run real-life data through the software. If you think that Check-It 2 is
reporting errors incorrectly, we would appreciate your assistance by notifying us as
soon as possible in order to confirm and correct faults immediately.
Contact us
For more information, contact:
Classification Management and Statistics Section
Healthcare Services Information Branch
Acute Care Division
MDP 501
GPO Box 9848
Canberra ACT 2601
Phone:
Fax:
Check-It 2 User Documentation
(02) 6289 1085
(02) 6289 3673
2 of 11
How to check a file
1. From the opening screen, select the specifications for the types of file/s you wish to check
during the session.
Select
specifications
Open file
2. Open a file you wish to check using either:
• the File drop-down menu,
• the links in the list of Last validated files (if any), or
• the link to Choose another file to validate…
and follow the normal ‘windows’ file loading mechanisms.
3a. If you selected more than one specification at Step 1:
Select the file you wish to check from the Choose File… screen and click the Next button.
Select file
Check-It 2 User Documentation
3 of 11
Then select the data format of the file you wish to check from the Choose Data Format…
screen and click the Validate button.
Select format
3b. If you selected only one specification at Step 1:
Select the file you wish to check and click the Validate button.
Select file
4. A Validation Summary Report will be generated.
Please note: large files ( > 1 million records) to may take more than an hour to run.
This is because Check-It 2 carries out exhaustive checks on every field and every record
in the selected file.
Before processing very large files, it may be beneficial to check only a subset of the file
to identify and correct any obvious faults without having to wait for a full data set to
process.
As the data is being processed, you can view a progress bar with an estimated time to
completion and a pie chart indicating the number of scanned records that are good,
critical or identified.
The progress display also contains a cancel button that can be used to stop the
processing at any time. Any errors identified up until that point will be displayed in the
reports.
Check-It 2 User Documentation
4 of 11
The Validation Summary Report
Page view
Screen view
Reports
Grid Views
Compliance Indicator
Data File Summary
Data file
summary
Error Summary
Data
specifications
The Validation Summary Report contains the following information:
Compliance indicator —to identify whether the file ‘PASSED’ or ‘FAILED’.
Data File Summary—to identify:
- the number of lines read.
- the number of records found/checked.
- the number and percentage of:
o ‘Critical’ records (records with at least one critical error (which must be corrected
for the file to ‘pass’. These records may also contain identified (warning) errors).
o ‘Identified’ records (records with at least one identified (warning) error and no
critical errors).
o ‘Good’ records (ie records with no errors).
Error Summary—to identify the types of errors (critical or identified) by field, code, description
and their frequency.
From this screen you can also:
Select Reports to view and print data error information
Select Grid Views to view and sort data error information
Select Specifications to view the data file specifications
Select Page view to scroll through the pages of the report
Select Screen view to select screen view options (eg zoom)
Check-It 2 User Documentation
5 of 11
What to do if your file fails
1. Use the Reporting, Grid Views and Specifications functions (located in the left-hand column of
the screen) to identify:
• the types of errors and their frequency
• where the errors have occurred
• why the errors have occurred
2. Once you have identified the errors go back to your original data file to correct them. Note
all critical errors must be corrected for the data file to ‘PASS’.
3. Re-run the amended data file through Check-It 2.
Please alert the Department of any errors that you think are being incorrectly flagged
or are inconsistent with the data specifications or are impossible to address.
How to find your errors
After completing the validation process the Validation Summary Report is displayed.
Check-It 2 User Documentation
6 of 11
If there are errors identified in the file then use the Error Detail grid view to get further information
about the errors.
To locate a particular error (for example the Postcode error in the sample above) choose the
particular error code from the drop-down list in the ErrorCode column. This will filter the grid view
to include only those records that have that error code.
The DataValue column will display the field value that is causing the error.
Check-It 2 User Documentation
7 of 11
The LineNo column will identify the line number in the file which contains the error.
By clicking in the LineNo cell you can jump to the particular line in the Data Explorer view
The Data Explorer view
Regardless of how you get there, the data Explorer view provides you with the ultimate mechanism
for locating and identifying your errors.
In this view you can
• identify the line on which the error occurs
• locate the cell in which the error occurs
• see the value that is in error
• get an explanation of why it is an error
• find the unique record identifier that will link the record back to your original source data
Check-It 2 User Documentation
8 of 11
Use the features of the Data Explorer Grid to rapidly locate the source of your errors
Jump to the
next/previous
error cell
View only
Good, Critical
or Identified
records
Highlighted Error cell
Place cursor on cell to
see error description
By right-clicking an error cell and selecting the Show additional information… option you can see
a detailed explanation of the format and edit rules applied to the field, the value found in the field
and why it failed the edit check.
Check-It 2 User Documentation
9 of 11
Checking Data Frequencies
To compare the frequencies of field values in the current data file with the previous year’s data
supply, use:
• the Field Frequencies Report for a list of each field, the field values provided, each value’s
description, the last year’s frequency, current frequency and percentage difference.
• the Field Frequencies Grid View for a graph or grid of the current and previous frequencies of
values provided for each field. To alternate between the graph and grid view, select the
appropriate icon.
Please note the field frequency report, graphs and grid display the frequencies of all
current field values without regard to their validity. If previous frequency values are not
available (the default situation) the frequency report is also not available and the graph
and grid display current values only.
Check-It 2 User Documentation
10 of 11
Features
Check-It 2 has a number of features to provide you with information about your data file. Reports
present information in a print friendly format while the Grid Views allow you to sort the data (by
group, ascending/descending order, field value, error type, etc) and to export data.
Reports
Validation Summary to print and view:
• the data file compliance indicator (‘passed’ or failed’)
• the number of lines read
• the number of records found/checked
• the number and percentage of ‘good’ records (ie records with no errors)
• the number and percentage of ‘critical’ records (ie records with at least
one critical error, which may also contain identified (warning) errors)
• the number and percentage of ‘identified’ records (ie records with at
least one identified (warning) error but no critical errors)
• the types of errors that occurred and their frequency.
Error Summary
to print and view a list of the types of errors that occurred and their
frequency.
Error Detail
to print and view a list of all errors by line number, with the field, value,
error type and error details.
Field Frequencies
(where available)
to print and view a list of each field, the field values provided, each value’s
description, the previous frequency, current frequency and percentage
difference. (Please note, this report lists the frequencies of all field values
provided without regard to the field’s validity).
Grid Views
Error Summary
to view and sort summarised details of what errors occurred and their
frequency.
Error Detail
to view, sort and group a detailed list of all errors by line number with the
field, value, error type and error details.
Field Frequencies
to view and print graphs and grids of the frequencies of data values provided
for each data field and, if available, compare with previous frequencies.
(Please note, these graphs and grids display the frequencies of all field
values provided without regard to the field’s validity).
Data Explorer
to view and sort all records. This view allows you to filter the data by
‘critical’, ‘identified’ and ‘good’ records. All records and fields containing
errors are highlighted for easy identification.
Check-It 2 User Documentation
11 of 11