1
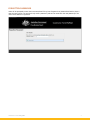
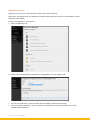
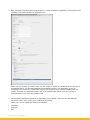
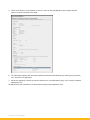
Classification Board Classification Portal user guide Version 0.4 CONTENTS Key/important terms............................................................................................................................................................................................. 2 Accessing the portal................................................................................................................................................................................................ 3 Login page................................................................................................................................................................................................................... 3 Register your account information. ................................................................................................................................................. 3 Forgotten password.......................................................................................................................................................................................... 4 Using the portal............................................................................................................................................................................................................. 5 Home information............................................................................................................................................................................................... 5 Account menu......................................................................................................................................................................................................... 5 Update account details—request....................................................................................................................................................... 5 Close your account—request.................................................................................................................................................................. 5 Update your applicant details................................................................................................................................................................ 6 Applications......................................................................................................................................................................................................................... 7 View applications................................................................................................................................................................................................. 7 Portal users.......................................................................................................................................................................................................................... 12 Edit my details........................................................................................................................................................................................................ 12 Manage portal users. ....................................................................................................................................................................................... 12 Payments. ............................................................................................................................................................................................................................... 13 Making a payment.............................................................................................................................................................................................. 13 About/resources.......................................................................................................................................................................................................... 13 KEY/IMPORTANT TERMS Accountan account is the parent entity that all applicants, contacts and portal users are tied to. Accounts hold the information about available funds for the organisation. Applicantan applicant is linked to an account. Applicants are organisations that submit applications to the Classification Board. An account can have one or many applicants listed. Applicants are not people; rather they are the name of the part of the organisation that wish to appear on the Classification certificate at the end of the application process. Applicants are generally used where a parent company supplies funds for two or more differently named applicant groups, e.g. for account MEGACOMPANY, applicants may be MEGACOMPANY FILMS and MEGACOMPANY INTERACTIVE. Contacta person who is listed as the contact for an application; this person is listed on the Classification certificate. A contact does not have to be a portal user. Portal usera person who is registered to access the portal. Portal users access the portal to create application requests, make payments, and update applicant information and request changes to accounts. Portal users don’t have to be contacts in the portal, but can be if separately added. Portal users can only be attached to a single account. Activatewhen new accounts, applicants, contacts or portal users are created, they are immediately active. Only active items in the portal can be selected when creating a new application request. Deactivateonce created: accounts, applicants, contacts and portal users cannot be deleted. The only option available to users who no longer want to use any available account/applicant/ contact/portal user is to deactivate them. This stops them being selectable for future application requests, but does not remove them as they may be tied to active or past applications. Items that are deactivated can be reactivated for future use. Business addressthe address where the business is actually located, e.g. the street address Postal addressthe address where mail is sent for the business. Postal addresses can be the street address, but are often PO boxes or locked bags. Mandatory fieldsmandatory fields are marked with a red asterix (*). Mandatory fields require users to provide information e.g. a name, email address, attachment document, and cannot be left blank. Users cannot submit forms where mandatory fields are left blank—an error message with the blank fields will appear at the top of the screen to provide detail about where information was missed in the form. Withdrawusers can request that an application be removed from the workflow for different reasons, e.g. duplication of an application, addition of extra content for a submitted application, no longer want to receive a classification decision for the application. Charges may apply depending on the stage of the workflow the application is in, and the length of time the application has been in the workflow. Please contact a Client Liaison Officer for more information. Classification Portal user guide 2 ACCESSING THE PORTAL LOGIN PAGE You can access the classification portal from https://portal.classification.gov.au Existing users can log in to the portal by entering their username and password. Existing users can request a password reset if they have forgotten their password—a new password is emailed to the user if their email address is linked to a registered user. New users can register account information so an account and portal access can be set up. A link to accessibility information is available to users who use adaptive technology to access websites. REGISTER YOUR ACCOUNT INFORMATION New users to the Classification portal can register their details by submitting a request for a new classification account. Users must provide details of their: • Business—name and trading name; also ABN information if they are registered for the GST; • Business address details; • Postal address details (if different to business address); and • Primary contact information—an ‘account’ contact who will receive emailed receipts for payments entered for the account. When a new account request is submitted via the portal, the user will receive a confirmation email to the email address listed in the contact information. Users will also see a screen confirming that an account request has been registered. Once processing of the account request is complete, new users will receive an email with portal login information and can start accessing the portal. Classification Portal user guide 3 FORGOTTEN PASSWORD Users will be prompted to enter their username/email if they have forgotten their password and wish to have a new one sent to them. The portal will only reset a password (and send an email with the new password) if the user’s email address is registered. Classification Portal user guide 4 USING THE PORTAL HOME INFORMATION Users can find basic information about their account, including available funds, registered portal users, business and postal addresses registered to the account, any applicant organisations attached to the account and registered portal users for the account. ACCOUNT MENU Users can make requests to change information registered to the account, such as addresses, applicants and to request the account be closed. UPDATE ACCOUNT DETAILS—REQUEST Users can request changes to the postal and business addresses and business names held by the Classification branch by submitting an Update Account Details Request form. This request may take a few working days to complete once it is lodged. Users may be contacted by the branch prior to this request being actioned. Please note: Do not use the account update form if the new business name has a different Australian Business Number (ABN). For change of ABN, please contact Business Services Team at [email protected]. CLOSE YOUR ACCOUNT—REQUEST Users can request their account be closed by submitting a Close an Account Request form. Users must provide a reason to close the account and a formal request in company letterhead. Users may be contacted by the branch prior to this request being actioned. Classification Portal user guide 5 UPDATE YOUR APPLICANT DETAILS Users can add, update and deactivate applicant records held by the branch. Applicants are not people; rather they are the name of the part of the organisation that users wish to appear on the Classification certificate at the end of the application process. Applicants are generally used where a parent company supplies funds for two or more differently named applicant groups, e.g. for account MEGACOMPANY, applicants may be MEGACOMPANY FILMS and MEGACOMPANY INTERACTIVE. To add a new applicant, users click on the ‘Add New Applicant’ button and complete the mandatory fields in the form. Once saved, the newly created applicant is immediately available to select for application requests. To edit or deactivate an applicant - click on the name of the applicant record you wish to edit/deactivate—the details of the applicant record will appear. Update/edit applicant Users can edit the name of the applicant—changes are immediately visible and can be immediately selected for future application requests Activate/deactivate applicant Active applicants can be selected for new application requests. Deactivated applicants are listed in this section, but cannot be selected for application requests. Users can activate and deactivate applicants by selecting the applicant record they wish to change, then by choosing ‘activate’ ( ) or ‘deactivate’ ( ), respectively. Contacts Add a new contact: Click on ‘add contact’ and complete the mandatory details; click ‘save’ ( ) and the contact will appear in the list on the applicant details screen. The contact will also be selectable when making a new application request Edit existing contacts: click on the ‘edit’ icon ( ) and make changes to the name/telephone numbers/email addresses listed. Changes are immediately applied Deactivate contact: click on the ‘view’ icon ( ) and then select ‘Edit’. Change the radio button for ‘Is Active’ from yes to no ( ). The contact will no longer be selectable when making a new application request Addresses Two types of addresses are available—business and postal. The postal address appears on any Classification certificates resulting from applications received that are attached to the applicant. Addresses can be added by clicking on the ‘Add Address’ ( ) icon. Changes can be made to the addresses by clicking on the ‘edit’ icon ( ), and saving the changes. The changes are immediately available and will appear on any future Classification certificates created. Classification Portal user guide 6 APPLICATIONS Users have two options in the applications menu—new application or view applications. VIEW APPLICATIONS The view applications menu gives users information about application activity, e.g. saved and active applications. Saved applications ‘Saved applications’ are applications that have been started and saved, but not submitted to the Classification Board. These applications can be edited or deleted by portal users before they are submitted to the Classification Board for validation. Any applications that have been rejected by the branch also appear here, as do applications that users have withdrawn from the ‘submitted’ stage in the ‘Recently completed applications’. Recently completed applications ‘Recently completed applications’ are applications that have been submitted for validation and processing. These applications display their stage in the workflow. Stages include: • Submitted—application has been sent to for processing, but has not yet been validated or processed • Received—application has been validated, but not yet sent to the Classification Board for processing • Recommended as valid—application has been validated and has been sent to the Classification Board for a classification to be made • Considering application—application is being processed by the Classification Board • Signoff decision—application is being processed by the Classification Board • Finalising documents—the Classification Board has completed their processing, and a certificate is to be generated and issued • Invoicing—certificates are issued; the final step before an application is then closed • Closed—application processing has been completed and certificates (where generated) have been sent to users Application statuses change in real time so may be different each time users log in and make new application requests. As application requests are submitted to the Classification Board, they are listed in this section. Users have a limited ability to withdraw an application. at ‘Submitted’ stage, applications can be withdrawn without making a request to the branch at ‘Received’ stage, users can make a request to withdraw an application at ‘Recommended as Valid’ stage, users can make a request to withdraw an application—charges may apply at ‘Considering application’ stage, users must contact the Classification Branch to request the application be withdrawn—this cannot be requested via the portal. Charges may apply Users can view, save and print Application snapshots created during the new application process. Click on the ‘page’ ( ) icon to open the PDF document. Classification Portal user guide 7 Note that there are differences between browsers when viewing the application snapshot: for Internet Explorer, click on the page icon and select to ‘open’ or ‘save’ the PDF document for Google Chrome and Mozilla Firefox, when users click on the PDF icon, the document downloads and should be available to view in the ‘Downloads’ bar at the bottom of the screen. You may need to tell the document to open with a PDF viewer. New application Users can launch the ‘new application’ page by selecting the option in the left hand side menu, or by clicking on the ‘new application’ button ( ) on the ‘view application’ page. There are several different application forms available to select; these are sorted into classifications for films, computer games, publications, and also into other application types, like reviews and title changes. Application forms available on the portal are: • Film for public exhibition • Film not for public exhibition • Film—Additional Content Assessor (ACA) scheme • Film—Authorised Television Series Assessor (ATSA) scheme • Assessment of likely classification of a film • Computer game • Assessment of likely classification of a computer game • Publication • Serial classification for a publication • Review film classification • Review computer game classification • Review publication classification • Review classification (Broadcasting Services Act) • Title change—film • Title change—computer game • Title change—publication Classification Portal user guide 8 Application process Application forms all work in the same basic manner (with a few exceptions). Please note: The images below are intended to illustrate the basic process, they are not representative of every application type available. To start a new application, users need to: 1. Select an application type 2. Decide if the title (production) information for the application is new or already exists • If a new title (production), users must enter all the mandatory information for the title; • If an existing title (production), users must search for and select the existing information from a list of available options displayed; Classification Portal user guide 9 3. Enter remaining information about the application e.g. format submitted for application, running times, other mandatory information specific to an application form Please note: for Duration, you need to enter only the number of minutes of unclassified content into the ‘To be classified’ field. If you have both classified and unclassified content in your application, eg you are submitting a DVD version of a classified film, and only need to get the extra material classified, enter the number of minutes of unclassified content in the ‘To be classified’ field, and the number of minutes of classified content in the ‘Previously classified’ field. 4. Add mandatory attachments specific to the application via the uploader—users can also add additional documents via the ‘other’ option (up to 4 additional documents) Please note: only the following formats can be accepted: • DOC/DOCX • XLS/XLSX • PDF Classification Portal user guide 10 5. Check the summary to ensure details are correct—users can edit the application at this stage. Payment options can also be selected at this stage 6. The ‘application snapshot’ PDF document should be printed and submitted with any media (discs, gamecode, etc.) required for the application 7. Submit the application—details canthen be viewed on the ‘view applications’ page, in the ‘recently competed applications’ area All applications that are available in the portal replace a paper-based application form. Classification Portal user guide 11 PORTAL USERS This section allows users to update their access information for the Classification portal, and to provide access to other portal users in the same organisation. EDIT MY DETAILS Users can update their name, login email address and password. Please note: there are minimum requirements for password length and complexity outlined on the page. Please make note of these when changing your password. MANAGE PORTAL USERS Users can add additional users to the account by adding them via the ‘Manage portal users’ screen. To add a new user, click on the ‘Add new user’ ( new user should be emailed confirmation of this action. ) button and complete the requested details. The Users can edit ( ), deactivate ( ) and reset ( ) passwords for other registered portal users attached to the same account. Please click on the relevant icon on the summary page to make changes as required. Classification Portal user guide 12 PAYMENTS Payments can be made in two ways—during the application (for the specific application amount) and a ‘bulk’ payment (account top up). Payments made for a specific application can be triggered by a user at the summary stage, by selecting ‘Online credit card payment’ option in the Fees section Account top ups/bulk can be accessed via ‘Payments’ in the left hand menu. Making a payment To make a payment: 1. Select ‘Make a payment’ from the menu. Account information and postal address details are then displayed, and a space for users to enter the amount they wish to pay. (Max payment is $$$). Click on ‘next’ ( ). 2. Users are then prompted to enter credit card information—accepted cards are AMEX, MasterCard and Visa. Once entered, users click on ‘Pay now’ to make a payment. 3. The payment is then processed—if successful, the screen will show ‘successful’ and show a receipt number; if ‘unsuccessful’, a reason will display. 4. The account contact should then receive a receipt by email from the Classification Branch for the payment. 5. The updated balance will appear on the ‘home’ page If a receipt is not received, please contact [email protected]. ABOUT/RESOURCES This section contains additional information and links to assist users of the portal. Please refer to this menu item for assistance. Classification Portal user guide 13