1
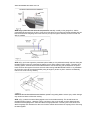
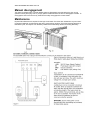
ACDC MOTORISED SOLUTIONS PTY LTD STEP 5 (fig. 5) Place the chain drive rail and powerhead assembly centrally on the garage floor, with the
powerhead furthest away from the door. Lift the front of the drive rail up to the front bracket assembly that has
been mounted above the garage door.Insert the main pivot pin through the assembly and secure it with the
split pin supplied.
STEP 6 (Fig. 6) Lift and support the powerhead (with a ladder) so it is positioned centrally and level. Using the
brackets supplied, mount the powerhead by attaching to the ceiling rafters or rafter noggins. There are many
mounting options, however the recommended method is to use the mounting rails on the side of the powerhead, as well as the support of the chain drive rail side mounting bolts.IMPORTANT NOTE: In any installation
the chain drive rail must be supported halfway along its length to prevent any flex in the drive rail assembly.
Failure to do so will void any warranty.
WARNING: Do not allow children around the door, opener or supporting ladder. Serious injury and/or damage
may result from failure to follow this warning.
STEP 7 (Fig. 7) Attach the manual disengagement cord to the shuttle assembly. This should be set at a
reachable height of approx. 1.8metres. Pull the cord down to free up the shuttle, and then slide the shuttle
towards the closed garage door. Select and attach the appropriate door connecting arm to the shuttle, then
attach the garage door bracket to the other end. Position and bolt the bracket to the top edge of the door using
the bolts supplied.