1
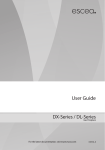
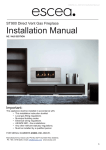
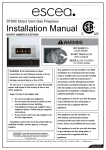
GAS FIRE USER GUIDE
ST900
NZ / AU
www.escea.com
630289_0_Manual_User_ST900_AUS_NZ_R-emotion
Any installation or service work carried out on this appliance must only
be done by a recognised and qualified gas fitter.
The data plate for this appliance, containing technical information and
specifications, can be found to the right of the control tray, near the
base of the fire. To access this, the fascia must be removed.
Escea recommends the ST900 is inspected and serviced by a
qualified Gas Fitter once every twelve (12) months.
DO NOT PLACE ARTICLES OR FURNISHINGS ON OR AGAINST THIS
APPLIANCE.
DO NOT USE OR STORE FLAMMABLE MATERIALS NEAR THIS APPLIANCE.
DO NOT SPRAY AEROSOLS IN THE VICINITY OF THIS APPLIANCE WHILE IT
IS IN OPERATION.
PRIMARILY A DECORATIVE APPLIANCE - NOT CERTIFIED AS A SPACE
HEATER.
DO NOT MODIFY THIS APPLIANCE
DO NOT OPERATE THE FIRE IF THE GLASS HAS BEEN BROKEN, DAMAGED
OR IT IS NOT PROPERLY POSITIONED/HOOKED ONTO THE FIRE
DO NOT OPERATE THE FIRE WITH THE FASCIA PANELS REMOVED.
THIS APPLIANCE IS NOT INTENDED FOR USE BY YOUNG CHILDREN OR
INFIRM PERSONS UNLESS THEY HAVE BEEN ADEQUATELY SUPERVISED
BY A RESPONSIBLE PERSON TO ENSURE THAT THEY CAN USE THE
APPLIANCE SAFELY.
THIS APPLIANCE MUST BE INSTALLED IN ACCORDANCE WITH THE
MANUFACTURERS WRITTEN INSTRUCTIONS.
NZ LTD
17 Carnforth St, PO Box 5277
Dunedin, New Zealand
E-mail: [email protected]
Web: www.escea.com
Phone: +64 3 478 8220 Fax: +64 3 478 8221
IF APPLIANCE DOES NOT LIGHT AFTER 6 ATTEMPTS - PLEASE WAIT FOR 10
MINUTES BEFORE ATTEMPTING TO RELIGHT
THE GLASS SURFACE ON THE FRONT OF THE FIREPLACE IS CONSIDERED
A WORKING SURFACE, AND AS SUCH IS HOT AND CARE MUST BE TAKEN
NOT TO TOUCH THIS SURFACE. IT IS RECOMMENDED A SECONDARY
GUARD IS FITTED IN PLACES WHERE THERE ARE YOUNG CHILDREN OR
AGED OR INFIRM PERSONS.
CURTAINS SHOULD NOT BE POSITIONED ABOVE THE FIREPLACE AND ANY
PROTRUDING LEDGES MUST NOT COME WITHIN THE MINIMUM
DISTANCES SPECIFIED IN SECTION 5.1 OF THE INSTALLATION MANUAL
SUPPLIED WITH THIS APPLIANCE.
IF A GUARD IS FITTED TO THIS APPLIANCE TO REDUCE THE RISK OF FIRE
OR INJURY FROM BURNS AND NO PART OF IT SHOULD BE PERMANENTLY
REMOVED.
FOR PROTECTION OF YOUNG CHILDREN OR THE INFIRM, A SECONDARY
GUARD IS REQUIRED.
Contents
> Basic Operation
Turning the ST900 on
Setting the Control Mode
Locking the Remote Control
Operation from the touch pad
1
2
5
5
> Clearances
6
> Cleaning and Maintenance
8
> Normal operating Sounds and Smells
11
The ST900 electronic control system is designed to work within the
temperature range of 0°C to 70°C, with a humidity level that is non
condensing. This is to ensure safe operation of the electronic and
gas control system.
If the fireplace is subjected to an environment with temperatures
very close to or exceeding these temperature limits (irrespective of if
the fireplace is on or off at the time) the fireplace may not start up
until the temperature returns back to within the operating range.
To remedy this the environmental temperature should be addressed
and the fireplace control system given time to adjust accordingly.
The fireplace should then function correctly.
1
Basic Operation
The ST900 remote control allows you to turn ON and OFF the fire, control the
flame height in the Manual mode, or control the room temperature in the
Thermostat mode. The remote has a maximum range of 10 metres, and
because the remote works by radio frequency, it does not need to be aimed at
the ST900 for it to operate.
Switching on the ST900
When first powered the remote starts at the OFF screen (it is possible that the
remote is locked in the OFF screen: to unlock it just press the button below
Unlock, and then OK).
Switching on: Once the remote is unlocked, press On (left button) and OK
(middle button). A beep from the control unit will be heard, and the ignition
process starts (the pilot will start sparking and gas will start flowing to the pilot,
which should then be lit within a few seconds, after which the main burner will
ignite in HIGH flame mode).
Wait until the current flame status displays HIGH before performing any
other action.
If the pilot flame fails to ignite, you must turn OFF the ST900 from the remote
and start the process of turning it ON again. BLOCKED ERROR will occur
after 5 ignitions within a 15 min period. This requires the control unit’s power
supply to be turned off for 15 seconds or you can wait out 15 minutes.
Basic Operation
2
Switching off the ST900
To turn off the fire, push the OFF button, to shut down the gas flow to the fire
and switch it off. The OFF display will now appear in the display.
Setting the control mode for the fireplace:
There are three different modes for controlling the appliance:
> Manual
> Automatic
> Program
Automatic mode allows you to set a temperature, while in manual mode the
flame level may be set to HIGH, MEDIUM, LOW & PILOT. Program mode
offers automatic temperature control for specific times of the day.
In the initial screen when the remote is turned on, three options are available:
AUTO, MANUAL and MENU.
Auto and Manual are two of the three different modes for controlling the
appliance with the remote.
Manual mode:
If Manual is pressed, HIGH appears as the selected
setting. In the bottom row, ↓ and ↑ appear,
indicating that the flame level can by changed by
just pressing the left or middle button. There are four
possible flame positions: Pilot flame, Low flame,
Medium flame and High flame. Pressing Back (right
button), returns to the initial screen. Note that a
Safety temperature can be previously set in the
configuration menu. This specifies the maximum
the maximum permitted room temperature. This
temperature can never be set higher than 40ºC
(104 ºF).
3
Basic Operation
Automatic mode:
If Auto is pressed in the initial screen, 25ºC (77 º F)
appears as the desired temperature in the selected
setting. In the bottom row, ↓ and ↑ appear,
indicating that we can change the desired
temperature value by just pressing the left or middle
button. In auto mode the appliance heats until this
temperature is reached. Limits are 0-37ºC (3299ºF).
Pressing Back (right button), returns to the initial
screen.
In this mode the main burner can be switched on and off.
Program mode:
By default the program mode is not enabled. To enable program mode, enter
configuration mode by pressing and holding the OFF button for 40 seconds,
selecting “Programming” and selecting “yes” (For more information on
configuration mode see the installation manual, section 19.9).
There are two types of program mode: a Daily mode and a Weekly mode. In
the daily mode, every day uses the same program. In the weekly mode, every
day has its own program, so it is possible have a different program for each
day of the week.
In this mode the main burner can be switched on and off (pilot still burning).
Day programming menu: (Menu → Adjust Menu → Change Program)
There are 8 menus like this. One for Daily, and the others for each separate
day (Monday, Tuesday, Wednesday, Thursday, Friday, Saturday and
Sunday).
(Continued next page)
Basic Operation
4
Program mode (continued)
The daily program screen consists of:
A: Selected (including “Daily”). The selected
day can be changed by pressing Change
(middle button).
B: Day schedule graphic. This bar displays
the program for the whole day by showing
the temperature setting for each hour of the
day. To access the day schedule graphic,
press ↓ (left button). To change the desired temperature, go to the hour you
want to change by pressing → (left button) and then press change (middle
button).
There are 3 temperature settings (bars):
Off
[Small bar] No temperature control (the appliance is in pilot
mode).
Night Temp
[Medium bar] The night temperature is set as the desired
temperature and the appliance will heat until this
temperature is reached. To adjust the night temperature
press “Menu → Adjust menu → Night” and set the desired
temperature.
Comfort Temp
[Large bar] The comfort temperature is set as the desired
temperature and the appliance will heat until this
temperature is reached. (High bar). To adjust the comfort
temperature pres Menu → Adjust menu → Comfort and set the
desired temperature.
Finally, to launch the program mode, in the main menu, set Program to On,
and select the desired Program Type (Daily or weekly). When activated, the
screen will show which of the above temperature settings is currently active,
Off, Night, or Comfort. The pilot must remain lit in order for the program to
remain running.
Changing the display from Celsius to Fahrenheit:
Go into Menu → Adjust menu → Unit. Press middle button and then left button
for changing units.
5
Basic Operation
To Lock / Unlock the remote control buttons:
Go into Menu → Lock. Press middle button and then left button for locking the
remote.
To unlock pres left button and then middle button.
Operation from the Touch Pad
The touch pad is intended to be used for service/diagnostic purposes and to
operate the fire in the event that the remote handset becomes lost or inoperative.
If you remove the fascia you will find an electronic touch pad in the lower centre of
the fire. The touch pad features the basic operations of the fire: On, off, and
manual adjustment of the flame height.
To turn on the ST900, push the ON/OFF button on the touch pad. The system will
emit a beep and begin the ignition process, which can take about 10 seconds.
Once the start up process is complete, the fire will be running in HIGH mode. The
ST900 is now in the 'Manual' mode and ready to be used.
While the fire is running, press the 'Flame Up' or 'Flame Down' button to alter the
flame height. The LED will flash once and the unit will beep to confirm the flame
height has been adjusted. The ST900 has 4 flame positions: Pilot only, Low,
Medium, and High flame height.
If the 'Flame Up' button is pressed while the unit is in the 'high' flame position, the
unit will emit 2 beeps. Similarly, if 'Flame Down' is pressed while the unit is in the
'pilot' flame position, the unit will emit 2 beeps.
To shut down the gas flow to the ST900, press the On/Off button and the LED will
blink and the unit will emit a beep.
DO NOT DROP THE REMOTE.
Dropping the remote may result in a cracked LCD screen or malfunctioning components.
The warranty does not cover damage to the remote sustained by dropping, however
replacement remote controls are available.
Clearances
Cabinet Clearances
There must be a minimum of 100mm from the sides of the fascia to any
protruding side walls or cabinetry.
Television Positioning Considerations
It is becoming common practice for consumers to mount flat screen TV's
above their gas fireplace.
Most TV manufacturers have specified in their instructions that the
TV should not be installed on, near or above a heat source. For this
reason TV location decisions rest solely with the householder and
the manufacturer / distributor will not be held liable for any adverse
affects on a TV located near to the ST900 fireplace that may be
caused by heat.
The drawings below are suggestions that may be used as a GUIDE
for those consumers who do decide to locate their TV above an
ST900 gas fire. These drawings show ways to reduce the amount of
warm air rising off the fireplace and onto the TV.
6
7
Clearances
The material that the wall and mantle are made from will also affect
the operating temperature of the TV so it is the customers
responsibility to satisfy themselves that their TV mounting and mantle
design will not exceed the listed maximum operating temperature of
their electronic goods.
Replacing Batteries
When batteries are replaced in either the battery box (inside the
fireplace) or in the handset, the unit will require 1 minute afterwards
to regain connection.
ST900 Mantle Clearances
If any part of the installation (mantle, wall
or cavity) is constructed from
COMBUSTIBLE materials, the diagram
below shows the maximum allowable size
for mantles or protruding surfaces
mounted above an ST900
If the entire installation (mantle, wall and
cavity) is constructed from NONCOMBUSTIBLE materials, then the
clearances to mantles or protruding
surfaces mounted above an ST900 may
be as shown by the shaded area in the
diagram below
ST900
Cleaning and Maintenance
8
Annual Servicing
Your ST900 Decorative Gas Fireplace requires that annual service checks be
carried out by a Registered Installer to ensure that it will continue to operate in
a safe manner.
Please ensure that you schedule annual service checks for your ST900 with
your local Registered Installer or service agent.
Removing the ST900 Fascia
Ensure the fascia is allowed to cool before handling.
The ST900 fascia attaches to the fire by four hooks. To remove the fascia,
simply lift it upwards 15-20mm, and pull towards you. Care should always be
taken when handling the fascia.
To replace the fascia, line up the four hooks with the matching receptacles on
the fire and push the fascia into place and let it drop down, the fascia should
now be securely in position
If you have a Velo fascia, the instructions above also apply (lift upwards then
outwards), however before removing the fascia the lower trim must be
removed.
Removing the ST900 Glass Assembly
Ensure the ST900 is allowed to cool before continuing with the following
procedure.
Pull the four hooks shown below towards you and then away from the glass
to release the glass frame underneath the hook.
Lift the glass assembly towards you to clear the locating supports and
place it flat upon some newspaper or a sheet of cardboard to protect your
floor coverings.
9
Cleaning and Maintenance
Follow the instructions on page 8 in reverse to refit the glass assembly to
the fireplace.
Do not operate the appliance if the glass has been broken, damaged, or
the glass is not properly positioned/hooked onto the appliance.
Cleaning your ST900
The unit must be cold before starting any form of maintenance or cleaning.
The glass can be cleaned using standard window cleaner. If you wish the
clean the inside of the glass, you can remove the glass assembly by following
the instructions on page 8.
Take care while cleaning the glass so as not to interfere with or damage the
fibreglass gasket material on the glass assembly.
Fuel Bed Media
Some discolouration of the coals may occur over time, particularly on white
coals. The gravel or driftwood layout and the quantity of material contained
therein must not be altered.
Warning: Use only Escea approved fuelbed media.
Cleaning and Maintenance
10
Cleaning the fascia
The Fascia is the visible surround of your Escea Gas Fireplace and must be treated
carefully to prevent unsightly marks from tarnishing the visual quality of the product.
Some marking over time is inevitable however, so the following directions will assist
you in getting the maximum enjoyment from your Escea Gas Fireplace.
Never ever rub the fascia. For example, the high temperature silver powder
coating that is used on some Escea fascia parts contains certain amounts of
aluminium that when rubbed too hard will oxidise leaving a big black smudge that
cannot be removed. If the fire is operated with finger or other marks present on the
fascia panels, there is a risk of them being burnt into the fascia as the fire gets hot
from normal running.
The outside of an Escea Fascia must only be cleaned with a soft microfibre cloth. If
heavier cleaning is required for the likes of grease or stubborn fingerprint removal
we recommend the use of Steel Kleen brand Ezi Wipes. These wipes have been
tested by Escea technicians and produce very satisfying results, when used
correctly. Instructions for their use follow.
For Stainless Steel Fascias (Outdoor and Direct Vent products):
1. Ensure that the Gas Fireplace is off, and that the fascia is cold.
2. Using the gloves provided with your fascia, remove the towelette from the sachet
and wipe the fascia with even, straight strokes.
3. Make sure your strokes follow the direction of the grain or brush finish. Wiping
across the grain can leave small scratches.
4. The wipe will leave a very fine film over the fascia, ensure this film is distributed
evenly.
5. If the film is applied too heavily and is quite visible, you can remove the excess by
gently wiping dry with a microfibre cloth. Ensure your strokes still follow the direction
of the grain or brush finish.
6. Ensure that no film is applied to the glass of your Escea Gas Fireplace. If applied
accidentally, wipe off with an absorbent microfibre cloth.
For Powder Coated Fascias (Inbuilt, Outdoor and Direct Vent products):
1. Ensure that the Gas Fireplace is off, and that the fascia is cold to the touch.
2. Using the gloves provided with your fascia, remove the towelette from the sachet
and wipe the fascia with even, straight strokes.
3. Because the wipe leaves a protective film over the fascia, the entire fascia will
need to be wiped to avoid seeing a difference in surface texture. Ensure this film is
distributed evenly.
4. If the film is applied too heavily and is quite visible, you can remove the excess by
gently wiping dry with a microfibre cloth
5. Ensure that no film is applied to the glass of your Escea Gas Fireplace. If applied
accidentally, wipe off with an absorbent microfibre cloth.
11
Sounds and Smells
Note: Each time the fire is lit from cold the glass will fog up with condensation.
This is normal and the condensation will disappear within a few minutes once
the glass heats up.
Sounds
It is possible that you will hear some sounds from your gas appliance. This
is perfectly normal due to the fact that there various types of materials used
within your appliance. Listed below are some examples. These are all
normal operating sounds and should not be considered as defects in your
appliance.
Gas Control Valve:
As the gas control valves turn ON and OFF, a dull clicking sound may be
audible, this is normal operation of a valve. When the fire is switched off
after being run for a while, there may be popping and fluttering noises as
the residual gas in the burner burns away. These are normal and should be
no cause for concern.
Unit Body / Firebox:
Different types and thickness’ of steel will expand and contract at different
rates resulting in some “dull drumming” and “ticking” sounds being heard
throughout the cycling process.
Smells
The first few times the unit is operated, the unit may release an odour and
the flames may appear orange caused by the curing of the paint, the
burning off of the starch in the gas coals and the oils in the metal. This is a
temporary curing process which will disappear with use.