1
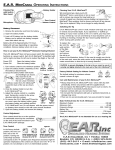
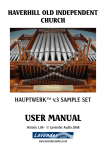
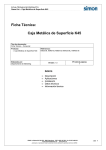
User Guide
7/8/07
11:46 AM
Page 1
User Guide
TABLE
7/8/07
OF
11:46 AM
Page 2
CONTENTS
Identification . . . . . . . . . . . . . . . . . . . . . . . . . . . . . .
Features: Full-Shell and Half-Shell . . . . . . . . . . . . . .
Features: MiniCanal™ and CIC (Completely-In-Canal)
Features: BTE (Behind-The-Ear) and Open E.A.R.™ .
Healthy Hearing . . . . . . . . . . . . . . . . . . . . . . . . . . .
Battery Installation and Removal . . . . . . . . . . . . . . .
Battery Warning . . . . . . . . . . . . . . . . . . . . . . . . . . .
Volume Control Adjustments . . . . . . . . . . . . . . . . . .
MiniCanal™
Application and Removal of Silicone Tip . . . . . .
Inserting Your MiniCanal™ . . . . . . . . . . . . . . . .
Removing Your MiniCanal™ . . . . . . . . . . . . . . .
Half Shell Models
Inserting Your Half Shell . . . . . . . . . . . . . . . . . .
Removing Your Half Shell . . . . . . . . . . . . . . . . .
Full Shell Models
Inserting Your Full Shell . . . . . . . . . . . . . . . . . .
Removing Your Full Shell . . . . . . . . . . . . . . . . .
Behind-The-Ear (BTE) Models
Installation and Removal of the Battery . . . . . .
Volume Control Adjustment . . . . . . . . . . . . . . .
How to Wear Your BTE . . . . . . . . . . . . . . . . . .
Removing Your BTE . . . . . . . . . . . . . . . . . . . . .
M-T-O Switch . . . . . . . . . . . . . . . . . . . . . . . . . .
Open E.A.R.™ Models
Installation and Removal of the Battery . . . . . .
Volume Control Adjustment . . . . . . . . . . . . . . .
How to Wear Your Open E.A.R.™ . . . . . . . . . . .
Multi-Memory Button . . . . . . . . . . . . . . . . . . . .
Using the Private Ear Option . . . . . . . . . . . . . . . . . .
Multi-Memory Button . . . . . . . . . . . . . . . . . . . . . . .
Music Monitor Option . . . . . . . . . . . . . . . . . . . . . . .
Select-A-Vent System . . . . . . . . . . . . . . . . . . . . . . . .
Care and Storage . . . . . . . . . . . . . . . . . . . . . . . . . .
Troubleshooting Guide . . . . . . . . . . . . . . . . . . . . . .
Repair and Service . . . . . . . . . . . . . . . . . . . . . . . . . .
Limited Warranty . . . . . . . . . . . . . . . . . . . . . . . . . .
2
.
.
.
.
.
.
.
.
.
.
.
.
.
.
.
.
.
.
.
.
.
.
.
.
.
.
.
.
.
.
.
.
.
.
.
.
.
.
.
.
.
.
.
.
.
.
.
.
.
.
.
.
.
.
.
.
.
.
.
.
.
.
.
.
.
.
.
.
.
.
.
.
.
.
.
.
.
.
.
.
.
.
.
.
.
.
.
.
.3
.4
.5
.6
.7
.8
.8
.9
. . . . . . . . . . .10
. . . . . . . . . . .11
. . . . . . . . . . .11
. . . . . . . . . . .12
. . . . . . . . . . .12
. . . . . . . . . . .13
. . . . . . . . . . .13
.
.
.
.
.
.
.
.
.
.
.
.
.
.
.
.
.
.
.
.
.
.
.
.
.
.
.
.
.
.
.
.
.
.
.
.
.
.
.
.
.
.
.
.
.
.
.
.
.
.
.14
.14
.15
.15
.15
.
.
.
.
.
.
.
.
.
.
.
.
.
.
.
.
.
.
.
.
.
.
.
.
.
.
.
.
.
.
.
.
.
.
.
.
.
.
.
.
.
.
.
.
.
.
.
.
.
.
.
.
.
.
.
.
.
.
.
.
.
.
.
.
.
.
.
.
.
.
.
.
.
.
.
.
.
.
.
.
.
.
.
.
.
.
.
.
.
.
.
.
.
.
.
.
.
.
.
.
.
.
.
.
.
.
.
.
.
.
.
.
.
.
.
.
.
.
.
.
.16
.16
.17
.17
.18
.19
.20
.20
.21
.22
.22
.23
User Guide
7/8/07
11:46 AM
Page 3
IDENTIFICATION
Full Shells – Rear View
Serial numbers are imprinted on the back
of Full Shell, Half Shell, and CIC (Completely
in Canal) models, on the side of the
Open E.A.R.™ and on the shell of
MiniCanal™ models.
Open . E.A. R.™
The serial number for Behind-The-Ear (BTE)
units can be found inside the battery door.
Full Shell, Half Shell, and CIC (Completely
in Canal) models are marked with a red
dot on the back of the instrument to indicate that the unit is intended for the right
ear and a blue dot to indicate the left ear.
Some MiniCanals feature a red shell (right)
and a blue shell (left.) Some MiniCanals
with beige shell feature a red indication
(right) and a blue indication (left.)
MiniCanal™
BTE
3
User Guide
7/8/07
11:46 AM
Page 4
FEATURES: FULL SHELL
Removal Line
(Lanyard
Placement)
Battery Drawer
Multi-Memory Button
(Digital Only)
Microphone
Port
Lanyard
Receiver
Port
Tone
Adjustments
(Advantage Only)
Volume
Control
Audio Input
(Optional)
Audio Upgrade
(Optional)
Private Ear™ (Optional)
Select-A-Vent (Optional)
FEATURES: HALF SHELL
Volume Control
Microphone Port and
Wind Screen
Battery Drawer
Removal Line
(Lanyard Placement)
Your hearing protection may have different combinations of these features.
4
tures.
User Guide
7/8/07
11:46 AM
Page 5
FEATURES: MINICANAL™
Removable Silicone Tip
Microphone Port and
Wind Screen
Removal Line
(Lanyard Placement)
Battery Drawer
Tone Adjustment
(Analog Only)
Receiver Port
Volume Control
Your MiniCanal ™ model may differ from the one shown here.
FEATURES: CIC (COMPLETELY IN CANAL)
Volume Control
Microphone Port and
Wind Screen
Battery Drawer
Removal Line
(Lanyard Placement)
Your hearing protection may have different combinations of these features.
5
User Guide
7/8/07
11:46 AM
Page 6
FEATURES: BTE (BEHIND-THE-EAR)
Ear Hook
Microphone Port
and Windscreen
Volume Control
Potentiometers (Featured on
various SHS units)
M-T-O Switch
(Private Ear™ Option)
Battery Drawer
FEATURES: OPEN E.A.R.™
Microphone Port
and Windscreen
Multi-Memory Button
Battery Drawer
Interchangeable Tips –
Open or Closed
(Open Tip shown here)
Volume Control
Your hearing protection may have different combinations of these features.
6
User Guide
7/8/07
11:46 AM
Page 7
d on
tures.
HEALTHY HEARING
Proper use of your hearing protection is crucial to reduce the
risk of hearing damage due to high level noise exposure.
It is highly recommended that you have an annual hearing
evaluation by a licensed Hearing Healthcare Professional.
This will keep you informed of any changes in your hearing.
There are many things that contribute to hearing loss,
including natural aging, diseases and lack of protection to
high levels of noise. Your hearing protection can reduce
the risk of hearing damage when used properly. Use your
hearing protection when sound levels are greater than
normal everyday levels (i.e. gunshots, motorcycles, etc.)
7
User Guide
7/8/07
11:46 AM
Page 8
BATTERY INSTALLATION & REMOVAL
Your hearing protection uses either a size 13, 10A or 312
battery. Your hearing professional will advise you on which
battery to use.
Installing the battery
Open the battery compartment
by gently lifting the raised edge
of the swing-out drawer. Place
the battery in the drawer with
the “+” side facing the same
direction as the “+” sign on the
drawer. Close the battery compartment by gently swinging the
drawer until it securely snaps in
place. Remove installed batteries by fully opening the drawer
and pushing the battery out from the bottom.
If the drawer does not close easily, verify that the battery is
placed correctly in the compartment. DO NOT FORCE THE
BATTERY DRAWER SHUT.
BATTERY WARNING
Warning: Batteries are dangerous if swallowed.
If ingested, immediately contact a physician or the
National Button Battery Ingestion
Hotline at (202) 625-3333.
Dispose of used batteries in the proper waste or recycling
container. Keep batteries out of reach of children and pets.
8
User Guide
7/8/07
11:46 AM
Page 9
VOLUME CONTROLS
Volume Control
Allows you to adjust the
amount of amplification
provided by the protection.
For Full Shells, Half Shells and
MiniCanals, to increase amplification, turn the volume control forward, toward your face. To
decrease amplification, turn the
volume control backward, toward
the back of your head.
For SHS models. turn the
Volume Control to a higher
number for higher volume.
MiniCanal™
Full Shell, Half Shell
On Open E.A.R.™ models, the
Volume Control is located on
the bottom of the instrument.
Rotate clockwise for higher
volume, counter-clockwise
for lower volume.
SHS
Turning your instrument
On and Off. Your instrument is
on any time a functioning battery
is placed in the compartment,
and the battery drawer is
closed. To turn your instrument
off, fully open the battery drawer
and remove the battery.
Open E.A.R.™
9
User Guide
7/8/07
11:46 AM
Page 10
MINICANAL™
Application and removal of silicone tip:
To apply silicone tip, hold tip between thumb
and index finger. Insert MiniCanal™ tip into
silicone tip as shown.
To remove silicone tip, grasp MiniCanal™ instrument and tip between thumb and index finger
and gently pull apart.
DO NOT USE THE BATTERY DRAWER AS HOLDING
POINT. DAMAGE MAY OCCUR.
10
User Guide
7/8/07
11:46 AM
Page 11
MINICANAL™
Inserting your MiniCanal™
To insert your MiniCanal™, hold it with the
extraction line between your thumb and index
finger. The microphone opening should be at
the bottom.
Gently guide the MiniCanal™ into
your ear canal until you feel
resistance.
Release the extraction line. Using
your index finger, push the
MiniCanal™ in until it is seated
comfortably in your ear canal.
Pulling down on your ear lobe with
your other hand as you push may
help with insertion.
Removing your minicanal
To remove , grasp the extraction line and gently
pull the MiniCanal™ out of your ear canal.
DO NOT USE THE BATTERY DRAWER TO REMOVE YOUR
MINICANAL™. DAMAGE MAY OCCUR.
11
User Guide
7/8/07
11:46 AM
Page 12
HALF SHELL MODELS
Inserting your Half Shell
To insert your
Half Shell, hold it
between your
thumb and index
finger. The volume control
should be at the top.
Gently guide the
Half Shell into your
ear canal. Press on
the instrument to
ensure that it is in place. To
achieve the highest level of
protection, the instrument
must be properly inserted.
Removing your Half Shell
To remove your Half Shell, reach into the ear with your
thumb and index finger, and gently pull out the instrument.
DO NOT USE THE BATTERY DRAWER TO REMOVE YOUR
HALF SHELL. DAMAGE MAY OCCUR.
12
User Guide
7/8/07
11:46 AM
Page 13
FULL SHELL MODELS
Inserting your Full Shell
To insert your
Full Shell, hold it
between your
thumb and index
finger with the battery drawer
facing away from the ear.
Slowly insert the
Full Shell into your
ear canal. Gently
twist the Full Shell
until it is securely and comfortably seated in your ear.
To achieve the highest level
of protection, the instrument
must be properly inserted.
Removing your Full Shell
To remove your Full Shell, grasp the instrument with your
thumb and index finger, and gently twist it as you pull
outward.
DO NOT USE THE BATTERY DRAWER TO REMOVE YOUR
FULL SHELL. DAMAGE MAY OCCUR.
13
User Guide
7/8/07
11:46 AM
BEHIND-THE-EAR (BTE)
Page 14
MODELS
Installing the Battery
twist
d in
e
To install the battery, open
the battery compartment by
gently lifting the raised edge
of the swing-out drawer.
rt your
er.
Place the battery in the drawer
with the “+” side facing the
same direction as the “+” sign
on the drawer.
nd
Close the battery compartment
by gently swinging the drawer
until it securely snaps in place.
of
DO NOT FORCE THE BATTERY DRAWER SHUT. If
the drawer does not close easily, verify that the
battery is placed correctly in the compartment.
ward.
own-
ormal
phone
e
o the
Your Open E.A.R.™ hearing protection uses a size 13 battery.
Remove installed batteries by fully opening the drawer
and pushing the battery out from the bottom.
Volume control adjustment
To increase amplification, turn the volume control upward to display a higher
number. To decrease , turn downward
to a lower number.
14
User Guide
7/8/07
11:46 AM
BEHIND-THE-EAR
(BTE)
Page 15
MODELS
How to Wear Your BTE
To insert your earmold, hold it
between your thumb and
index finger.
Slowly insert the earmold into
your ear canal. Gently twist it
until it is securely and comfortably seated in your ear.
To achieve the highest level of
protection the instrument
must be properly inserted.
Place the hearing protection
behind your ear.
To Remove Your BTE, take the instrument out from
behind your ear and gently pull the earmold outward.
M-T-O switch
Some BTEs are equipped with an M-T-O
switch. For normal listening situations,
set the switch to the “M” or Microphone position. When using the
Private Ear™ option, set the switch to
the “T”. To turn the BTE off, set the
switch to the “O” or off position.
15
User Guide
7/8/07
11:46 AM
OPEN E.A.R.™
Page 16
MODELS
Installing the Battery
To install the battery, open
the battery compartment by
gently lifting the raised edge
of the swing-out drawer.
Place the battery in the drawer
with the “+” side facing the
same direction as the “+” sign
on the drawer.
Close the battery compartment
by gently swinging the drawer
until it securely snaps in place.
DO NOT FORCE THE BATTERY DRAWER SHUT. If
the drawer does not close easily, verify that the
battery is placed correctly in the compartment.
Your Open E.A.R.™ uses a size 13 battery.
Remove installed batteries by fully opening the drawer
and pushing the battery out from the bottom.
Volume control adjustment
The Open E.A.R.™ Volume Control is
located on the bottom of the instrument.
Rotate clockwise for higher volume, counterclockwise for lower volume.
16
User Guide
7/8/07
11:46 AM
Page 17
OPEN E.A.R.™ MODELS
How to Wear Your Open E.A.R.™
The Open E.A.R.™ comes
with two types of interchangeable tips. Use the
Open Tip for hearing
enhancement in quiet
activities like bow hunting,
nature listening, and communications. Use the
Closed Tip for hearing protection from loud sounds such
as gunfire, industrial noise, racing and motorcycling. (Note:
In this case, superior sound quality remains, but most users
will experience some degree of occlusion due to the closed
tips required to reduce loud sounds.)
Slowly insert the open or closed tip into your ear canal.
To achieve the highest level of protection the tip must be
properly inserted. Bring the tubing to the top front of the
ear and place the instrument behind your ear.
Removing Your Open E.A.R.™
To remove, gently pull the tip outward.
Multi-Memory Switch
The Multi-Memory button allows you to
select from the different memory settings
that your hearing professional has programmed for you. For more information
on the Multi-Memory switch, see page 19.
17
Use it
and u
it for
case,
most
occlus
to red
Close
sound
ing an
Open
activit
and c
nicae
er to
ations
User Guide
USING
7/8/07
THE
11:46 AM
Page 18
PRIVATE EAR™ OPTION
The Private Ears™ option brings communications from a
two-way radio or cell-phone straight to the ear via an
induction loop system. This feature enables the user to
camouflage radio commands communications without any wires to the ear.
The Private Ear™ option is available
on Full Shell, Half Shell, BTE and Open
E.A.R.™ models and is designed to
activate when used with a telephone
orcommunication radio connected to
an induction loop which transmits to
the hearing protection instrument.
BTE
If you have an instrument with an
M-T-O switch, set it to “T” for Private
Ear™ option. For units equipped with
an “Active Telecoil”, instrument will
respond automatically.
If your Full Shell or Half Shell is
equipped with the Private Ear™
option be sure to activate it by
gently toggling the switch
upward.
The Private Ear™ is also available
in a stand-alone non-custom
Micro unit and features
receive-only ability.
18
Full and Half Shell
Micro Private Ear™
User Guide
7/8/07
11:46 AM
Page 19
MULTI-MEMORY BUTTON (IF
SO EQUIPPED)
Your hearing protection may be
equipped with a
multi-memory
button. The multimemory button
allows you to select
from the different
Open E.A.R.™
memory settings that Full and Half Shell
your hearing professional has programmed for you. Your hearing professional
will advise you on when to use each memory setting.
If the hearing protection is turned off or the battery is
removed the protection will default to Memory Setting 1.
Memory
Setting
Listening
Environment
1
2
3
4
19
User Guide
7/8/07
11:46 AM
Page 20
MUSIC MONITOR OPTION
The Audio Input option gives users the ability to use their
electronic earpiece as a music monitor. This feature is
completely independent from the electronic enhancement
aspect of the earpiece and will not rely on a battery
to power it.
The 4 foot audio cord is
detachable and has a
standard 3.5mm stereo
jack that will fit all stereo
devices.
SELECT-A-VENT SYSTEM
Select-a-Vent technology is ideal for users who also participate in non-impact situations such as archery, bird watching and general communications. This feature will reduce
the overall occlusion effect of a completely solid earplug
and allow the ear canal to breathe.
For those who select this option and still wish to have the
option of using their electronic
earpieces within high impact
noise areas, the vent hole
can be closed with
supplied plugs. This
will create a solid earpiece again and protect
from high noise activities.
20
User Guide
CARE
7/8/07
AND
11:46 AM
Page 21
STORAGE
If you are not planning to use your hearing protection for
an extended period of time, remove the battery and store
your hearing protection and battery separately in the
supplied storage case.
Carefully brush your hearing protection with the supplied
brush tool located in your storage case. Do not push any
earwax or other debris into the openings of the hearing
protection. After brushing your hearing protection, wipe it
thoroughly with a soft cloth.
If you use a BTE, clean the earmold by wiping it with a soft, moist
cloth. Inspect the plastic tubing frequently. Have your hearing
professional replace cracked, hardened, or clogged tubing.
DO NOT wear your hearing protection while showering or
bathing, or otherwise allow any liquid to enter the protection.
DO NOT drop your hearing protection.
DO NOT apply perfumes, colognes, or hair spray while
wearing your hearing protection.
DO NOT expose your hearing protection to excessive heat,
such as ovens, heat lamps, hair dryers, etc.
KEEP BATTERIES OUT OF THE REACH OF
CHILDREN. If ingested, immediately contact a
physician or the National Button Battery
Ingestion Hotline at (202) 625-3333.
21
User Guide
7/8/07
11:46 AM
Page 22
TROUBLESHOOTING GUIDE
Please contact your hearing professional for further assistance if these suggestions do not resolve the problem.
PROBLEM
Dead
Weak
Distorted
Intermittent
POSSIBLE CAUSE
RESOLUTION
Dead Battery
Replace Battery
Not Turned On
Turn the Volume
Control to the
"On" Position
Receiver Tube
Blocked
Contact Your
Hearing Professional
Low Battery
Replace Battery
Receiver Tube
Blocked
Contact Your
Hearing Professional
Low Battery
Replace Battery
Defective Instrument
Contact Your
Hearing Professional
Low Battery
Replace Battery
Defective Instrument
Contact Your
Hearing Professional
REPAIR AND SERVICE
Should your hearing protection instrument fail, refer to the
Troubleshooting Guide, above, for possible solutions. If a
solution is not reached, please contact your hearing
protection provider for further assistance.
22
s-
nal
nal
nal
nal
the
a
User Guide
7/8/07
11:46 AM
Page 23
LIMITED WARRANTY
Your new E.A.R., Inc. custom or BTE hearing protection is warranted against defects in materials and workmanship for a period
of 24 months from date of manufacturer’s invoice. The
MiniCanal™ series are warranted for 1 year (U.S.) or 2 year
(Europe). During the warranty period, we will repair the hearing
protection should it prove to be defective in materials or workmanship. If the hearing protection cannot be repaired, it will be
replaced with a comparable hearing protection that is new or
refurbished. The warranty period is not extended if we repair or
replace a warranted hearing protection.
This warranty does not cover accessories, including earmolds,
tubing, cords, and batteries. Appearance changes due to normal
wear and tear are not considered defects.
Damage due to accidents, abuse, misuse, or neglect are excluded
from this warranty. Tampering and attempted repairs by unauthorized personnel voids warranty coverage. Instruments with missing
or altered serial numbers are excluded from this warranty. This warranty does not include a promise of specific hearing improvement.
This warranty is exclusive, and is in lieu of all other warranties,
express or implied, including but not limited to, the implied
warranties of merchantability or fitness for a particular purpose.
We do not accept liability beyond the remedies provided for in
this limited warranty or for consequential or incidental damages.
This warranty gives you specific legal rights, and you may also
have other rights which vary from state to state. Some states do
not allow limitations on how long an implied warranty lasts or
limitations on incidental or consequential damages, so the above
limitations or exclusions may not apply to you.
23
User Guide
7/8/07
11:47 AM
Page 24
If you have any questions, or your hearing protection
requires service, please contact your hearing professional:
E.A.R./Insta-Mold, Inc. • P.O. Box 18888
Boulder, CO. 80308 U.S.A. • (800) 525-2690
(303) 447-2619 • E-mail: [email protected]
www.earinc.com • www.freehearingtest.com