1
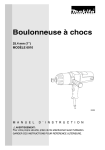
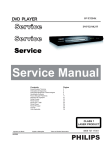
I. Common Troubleshooting Fixes within the Kimoto RIP software
A. Installation of the Printer Driver (Step 1 on the Installation CD) and RIP (Step 2 on the Installation CD)
It is necessary to install the printer driver BEFORE the RIP software. The Printer Driver installation is located towards the end of the
RIP Manual in Appendix D. Please install the information in Appendix D first, and install the RIP software only after the printer
driver is installed.
B. How to check if both the Printer Driver and RIP software is installed in your printer folder
1.
2.
3.
4.
5.
Click the START button in the lower left corner of the Windows desktop screen.
Click on the CONTROL PANEL.
Click on the PRINTERS folder.
There should be two printer icons:
a. KIMOTO Kimosetter 340 (Printer Driver)
b. Kimosetter 340 RIP (RIP Driver for Hot Folder)
If one or both of these icons do not appear, then the software is only partially installed
C. ERROR MESSAGE: “Cannot Allocate Port.”
1.
2.
3.
4.
5.
Make sure the RIP software is open.
Click SETUP.
Click SETUP PROPERTIES.
Click the GENERAL tab.
Enter the correct port in the Port window (See example below).
The correct port should read USBxxx (KMT340A). Examples of this are USB001 (KMT340A), USB002 (KMT340A),
USB003 (KMT340A)…and so on. The 3-digit number may change depending on if other Kimosetter 340s have been
previously installed or if other devices occupy the computer’s USB ports.
Figure #1
Other PORT issues:
•
The port window will appear blank if the Kimosetter
340 is not turned on.
•
If the port window is still blank then re-select the
correct port.
•
If USBxxx (KMT340A) still does not appear in the
pull-down window, then the USB port was not
chosen as the correct device port during installation.
1
D. Nothing prints through the RIP or even goes through the RIP dialog queue. Check the following two
settings. There could possibly be a mislabeled port in your Printers folder. To check this:
1.
Printer Driver Port Assignment
a. Click the START button in the lower left corner of the Windows desktop screen.
b. Click on the CONTROL PANEL.
c. Click on the PRINTERS folder.
d. Right click on the KIMOTO Kimosetter 340 (Printer Driver) icon.
e. Click PROPERTIES.
f. Click the PORTS tab – the correct box should be checked. The window should appear as below.
Figure #2
Note: The correct port (in this example USB001) should be
the same as the first 6 characters in the port setting inside of the
RIP software, under the port window box (Figure #1).
2.
Hot Folder (Kimosetter 340 printer icon) assignment
a. Click the START button in the lower left corner of the Windows desktop screen
b. Click on the CONTROL PANEL.
c. Click on the PRINTERS folder.
d. Right click on the KIMOSETTER 340 RIP (Hot folder/ RIP driver) icon.
e. Click PROPERTIES.
f. Click the PORTS tab – the correct box should be checked. The window should appear as below.
Figure #3
Note: The checked box is the assignment for the Hot Folder.
This is the folder that the job goes into the RIP software to
print.
2
E. Your job goes to the RIP dialog queue, finishes printing, but the Kimosetter 340 won’t print.
The job folder definition (folder where the RIP sends the job to be printed) could be incorrect. To check if an incorrect folder
is assigned:
1.
2.
3.
Open the RIP software
If the title bar on the top of your RIP reads Kimosetter 340 RIP – Kimosetter 340_1 (Figure #4) then click SETUP.
Click CHANGE SETUP.
Figure #4
4.
Under “Manufacturer:” select KIMOTO and under “Model Name:” select KIMOSETTER 340 and click NEXT.
Figure #5
5.
“Name:” should read Kimosetter 340. “Port:” should read USBxxx (KMT 340A). Click FINISH.
Figure #6
3
6.
You will be prompted to install the postscript printer driver, click OK for this. The RIP software dialog box and title bar
should appear as below (Figure #7).
Figure #7
II. Troubleshooting the Kimosetter 340 unit
If there is a problem with the plate, there are two self-tests that may be tried in order to determine if the Kimosetter unit is working
properly. (A computer hookup is not necessary for these tests. Do NOT use paper for these tests. Use the back of a used plate instead.)
A. Basic Test #1
1.
2.
3.
4.
5.
6.
Plug in the power cord and turn the Kimosetter unit ON.
Press and hold down the READY/INSERT button until the LED lights on the front panel start to flash, then release the
button. (It may take about 5-6 seconds.)
One Kimoplate should feed and start to print a test.
Check the print for any interruptions in the fine lines across the page. (A loupe may be needed.)
If the fine lines are intact and unbroken, then all of the elements in the print heads are firing properly. The lines are designed
to print in a slight step pattern.
If the fine lines are broken, then you may need to clean the print heads. See below.
B. Diagnostic Test #2
Use this test if you are still unsure if all of the print heads are working properly.
This is a more extensive diagnostic test that will print three (3) plates. However, the first plate is the most important.
1.
2.
3.
4.
5.
6.
Turn the Kimosetter unit OFF.
Remove the USB cable from the port on the Kimosetter.
Press and hold the READY/INSERT button, then the ON/OFF button.
Release the ON/OFF button only.
After 5 seconds, release the READY/INSERT button and the LED lights should start to flash.
While the LED lights are still flashing, press and release the READY/INSERT button once more. A plate should begin to
feed into the printer.
7. After the first plate is printed, press the ON/OFF button to cancel the other two plates.
8. Check the fine lines as described in Steps 4-6 above.
9. While the Kimosetter is still OFF, plug in the USB cable again.
10. Press the ON/OFF button to turn the Kimosetter on again.
4
4/38 Dacre Street
Mitchell ACT 2911
Australia
Ph +61 2 6242 4427
Fax +61 2 6242 5986