1
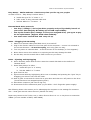
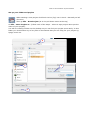
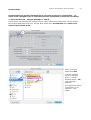
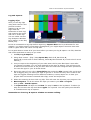
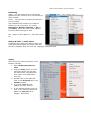
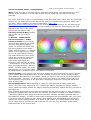
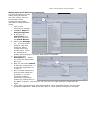
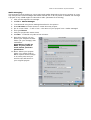
Handbook for Final Cut Pro 5 HD
By Paul Ritchard
This handbook is extremely cursory so refer to the soft manual (Go – Help – Final Cut
HD Help) or you can borrow the manuals.
There should be a soft copy of the Final Cut pro manual on the desktop. It has a
search engine but you often need to know what something is called before you can
find it.
Please note: If you have any suggestions or something is not clear please inform the
teaching staff so they can update it.
Troubleshooting
If computer crashed or frozen:
1. Press option - apple - esc.
2. It will ask you to force quit. Do it
3. If the computer or application is still frozen contact Paul or the tex.
If image or sound not getting to monitor or speakers
1. Make sure mini DV or DVC-pro player is turned on.
2. Make sure switching box (journos) is switched to DV deck
3. still not working in Final Cut go – View – External Video - All Frames
4. still not working - go - View – Refresh A/V Devices
Updated feb 2007
Final Cut Pro Handbook by Paul Ritchard
2
Easy Setup – Media students - Check every time you fire up your project
Go Final Cut Pro - ‘Easy Setup’ & select either –
a. ‘media dvc-pro’ for ‘V’ suites 1 - 6
b. ‘HDV 1018i’ if using external HDV deck
c. ‘DV-PAL 48khz’ in ‘J’ suites 1 - 3
External Hard Drive protocols
•
You drop / damage / don’t eject drive properly and you’ll probably lose all of
your work: data integrity & backing up is YOUR responsibility.
•
You fry the firewire port, damage or lose your assigned drive, you agree to pay
for its replacement. (Approx. HDD value $450.00)
•
You must reset ‘scratch disk’ and ‘easy set up’
Rules – Plugging in & Mounting
1. Make sure external HDD (Hard Disk Drive) is turned off.
2. Plug in the firewire cable into the front port of the computer – ensure it is oriented in
the correct direction – do not force plug, as it only goes one way.
3. Turn on power to external HDD – it should mount on the desktop (ie. Icon appears).
4. Note: Never move drive whilst on or spinning as this may damage the disk.
5. On the Mac, set the scratch disk in Final Cut Pro to your drive.
Rules – Ejecting and Unplugging
6. When finished, within Final Cut Pro reset the scratch disk back to the default of
‘Student Work’
7. Reset ‘Easy Setup’ to either a. ‘media dvc-pro’ in ‘V’ suites;
b. ‘DV-PAL 48khz’ in ‘J’ suites.
8. Quit Final Cut Pro.
9. Eject external HDD by highlighting drive icon on desktop and pressing the ‘eject’ key or
dragging your drive’s icon into the trash.
10. Wait a good 10 seconds for the drive to spin down and then turn off power to the drive
(check that drive has stopped spinning first!).
11. Shut down computer (No need to log out)
12. Disconnect firewire cables and pack up your HDD – don’t forget the power supply!
Not following these rules means you’re sabotaging the computer or its settings for someone
else – what goes around comes around. (Karma is a bitch).
Report any issues to the Techs a.s.a.p. either face-to-face in 6.1.1 or via phone on extension
52848 (or from outside of RMIT, 9925 2848).
Final Cut Pro Handbook by Paul Ritchard
Set up your folder and project
When starting a new project click Final Cut Pro (fcp) icon in dock – Normally on left
of screen.
Then go File – New Project (as in the pull down menu at the top)
Go File – Save Project as
name of your project).
(Follow each of the steps – where it says project name put the
You will be creating a folder on the desktop so you can find your project more easily. In this
folder you should store any of any files or documents that you are using for your project eg.
Jpegs, music etc.
4
1
1
1
3
1
2
1
3
Final Cut Pro Handbook by Paul Ritchard
4
Scratch Disks
Scratch disks are already allocated but if you need to set your scratch disk - (it
needs to be changed if you or someone else has introduced an external hard drive)
Go Final Cut Pro HD – System Settings or shift Q
This is where you allocate the location of your video, audio and render files. All the files for
the project might take from 5 to 100 gb. Only select one ‘Scratch Disk’ i.e. if there are
others ticked untick them
c
1
Click (c) all four
boxes then Set.
1
2
1 Select ‘student
work’ or ‘student
drive’ – usually
marked yellow - OR
your external
hardrive
2 In that drive select
‘fcp scratch’ or on
external - your
folder.
Final Cut Pro Handbook by Paul Ritchard
5
Log and Capture
Logging clips
Here you will log clips
using deck control. This
process involves
marking in & out (the
begin and end
timecodes of each clip)
and entering the name
and reel # of the clip.
You can either use the
Log & Capture Window
keys (above) or the Key
Board (left).
I
O
In FCP it is essential to log clips before capturing. Capture Now can be problematic for two
reasons: you might capture unnecessary footage and; you might capture across a time code
break or glitch which can cause corrupt files.
It is a good idea to create all of your bins before you start your log & capture. Go File, New Bin
and create and label as many as you need.
1. Go File, Log & Capture
2. Using deck control - (Play / Stop Space Bar, Mark In I, Mark Out O,
Rewind J (1 touch slow 3 touch fastest), Pause K, Fast Forward L (1 touch slow 3 touch
fastest))
3. Cue your tape to the beginning of your shot enter the In point I at least 2 secs after
you started recording. You can keep hitting I as the tape is playing. This will move the
In Point once the In Point is set you then enter the Out Point using the same procedure.
You can also type in your In & Out Points.
4. Enter the name of your clip in Description then select the Bin (Control click on bin and
set as logging bin) you want your clips to go into it. If there are any more a than a few
clips we suggest creating bins for different locations, scenes, tapes etc. so that your
project does not become cluttered with clips, music and sequences.
5. When this entering is done click Log Clip. This will enter the clip into your project or bin.
6. Batch Capture. To do this select the clips you want in your Bin or Project
then go File – Batch Capture.
7. To Capture Now roll tape and hit Now. To stop hit esc on the keyboard. To abort (to
stop and not save the clip hold down apple. for a period. You will quickly see that this
is a cumbersome way to capture.
Remember to close Log & Capture window to resume editing.
6
Final Cut Pro Handbook by Paul Ritchard
5
1
1
1
2
1
4
1
7
8
6
1
3
1
1 1 The Viewer You use it to watch individual clips, mark edit points, and apply effects.
2 The Canvas displays the composited results of the edited sequence as you are creating it.
3 The Timeline or Sequence displays a chronological view of a sequence. As you drag the
playhead along the Timeline ruler, the current frame of the sequence is updated in the Canvas
window and vice versa. Video tracks are displayed in descending order.
4 The Browser is used to organize and locate the source material for your project and the
finished product. The Browser is not a collection of files; it is a collection of references to files,
which you organize in the context of your project.
5 The Pull Down Menus are at the top of the screen and offer many options, including HELP
6 The Tool Palette contains tools for selecting and manipulating items in the Sequence (and
Canvas) **NOTICE** there are familiar tools like the Magnifying glass to zoom in and out of
the Timeline, the Hand tool to move around, etc. Move and pause mouse over tool to read its
name label, and there are tools that have hidden tools underneath which are accessed by
clicking and holding on them.
7 Linked Selection (Left Button) If this is green Video & Audio are linked and will move
together.
Snapping (Right Button) If this is green clips and tools will ‘snap’ to the one closest or to
the Playhead.
8 Playhead
Final Cut Pro Handbook by Paul Ritchard
7
The Sequence (Timeline)
1. Drag desired clip from bin to sequence, drop it into the V1 (Video track One) row of the
sequence
2. Drag the next clip into sequence, placing it either next to the first clip, or in another
track. Creating another track is achieved by dragging a clip so that it is above the
default V1 track and dropping it in the blank space. There can be 99 layers of video
and audio.
3. To play the Timeline, position the playhead at the beginning of the clip by clicking the
mouse there and press the space bar.
4. There are many ways to navigate around the sequence:
a. Scrub (click-drag) the playhead left or right. This
is made easier by Zooming in or out.
Press apple + or - or
Zoom in Tool (Z) or,
View Slider (diag. 1)
1
2
3
1
1
1
3
1
1
3
1
b. scroll with arrows (diag. 2)
1
c. move the slider left or right (diag. 3)
d. use the
playhead in the
canvas window
(diag. 4).
3
3
1
2
4
3
1
1
Tool Palette
To the right is an inconspicuous vertical bar. This is the tool palette with 9 icons.
When you click on an icon it will expand to show you options in the same family of
tools.
1. The most commonly used tool is the default selector at the top. The top three
icons are selector tools of some kind or other. These are to highlight clips and
move them.
2. The next three icons are edit tools: roll, ripple, slip, slide, and razor blade.
These are to trim and help you match motion in a movement sequence or to
sync movement to sound.
3. The 7th icon is for view tools. These make clips in the Timeline larger or
smaller.
4. The 8th is for image modification tools. These are for cropping or distorting
the image.
5. The 9th is for keyframe tools. These are to create or delete keyframes.
Especially helpful on a motion path or audio graph.
You will become familiar with these as you work with your clips in the Timeline.
To select a tool either click on that icon or use the keyboard shortcuts. Holding the
pointer over the icon will tell you what the icon is and its keyboard shortcut. (A –
Selection Tool, B – Razor Blade Tool etc)
Final Cut Pro Handbook by Paul Ritchard
8
Editing
Putting a program together means putting clips, or parts of clips into a sequence. You do not
have to start at the beginning. You can build sequences of sections and then copy these
sections into a new sequence. If you have a sequence that you like, you should make a copy of
it before tweaking it further so that you can always go back to something you liked if your new
idea doesn’t pan out. You can make multiple versions of a sequence to try out ideas.
The first objective in editing is to get the program flowing, to get your clips in the correct
order, and to make sense out of your story. This can be done with straight cuts that do not
require rendering (which eats time). Save all transitions, and effects until you are happy with
your straight cut edit.
1. Double click the first clip you want to use in the browser window. It will appear in the
source window (on the left).
2. Play the clip by hitting the space bar, and stop it when you get to the place you want to
make the in edit. You can use the left and right arrow keys to move back and forth a
frame at a time to find your exact edit point.
3. When you find the edit point, press the I key (for IN)
4. Then Play the clip until you get to the end of the part you want to use and when you
have the precise frame, hit the O key (for OUT)
5. Pick up the clip by clicking on the image in the Viewer window and drag in to the
sequence window it will give you options like insert or overwrite. Choose one – this will
then place the clip you have trimmed into the sequence where the play-head is placed
in the way you have chosen. Or just place it into the sequence or drop it back into the
Browser
6. Or pick up the clip from the browser and place into the sequence to trim it there. Pick
up the In Point by placing the Selection Tool (keyboard shortcut A (for Arrow)) over the
beginning of the clip – click and trim.
7. Or, in the sequence split the clip with the blade tool (B) or hit ctrl v (split at playhead)
Moving clips or blocks of clips around.
If you need to insert a clip amongst many others here are some ways to do it.
1. It is safest to make a gap to insert it otherwise you can put audio or graphic clips out of
alignment with other clips.
2. To make a gap:
a. Apple click on the clips you need to move to select them then pick them up and
move them to the right.
b. Click drag to the side of the clips then continue over the clips to select them
(marquee) then move them to the right.
c. tttt The preferred method is to use the track tool. Hit ‘t’ four times this will
select everything to the right of the playhead – then move the selected clips to
the right.
3. To move vision or sound independent of one another
Sometimes you will need to separate vision or sound.
Hit the ‘Linked Selection’ tool – (Shift-L) - top right of the sequence. This will unlink
the two – remember to reset.
9
Final Cut Pro Handbook by Paul Ritchard
Audio
1. Click on the Audio Keyframe tool (1)
2. Using the pen tool (2) you can click and
drag - creating and moving keyframes to
change the level at that point in time. The
audio will increase or decrease to the next
keyframe or the end of the clip.
1
2
3
1
1
3
1
1
3. Or use the selection tool to click drag the whole line up or down to change overall clip
volume.
4. Your audio should peak at the –12db point in the
audio meter
2
2
3
1
1
3
2
3
1
1
3
1
1
3
1
1
Effects
There are numerous effects which can be divided into three categories: transition, filters and
generators.
Transitions
1. To use a basic transition, you must have two adjacent clips that have been trimmed at
the tail of the first and the head of the second. ie. There is an overlap created.
2. Click on the intersection of the two clips. The transition shape will appear then hit
apple-T. The default cross dissolve will appear.
3. To change length of dissolve drag (1) and to slide disslolve- drag (2)
or my prefered method
4. Using the pen tool as outlined in audio above you can alter the opacity and do vision
fadeouts
1
2
3
1
1
3
1
1
2
2
3
1
1
3
1
1
Final Cut Pro Handbook by Paul Ritchard
Rendering
Video – you will notice that a red line has
appeared in the Timeline over the effects you
have created.
Audio - you will hear a beeping sound when
you try & play.
This indicates they need to be rendered
before you can view them. To render
Sequence > Render Selection > All (or
just Video) There are many other options
here but that’s enough for now.
OR – apple ‘A’ then apple ‘R’ – this will render
all
Effects & Video / Audio Filters
Go Effects then apply the effect or filter you
need then Render Open the Video Filter bin.
Choose a different filter for each clip. Highlight, drag and drop.
Titling
Titles using the Video Generator in the
Browser window.
1. Select Video Generators >
Text
2. Drag the Text (Title) in to the
sequence above the clip that
the title will be superimposed
onto. Make sure playhead is
over clip.
3. Double click on the title and
click on the Controls tab in the
Viewer window.
4. Type over SAMPLE TEXT
change the font, size etc.
5. In the Canvas window you can
pick up the title and position it.
Make sure Canvas set to
Image + Wireframe
10
Final Cut Pro Handbook by Paul Ritchard
Pt 2 - Finishing the Edit in Final Cut Pro
Text on Screen
A suggestion for text on screen in Final Cut Pro
Once you have your Text clip which you’ve got from
Video Generators you can start manipulating the title to
get it working graphically. These are some select tips:
1. Select Colour (1) and change the colour so that it
is in contrast with the background image – to stop
it ‘reversing out’. i.e. white on black (dark)
2. Increase the Tracking (2) so it is not too ‘bunched
up’
3. Then try a Drop Shadow(3) under the motion
Tab. Changing the Offset can make it a border that
makes white text stand out on white or bright
areas.
Start refining the font, colour, size, shadow, tracking,
placement, aspect etc. of your text as you are editing. Unless you’re well trained in
graphics it takes a long time before the text on screen becomes ‘resolved’.
1
1
2
3
1
11
Final Cut Pro Handbook by Paul Ritchard
12
Supers for journos (in the J suites)
Open the journo template on the desktop. In the sequence there will be the clockleader and
some template supers.
1. Select both the blue bar and text ie. Shift click or click drag.
2. Copy both and paste into your sequence above the vision where it is needed
3. Double click on the title and click on the Controls tab in the Viewer window.
4. Type over SAMPLE TEXT change the font, size etc.
5. If it needs rendering refer to page 9
Adding Motion to your title
1. Double-click on the title clip so it reappears in the viewer.
2. Click on the Motion tab.
3. Open Basic Motion.
4. Make sure the playhead in the viewer is at the beginning of the title.
5. Adjust the scale, the rotation, the center, and the anchor point by moving the sliders or
typing in a value. As you tab the changes will appear on the screen.
6. To secure these changes at the beginning of the clip, click on the green keyframe
button. This creates a keyframe on the graph.
7. Drag the playhead forward in the viewer.
8. Once again, change the values of scale, rotation, center and anchor point. As you
change the value, a new keyframe is created on the graph. This is creating motion
9. Drag the playhead another few seconds forward and change the values.
10. Finally, drag the playhead to the end of the title and change the values.
11. By dragging the playhead you can review what you've done. If you want to change
these values you can skip forward or backward by clicking on the arrows on either side
of the green keyframe buttons.
12. Render your Title.
Recording Voiceover (for journos)
To record voiceover you can capture it straight onto the computer without vision – this is how.
1. Go File, Log and Capture (close this window when finished)
2. click on the Clip Settings tab
3. change capture from aud + vid to audio only
4. then click on Capture Settings tab
5. change device control from firewire pal to non controllable device
6. change input select on video recorder to a3 then turn speakers down
7. when you are ready to record hit Capture ‘Now’
8. hit esc on keyboard to stop capturing
When finished - reset all settings or you are sabotaging the next user!
Final Cut Pro Handbook by Paul Ritchard
13
Importing music from a CD
Importing jpegs, gifs, stills, quicktimes etc.
Drag the tracks or files you need into your folder.
Note: You should have copyright clearance or use copyright free music.
Open a Bin to place it in.
Choose File>Import. Go to your folder. Open the CD. Import the Track.
Exporting to quicktime – full quality and making DVDs
1. In your finished sequence go File Export to Quicktime (save it into student drive in a
folder with your name or film on it)
2. Check the ‘Make Movie Self Contained’ box
3. This is great for archiving your finished product for show-reel and exhibition as it is full
quality copy of your work.
4. Or drag it into Toast and make a dvd from there.
a. Open Toast
b. Select the Video Tab on the right
c. Under the Advanced tab on the left check DVD-Video
d. Delete the camera in the window and drag your quick time into the window
e. Insert DVD then press ‘big red’
Exporting to quicktime, quicktime conversion & compressor – See Paul for advice
Use these to convert, compress or encode for dvd and web.
Mastering to tape / recording to tape
2 methods:
1. Print to Video
1. Go File > Print to Video
2. Check
a. colour bars (5 secs) and
b. countdown
c. five secs of black at the end.
d. Automatically start recording
3. Insert Tape and cue it up (i.e. not over your footage)
4. Press ‘ OK’
5. Journos – once that is done got to the dub suite near tex office and dub to vhs
or dvd
2. crash recording – only when you cannot ‘Print to Video’
1. Place the playhead at the beginning of the sequence in black
2. Roll the record deck i.e. press play and record for five secs
3. Press play in the sequence
4. Once the program has played out let the deck continue to record for another five
secs
Final Cut Pro Handbook by Paul Ritchard
14
Colour correction and or / manipulation.
Note: Check the hard or soft manuals for extensive explanations. The soft manual is on the
desktop of the computer or under Help in Final Cut Pro. Staff and techs have hard copy
manuals.
The colour spectrum of light is a combination of Red, Blue and Green. When they are combined
equally you get white whereas with paint & ink when you combine Red, Blue and Yellow you
get black. Paint is additive and light is subtractive. (http://ianalbert.com/graphics/addsubcolor.php) If you look at the colour spectrum you see that Red at
11 o’clock is opposite Cyan at 5 o’clock. If you subtract cyan from an image it goes red. The
top half of the circle is the warm
colours and the bottom cold.
Colour Corrector 3-Way. Double
click on the clip you need to
change.
Go Effects > Video Filters >
Colour Correction > 3-Way
Colour Corrector. If you had an
incorrect white balance you could
correct a blue cast by adding
yellow. To do this you would drag
the colour pointer in the whites
slowly away from blue. i.e. towards
yellow. If it is required you would
do it in the mids and the blacks.
The slider below the colour wheel
adjust the Luminance (exposure)
of the blacks for example. The
slider below that adjust the
Saturation (the intensity of colour
– Chrominance. If you slid it to the
left it would de-saturate – Black &
White – monochromatic. The Limit
Effect allows you to Limit the effect
of manipulation to a specific colour, saturation or luminance.
Colour Grading. Your colours, hues should be designed in pre-production but there is always
colour grading and manipulation done in post. Grading is where you correct exposures and
white balance discrepancies in the editing. (When you shoot in film you do this at the transfer
to video process – telecine.) You find a shot in the scene that is the master shot or the most
colour/exposure correct shot or the shot that is hardest to correct etc. and grade/match the
other shots to that.
Colour Manipulation. When shooting on video you often attempt to make it look more
‘filmic’. There are many ways to do this – blacken the blacks, saturate the colours, make it
cooler, soften the image, feather the edges, drop the second field, scratch the film, put dust on
the image etc.
Many of these effects take it away from the natural, but flat look of video. An easy method is
to make the image cooler and increase the contrast. (A common mistake is to make it warmer
– this often makes it look murky and colours lose their contrast- warmth is genrally done in
the production design). To make it cooler start in the blacks and slide towards cyan. You could
try it in the mids and whites as well. When colour grading and manipulating only spend five
minutes on it every editing session. It is easier to get caught up in it and waste hours. Once
you’re happy with it, towards the end of the fine cut, you can copy and paste those effect
attributes to all of the desired clips.
Final Cut Pro Handbook by Paul Ritchard
15
Making Mpeg2s for DVD using compressor
This process makes the best
quality mpeg2s because
you have control over the
compression and it
compresses clip specific
(see Seth’s DVD production
guide).
1
2
3
1
1
3
1
1
1. Click on the
sequence to manage
2. Go File > Export >
Using Compressor
3. It will open up
Compressor and
load your sequence
into Batch Monitor
4. Select your Settings
(1) - you will need to
create a video and
audio file. Select
‘media video’ then
‘media audio’. These
are optimized for
quality whilst playing on as many DVD players as possible.
5. Then select the
Destination(2) – where
you want the compressed
file to go.
6. Now you can select Submit
to start the compression – a
10 min film might take up
to 2hrs or
2
2
3
1
1
3
1
1
7. Go to another sequence in
Final Cut and repeat the
procedure – you can
compress multiple
sequences in the batch
monitor by putting them in
the Batch or Queue - this way you can set it off over night because it might take all
night.
8. These files (mpeg2 and ac3 dolby digital audio) can be imported directly into any DVD
production application: DVD studio pro, iDVD or Toast without having to be encoded.
Final Cut Pro Handbook by Paul Ritchard
16
Media Managing
This process involves making a new project and media identical to the source project in every
way except that unused footage and media outside the in & out points is deleted. On average
a project of say 15GB might be reduced to 2GB. (Fantastic for archiving)
1. Click on the sequence to manage
2. Go File > Media Manager
3. I recommend using these settings described in the picture
4. Press Browse to locate where to create this new project.
5. Put in a new folder – I call it ‘mm – the name of your project’ mm: media managed
6. Then go Choose
7. Call your project the same name
8. Go Save - It should only take a few minutes.
9. Once this is done you can
delete your Capture Scratch
folder (all your footage) with
confidence.
Note! Never do this at
RMIT or your place of
work unless you have
permission.
10. Never delete your project
folder. You might need to
Batch capture some footage
in at some point and you
need to clip references in
your original project