1
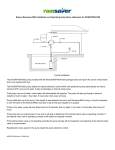
Bianco Rainsaver MK3 Installation and Operating Instructions
The no
brainer.
Bianco Rainsaver MK3 & MK3E
Installation and
Operating Instructions
1
Bianco Rainsaver MK3 Installation and Operating Instructions
This thing will save
water, money and most
importantly time.
Pumps
suitable to use
with Rainsaver
Switch
Submersible pumps.
RS3-JH80003PMPCX
RS3-DIVERTON1200
Surface mounted pumps.
RS3-INOX60PCA
2
RS3-MULTI900PCA
RS3-JETCOM82MAPCX
Bianco Rainsaver MK3 Installation and Operating Instructions
Contents
Bianco Rainsaver MK3 Installation and Operating Instructions. . . . . . 4
1. Introduction . . . . . . . . . . . . . . . . . . . . . . . . . . . . . . . . . . . . . . . . . . . . . . . . . . . . 4
2. General Specifications . . . . . . . . . . . . . . . . . . . . . . . . . . . . . . . . . . . . . . . . . . . . 4
3. Operation. . . . . . . . . . . . . . . . . . . . . . . . . . . . . . . . . . . . . . . . . . . . . . . . . . . . . . 4
4. Installation. . . . . . . . . . . . . . . . . . . . . . . . . . . . . . . . . . . . . . . . . . . . . . . . . . . . . . 4
5. Sound Emissions. . . . . . . . . . . . . . . . . . . . . . . . . . . . . . . . . . . . . . . . . . . . . . . . . 9
6. Maintenance. . . . . . . . . . . . . . . . . . . . . . . . . . . . . . . . . . . . . . . . . . . . . . . . . . . . 9
7. Trouble shooting. . . . . . . . . . . . . . . . . . . . . . . . . . . . . . . . . . . . . . . . . . . . . . . . . 9
Installation Dimensions. . . . . . . . . . . . . . . . . . . . . . . . . . . . . . . . . . . . . . . . . . . . . 10
Typical Installations. . . . . . . . . . . . . . . . . . . . . . . . . . . . . . . . . . . . . . . . . . . . . . . . 10
Bianco Rainsaver MK3 addendum for DIVERTRON1200. . . . . . . . . . . 12
Typical Installation. . . . . . . . . . . . . . . . . . . . . . . . . . . . . . . . . . . . . . . . . . . . . . . . . 12
Bianco Rainsaver MK3E Installation and Operating Instructions. . . . 13
1. Introduction . . . . . . . . . . . . . . . . . . . . . . . . . . . . . . . . . . . . . . . . . . . . . . . . . . . 13
2. General Specifications . . . . . . . . . . . . . . . . . . . . . . . . . . . . . . . . . . . . . . . . . . . 13
3. Operation. . . . . . . . . . . . . . . . . . . . . . . . . . . . . . . . . . . . . . . . . . . . . . . . . . . . . 13
4. Installation. . . . . . . . . . . . . . . . . . . . . . . . . . . . . . . . . . . . . . . . . . . . . . . . . . . . . 13
5. Sound Emissions. . . . . . . . . . . . . . . . . . . . . . . . . . . . . . . . . . . . . . . . . . . . . . . . 17
6. Maintenance. . . . . . . . . . . . . . . . . . . . . . . . . . . . . . . . . . . . . . . . . . . . . . . . . . . 17
7. Trouble shooting. . . . . . . . . . . . . . . . . . . . . . . . . . . . . . . . . . . . . . . . . . . . . . . . 17
Installation Dimensions. . . . . . . . . . . . . . . . . . . . . . . . . . . . . . . . . . . . . . . . . . . . . 18
Typical Installations. . . . . . . . . . . . . . . . . . . . . . . . . . . . . . . . . . . . . . . . . . . . . . . . 18
Terms & Conditions. . . . . . . . . . . . . . . . . . . . . . . . . . . . . . . . . . . . . . . . . . 20
3
Bianco Rainsaver MK3 Installation and Operating Instructions
Bianco Rainsaver
MK3
1. Introduction
The Bianco Rainsaver MK3 is an Automatic Rainwater / Mains
Water Changeover Device designed to provide automatic mains back up
for Pressure Pump supply systems.
The Bianco Rainsaver MK3 is designed to be installed in
conjunction with a Pressure Pump supply system that is fitted with a
FLOAT SWITCH as well as an independent PRESSURE AND
FLOW CONTROLLER with LOSS OF PRIME PROTECTION
and AUTOMATIC RE-START.
WARNING! The Bianco Rainsaver MK3
is NOT A PUMP CONTROLLER!
2. General Specifications
Maximum water temperature (mains + pump): 400 C.
Maximum recommended continuous pump flow: 100 litres per minute.
Maximum recommended pump pressure: 800 kPa.
Maximum recommended mains inlet pressure: 800 kPa.
3. Operation
The Bianco Rainsaver MK3 supplies clean rainwater from a rainwater tank and associated pressure pump system, to toilets, laundry,
garden taps and household.
Mains water is also connected to the Bianco Rainsaver MK3 as an automatic back up.
When the pressure pump ceases to supply water because the float switch has detected that the rain water level in the tank is too low, or
if there is a power or pump failure, the Bianco Rainsaver MK3 will automatically change over to supply mains water to meet the household
needs.
When the rainwater supply is replenished and the float switches the pump back on, or the power is restored to the pump, the pump will
pressurise the Bianco Rainsaver MK3 and the unit will switch back automatically to supplying tank water to the household.
4. Installation
4.1 Pump Float Switch installation
Submersible pumps supplied with the Rainsaver MK3 will have a pump mounted float switch and no adjustments should be necessary,
however, the submersible pump should be positioned so that the float switch cannot touch the sides of the rainwater tank, or be less than
200 mm away horizontally from the rainwater tank inlet or outlet. The submersible pump power lead should be taped to the discharge pipe
to prevent the float switch becoming tangled with the power lead.
Surface mounted pumps supplied with the Rainsaver MK3 will also have a pump mounted float switch which needs to be installed in the
rain water tank.
The float switch for the surface mounted pumps is supplied with an inline connector to assist should the cable be required to run through
conduit. Check that the conduit size is appropriate for the inline connector.
4
Bianco Rainsaver MK3 Installation and Operating Instructions
Important: Switch off power supply and ensure all parts are clean and dry before
unmating and mating the inline connector.
To unmate the connector, pull the collar back in the direction of the arrow.
To mate the connector, line up the alignment ribs, then push the two halves together. Full engagement is indicated by a click.
The float switch supplied prevents the pump from running dry and allows automatic switch over to mains supply. It is supplied complete
with a counterweight and water tank mounting plate, and is designed to enter the rainwater tank from the roof of the rainwater tank.
Choose a location on the roof of the rainwater tank to cut the 85mm hole required. The centre of the hole should be at least 200 mm
away from the side of the tank as well as being 200mm away horizontally from tank rainwater entry and rain water tank outlet. Any shavings
should be removed with a vacuum cleaner.
Uncoil and lay out the float switch cable. Move the counterweight so that it is 200 mm from the float switch.
Position the water tank mounting plate so that the distance between the mounting plate and the end of the float switch is at least 50 mm
less than the depth of the tank when measured from the float switch access hole, and tighten the cable gland and conclamp.
4.2 Rainsaver MK3 installation
The Bianco Rainsaver MK3 can be Wall mounted or Pump Mounted i.e. mounted directly onto a pressure pump outlet. The
steel wall mounting bracket, which is connected to your Bianco Rainsaver MK3, can be rotated to allow the unit to be wall mounted
in either direction, or may be removed for pump mounting.
4.21 Wall Mounting:
The Rainsaver MK3 can be remotely mounted any distance from the pump.
The Rainsaver MK3 can be mounted outdoors on a flat vertical surface.
The Rainsaver MK3 can be mounted with the mains inlet pointing in either direction.
5
Bianco Rainsaver MK3 Installation and Operating Instructions
Wall Mounting Instructions
-
-
-
-
-
-
To reverse the mounting direction, so that “Mains” inlet will be on the left side and “House” outlet on the right, follow the first steps of
Pump Mounting Instructions below to remove and reverse the mounting bracket. Then continue:Remove the Bianco Rainsaver MK3 lid by unscrewing the 4 Phillips head screws
Hold the Bianco Rainsaver MK3 in the desired position and mark the screw centres through the keyhole slots in the mounting
bracket. Return the Bianco Rainsaver MK3 to the box.
Drill and insert mounting hardware into the mounting surface (wall). Insert screws leaving a few millimetres under the head to allow
insertion of the mounting bracket
Mount the Bianco Rainsaver MK3 onto the screws through the keyhole slots in the mounting bracket. Tighten screws to secure
the bracket to the wall
Replace the Bianco Rainsaver MK3 lid and re-tighten the four (4) lid screws.
4.22 Pump Mounting:
Bianco Rainsaver MK3 can be mounted directly onto the outlet of the pump with the adaptor supplied with the Rainsaver–ready
pump. If another size threaded port is found on the pump or controller outlet use quality standard plastic threaded pipe fittings to adapt.
Pump Mounting Instructions
-
-
6
Remove wall mounting bracket by unscrewing the lower (Pump Inlet) union nut using the plastic spanner provided. Remove the union
nut and pipe being careful not to lose any of the internal components.
Unscrew the two bracket holding screws and remove the bracket.
Bianco Rainsaver MK3 Installation and Operating Instructions
-
-
-
-
-
REPLACE THE BRACKET HOLDING SCREWS into the housing. This will stop insects creating a nest inside the Rainsaver Unit.
Replace the lower union nut and pipe being sure that internal components are in place and that the o-ring is properly seated.
Leave the lower union nut slightly loose to allow fitting and alignment to pump.
Attach the ¾” BSPT male pipe fitting to the pump outlet, either directly, or using plastic threaded pipe fittings as required, and tighten
using the spanner provided.
Once the ¾” BSPT pipe fitting is secured to the pump and the Bianco Rainsaver MK3 aligned as required, tighten the lower nut
with the plastic spanner provided.
4.4 Filtration and Water Quality
The Bianco Rainsaver MK3 is designed to operate on clean rainwater and clean Mains water supply, and as such, the rainwater tank
should be fitted with an inlet strainer and a suitable first flush device.
The Bianco Rainsaver MK3 is fitted with internal strainers to ensure continuous reliable service. These internal strainers may restrict
the water flow of the unit, especially if they become clogged, and they should be cleaned periodically.
White International strongly recommends the use of a strainer or filter upstream from both the rainwater and mains inlet connections of
the Bianco Rainsaver MK3. If quality filters are installed upstream from the Rainsaver MK3 inlets, then the supplied internal strainers
can be removed, at the discretion of the installing plumber.
To access the internal strainers, both prior to installation and afterwards for maintenance, undo the inlet union nuts with the spanner
supplied. Pull connection pipe work sideways to reveal the strainer, situated inside the union pipe, and remove for cleaning.
Additional water filters may be required at tap outlets to assist in the filtration of tannins etc that may discolour the water. Also check the
water tank and first flush device manufacturers’ instructions regarding periodic servicing that is required.
4.5 Plumbing
Plumbing connections should be carried out by a licensed plumber.
Use of flexible pipe connections and isolation vales is recommended to assist in alignment and servicing and to reduce any transmitted noise.
Use a standard ¾” compression x F.I. union or Compression x F.I. elbow fitting to connect between ¾” copper tubing and ¾” BSPT
threaded pipe fitting at the “MAINS” inlet, “PUMP INLET” (if unit is wall mounted), and “HOUSE” outlets.
7
Bianco Rainsaver MK3 Installation and Operating Instructions
Use standard ¾” BSP female threaded fittings to connect to ¾” BSPT threaded pipe fitting when connecting other types of piping.
Do NOT remove the union nut and ¾” bspt pipe fitting and attempt to connect
pipe work directly to the body of the unit!
Do NOT attempt to connect copper or plastic pipe, using copper or nylon olives,
and compression nut directly to the ¾” bspt pipe fitting!
Always use the spanner provided, or correct open ended spanner, when tightening fittings.
All pipe-work and outlet fittings from the Bianco Rainsaver MK3 must be labelled to AS3500.
The Bianco Rainsaver MK3 control incorporates a dual check valve to prevent cross connection between mains and rainwater.
Connection to an underground rain water tank, or local water supply authorities, may require additional, or higher safety level, back flow
prevention, and your licensed plumber can advise you on this.
The incorporation of an additional “Tee” fitting between the tank water pressure pump supply, and the Bianco Rainsaver MK3 lower
“PUMP INLET”, will allow the householder to use collected rainwater, but NOT mains water supply, to irrigate gardens and lawns, or wash cars.
4.6 Pressure Tank Outlet
The Bianco Rainsaver MK3 is supplied with an additional outlet specifically designed for the installation of a pressure tank.
The installation of a pressure tank will:
- Reduce wear and tear on your pump by significantly reducing the number of starts
- Reduce your electricity consumption by significantly reducing the number of starts
- Reduce the incidence of “pressure drop” when opening a tap
- Stop your pump kicking in every time you open a tap or because of a small leak, like a dripping tap, or toilet cistern.
To install a WATERMARK approved pressure tank:
- Turn off both mains water supply pressure and your rainwater tank pump and supply
- Open a tap to remove all pressure from the system
- Using the spanner supplied, remove the ¾” plug from the “AUX. OUTLET” port. Note that there is an o-ring inside the body of the
Rainsaver which can be left in place if using a ¾” BSP fitting, or removed if using a ¾” BSPT fitting.
- Use a suitable flexible reinforced hose with ¾” BSP or BSPT MALE THREAD to connect a WATERMARK approved pressure tank such
as a GWS Energy Saver to your Bianco Rainsaver MK3.
- Carefully follow the manufacturer’s instructions regarding pressurization of your pressure tank.
4.7 Pressure Tank Pre-charge.
To ensure optimum performance and system life, the Pressure Tank pre-charge needs to be set by filling the pressure tank with air through
the air valve so that the air pressure is 65% of the pump maximum pressure, according to its maximum performance.
Pre-charge the pressure tank before it is installed by using an air pump or using local service station facilities. C
CAUTIONS
In conjunction with this manual, read and understand the installation and maintenance manual for the water pump that is to be
connected to the Bianco Rainsaver MK3.
The Bianco Rainsaver MK3 and any pump connected to it are not to be used by children or infirm persons and must not be
used as a toy.
A licensed plumber should carry out plumbing connections.
Servicing of the Bianco Rainsaver MK3 and, or water pump should only by carried out by qualified persons.
Do not clean the Bianco Rainsaver MK3 with abrasive or petroleum based fluids, and do not use hydrocarbon propelled sprays
on or around the Bianco Rainsaver MK3.
8
Bianco Rainsaver MK3 Installation and Operating Instructions
5. Sound Emissions
The Bianco Rainsaver MK3 is virtually silent but may emit noises associated with the flow of water through the unit.
In any case, the pump, which is connected to the Bianco Rainsaver MK3, may emit sound levels, which may inconvenience you or your
neighbours, or may operate during normal sleeping hours, which may be prohibited by local government regulations. If this is the case, your
pump can be switched off during the night or may be operated from a time clock.Your Bianco Rainsaver MK3 will automatically supply
your house with Mains water supply while the pump is inactive.
6. Maintenance
Ensure that water flowing through the Bianco Rainsaver MK3 is as free from dirt and foreign matter as conditions allow.
If you rarely run out of rain water and do not turn your pump off at night, operate the valve within the Bianco Rainsaver MK3 at least
monthly by switching off the power to your pump and flushing a toilet, or opening a tap connected to the system, thus allowing mains water
to flow through the unit for a short period of time.
Periodic inspection and cleaning of the units internal components is highly recommended.Your plumber can perform this work, and can
advise on the maintenance periods as dictated by individual situations and water quality.
7. Trouble shooting
Consult the manuals supplied with the water pump and its controller if fitted in addition to the following guide.
1.
Mains flow is not available or low when Pump is switched off or not operating.
a. Isolation valve, if fitted, is not open.
b. Debris has jammed the check valve closed or is caught in the moving parts or bleed hole of the internal valve.
c. External Inlet strainer / filter, if fitted, is blocked.
d. Internal inlet strainer is blocked.
2.
Pump flow is not available or low when pump is operating through Bianco Rainsaver MK3.
a. Pump has lost its prime.
b. Isolation valve, if fitted, is not open.
c. Debris has jammed the internal check valve closed, or has blocked the check valve.
d. External Inlet strainer / filter, if fitted, is blocked.
e. Internal inlet strainer is blocked.
For after sales service please contact White International Customer Service: 1300 783 601.
9
Bianco Rainsaver MK3 Installation and Operating Instructions
Installation Dimensions
DAB or BIANCO Surface Mounted Pumps
Typical Installations
10
Bianco Rainsaver MK3 Installation and Operating Instructions
TESLA DIVERMAPCX Submersible Pump
Typical Installations
BIANCO JH8003PMPCX Submersible Pump
Typical Installations
11
Bianco Rainsaver MK3 Installation and Operating Instructions
Bianco Rainsaver
MK3
addendum for DIVERTRON1200
Typical Installation
The DIVERTRON1200 pump included with the RS3-DIVERTRON1200 package does not require the use of a float switch and is
not supplied with one.
The DIVERTRON1200 pump utilises an internal electronic control which will operate the pump automatically as well as turning it off if
it runs out of water. It also incorporates an internal check valve.
If the pump runs out of water, mains water will automatically be supplied. The pump will also go through a series of restarts to look for
water 1 hour later, 5 hours later, then every 24 hours.
During initial start up of the pump, if the length of pipe between the pump and RainsaverMK3 is long, it may be necessary to turn off mains
to the RainsaverMK3 and open a tap so that any trapped air is purged.
If there is no water, pump will retry three times for 30 seconds, then try again 1 hour later, 5 hours later, then every 24 hours.
If the pump has run continuously for one hour it will stop to determine if the internal check valve is operating correctly. If the internal
check vale is operating correctly it will restart and operate normally.
If the internal check valve is not operating correctly the pump will stay off and inspection and cleaning of the internal check valve is
recommended.
Resetting the mains power to the pump resets the pump electronic control.
12
Bianco Rainsaver MK3E Installation and Operating Instructions
Bianco Rainsaver MK3 Installation and Operating Instructions
Bianco Rainsaver MK3E
1. Introduction
The Rainsaver MK3E is an Automatic Rainwater / Mains Water
Changeover Device designed to provide automatic mains back up for
Pressure Pump supply systems.
The Rainsaver MK3E is designed to be installed in conjunction
with a Pressure Pump supply system that is fitted with an independent
PRESSURE AND FLOW CONTROLLER with LOSS OF
PRIME PROTECTION and AUTOMATIC RE-START.
WARNING! The Bianco Rainsaver MK3E
is NOT A PUMP CONTROLLER!
2. General Specifications
Controls pumps to a maximum 1.5 hp, 1.1 kW 240V.
Maximum water temperature (mains + pump): 400 C.
Maximum recommended continuous pump flow: 100 litres per minute.
Maximum recommended pump pressure: 800 kPa.
Maximum recommended mains inlet pressure: 800 kPa.
3. Operation
The RainsaverMK3E supplies clean rainwater from a rainwater tank via an automatic pressure system pump to toilets, laundry and
garden taps in a household.
Mains water is also connected to the RainsaverMK3 as an automatic back up should rain water level be too low, or if there is a power or
pump* failure).
*Should there be a pump failure, mains back up is achieved by turning the RainsaverMK3E off at the power point.
The low voltage float switch supplied prevents the pump from running dry and allows automatic switch over to mains supply should the
rain water level in the tank be too low.
4. Installation
4.1 Pump Float Switch installation
The 10m low voltage float switch supplied prevents the pump from running dry and allows automatic switch over to mains supply. It is
supplied complete with a counterweight and water tank mounting plate, and is designed to enter the rainwater tank from the roof of the
rainwater tank.
Choose a location on the roof of the rainwater tank to cut the 85mm hole required. The centre of the hole should be at least 200 mm
away from the side of the tank as well as being 200mm away horizontally from tank rainwater entry and rain water tank outlet. Any shavings
should be removed with a vacuum cleaner.
Uncoil and lay out the float switch cable. Move the counterweight so that it is 300 mm from the float switch. Tighten the cable gland
on the counterweight to lock it in position.
13
Bianco Rainsaver MK3 Installation and Operating Instructions
Bianco Rainsaver MK3E Installation and Operating Instructions
Position the float switch cable in the water tank mounting plate so that the distance between the mounting plate and the end of the float
switch is at least 100 mm less than the depth of the tank when measured from the float switch access hole, and
tighten the cable gland and conclamp.
Submersible pumps supplied with the RainsaverMK3E may have a pump mounted float switch which needs to be cable tied so that it is
always in the vertical position.
4.2 RainsaverMK3E installation.
The RainsaverMK3E can be Wall mounted or Pump Mounted i.e. mounted directly onto a pressure pump outlet. The steel wall
mounting bracket, which is connected to your RainsaverMK3E, can be rotated to allow the unit to be wall mounted in either direction,
or may be removed for pump mounting.
4.21 Wall Mounting:
The RainsaverMK3E can be mounted outdoors on a flat vertical surface.
The RainsaverMK3E can be mounted with the mains inlet pointing in either direction.
Wall Mounting Instructions:
-
-
-
-
-
-
14
To reverse the mounting direction, so that “Mains” inlet will be on the left side and “House” outlet on the right, follow the first steps of
Pump Mounting Instructions below to remove and reverse the mounting bracket. Then continue:Remove the RainsaverMK3E lid by unscrewing the 4 Phillips head screws
Hold the RainsaverMK3E in the desired position and mark the screw centres through the keyhole slots in the mounting bracket.
Return the RainsaverMK3E to the box.
Drill and insert mounting hardware into the mounting surface (wall). Insert screws leaving a few millimetres under the head to allow
insertion of the mounting bracket
Mount the RainsaverMK3E onto the screws through the keyhole slots in the mounting bracket. Tighten screws to secure the
bracket to the wall
Replace the RainsaverMK3E lid and re-tighten the four (4) lid screws.
Bianco Rainsaver MK3E Installation and Operating Instructions
Bianco Rainsaver MK3 Installation and Operating Instructions
4.22 Pump Mounting
RainsaverMK3E can be mounted directly onto the outlet of the pump with the adaptor supplied. If another size threaded port is found on
the pump or controller outlet use quality standard plastic threaded pipe fittings to adapt.
Pump Mounting Instructions:
- Remove wall mounting bracket by unscrewing the lower (Pump Inlet) union nut using the plastic spanner provided. Remove the union
nut and pipe being careful not to lose any of the internal components.
- Unscrew the two bracket holding screws and remove the bracket.
- REPLACE THE BRACKET HOLDING SCREWS into the housing. This will stop insects creating a nest inside the Rainsaver Unit.
- Replace the lower union nut and pipe being sure that internal components are in place and that the o-ring is properly seated.
- Leave the lower union nut slightly loose to allow fitting and alignment to pump.
- Attach the ¾” BSPT male pipe fitting to the pump outlet, either directly, or using plastic threaded pipe fittings as required, and tighten
using the spanner provided.
- Once the ¾” BSPT pipe fitting is secured to the pump and the RainsaverMK3E aligned as required, tighten the lower nut with the
plastic spanner provided.
Surface pump, inline pressure tank.
4.4 Filtration and Water Quality
The RainsaverMK3E is designed to operate on clean rainwater and clean Mains water supply, and as such, the rainwater tank should be
fitted with an inlet strainer and a suitable first flush device.
The RainsaverMK3E is fitted with internal strainers to ensure continuous reliable service. These internal strainers may restrict the
water flow of the unit, especially if they become clogged, and they should be cleaned periodically.
White International strongly recommends the use of a strainer or filter upstream from both the rainwater and mains inlet connections of
the RainsaverMK3E. If quality filters are installed upstream from the RainsaverMK3E inlets, then the supplied internal strainers can
be removed, at the discretion of the installing plumber.
To access the internal strainers, both prior to installation and afterwards for maintenance, undo the inlet union nuts with the spanner
supplied. Pull connection pipe work sideways to reveal the strainer, situated inside the union pipe, and remove for cleaning.
Additional water filters may be required at tap outlets to assist in the filtration of tannins etc that may discolour the water. Also check the
water tank and first flush device manufacturers’ instructions regarding periodic servicing that is required.
15
Bianco Rainsaver MK3 Installation and Operating Instructions
Bianco Rainsaver MK3E Installation and Operating Instructions
4.5 Plumbing
Plumbing connections should be carried out by a licensed plumber.
Use of flexible pipe connections and isolation vales is recommended to assist in alignment and servicing and to reduce any transmitted noise.
Use a standard ¾” compression x F.I. union or Compression x F.I. elbow fitting to connect between ¾” copper tubing and ¾” BSPT
threaded pipe fitting at the “MAINS” inlet, “PUMP INLET” (if unit is wall mounted), and “HOUSE” outlets.
Use standard ¾” BSP female threaded fittings to connect to ¾” BSPT threaded pipe fitting when connecting other types of piping.
Do NOT remove the union nut and ¾” bspt pipe fitting and attempt to
connect pipe work directly to the body of the unit!
Do NOT attempt to connect copper or plastic pipe, using copper or nylon olives,
and compression nut directly to the ¾” bspt pipe fitting!
Always use the spanner provided, or correct open ended spanner, when tightening fittings.
All pipe-work and outlet fittings from the RainsaverMK3E must be labelled to AS3500.
The RainsaverMK3E control incorporates a dual check valve to prevent cross connection between mains and rainwater. Connection to
an underground rain water tank, or local water supply authorities, may require additional, or higher safety level, back flow prevention, and
your licensed plumber can advise you on this.
The incorporation of an additional “Tee” fitting between the tank water pressure pump supply, and the RainsaverMK3E lower “PUMP
INLET”, will allow the householder to use collected rainwater, but NOT mains water supply, to irrigate gardens and lawns, or wash cars.
4.6 Pressure Tank Outlet
The RainsaverMK3E is supplied with an additional outlet specifically designed for the installation of a pressure tank.
The installation of a pressure tank will:
- Reduce wear and tear on your pump by significantly reducing the number of starts
- Reduce your electricity consumption by significantly reducing the number of starts
- Reduce the incidence of “pressure drop” when opening a tap
- Stop your pump kicking in every time you open a tap or because of a small leak, like a dripping tap, or toilet cistern.
To install a WATERMARK approved pressure tank:
- Turn off both mains water supply pressure and your rainwater tank pump and supply
- Open a tap to remove all pressure from the system
- Using the spanner supplied, remove the ¾” plug from the “AUX. OUTLET” port. Note that there is an o-ring inside the body of the
Rainsaver which can be left in place if using a ¾” BSP fitting, or removed if using a ¾” BSPT fitting.
- Use a suitable flexible reinforced hose with ¾” BSP or BSPT MALE THREAD to connect a WATERMARK approved pressure tank such
as a GWS Energy Saver to your RainsaverMK3E.
- Carefully follow the manufacturer’s instructions regarding pressurization of your pressure tank.
4.7 Pressure Tank Pre-charge.
To ensure optimum performance and system life, the Pressure Tank pre-charge needs to be set by filling the pressure tank with air through
the air valve so that the air pressure is 65% of the pump maximum pressure, according to its maximum performance.
Pre-charge the pressure tank before it is installed by using an air pump or using local service station facilities.
16
Bianco Rainsaver MK3E Installation and Operating Instructions
Bianco Rainsaver MK3 Installation and Operating Instructions
CAUTIONS
In conjunction with this manual, read and understand the installation and maintenance manual for the water pump that is to be
connected to the RainsaverMK3E.
The RainsaverMK3E and any pump connected to it are not to be used by children or infirm persons and must not be used as a toy.
A licensed plumber should carry out plumbing connections.
Servicing of the RainsaverMK3E and, or water pump should only by carried out by qualified persons.
Do not clean the RainsaverMK3E with abrasive or petroleum based fluids, and do not use hydrocarbon propelled sprays on or
around the RainsaverMK3E.
5. Sound Emissions
The RainsaverMK3E is virtually silent but may emit noises associated with the flow of water through the unit.
In any case, the pump, which is connected to the RainsaverMK3E, may emit sound levels, which may inconvenience you or your
neighbours, or may operate during normal sleeping hours, which may be prohibited by local government regulations. If this is the case, your
RainsaverMK3 can be switched off during the night or may be operated from a time clock.Your RainsaverMK3E will automatically
supply your house with Mains water supply while the pump is inactive.
6. Maintenance
Ensure that water flowing through the RainsaverMK3E is as free from dirt and foreign matter as conditions allow.
Periodically inspect the rainwater tank inlet strainer and the first flush device. Periodically inspect strainers if fitted upstream from the
RainsaverMK3E.
Periodically inspect and clean the internal strainers at “MAINS” inlet and “PUMP INLET”. To access the internal strainers, undo the inlet
union nuts with the spanner supplied. Pull connection pipe work sideways to reveal the strainer, situated inside the union pipe, and remove
for cleaning.
If you rarely run out of rain water and do not turn your pump off at night, operate the valve within the RainsaverMK3E at least monthly
by switching off the power to your pump and flushing a toilet, or opening a tap connected to the system, thus allowing mains water to flow
through the unit for a short period of time.
Periodic inspection and cleaning of the units internal components is highly recommended.Your plumber can perform this work, and can
advise on the maintenance periods as dictated by individual situations and water quality.
7. Trouble shooting
Consult the manuals supplied with the water pump and its controller if fitted in addition to the following guide.
1.
Mains flow is not available or low when RainsaverMK3E is switched off.
a. Isolation valve, if fitted, is not open.
b. Debris has jammed the check valve closed or is caught in the moving parts or bleed hole of the internal valve.
c. External Inlet strainer / filter, if fitted, is blocked.
d. Internal inlet strainer is blocked.
2.
Pump flow is not available or low when pump is operating through RainsaverMK3E.
a. Pump has lost its prime.
b. Isolation valve, if fitted, is not open.
c. Debris has jammed the internal check valve closed, or has blocked the check valve.
d. External Inlet strainer / filter, if fitted, is blocked.
e. Internal inlet strainer is blocked.
Note* Should there be a pump failure, mains back up is achieved by turning the RainsaverMK3E off at the power point.
For after sales service please contact White International Customer Service: 1300 783 601.
17
Bianco Rainsaver MK3 Installation and Operating Instructions
Installation Dimensions
DAB or BIANCO surface mounted pumps
Typical Installations
18
Bianco Rainsaver MK3E Installation and Operating Instructions
Bianco Rainsaver MK3E Installation and Operating Instructions
Bianco Rainsaver MK3 Installation and Operating Instructions
TESLA DIVERxxxMPCX Submersible Pump
Typical Installations
BIANCO JH8003PMPCX Submersible Pump
Typical Installations
19
Bianco Rainsaver MK3 & MK3E Terms & Conditions
2
TY
I
RA
R
III
YEA
Terms & Conditions
KM
N
V E R M KII &
SA
N
Bianco Rainsaver MK3 Installation and Operating Instructions
WA R RA
Subject to the provisions of the Trade Practices Act and Goods and Consumer Protection Legislation of various States)
1) White International Pty Ltd / White International NZ Ltd warrants that the Bianco RAINSAVER MKII and MKIII that we
distribute, are free from defects in workmanship and materials, for 2 years from the date of purchase. Subject to our conditions of
warranty White International will repair any defective products free of charge on site within 25 kilometres of our nearest authorized
in-field Bianco RAINSAVER Service Agent. In the event that service is required outside the 25 km radius of the nearest in-field Bianco
RAINSAVER Service Agent, arrangements for the payment of additional travel cost must be made between the “owner” and the
“service agent” before work is carried out.
2) The warranty includes in field labour costs where the Bianco RAINSAVER MKII or MKIII including pump is installed within a 25
km radius of an authorised in-field Bianco RAINSAVER Service Agent. This warranty excludes transportation costs to and from White
International or its appointed service agents, defects due to non-compliance with installation instructions, neglect or misuse, inadequate
protection against the elements, low voltage or use or operation for purposes other than those for which they were designed or
where equipment is not readily accessible. For further information regarding the suitability of your intended application contact us on
our Sales Hotline.
3) The 2 Year Warranty refers to Bianco RAINSAVER MKII and MKIII after the 1st AUGUST 2009, and is not transferable to
another Bianco Rainsaver product and only applies to the original owner, purchaser or end user, and is subject to the Trade Practices
Act and Goods and Consumer Protection legislation of various states.
4) Our warranty commences from the date of purchase of the above mentioned product. Proof of purchase is required before
consideration under warranty is given. Record your date of purchase in the space below and retain this copy for your records.
Date of PurchaseModel Purchased WHITE INTERNATIONAL Pty Ltd
A.B.N. 48 000 119 380
52-60 Ashford Ave, MILPERRA NZW 2214
PO Box 4755, MILPERRA BC NSW 1891
Ph: (02) 9783 6000 Fax: (02) 9783 6003
Customer Service Hotline: 1300 783 601
Customer Sales Faxline: (02) 9783 6003
www.whiteint.com.au
20
Sales Enquiries: [email protected]
WHITE INTERNATIONAL NZ Ltd
138 Hugo Johnston Drive
Penrose, Auckland, NZ
PO Box 12704, Penrose, Auckland, NZ
Ph: (09) 579 9777 Fax: (09) 579 7775
Customer Service Hotline: 0800 509 506
Customer Sales Faxline: 0800 804 344
General Info: [email protected]
Bianco Rainsaver MK3 Installation and Operating Instructions
21
22
23
24
25
Bianco Rainsaver MK3 Installation and Operating Instructions
26
Bianco Rainsaver MK3 Installation and Operating Instructions
27
WHITE INTERNATIONAL Pty Ltd
A.B.N. 48 000 119 380
52-60 Ashford Ave, MILPERRA NZW 2214
PO Box 4755, MILPERRA BC NSW 1891
Ph: (02) 9783 6000 Fax: (02) 9783 6003
Customer Service Hotline: 1300 783 601
Customer Sales Faxline: (02) 9783 6003
www.whiteint.com.au
Sales Enquiries: [email protected]
WHITE INTERNATIONAL NZ Ltd
138 Hugo Johnston Drive
Penrose, Auckland, NZ
PO Box 12704, Penrose, Auckland, NZ
Ph: (09) 579 9777 Fax: (09) 579 7775
Customer Service Hotline: 0800 509 506
Customer Sales Faxline: 0800 804 344
General Info: [email protected]