1
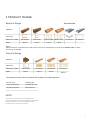
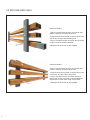
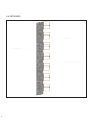
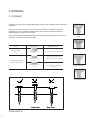
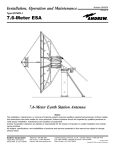
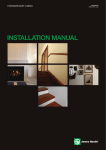
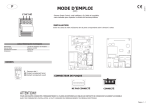
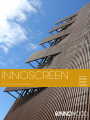
INNOSCREEN
INSTALLATION MANUAL
IBFS05050
IBFS10050
IBFS15050
IBFS04030
IBFS06516
IBFS09028
IBFS12530
1
Contents
1 INTRODUCTION
2 PRODUCT INFORMATION
3 FRAMING & PREPARATION
4 INSTALLATION
5 GENERAL
IT IS THE RESPONSIBILITY OF THE
SPECIFIER OR OTHER PARTY TO ENSURE
THAT THE INFORMATION IN THIS MANUAL
IS APPROPRIATE FOR THE INTENDED
APPLICATION AND FURTHER DESIGN
DETAILING MAY HAVE TO BE MADE FOR
SPECIFIC APPLICATIONS THAT FALL OUTSIDE
THE SCOPE OF THE MANUAL.
1 INTRODUCTION
InnoScreen products are an innovative
and cost effective composite timber
screening solution to achieve any design
of Façade Screens, Sun Screens, Fencing
Screens, Privacy Screens and Trafficable
Screens.
InnoScreen systems have multiple
benefits over real timber and are ideal
for internal and external use in both
commercial and residential settings.
They also provide shade and optimise
natural light, privacy, security and acoustic
qualities.
InnoScreen is designed for both horizontal
and vertical fixing applications over steel
or timber supports.
2
02
03
04
05-09
10-12
INFORMATION CONTAINED ON THIS
DOCUMENT IS THE COPYRIGHT OF
INNOWOOD AUSTRALIA PTY LTD. USE OR
COPYING OF THIS DOCUMENT IN WHOLE
OR IN PART WITHOUT THE WRITTEN
PERMISSION OF INNOWOOD AUSTRALIA IS
NOT PERMITTED.
INNOWOOD BOARD is an advanced composite
material does not splinter, mildew, is water, fire
resistance and termite proof. It is also simple and
easy to maintain.
1.1 InnoScreen Snap fixing system
A Snap Fixing Screen System creates
perfectly straight lines. Simply snap
battens into the clip for quick and easy
installation, saving you time and money.
1.2 InnoScreen Face fixing system
InnoScreen battens cater for face fixed or
back fixed systems and are designed to
simply screw over the structural support.
InnoScreen Face Fixing Systems are
lightweight and their unique installation
method makes it easy to achieve a modern
look with consistency.
2 PRODUCT RANGE
Snap-Fix Range
Accessories
PROFILE
SECTION
PRODUCT CODE
SPAN
IBFS05050
IBFS10050
450mm
450mm
IBFSC10050 IBFSC15050
450mm
AL05050PC
AL05050PC
450mm
NOTE:
Where aluminum accessories are used as part of the fixing configuration, a longer span (900mm max.) of backstructure is acceptable.
Face-Fix Range
PROFILE
SECTION
PRODUCT CODE
SPAN
IBFS04030
IBFS06516
IBFS09028
IBFS12530
450mm
450mm
450mm
450mm
Innowood products can be worked with ordinary woodwoking tools:
Circular Saw
Cordless Drill
Crosscut Mitre Saw
Level&Chalk Line
Carpenters Square
Tape Measure
NOTE:
To ensure long- term performance, we recommend that a
professional trade person carry out the installation. The installation
MUST be carried out in accordance with these instructions
including the use of all trims and accessories.
3
3 FRAMING AND
PREPARATION
3.1 SITE STORAGE & HANDLING
• Innowood boards should not be dumped or dropped
when unloading.
• Innowood boards should be unpacked, stored on a flat
surface and supported at 600mm centres.
• Innowood should be stored under cover out of the
weather and in the shade, until ready to install.
• Innowood should not be stored in the rain or covered
with plastic cover sheets.
• Do not slide boards against each other or drag
equipment including tools across the top of the boards.
• Innowood boards should be carried on edge, for better
support.
3.2 FRAMING CONSTRUCTION
REQUREMENTS
InnoWood screen may be fixed to seasoned timber
or steel stud wall framing members or to a proprietary
batten system.
Battens spacing for InnoWood screen is nominally set
at 450mm centres for urban and non-cyclonic wind load
areas.For higher wind-load areas may be accommodated
by reducing batten spacing or contact our office.
Battens, noggings and trimmers must have a face not
less than 45mm for timber and 38 mm for steel.
Where studs are less than the required minimum facewidth under a joint, sufficient landing must be provided
by fixing an additional batten or trimmer.
3.3 THERMAL MOVEMENT
3.4 TIMBER FRAMING
Any wood based products will expand and contract
with changes in temperature, the amount of expansion
varies according to the amount of changes of
temperature. Although thermal movements are
reversible, these movements due to temperature
change may vary by up to 2mm per meter during the
installation process,if both ends are properly fixed with
screws.
Timber framing must comply with AS 1684: Timber
Framing Code.
It is important to use adequately seasoned timber to
minimise shrinkage and associated building movement,
which may damage the cladding system.
Innowood boards that have been exposed to the direct
sun for several hours, prior to installation will have
expanded more than those boards left in the shade.
When installed, the hotter boards will contract more
than the cooler boards that were left in the shade prior
to installation. It is important to maintain an average
consistent temperature for all the boards as it is being
installed.
Steel framing must comply with AS/NZS 4600: ColdFormed Steel Structure or AS 3623: Domestic Metal
Framing.
Where steel framing members are specified, use only
corrosion resistant galvanized steel framing.
Specific instructions for fixing to steel frames are included
where appropriate.
Innowood products can tolerate temperature range
from -20° to +65°, if there is any application has to be
specifically adapted to suit the purpose that fall outside
the limited of Innowood products can tolerate , please
consult with Innowood.
3.5 STEEL FRAMING
NOTE: Thermal breaks are required for steel framed
buildings and should be installed between the InnoWood
cladding and lightweight steel CFS stud and or top hat
sections.
Thermal break tapes should have a minimum R-Value of
0.2 or less.
NOTE
-Provision should be made for adequate drainage and
ventilation behind the cladding.
-When the construction is carried out in full sun,
the temperature of InnoWood board is expected to
be approx. 20 - 25 degrees higher than its ambient
temperature. Hence, installation should not be carried
4
out in extremes of temperature (less than 25 degree is
recomended).
-Ensure product is stored under cover and out of
direct sunlight during storage and installation to
reduce expansion and contraction. Always fix boards
from one end to the other and not middle to ends.
4 INSTALLATION
4.1 IBFS05050/10050
FIX TWO SCREWS ON EACH FEMALE FIXING MOULD
INSTRUCTION
1.Fix the aluminium male fixing mould (AL05050WC)
onto the existing batten spacing at 900mm centres.
(screws to suit structure)
2.Fix the female fixing mould (AL05050PC) into the
groove of the panel. (2 screws for each mould)
3.Clip two parts together.
4.Use end caps to finish off both ends.
5
4.2 IBFS10050/IBFS15050
INSTRUCTION A
1.Set up a proper back structure, for special case
please consult an Innowood technician.
2.Insert an aluminium flat bar or square section into
InnoScreen, and pre-drill the fixing hole.
3.Fix the Innowood screen onto back structure with
proper screws from back if possible.
4.Repeat until the screen is fully installed.
INSTRUCTION B
1.Set up a proper back structure, for special case
please consult an Innowood technician.
2.Insert an aluminium flat bar or square section into
innoscreen, and pre-drill the fixing hole.
3.Fix the Innowood screen onto back structure
with proper screws from front for special aesthetic
requirement or when back fixing is impossible.
4.Repeat until the screen is fully installed.
6
4.3 IBFS10050&IBFS15050 CONFIGURATION
7
4.4 IBFS04030
8
4.5 IBFS6516/ IBFS09028/ IBFS12530
9
5 GENERAL
5.1 SCREWS
Screws must compy with AS 3566 Self Driling Screws for the Building and Construction
Industries.
Screws must have a minimum Class 3 corrosion resistance, suitable for external
applications in mild, moderate industrial and marine environments and Class 4 or
stainless steel for severe environments.
Screw points and threads should be suited to framing material into which the screw is
fastened, as shown in the following table.
fix to
point type
gauge & size
6 or 8g 18x50mm for connector
Timber Framing
Type 17 or self
-tapping
Raised Countersunk
Head
Countersunk Rib
Head
8g 18x50mm for last board fixing
6g 18x40mm for connector
Light gauge steel
up to 2.5mm thick
Self-driling point
screw
8g 18x40mm for last board fixing
Self-driling winged
screw
10g 16x45mm for last board
fixing
8g 18x40mm for connector
Countersunk Head
Self Embedding head
SCREW DEPTH
10
5.2 CARE & MAINTENANCE
5.3 TROUBLE SHOOTING
General dirt and debris
INNOWOOD product is a low-maintenance
material; composite wood requires simple
care and handling to ensure lasting integrity.
It is best to complete cleaning when the board
surface is cool to prevent cleaners from drying/
evaporating on the board surface. Many stains
can be cleaned with soap and water, normal
procedure as following:
Spray with a hose to remove surface debris. Use
warm soapy water and a soft-bristled brush to
clear dirt and/or debris from grooves or contours.
Pressure wash to remove more stubborn stains.
•
Immediately wipe the spot stain area
and remove as much of the spill as possible.
•
If the spill consists of an abrasive
substance, blot the spill. Do not rub.
•
Soak the stained area with warm water
and blot up with a soft towel.
•
Using a clean towel or soft sponge,
apply the soapy solution to the stain and allow
to stand for 3 minutes.
•
After the stain has soaked wipe with a
clean towel or sponge.
INNOWOOD products are like any natural
timber product, coating is required depending
upon location to sun or how much pedestrian
traffic it attracts. If INNOWOOD Board is not
applied with a coating, when exposed to UV,
INNOWOOD BOARD will oxidise and show
discolouration, the colour will revert to its silver
/ grey colour, however it can be and revived by
re-coating or stained should this be desired.
Best protection of INNOWOOD board is
ensured by applying the coating prior to
installation.
The coating detail can be found out at our
website :http://www.innowood.com/resourcecenter/innowood-care-maintenance.html.
To maintain and protect the colour and
extend the life of your INNOWOOD Board,
regular simple maintenance is recommended.
Conducting routine 6-monthly maintenance
inspections to determine to reapply Coating
or not, it is time to re-apply coating when your
InnoBoard surface begins to show signs of
fading or dullness, InnoCoat is quick and easy
to apply, InnoCoat will instantly bring back the
colour to your INNOWOOD Board.
Oil,grease,food and drink
Remove and wipe as soon as possible. Spray with a
hose and use warm soapy water and a soft-bristled
brush. Pressure wash to more stubborn stains. Any
surface stain that has been absorbed can be easily
removed with a light, progressive sanding.
Ice and snow
Use a plastic shovel or broom to remove snow. Use
rock salt or calcium chloride to melt ice.
Rust stains and engrained dirt
Cleaning products containing Oxalic or Phosphoric
Acid can be used but DO NOT use bleach as this
will lighten the cladding. With any cleaning product,
test it on a small, inconspicuous area first, following
manufacturer’s instructions.
Disposal of Innowood offcuts
Spray with a hose to remove surface debris. Use
warm soapy water and a soft-bristled brush to
clear dirt and/or debris from grooves or contours.
Pressure wash to remove more stubborn stains.
Safely dispose of Innowood cladding as per local
legislation.
•
Do not burn.
•
Treat as construction waste.
•
If unsure, consult your local governing
body/ council.
Scuffs, surface indents and marks
Sanding should only be used for very stubborn
stains and to a maximum depth of 0.5mm. Most
marks blend naturally after certain period. Please
note: All timber based products will release tannins
but these will naturally stabilise after approximately
12 weeks, depending on the temperature, UV and
exposure to rain.
These Guidelines are subject to modifications without notice. Drawings & sketches are for illustration
purpose only. Purchasers should verify whether any changes to specifications or applications or
otherwise have been made since this literature was issued. This installation manual is only suited for
conventional timber or metal framing systems. Please contact us for any other installation method.
11
NOTES
12
PLEASE FIND INNOWOOD WARRANTY TERMS & CONDITIONS AT: WWW.INNOWOOD.COM
FOR MORE INFORMATION, PLEASE VISIT INNOWOOD AT
WWW.INNOWOOD.COM
OR CALL 1300 787 717
INNOSCREEN SYSTEM INSTALLATION JULY 2014
13