1
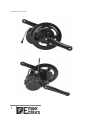
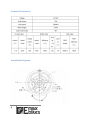
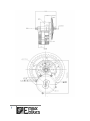
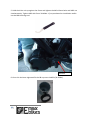
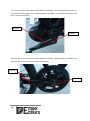
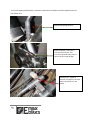
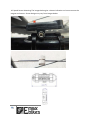
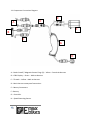
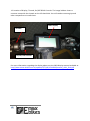
BAFANG BBS01/BBS02 Installation Manual Prepared for Customers of eMax eBikes, Sydney, Australia. 1 Bafang – About the Company Located in Suzhou Industrial Park, at the center of Yangtze River Delta, a convenient location for both international and domestic business. Bafang company was founded in 2003, which is a high-tech enterprise of electric drive system, combining design, R&D, manufacturing and sales. We have more than 260 employees, more than 35 senior engineers in R & D department, be able to accept of various challenging projects. Our well-established quality control system, advanced motor and controller production, and testing equipment, as well as high-level R&D and testing center enable us to deliver high quality products consistently. Now our annual production capacity reaches 1,000,000 sets. Your dream, our goal! 2 System Overview 3 Display Mid-Drive Motor 4 Speed Sensor Magnet Speed Sensor Advantages of Mid-Drive / Central Motor Can be installed on standard bike frame easily. High starting torque, Max torque≥80Nm, good performance on climbing. Double clutch is used on drive unit, adding to safe operation. Speed sensor and torque sensor can be applied to users pedalling, controller Integrated internally High efficiency, low consumption, longer range compared to similar output hub motors. Unit Numbering and Information Countermark serial number on motor casing as following: BBS01 36V 250W 15A 25km/h 13010001 1. “BBS01”, “BBS": motor type (speed sensor) 2. “36V”: rated voltage; 250W: rated power. 3. “15A”: limited current, 25km/h: max speed. 4. “1301”: production date. 5. “0001:Serial Number Construction Material and Waterproof Grade Die-cast aluminium electrophoresis black treatment, working environment temperature:25℃-55℃, waterproof grade: IP65. 5 Technical Parameters Installation Diagrams 6 7 8 Installation Procedures 1. Open the package and take out the drive unit and accessories. Check whether the specifications of the motor are correct. Check that all accessories and wiring have been included in the box as per the packing list. 2. Fix the chain wheel on drive unit with 5pcs screw M5*10, (see picture 1), then fix chain cover (optional) on chain wheel with 5pcs screw ST3.9. Do not use Loctite with these bolts. Higher Surface 5 x M5 x 10mm Recessed Surface 3. Carefully feed the drive unit axle through the bottom bracket. If you encounter resistance your BB shell may need to have burs / weld overflow smoothed with a rounded file. 9 Make sure the thread of the axle tube extends beyond the bottom bracket more than 10mm. Please note that for 73mm bottom brackets this may be less. Axle Thread 4. With the teeth on the fixing plate facing inwards, fix the plate on the drive unit with 2 pieces of M6 x 10mm bolt. Use Loctite if you wish. Fixing Plate Teeth (Outside when fitted) 10 Fixing Plate (Outside Surface Without Teeth) 2 x M6 Bolts 5. Hold the drive unit up against the frame and tighten the M6 x 10mm bolts and M33 nut simultaneously. Tighten M33 with force 30-40Nm. If you purchased an installation toolkit use the BBB Lockring tool. M33 Nut 6. Once this has been tightened fit the BB cup over theM33 (20-30Nm) 11 7. Fix the LH crank on the bike with the M8 inner hex bolt. It is very important you do not confuse the left and right cranks. Tightening force 35-40Nm. Use Loctite if you wish as this bolt is prone to loosening. LH Crank M8 Nut 8. Fix the RH crank on the bike with the M8 inner hex bolt. Tightening force 35-40Nm. Use Loctite if you wish as this bolt is prone to loosening. RH Crank M8 Nut 12 9. Connect waterproof harness, Anderson connectors for battery and the speed sensor to the motor unit. Waterproof Wiring Harness Anderson Battery Connectors (You may choose your own connectors provided they have a similar current rating of 40a) Speed Sensor – Optimal position of magnet is less than 5mm from Sensor on rear wheel. 13 10. Speed Sensor Mounting.The images below give a clearer indication on how to mount the magnet and sensor. Sensor design may vary from images below. 14 11. Component Connection Diagram D A E F B C G H A – Brake Cuttoff / Magnetic Sensor Plugs (2) – Yellow – Female At Harness B – C961 Display – Green – Male at Harness C – Throttle – Yellow – Male at Harness D – Main Harness waterproof connection E – Battery Connectors F – Battery G – Controller H – Speed Detecting Sensor 15 12. Location of Display, Throttle, On/Off & PAS Controls. The image bellows shows a common setup with the throttle on the left hand side. You will need to remove grips and other components to install these. C961 Display Throttle On/Off, PAS Control For more information regarding the display please see the C961 Display manual available at: http://www.emax-ebikes.com.au/uploads/3/7/4/4/37442009/manual_c961_final.pdf 16 Packing List 1. 2. 3. 4. 5. 6. 7. 8. 9. 10. 11. 12. 13. BBS01 / 02 Motor Display Brakes / Cutoff Sensor (2 pieces) EB-BUS Cable Fixing Plate (with teeth) Chain Wheel and Chan Whee Cover Cranks (2 pieces) M5 x 10mm Nut (5 pieces) M6 x 12mm Nut (2 pieces) M33 Nut And Cup (2 Pieces) ST 3.7 Nut (2 Pieces) Speed Detection Sensor Speed Detection Magnet After Sale Service and Warranty All kits sold via eMax eBikes come with a standard 12 month warranty. There is also a 14 day return / swap policy which covers customers against defect in the first 2 weeks after purchase. Outside warranty repairs are also available at customers expense. The following terms and conditions below were taken directly from Bafang: Suzhou Bafang Electric Motor Science-Technology Co Ltd (here in after to be referred as “Bafang”) warrants that the products bought from Bafang can be provided service freely if the products are non-conformities in material and workmanship within warranty period. Bafang limited warranty does not cover or apply to the following: 1) Damage, failure and/or loss caused by refitting, neglect, improper maintenance, competition or commercial purpose, misuse, abuse or accident; 2) Damage, failure and/or loss caused by shipping; 3) Damage, failure and/or loss caused by improper installation, adjusting or repairing. 4) Damage, failure and/or loss irrelevant to material and workmanship, e.g., failure to follow instructions by consumers; 5) Damage, failure and/or loss caused by product’s appearance and surface change which doesn’t affect its function. 6) Damage, failure and/or loss caused by unauthorized service or installation; 17 7) Damage, failure or loss caused by normal wear and tear. Bafang reserves the right to repair the components or replace the components, and is only responsible for repairing or replacing of the products. In case bike manufacturers or dealers encounter quality problems when using or selling Bafang products, they can report the purchase order number and products’ serial number to Bafang technology service department who makes sure that if the products are under warranty or not. If it is under warranty, Bafang will offer repair or replacement for free. If it is out of warranty, Bafang still can repair for customer, but the concerning material cost, labor cost, freight etc. will be paid by customer. If you have Bafang components on complete bikes need to be repaired, please contact the bike manufacturer or dealer directly. If this warranty statement is against to Chinese current law, the Chinese law shall prevail. Bafang reserves the right to modify the terms without any announcing in advance. 18