1
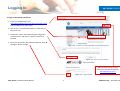
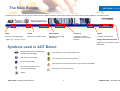
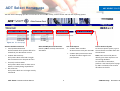
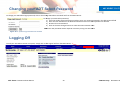
ADT SELECT SOLUTIONS
> Remote access to
account information
> Real-time online
reporting
> Alarm activations
and event history
at your fingertips
ADT Select
Commercial User Manual
ADT Select is a product that provides easy access to
With ADT Select, you can access personal monitoring and
information that is important to you and your
account information through the web. Information such as
business. This web-based customer service portal
account details, scheduled exceptions and signal activity
allows you to quickly review your monitoring activity
are now only a click away.
online, anytime, remotely.
Contents
ADT SELECT SOLUTIONS
Logging In
3
The Main Banner
4
Symbols used in ADT Select
4
ADT Select Homepage
5
Searching for Account Information
6
Site General Information
7
Placing a System on Test
8
Emergency Contacts
9
Dispatch Instructions
11
Event History
12
Open / Close Schedules
13
Site & System Details
14
Zones
15
Reports
16
Alarm Report Definitions
17
Scheduling Alarm Reports
18
Contacting ADT
19
Changing your ADT Select Password
20
Logging Off
20
ADT Select Commercial User Manual
2
©ADT Security
December 2011
Logging In
ADT SELECT SOLUTIONS
To login to ADT Select Commercial
1. From your web browser, type
http://www.adtsecurity.co.nz/commercial/adt-select
select
into the address bar. Press enter
2. Click on the “Commercial Customers – Click here to
login now” link
3. Review the “Terms and Conditions governing online
account access” and select “I Agree” at bottom to
proceed
4. Enter your User Name and Password and then click on
the Sign In button to login
Figure 1.1 Commercial,, Small Business and Residential links
Figure 1.2 Terms and Conditions
TIP: This banner links to ADT
Select from the ADT NZ website;
www.adtsecurity.co.nz
Figure 1.3 Login window
ADT Select Commercial User Manual
3
©ADT Security
December 2011
The Main Banner
ADT SELECT SOLUTIONS
The banner across the top of the screen provides access to the key features of ADT Select. Hover over the title links with the mouse for a brief description
Home
Search
Alarm Reports
Contact Us
Logout
Returns to the Homepage
Search for a specific system
Navigates to reporting
functionality
Navigates to contact
information for ADT New
Zealand
To logout of ADT Select
Figure 2.1 The Main Banner
Update your password to access
ADT Select
Symbols used in ADT Select
Navigate back and forward through
previously viewed pages
Refresh the current page
Change ADT Select Password
The system is currently open (disarmed)
The system is currently closed (armed)
Go to the Homepage
The system is currently Out of Service (not actively monitored)
Go to the help menu for the
currently viewed page
The system is currently On Test
Logout
ADT Select Commercial User Manual
4
©ADT Security
December 2011
ADT Select Homepage
ADT SELECT SOLUTIONS
The ADT Select Homepage provides an overview of recent alarm activity, account access aand one-click reporting options
Figure 3.1 The homepage
Account Statistics Overview
•
Total Systems Monitored
# of monitored alarm systems able to be
viewed via your ADT Select account
•
24 Hour Alarm Activity
# of systems which have had a burglar
alarm activation over the past 24 hours
•
Currently in Alarm Status
# of systems which have an alarm event
which is currently being responded to
•
Out of Service
# of systems which are no longer actively
monitored
ADT Select Commercial User Manual
Most Recently Accessed Accounts
One-Click Reports
Details systems
ystems recently accessed via
ADT Select
•
24 Hour Alarm Incident
All alarm events over past 24 hours
•
24 Hour Open/ Close Occurrence
All Open and Close signals over
past 24 hours
Find an Account by CS#
To locate a specific system, type in
the CS reference number then click
the Go button
Note: CS#’s are used by ADT to
identify your Alarm System in our
monitoring database.
To view CS#’s in ADT Select,
perform a site search (refer to page
6). CS#’s are listed in the Account
ID column to the left.
5
©ADT Security
December 2011
Searching for Account Information
ADT SELECT SOLUTIONS
Use the Search function to locate the account you wish to review
To search for an account, click on the Search link in the Main Banner and try one of the following:
1) a) Click on the Search button with no details entered – this lists all systems accessible via ADT Select
b) Make a selection from the search results
2) a) Enter the CS reference number in the CS# field
field. Press Enter or Click on the Search button
b) Click on the listed system
3) a) Enter the name, address or phone number for the account in the applicable field. Press Enter or Click on the
Search button
b) Make a selection from the search results
Notes:
• The search details entered must be an exact match with the records in the database
• The % symbol can be used as a wildcard if required e.
e.g. Typing “%Brown Street” in the Address field will retrieve
all systems on Brown Street without a street number being entered
Figure 4.1 The Search menu
Figure 4.2 Search results
ADT Select Commercial User Manual
6
©ADT Security
December 2011
Site General Information
ADT SELECT SOLUTIONS
Once a specific account has been selected, more detailed account information can be reviewed and edited
edited.
Figure 5.1 Site General Information
Monitored Address
System Information
The physical address of the
monitored alarm system
Information detailing the
alarm system installed.
From the Alarm User
Manuals link an alarm
manual can be downloaded
Alarm System Status
Account Menu Banner
• Currently in Alarm Status
“Yes” if there is a current alarm
event
• Currently Open
“Yes” if any areas of the
system are currently open
• Alarm Activity within 24 Hours
“Yes” if there has been a burglar
alarm in the past 24 hours
• Currently Closed
“Yes” if any areas of the
system are currently closed
• Currently On Test
“Yes” if the system is “On Test”.
Click the Modify link to place
system On Test
• Out of Service
“Yes” if the system is no
longer actively
ctively monitored
Note: Signals are not actively
monitored when system “On Test”
ADT Select Commercial User Manual
Alarm System Status (cont.)
7
This banner provides access to
other ADT Select features for
the account selected
• View Open/ Close Status
Review Open and Close
statuses for multiple areas
©ADT Security
December 2011
Placing a System on Test
ADT SELECT SOLUTIONS
To prevent monitoring responding
nding to signals when testing your alarm, it is possible to place the system “on test” via ADT Select
elect
To place a system on test:
1) From the Site General Information window, click on the “Modify” link under
Alarm System Status
2) From the Account On-Test Status Modification window click on the “Place on
Test” button
3) Enter the date and time for the test to expire
4) Enter a comment noting why the system is being placed on test
5) Enter your login password
Figure 6.1 Site General Information window
6) Click on the “Yes – Proceed” button
7) Click on the refresh (
) button to ensure ADT Select reflects the correct “on
test” status in the Site General Information window
Note: Maximum “on test” duration is 24 hours
To clear the test:
1) From the Site General Information window, click on the “Modify” link under
Alarm System Status
2) From the Account On-Test
Test Status Modification window click on the “Clear
Test” button
3) Enter your login password
4) Click on the “Yes – Proceed” button
5) Click on the refresh (
) button to ensure ADT Select reflects the correct “on
test” status in the Site General Information window
Figure 6.2 Account On-Test
Test Status Modification window
ADT Select Commercial User Manual
8
©ADT Security
December 2011
Emergency Contacts
ADT SELECT SOLUTIONS
To review and update Emergency Contacts via ADT Select, select an account and then click on the Emergency Contacts link from the Account Menu Banner
Existing Contacts
Add a New Contact
Order/ Sort options
Click on the specific contact
name to edit
Click this link to add a new
contact
Use the Order/ Sort options to
view the information in the
preferred order
ADT Select Commercial User Manual
9
Figure 7.1 Emergency Contacts window
©ADT Security
December 2011
Emergency Contacts (C
Cont.)
ADT SELECT SOLUTIONS
Password (user
user specific voicecode)
Enter a password for the contact which will be required
requ
for
verification purposes when contacting, or contacted by, ADT
Note: This password is referred to as a “user specific” voicecode and
can only be provided by the specified contact.
contact Refer to page 14 to
establish a “site”” voicecode
Calling Sequence
Alarm contacts are sorted numerically using the Calling Sequence
number. Enter a number which places the contact into the
required call order in relation to other contacts
User#
The programming allocation that a user’s alarm code is assigned to
(not the actual alarm code).
Figure 7.2 Contact Information window
From the Emergency Contacts window (Figure 7.1), select a contact to edit or click on Add a New
Contact to add. Click on the Save Changes button when editing completed
First Name/ Last Name: Enter the first & last names of the contact
Start Date
This date cannot be edited and reflects the date the contact became
active
End Date
Enter an end date if a contact is to be made inactive
Type: Select from the drop down list to record the primary purpose of the contact
Phone/ Phone Type
Enter the contact phone number including area codes (without
spaces) and select the relevant Phone Type
Title: Enter a work title for the contact e.g. CEO
Email Address
Key: Select Yes if the contact holds a key to the site
Enter an email address for the contact
Relation: Select from the drop down list to record how the contact is related to the site
Contract Signer: Select Yes if the contact was the contract signer
ADT Select Commercial User Manual
10
©ADT Security
December 2011
Dispatch Instructions
ADT SELECT SOLUTIONS
To review alarm monitoring instructions, select an account and then click on the Dispatch Instructions link from the Account Menu Banner
Dispatch Instruction List
All customer defined instructions can be accessed from the Dispatch Instruction List by
clicking on the relevant Page#
If an instruction is not detailed in the list, click on the Global Procedures link to review
standard ADT instructions.
Note: If an instruction
struction is temporary the expire date will be defined. Temporary instructions
override permanent instructions for the period between the effective and expire dates.
Figure 8.1 Dispatch Instructions List window
Dispatch Page Instructions
Once a customer defined instruction has been selected from the Dispatch Instructions List
(Figure 8.1), the Dispatch Page Instruction window is displayed
Call List details the contact phone numbers available in relation to the instruction
Instruction Type details whether the instruction is temporary or permanent
The customer defined instruction is displayed inside the box. Note that the title describes
the alarm events which
ch this instruction applies to e.g. “Intruder Alarm”
Figure 8.2 Dispatch Page window
ADT Select Commercial User Manual
11
©ADT Security
December 2011
Event History
ADT SELECT SOLUTIONS
To review signals received from a monitored system, along with actions taken by the monitoring team, select an account and th
then
en click on the Event History link from the
Account Menu Banner
Start Date & Time, End Date & Time
Specify the date range which is to be reviewed
Max Events to Return
If desired, from the drop down menu select the maximum number of alarm
events to be displayed.
Order
Select whether information is displayed from most recent to historical
(descending) or vice versa (ascending)
Group By Incident?
Select whether or not information is sorted by alarm incidents
Figure 9.1 Account History Selection window
Search
Click on the Search button to retrieve the required information
Site Event History window
Once the requested information has been retrieved it will be displayed in
the Site Event History window. Information is displayed in columns which
are labelled across the top of the page
Use the navigation arrows to move back and forward through the pages of
event history information
Figure 9.2 Site Event History window
ADT Select Commercial User Manual
12
©ADT Security
December 2011
Open / Close Schedules
ADT SELECT SOLUTIONS
To review and edit monitoring schedules in place for a system, select an account and then click on the Schedules link from the Account Menu Banner
Order/ Sort options
Use the Order/ Sort options to view the information in the preferred order
Schedules
Select from the listed schedules by clicking on the relevant Schedule #
Figure 10.1 Schedules window
Once a schedule has been selected, the Schedule Details window is displayed
Permanent/ Temporary
Details whether the schedule is permanent or temporary
Comment
Describes which area of the system the schedule relates
es to
Alarm Condition
If Yes selected, the relevant schedule event is activated. See event definitions below
Window
If specified an additional period is added or subtracted from the expected Open or Close
timeframes before the relevant schedule event occurs
Expected Open and Close timeframes
Open = The expected time the alarm is to be opened on given day
Close = The expected time the alarm is to be closed on given day
To edit Open and Close
lose times, enter the time in 24 hour format with a colon separating the hours
and minutes e.g. 14:00. Click on the Save Changes button to save.
Figure 10.2 Schedule Details window
Schedule Event Definitions:
ADT Select Commercial User Manual
Early Open:
Late
te Open:
Fail to Open
Open:
Note: Multiple Open and Close times can be entered on a given day.
Alarm unset before expected open
Alarm unset after expected open
Alarm not unset prior to expected open
13
Early Close: Alarm set before expected close
Late Close: Alarm set after expected close
Fail to Close: Alarm not set prior to expected close
©ADT Security
December 2011
Site & System Details
ADT SELECT SOLUTIONS
To review and update Site and System information via ADT Select, select an account and then click on the Site/ System Details link from the Account Menu Banner
Site Information
Specifies
pecifies physical address details for the monitored site
Editable fields
Phone 1: The primary phone number for the site
Phone 2: A secondary phone number for the site
Codeword 1 & 2 (Site Voicecode
oicecodes): Shared codewords that can be
provided by any alarm user for verification purposes when contacting, or
contacted by, ADT
Note: These codewords are referred to as “Site” voicecodes. Refer to
page 10 to establish a “user specific” voicecode
System Information
Specifies the monitored system and CS reference for the system.
The ATI hours and minutes is the maximum period between expected
test signals from the system.
Click on the Save Changes button to save edited information
Figure 11.1 Site and System Details window
ADT Select Commercial User Manual
14
©ADT Security
December 2011
Zones
ADT SELECT SOLUTIONS
To review Zone information via ADT Select, select an account and then click on the Zones link from the Account Menu Banner
Zones
All devices connected to a monitored alarm system are assigned with a zone number. Review the Zones window for
details of devices connected to the system for the account selected
Order/ Sort options
Use the Order/ Sort options to view the information in the preferred order
Zone
The Zone number which the device has been assigned to. Click the Zone number to access the Zone Detail window
Description
The alarm event which will occur when the zone is activate
activated
Comment
A label entered into the monitoring database to assist in locating the device onsite
Zone Detail
The Zone Detail window provides technical
information in relation to zone configuration
Figure 12.2 Zone Detail window
Figure 12.1 Zones window
ADT Select Commercial User Manual
15
©ADT Security
December 2011
Reports
ADT SELECT SOLUTIONS
To request and schedule alarm reports via ADT Select, select the Alarm Reports link from the Main Banner
Report Inbox
The inbox contains one
one-off
off reports which have been generated via ADT Select.
Select The inbox does not contain
scheduled reports
Report Inbox Window
There are three options for viewing the Report Inbox;
• New Reports: Reports generated but not viewed
• Viewed Reports: Reports which have been viewed
• All Reports: All reports whether viewed or not
Figure 13.2 Report Inbox window
Note: There is a data limit for reports stored in the Report Inbox.
It is necessary to delete reports as the inbox becomes full
Account & Event Reports
Select from the report options available to review hist
historical
orical event history and/ or account information. Each report
can be requested (generated in real
real-time)
time) or scheduled to be run at a future date. See reporting definitions next
page for further detail
Customi
Customised Reports
All reports
eports which have been scheduled are listed under Customised
ed Reports. Click on the number in the
reptsched_no column to amend and/ or re-run previously scheduled reporting.
For more information on scheduling reports see Scheduling Alarm Reports on page 18
Figure 13.1 Report Selection Menu window
ADT Select Commercial User Manual
16
©ADT Security
December 2011
Alarm Report Definitions
ADT SELECT SOLUTIONS
Event History
Report
eport detailing some or all event history information for a user specified period
Battery Alarm Report (PDF)
Report
eport detailing Low Battery events for a user specified period
Alarm On/ Off Report
Report
eport detailing open and close signals for a user specified period
System Fault Alarm Report (PDF)
Report
eport detailing System Fault events for a user specified period
Event History Report (PDF)
Report detailing event history information for a user specified period
period. Less ability to
control reporting detail than “Event History” report (see above)
Open/ Close Alarm Report (PDF)
Report detailing open and close signals for a user specified period
Loss of Power Alarm Report (PDF)
Report
eport detailing Power Failure events for a user specified period
Alarm Incident Report
eport detailing all alarm events for a user specified period
Report
Hold Up Alarm Report (PDF)
Report detailing Hold-up
up Alarm events for a user specified period
Timer Tests Alarm Report (PDF)
Report
eport detailing Failed Timer Test (no alarm communication) events for a user
specified period
Medical Alarm Report (PDF)
Report
eport detailing Medical Alarm events for a user specified period
Patrol Response Report (PDF or Excel)
Report detailing Armourguard patrol response jobs for a user specified period
Fire Alarm Report (PDF)
Report
eport detailing Fire Alarm events for a user specified period
Customer Testing Report (PDF or Excel)
Report
eport detailing systems placed into On Test status for a user specified period
peri
Duress Alarm Report (PDF)
Report
eport detailing Duress Alarm events for a user specified period
Site Listing Report
Report detailing sites linked to customer account
Critical Equip Alarm Report (PDF)
Report
eport detailing Duress Alarm events for a user specified period
Service Job Report (PDF or Excel)
Report
eport detailing technical service jobs for a user specified period
Intruder Alarm Report (PDF)
Report detailing Intruder Alarm events for a user specified period
Data Change History
Report
eport detailing account changes for a user specified period
p
ADT Select Commercial User Manual
17
©ADT Security
December 2011
Scheduling Alarm Reports
ADT SELECT SOLUTIONS
To schedule
chedule alarm reports via ADT Select, select the Alarm Reports link from the Main Banner
Scheduling a Report
From the Report Selection Menu (Figure 13.1) select a report and complete the following steps.
ste In the example
the
he “Event History Report (PDF)” has been selected but the process applies to all reports
From the Event History Report (PDF) window;
1) Click on the Schedule Report button
From the Custom Report Maintenance window;
2) Enter a Description for the report
Figure 14.1 Event History Report (PDF) window
3) Select the reporting frequency from the drop-down options listed
4) Enter the Time and Date that the report is to be run
5) From the drop down list, select an Email Address for the report to be delivered to. If required, an email
address can also be manually inputted using the cc Address(es) look up window
6) Enter the CS# for the system for which event history information is being sought
Note: For some reports it is possible to select a range of CS#’s
7) Select the Start Date & Time and End Date & Time for the reporting period
pe
8) Click on the Save Changes button to save the report. Note: Once saved, the scheduled report can be
accessed from the Customised Reports listed on the Report Selection
Select Menu, see Figure 13.1
For
or reports with a repeating frequency, click
lick on the Calendar icon beside the Start and End date fields to access
the Date Formula Selection, refer below
Figure 14.2 Custom Report Maintenance window
ADT Select Commercial User Manual
Using the Date Formula Selection
Note: The Start date must be earlier than the End date for the report to work
i. Select the Initial Date Value
ii. Select whether a period is to be
e added or subtracted from the Initial
I
value
iii. Select the Time Frame
rame to be added or selected from the Initial value
iv. Click the Select button
Figure 14.3 Date Formula Selection
18
©ADT Security
December 2011
Contacting ADT
ADT SELECT SOLUTIONS
For a range of options for making contact with ADT, click on the Contact Us link from the Main Banner
The Contact Us webpage lists toll free phone numbers for all aspects of
ADT’s service provision.
The webpage also contains
ns a link to an online form for submitting
feedback or requesting further contact
Figure 15.1 Contact Us webpage
ADT Select Commercial User Manual
19
©ADT Security
December 2011
Changing your ADT Select Password
ADT SELECT SOLUTIONS
To change your ADT Select login password, click on the Change ADT Select Password link from the Main Banner
To change your ADT Select password;
1) From the Update Login Preferences window, enter
nter your existing password in the Old Password field
2) Enter the new Password in the New Password field. Ensure a secure password is selected
3) Re-Enter the new Password
4) Click on the Save Changes button to make the new Password active
Note: The new password will be required next time you log into ADT Select
Figure 16.1 Update Login Preferences window
Logging Off
To end your ADT Select session at anytime, simply click on the Logout link from the Main Banner
ADT Select Commercial User Manual
20
©ADT Security
December 2011