1
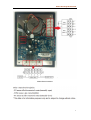
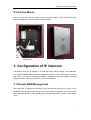
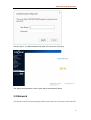
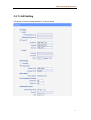
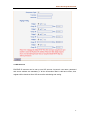
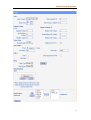
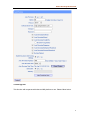
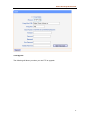
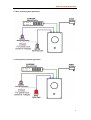
Smart Security IP Intercom Smart Security IP Intercom IS710v2 User Manual Smart Security IP Intercom Contents Copyright and Disclaimer .............................................................................................................. 2 1. Getting Started............................................................................................................................ 4 1.1 Outline ............................................................................................................................... 4 1.2 Product Features ............................................................................................................. 4 1.3 Technical Information ...................................................................................................... 4 2. Intercom Installation .................................................................................................................. 7 2.1 Dimensions ....................................................................................................................... 7 2.2 Flush Mount ...................................................................................................................... 7 2.3 Surface Mount .................................................................................................................. 9 3. Configuration of IP intercom ..................................................................................................... 9 3.1 Remote WEB Management............................................................................................ 9 3.2 Network ........................................................................................................................... 10 3.2.1 LAN Setting ......................................................................................................... 11 3.3 SIP Account .................................................................................................................... 12 3.4 Programmable keys ...................................................................................................... 14 3.5 Voice ................................................................................................................................ 14 3.6 Phone Book .................................................................................................................... 16 3.7 Advanced Setting ........................................................................................................... 16 3.7.1 Intercom Setting .................................................................................................. 16 3.7.2 VLAN Setting ....................................................................................................... 17 3.7.3 VPN Setting ......................................................................................................... 17 3.8 Maintenance ................................................................................................................... 18 3.8.1 Log .......................................................................................................................... 18 3.8.2 Password ............................................................................................................. 19 3.8.3 Factory reset ..................................................................................................... 19 3.8.4 Auto Provision ................................................................................................... 20 3.8.5 TR069 Upgrade .................................................................................................. 21 3.8.6 FTP Upgrade ....................................................................................................... 22 3.8.8 TFTP Upgrade .................................................................................................... 23 3.8.9 HTTP Upgrade .................................................................................................... 24 3.8.10 Reboot................................................................................................................ 24 3.9 Intercom Status .............................................................................................................. 25 3.10 System Info................................................................................................................... 25 3.11 Language ...................................................................................................................... 26 4. Brief pictures for application environment ............................................................................ 26 4.1 Door security system application ................................................................................. 27 4.2 Fire protection system application ............................................................................... 27 3 Smart Security IP Intercom 1. Getting Started 1.1 Outline The ESCENE IP Intercom - IS710(V2), has been developed to customers’ needs. Its classic fascia design is waterproof, dustproof and vandal resistant. It is ideal for many applications where SIP connectivity is required. 1.2 Product Features One button calling with full-duplex voice intercom. Fascia is 5mm thick drawn aluminum for strength and durability. Supports POE and local 12v power supply. Flush mount or surface mount with the surface mount cabinet supplied as standard. Two relays for releasing 2 doors or activating 2 devices. Gasket seals provide waterproof and dustproof level to IP65. Two input sensors for monitoring or egress button use. 1.3 Technical Information Intercom features WEB support Multi-Language 1 SIP account Hotline, Call forward, DND, Auto-answer, Volume control Default Ring tone selection/import/delete, Custom Warning Ring tone selection/import/delete Time setting (SNTP/SIP Server/Manual) Support SIP main/standby server Network parameters SIP v1 (RFC2543), v2 (RFC3261), DNS SRV (RFC3263) NAT Traversal: STUN mode. 4 Smart Security IP Intercom DTMF: In-Band, RFC2833, SIP Info, Auto HTTP/HTTPS Web Management IP Assignment: Static/DHCP/PPPoE Network support Bridge mode; TFTP/DHCP/PPPoE Security LLDP, VLAN QoS (802.1pq),VPN(L2TP) Transport Layer Security (TLS) Digest authentication using MD5/MD5-sess. secure configuration file via AES encryption; Phone lock for personal privacy protection; Admin/User 2-level configuration mode. Voice features Wideband Codec: G.722 Narrowband codec: G.711μ/A, G.723.1;G.726, G.729a/b, iLBC; VAD, CNG, AEC, Physical properties 1 hotline programmable key (Speed dial, Intercom etc.); 1 light touch button 1xRJ45 10/100M Ethernet ports; PoE, IEEE 802.3af, class 0. Power adapter: AC 100~240V input DC 12V/1A output; Net weight: 0.52KG, Gross weight: 0.65KG. Each motherboard port, check the picture illustration below "Mother Board Interface". Carton packaging The whole Size:162*112*40mm Product Certification Platform Compatibility Test (non-certificate) ZTE/Alcatel-Lucent/Asterisk/Broadsoft/Metaswitch/Yeastar/Avaya/3CX/Elastix/HUAWEI etc. 5 Smart Security IP Intercom Mother Board Interface 6 Smart Security IP Intercom 2. Intercom Installation Generally, your system administrator will connect your new IS710v2 IP Intercom to company LAN network. If not, please refer to the following information. Open IS710v2 packing box, according to the packing list, check the related attachment to make sure to no omitting. Packing list is as follows. IS710v2 Intercom Quick operating guide 4*Screws 4*Rubbers 2.1 Dimensions The dimensions of IS710 housing and openings. 2.2 Flush Mount If the product is used for flush mounting, then the cutting dimensions will be slightly smaller than the housing of the IP intercom. The cutting dimension is 120mm x 98mm x 45mm (length x width x depth). Please make 2 connectors floating and screw the IP 7 Smart Security IP Intercom intercom on the wall at 4 edges. Please refer to following picture. The front and rear view of flush mount installations are shown below. Front view Rear view 8 Smart Security IP Intercom 2.3 Surface Mount IS710 can also be used for surface mount to provide rating of IP65. The internal and external installation of surface mount is shown below. Internal view external view 3. Configuration of IP intercom You need to know the IP address of IP Intercom before starting setting. You could learn how to get IP address below. Default IP address is 192.168.1.153.in static status. If getting from DHCP, you need to search the related IP address by the third software scanning equipment MAC. (Getting IP by DHCP is not recommended.) 3.1 Remote WEB Management Once input the IP address of intercom on the web browser and tap the “enter” on the keyboard. Then a login screen will pop up from the intercom equipment. You need to input user name and password. Both default user name and password of system is case letters “root” 9 Smart Security IP Intercom After the log-in,the administration web page of the intercom will pop up. The setting and parameter of each option will be described as follows. 3.2 Network This option is used for network setting, please notice that you could set the LAN and VPN. 10 Smart Security IP Intercom 3.2.1 LAN Setting This option is used for setting speaker IP, as shown below. 11 Smart Security IP Intercom 3.3 SIP Account ESCENE IP Intercom can be set up one SIP account. Account’s user name, password and server address are mandatory. If all the information filled is valid and correct, then register will be launched from SIP server after submitting and saving. 12 Smart Security IP Intercom 13 Smart Security IP Intercom 3.4 Programmable keys This function is reserved for the future. 3.5 Voice You can adjust the speaker volume and microphone level which are shown in the following table. Please note that in most cases, if you open the microphone setting and set to level 7, it is recommended that you use speaker volume at no more than level 4, unless the environment is such that a higher speaker level is required. 14 Smart Security IP Intercom 15 Smart Security IP Intercom 3.6 Phone Book This function is reserved for the future. 3.7 Advanced Setting In advanced configuration, system parameters are the main points, other options, such as web dial-up, dialing rules, IP filtering strategy, ring tones, certificate management and global server, etc., are functions which can be ignored. 3.7.1 Intercom Setting System parameters can be configured IP Intercom’s basic configuration, PSTN Settings (reserved), QoS, call related, VoIP call forward, time Settings, and others. The commonly used functions in the option below are mainly used. Other functions do not need to be changed arbitrarily.. 3.7.1.1 Switch signal output 3.7.1.2 Hot Line Hotline function can be set as per the panel below. Default is to hotline immediately. It 16 Smart Security IP Intercom can be set for delay. 3.7.1.3 Time Setting IP Intercom’s time access can be SNTP, manual setting and update at the SIP server below, PSTN is reserved options. 3.7.2 VLAN Setting When IP Intercom‘s application environment involves the VLAN, the below operating settings will guide you. 3.7.3 VPN Setting When IP Intercom‘s application environment involves the VPN, the below operating illustration will guide you . 17 Smart Security IP Intercom 3.8 Maintenance This part mainly introduces some maintenance method. According to below, you can reconfigure the Intercom IP Phone or view Intercom IP Phone log to gain more information about maintenance. 3.8.1 Log For most systems, the log document will offer the record of behavior change of Intercom IP Phone. Log document information contains the question you need to investigate. It can upload log document to the appointed Server as you need to gain information from it. 18 Smart Security IP Intercom 3.8.2 sword If you need to change the default password of Intercom IP Phone, you will need to configure password information. Please note that password changes should be recorded and kept secure. 3.8.3 Factory reset The following will direct you on how to reset the factory default. Please note that factory reset will erase all original configuration information, so be mindful when using this function. IP address will default to : 192.168.1.153. 19 Smart Security IP Intercom 3.8.4 Auto Provision Intercom IP Phone's automatic update feature is that it automatically reads related configuration files from the server, thus replacing manual update operations. The following will illustrate related operations, such as the server name or address, verifying the user name and password (optional), inspection cycle, reboot detection, etc. 20 Smart Security IP Intercom 3.8.5 69 Upgrade This function will cooperate with telecom IMS platform to use. Please follow below. 21 Smart Security IP Intercom 3.8.6 Upgrade The following will direct you when you use FTP to upgrade. 22 Smart Security IP Intercom 3.8.8 P Upgrade The following will direct you when you use TFTP to upgrade. 23 Smart Security IP Intercom 3.8.9 P Upgrade The following will direct you when you use HTTP to upgrade. 3.8.10 boot The following will direct you if rebooting Intercom. Please note that do not need to reboot unless no response or hanging or freezing occurs 24 Smart Security IP Intercom 3.9 Intercom Status The following will direct you information of system operation working time, account registration status and network setting 3.10 System Info The following will direct you equipment name, software/hardware version No, kernel version No. and related server address. 25 Smart Security IP Intercom 3.11 Language The following will direct you how you to change language with the intercom. 4. Brief pictures for application environment The following pictures introduce the practical application of IP intercom. Take door security and fire protection for example. More compatibility application is subject to actual test. 26 Smart Security IP Intercom 4.1 Door security system application 4.2 Fire protection system application 27 Smart Security IP Intercom Notes: Distributed By: Aristel Networks Pty Ltd Unit 1, 25 Howleys Rd Notting Hill Vic 3168 P. 03 8542 2300 28