1
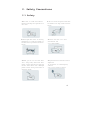
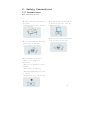
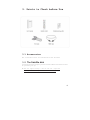
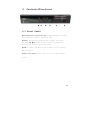
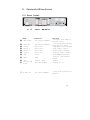
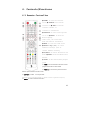
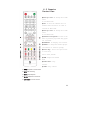
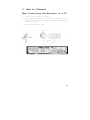
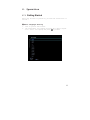
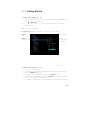
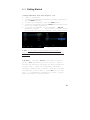
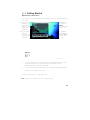
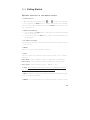
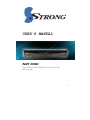
USER’S MANUAL
High Definition Digital Satellite Television Receiver
and Recorder
1
Contents
1. Introduction
-------------------------------------------------------3
1.1 Overview
--------------------------------------------------------
3
1.2 Main Features
---------------------------------------------------
3
2. Safety Precautions -----------------------------------------------4
2.1 safety
------------------------------------------------------------ 4
2.2 Precautions
----------------------------------------------------- 5
3. Points to Check before Use --------------------------------------6
3.1 Accessories
------------------------------------------------------
6
4. Controls/Functions -----------------------------------------------7
4.1 Front Panel
------------------------------------------------------ 7
4.2 Rear Panel
------------------------------------------------------ 8
4.3 Remote Controller ---------------------------------------------9
5. How to Connect --------------------------------------------------11
6. Operation ---------------------------------------------------------12
6.1 Getting Started
------------------------------------------------- 12
6.2 System Setting ------------------------------------------------23
6.3 Channels
------------------------------------------------------- 32
6.4 Electronic Program Guide -------------------------------------- 39
6.5 Entertainment
--------------------------------------------------- 41
6.6 External Device
------------------------------------------------- 44
6.7 System Information --------------------------------------------50
2
6.8 Conditional Access System ------------------------------------- 51
6.9 DVR
------------------------------------------------------------
53
7. Troubleshooting ---------------------------------------------------60
8. Specifications
-----------------------------------------------------61
9. Warranty Information----------------63
3
1. Introduction
h
1.1 Overview
This satellite receiver is designed for the reception of
free-to-air and encrypted channels. Depending on your
location, enjoy the rich choice of different channels
broadcasting a large range of programs: culture, sports,
cinema, news, events, etc. This receiver is assembled with
highly qualified electronic parts.
1.2 Main Features
▪ Video Resolution : 1080p / 1080i / 720p / 576p / 576i
▪ DVR Ready via USB External Mass Data Storage Device
▪ Time Shift, Record & Playback
▪ USB 2.0 Host for MP3 Playback, JPEG Viewing & Firmware Update
▪ 10,000 Programmable Channels
▪ DVB-S, DVB-S2 Compliant
▪ HDMI Output
▪ On-screen display with true color full resolution
▪ Advanced Blind Scan
▪ Auto & Manual Channel Search
▪ Dolby Digital Output
▪ Channel Sorting by Alphabet, Transponder or CAS
▪ 16 Favorite Channel Groups
▪ OSD in 12 Languages
▪ Multi Picture Display and Zoom
▪ 16:9 Full Screen, 4:3 Letterbox & Full Screen
▪ DiSEqC 1.2 and USALS Compatible
▪ Data Transfer Between Units
▪ Extended Electronic Program Guide (EPG) and program reservation
through EPG
▪ Teletext by OSD/VBI (Vertical Blanking Interval)
4
▪ Auto Voltage (AC 100 - 250V) SMPS
▪ High speed software upgrade via USB 2.0
▪ Parental Lock/ Installation Lock / Receiver Lock / Channel Lock / Lock
Channel Confirm
▪ Video color adjustment function. Manufactured under license from Dolby
Laboratorie
“Dolby” and the double-D Symbol are trademarks
of Dolby Laboratories.
✽ DiSEqC is a trademark of EUTELSAT
5
2. Safety Precautions
2.1 Safety
l
Be sure to read this manual
before starting the operation of
the unit.
l Never open the cover. It is very
l
Do not touch the power cord with
wet hands as it may cause electric
shock.
l
Place the unit in a well
dangerous to touch the inside of
the unit due to possible electric
shock.
ventilated and
cool environment.
l
l
When you do not use this unit
for a long time, make sure that
power cord is pulled out from the
outlet. Also do not use a damaged
power cord as it may cause fire or
electric shock.
A professional installation is
required.
If reception is interrupted,
contact
your local service centre
6
2. Safety Precautions
2.2 Precautions
When installing the unit
l
Install the unit horizontally.
An uneven
installation may cause the unit
to be damaged.
l
Do not put heavy items such as
a TV set on the unit. That may
damage the unit.
l
Do not put water holding items
such as vases on the unit.
l
Do not leave the unit where the
water drops or splashes.
l
Do not install the unit:
▪ Where it is subject to
vibrations
▪ Where it is exposed to direct
sunlight
▪ Where there is humidity
▪ Where the temperature is too high
or too low
▪ Where there is no ventilation
7
l
Moving the unit to a hot area
from a cold one will cause
condensation. Do not operate the
unit for one or two hours or until
it has dried completely.
8
3. Points to Check before Use
3.1 Accessories
The accessories below are included with this receiver:
3.2 The Satellite dish
Your dish should be properly installed and azimuth and elevation must
be precisely set up
✽ This unit supports DiSEqC 1.2 and can work with a compatible
antenna positioner. Ask your dealer for information.
9
4. Controls/Functions
❶
❸
❷
❹
❻
❺ h
4.1 Front Panel
❶ Standby/Power on Indications Lamp: Flashes red light in ‘Standby’
mode and shows no light in ‘Power ON’ mode.
❷ Power: Switches the receiver between ‘Standby’ and ‘Power
ON’ modes. ❸ -❹ CH. (▲/▼): To switch channels or change the
cursor position on the application screen.
❺ USB: To connect USB devices such as Memory stick or external
Hard Disk Drive.
❻ Smart Card Reader: Insert smart card for encrypted channel
access.
10
4. Controls/Functions
4.2 Rear Panel
Name
Connector
❶
LNB INPUT
IEC 169-24 FEMALE
❷
LOOP OUT
IEC 169-24 FEMALE
❸
❹
❺
❻
❼
VIDEO
AUDIO L
AUDIO R
S/PDIF
LAN
RCA cinch
RCA cinch
RCA cinch
RCA cinch
RJ-45
❽
HDMI
HDMI
❾
USB
RF OUT UHF
❿ 21-69
TV ANT IN
1USB A -type
IEC 169-2 MALE
IEC 169-2 FEMALE
Function
IF input from LNB to
digital tuner
IF loop-through output
from digital tuner
Composite video output
Left audio output
Right audio output
Digital audio output
10/100Mbps Ethernet
Digital Video/Audio
Output
USB2.0
Output to TV
Input from terrestrial
antenna
11
4. Controls/Functions
4.3 Remote Controller
English
❶ POWER: To turn the receiver
On/Off ❷ STAND BY: Just turn the
receiver off ❸ TEXT: To show the
teletext contents if
teletext is transmitted
❹ SUBTITLE: To turn closed captions
on or off ❺ AUDIO: To show the
Multi-language
audio track, the stereo-mono
mode and subtitle information
❻ MUTE: To turn the sound On/Off
❼ Numeric Keys (0-9): To enter
numerical settings (such as
channel numbers) directly
❽ TV/RADIO: To switch between TV and
Radio ❾ SLEEP: To set the STB off after
minutes
❿ GUIDE: To show the TV/Radio program
guide
INFO: To show information about the current
program. Press twice to show detail
RECALL: To move to the previous channel
Used for special functions in menu mode
ASPECT: To select
a TV aspect ratio
with Pan Scan or Letter-Box(4:3) (Full screen or pillar box(16:9)
MENU: To enter or exit the main menu
12
EXIT: To exit from the present menu and
move to the previous menu
Up & Down: To switch channels in non-menu mode and move the cursor up/down in
menu mode
13
4.3 Remote
Controller
❶ Vol Up & Down: To change the volume
level
in non-menu mode
❷ OK: To show the Channel List in
nonmenu mode and select an item or
confirm in menu mode
❸ Vol Up & Down: To change the volume
level
in non-menu mode
❹ Double arrow Up/Down: To move to the
next or previous page when many pages
are available
❺ FILELIST: To display the filelist
❻ GROUP: To change the channel groups
(Satellites or favorite groups)
❼ Color Key: Select the option such
as View List,
Select Disk, Rename
❽ REW: Playback in rewind
mode
❾ Time Shift: Play
Content
❿ PLAY: Play Content
FWD: Playback in forward mode
REC: Start recording
STOP: Stop Playback
SLOW: Playback in slow mode
ADVANCE: Go to live channel
14
MOSAIC: To display multiple pictures
FREEZE: To pause the video. Press again to resume the video
ZOOM: To zoom In/Out
V.FORMAT: To switch the resolution of video
output
F1~F4: Reserved button for new function
15
5. How to Connect
English
When Connecting the Receiver to a TV
1.
Connect the TV antenna to TV ANT IN
2.
Connect the Video and Audio of the TV to Video and Audio: connect
the red and white connectors to Audio R and Audio L, and the yellow
connector to Video
3.
Connect your satellite dish
16
6. Operation
6.1 Getting Started
After your receiver is powered on, proceed with installation as
follows :
➊ Menu Language Setting
1.
2.
Turn on your TV and receiver.
The wizard menu for language selection will appear.<Figure
6.1.1> Select one language and press
to proceed.
17
6.1 Getting Started
➋ Antenna Setup
1.
2.
3.
Press the MENU button to display the main menu.
and
to move in the menu.
Use
3. Press OK on ‘Dish Setting’. The following window will appear.
<Figure 6.1.2> If you have a motorized dish, press OK on ‘Motorized
Setting’. < Figure 6.1.3>
✽ Note: Enter a 4-Digit password if need arises. The default password
is ‘0000’.
4. Select the item that you want to edit, and set its parameters as
desired. <Dish Setting>
▪ LNB Power: Select among ON/OFF/13V/18V.
▪ LNB Type: Select among Single/Universal/OCS/SaTCR.
▪ LNB Freq: Set the frequency of the LNB oscillator.
▪ 22KHz: When not AUTO, set the signal path from LNB or switch by selecting
a control signal
among 0/22KHz.
▪ DiSEqC 1.0: Select DiSEqC 1.0 Port
▪ DiSEqC 1.1: Select DiSEqC 1.1 Port
5. Select the item that you want to edit and set its parameters as
desired. <Motorized Setting>
▪ Frequency: If the default TP frequency is not appropriate, you can
select another
TP frequency at which to check
for signal.
18
▪ DiSEqC Motor: Select DiSEqC protocol among OFF/1.2/USALS as
appropriate for your Motor.
19
6.1 Getting Started
(When the DiSEqC Motor parameter is set as 1.2 <Figure 6.1.4>)
▪ Satellite: Select any satellite by pressing
buttons.
▪ Frequency: Displays the current TP value of the selected
satellite.
▪ Move: Move the dish position to west/east by pressing
buttons.
▪ Move Fine: Move the dish position 1 step at a time to west/east
by pressing
buttons.
▪ Motor Control: Control motor by press OK button on the remote.
▫ Recalcuate: Recalculate the position of all other saved satellites relative
to the known position.
▫ Reset System: Reset the position of all saved satellites.
▫ Goto Reference: Move the dish to the 0 position.
▫ Disable Limit: Disable east and west limit.
▫ Enable Limit: Enable the saved east and west limit.
▫ Set East Limit: Edit & Save east limit by pressing
or OK buttons
▫ Set West Limit: Edit & Save limit by
pressing
or OK buttons
▪ Go To: Go to the position of the
saved satellite.
▪ Save: Save the current setting
of DiSEqC 1.2 system.
20
6.1 Getting Started
(When the DiSEqC Motor parameter is set as USALS <Figure 6.1.6>)
▪ Sat Degree: Satellite location.
▪ Antenna Position: Press OK.
▪ Goto Reference: Move the dish to the reference 0 position.
▪ Antenna Longitude: Your longitude at present.
▪ Antenna Latitude: Your latitude at present.
?
Note: You need to know what LNB you are using to correctly
set the L.O. (local oscillator) frequency.
?
Note: You need to understand how your receiver is connected
to properly set the 22KHz and DiSEqC.
Figure 6.1.
Figure 6.1.7
6. When you are done, press the EXIT button.
21
6.1 Getting Started
➌ Satellite Scan
Through this function, the receiver searches for all the
available channels and saves them in memory.
▣ Auto Scan <Figure 6.1.8>
1. Select the satellites you want to search by pressing the OK button
on the remote. You can select more satellites by pressing the
button and OK button on the remote.
▪ Search Type: Select the type of channel search you want by
pressing
buttons on the remote.
▫ All: To search all the Free To Air and scrambled channels, TV & Radio channels.
▫ Free: To search Free To Air channels only.
▫ TV: To search TV channels only.
▪ Network Search: Select Network Search ON/OFF to find more transponders
through NIT Search.
▪ Scan: Begin channel search of the selected satellite.
2. Press OK under ‘SCAN’ to scan the
selected satellites. <Figure 6.1.9>
22
English
6.1 Getting Started
▣ Blind Scan <Figure 6.1.10>
1.
Select the satellites you want to search by pressing the OK button
on
the remote.
Press
2.
to
set the “Polarization” and “Scan
Mode”options.
▪ TP: Select TP Frequency
▪
Polarization:Select among All / Vertical / Horizontal
▪ Mode:
All / Free /
Select among
TV
▪ SCAN: Begin
search of
channel
the selected
satellites.
Figure 6.1.10
▣ Manual Scan <Figure 6.1.11>
1.
2.
3.
Select a transponder.
To change a transponder’s information (Frequency, Symbol Rate),
use the NUMERIC buttons.
To add a new transponder, press the GREEN button.
4.
To delete a transponder, press the YELLOW button with the cursor
next to the Frequency parameter.
5.
To search a transponder, set its different parameters and press
23
RED button.
24
6.1 Getting Started
▣ Package Identifier (PID) Scan <Figure 6.1.12>
1.
2.
3.
Select a transponder.
To change a transponder’s information (Frequency, Symbol Rate),
use the NUMERIC buttons.
To add a new transponder, press the GREEN button.
4.
To delete a transponder, press the YELLOW button with the cursor
next to the Frequency parameter.
5.
To search a transponder, set its different
parameters and press
You can search a specific channel
of the transponder by setting its PID data (Video, Audio and PCR).
Figure 6.1.11
Figure 6.1.12
✽ Note: If you cannot access programs after correctly
completing a scan procedure, please contact your seller or your
installer.
▣ OTA Menu 1. Scan Mode ▪ Default: OTA service by default
setting ▪ User: OTA service by user’s setting 2.
Select a
satellite for OTA service (Available only when Scan Mode sets
as User’s mode) 3.
Enter the transpondes’s information
(frequency, symbolrate)by 0~9 buttons. (Available only when
Scan Mode sets as User’s mode) 4.
Scan. 5.
Press RED button to start
If transponder’s information is correct, a pop-up
window will display to update software.
25
6.1 Getting Started
➍ Channel Selection
You can use / to navigate between channels until you find the channel
you want.
▣ If you know
number, you
with the
buttons and
until the
changed.
the channel
can enter it
NUMERIC
wait 2 seconds
channel is
▣ If you know
name or
or CAS, you
display the
<Figure
the channel
transponder
can press OK to
channel list
6.1.13>
Figure 6.1.13
1.
In the left side of screen, detailed information about the
selected channel will be displayed. (Satellite Name,
Frequency(Polar) and Channel Name)
2.
You can use the following buttons to navigate between channels:
▪:
Moves one channel up/ down.
: Moves one page up / one page down.
▪ RED: Shows all channels in the current group.
26
▪ GREEN: Shows all channels sorted alphabetically.
▪ YELLOW: Shows all channels sorted by Transponder.
▪ BLUE: Shows all channels sorted by CAS system.
3. Press OK when the selection bar is positioned on the desired
channel.
27
6.1 Getting Started
➎ Other Functions of the Remote Control
▣ Volume Control
1. While watching a program, press
or
to control the volume.
2. You can press the MUTE button to remove the sound of the program:
the mute icon will be displayed. Press the MUTE button again to turn
the sound back on.
▣ Channel Information
1. You can press the INFO button to display the information banner
for a few seconds.
2.
If you then press the INFO button again, a detailed banner will
be displayed.
▣ TV/ RADIO switching
You can press this key to change from a TV channel to a Radio channel
or vice versa.
▣ RECALL
Press to return to the previous channel.
▣ Audio
Press to adjust the subtitle and/or audio status of the current
channel:
▪ Audio Mode: Select between, Stereo -> Mono-Left -> Mono-Right
▪ Audio Track: Select between tracks available in this program
▪ Audio Level: Select between, High -> Medium -> Low
✽ Note: These subtitle and audio parameters are workable only when
the desired channel supports these functions.
▣ TEXT The Teletext service is a text data service sometimes available
from the Service Provider.
▣ FREEZE
You can press this key to freeze the video. Press it again
28
to resume the video.
▣ GROUP
When watching TV or listening to Radio, you can press this button
to view the list of satellites and/or favorite channel groups. Only
registered satellites and favorite groups are displayed.
29
English
6. Operation
6.1 Getting Started
▣ Multi Picture Display <Figure 6.1.14>
You can press
to display multiple pictures;
you can choose the number of pictures such as 1X2, 2X2, 2X3 or 3X3.
Figure 6.1.14
▣ ZOOM
You can press
to zoom in
1. Press the FREEZE button
the video.
and press
.
You can zoom in sections of Frozen Video <Figure 6.1.15>
2.Whilst watching a program, press
You can zoom in sections of playing video. <Figure 6.1.16>
3. To cancel the freeze status, please release the zoom status.
Figure 6.1.15 Figure 6.1.16
30
6.1 Getting Started
▣ SUBTITLE <Figure 6.1.17>
You can press
to select the subtitle language of current channel.
▣ SLEEP <Figure 6.1.18>
You can set the your receiver to turn off after a few minutes. Press
to set the sleep timer.
▪ To cancel the sleep timer, please
press until you set time
“0 min”.
as
(Disable, 10, 20, 30, 60, 100, 120 Minutes)
Figure 6.1.17
Figure 6.1.18
▣ V.FORMAT <Figure 6.1.19>
You can press
to change the video resolution Select
between1080p->1080i->720p-> 576p->576i
▣ WIDE <Figure 6.1.20>
You can press ASPECT to change the TV aspect ratio.
▪ 4:3: Pan-Scan or Letter-Box
▪ 16:9: Full-Screen or Pillar-Box
31
Figure 6.1.19
Figure 6.1.20
6.2 System Setting
➊ Time Settings
This submenu allows you to set your local time, wake up time, wake
up channel and sleep time. <Figure 6.2.1>
▪ GMT Usage: Set this ON for the local time to be determined by adjusting
the time
difference with the GMT (Greenwich Meantime) according
to your location.
▪ Current Date: If GMT Usage is OFF, you can modify the date by pressing
OK.
▪ Current Time: If GMT Usage is OFF, you can modify the time using the
NUMERIC buttons.
▪ Summer Time: Select the period during which Summer Time is in force.
▪ Local Offset: If GMT Usage is ON, Local time is GMT time + Local Offset.
▪ Wake Up Mode: Select the wake up frequency. (Off/Once/Daily/Mon~Fri)
▪ Wake Up Time: Set the wake up time using the NUMERIC buttons.
▪ Wake Up
Channel: Press OK to set the wake up channel.
▪ Sleep Mode: Select the Sleep frequency. (Off/Once/Daily/Mon~Fri)
32
▪ Sleep Time: Set the sleep time using the NUMERIC buttons.
▪ Timer Lead Time: Press OK to set the Timer Lead In And Lead Out Time.
Figure 6.2.1
6.2
System
Setting
➋
A/V
Output
Settings
This
submenu
allows you
specify the
audio/video
output.
<Figure
to
6.2.2>
▪ Audio Language: Set the default audio language when selecting a
channel.
▪ Subtitle Language: Set the default subtitle language.
33
▪ Screen Format: Select the screen format. (16:9 / 4:3)
▪ Display Format: Select the TV aspect ratio(Full Screen/Pillar-Box)
▪ Video Format: Select the Video format.(1080p, 1080i, 720p, 576p, 576i)
▪ Digital Audio: Select the Audio output type.(DOLBY SPDIF/PCM/DOLBY
HDMI)
Figure 6.2.2
34
6.2 System Setting
➌ OSD Settings
This submenu allows you to set the menu language, OSD
transparency and Information and Volume timeouts. <Figure
6.2.3>
▪ Menu Language: Select the desired language for the menu.
▪ Information Timeout: Select the display duration of the information
banner.
(1, 2, 3, 5 or 10 seconds)
▪ Volume Timeout: Select the display duration of the volume box. (1,
2, 3, 5 or 10 seconds)
▪ Recall List: Set ON to display previous channel list.
Figure 6.2.3
35
6.2 System Setting
➍ Security Settings
This submenu allows you to set password options and to lock
or unlock access to menus (✽ Note: PIN code and password are
the same). <Figure 6.2.4>
▪ Receiver Lock: Set ON to require entering a PIN code at powering on.
▪ Install Lock: Set ON to require entering a PIN code to access the
installation menu.
▪ Channel Lock: Set ON to require entering a PIN code to access the
channels menu.
▪ Lock Channel Confirm: Set ON to require entering a PIN code to access
a locked channel.
▪ Age Limit: Set to prevent children or unauthorized people from
watching programs.
Select among (Free / 8 above / 12 above / 15
above / 18 above). When program information
(age limit) is
available from broadcaster and this age limit exceeds the selection,
a PIN code is
required to access the channel/program.
▪ Current Password: To change your password, first enter your current
password.
▪ New Password: Enter the new password that you want to set.
▪ Verify Password: Enter the new password again for confirmation.
✽ Note: The default password is ‘0000’.
36
Figure 6.2.4
6.2 System Setting
➎ Database Reset
This submenu allows you to restore the factory set values (useful
when encountering problems after changing settings). <Figure 6.2.5>
▪ Delete Radio Channels: Erase all radio channels in the database.
▪ Delete Scramble Channels: Erase all scramble channels in the database.
▪ Delete All Channels: Erase all channels.
▪ Factory Set: Erase all channels and restore the factory default
settings.
37
Figure 6.2.5
6.2 System Setting
➏ IP Setting
If the Network supports DHCP, IP settings can be allocated
automatically. If the Network does not support DHCP, the Addresses
must enter manually (Static IP). <Figure 6.2.6>
▪ Connection Type : Ethernet/Wi-Fi to select
▪ DHCP Usage: On/Off to receive IP settings automatically.
▪ IP Address: Enter the IP address.
▪ Subnet Mask: Enter Subnet Mask Number from your Network.
38
▪ Gateway: Enter IP address of Gateway (e.g.router).
▪ DNS: Enter IP address of main DNS server.
▪ MAC Address: MAC address display.
Figure 6.2.6
Figure 6.2.7
▪ Firmware update: Support download from a LAN.
1. Press BLUE button.
Figure 6.2.8
39
6.2 System Setting
▪ Wi-Fi Wizard: Scan Wi-Fi list.
1. Press Green button.
Figure 6.2.9
▪ Wi-Fi Setting
1.
Press Yellow button.
Figure 6.2.10
*Note: To use Wi-Fi, Please use External USB Wi-Fi Adaptor.
* Compatible Wi-Fi chipset List: Ralink RT5370.
40
6.2 System Setting
➐ Front Display Setting
This submenu allows you to set the
Standby Mode. <Figure 6.2.11>
▪ Standby Mode: Select the
Standby Mode.
Figure 6.2.11
➑ Key Setting
This submenu allows you to set the
Function Key (Auto Scan / Lock
Channel / Timer Manager / Dvix List
/...)
Figure 6.2.12
➒ Connecting your receiver to a PC via your Network
1. Follow these instructions prior to connecting your receiver to
your PC:
a) Run the PC Tool program (STB Daemon) before connecting to
your PC,
this can be downloaded from
www.strong-technologies.com
b) Click Browser and select a
sharing folder on your PC.
41
6.2 System Setting
c) Press 'OK' then select STB Daemon and
the window will be hidden. You can see
the icon on bottom right of the window
screen.
2. Connect an Ethernet cable from your
to your PC.
3.Press menu, Select System Settings, Select IP Settings: DHCP
Usage 'ON' and pressing the RED Key
A)
If your Network supports DHCP, IP settings can be allocated
automatically by turning DHCP Usage 'ON' and pressing the
RED Key
b) If your Network does not
support DHCP, the IP Address must
be entered manually (Static IP)
c) Click the network icon on
bottom of your PC's
Windows
d) Now select the Support Tap, you
can allocate your IP address.
4. Go to File Manager on your
and press the YELLOW Key to type
the IP address of PC which is
running STB Daemon.
42
6.3 Channels
➊ Set Favorites
This submenu allows you to set up favorite groups of channels. You
can select TV or Radio channels in an alternative way by pressing
the TV/RADIO button. The receiver supports 16 favorite groups.
1. Press on OK ‘Set Favorites’. The list of groups will be displayed.
<Figure 6.3.1>
2. Press
and OK to choose a group. The following menu will
be displayed. <Figure 6.3.2> If you want to change the name of a
favorite group, press the RED button.
3. Press OK to add (or remove if previously added) the selected
channel to/from the favorite channel group.
4. Press the EXIT button to return to the previous menu.
Figure 6.3.1
Figure 6.3.2
43
6.3 Channels
➋ Edit Channels
This submenu allows you to rename channels and input user PID. You
can select TV or Radio channels in an alternative way by pressing
the TV/RADIO button. You can choose a channel list group by pressing
the GROUP
button.
1.
on ‘Edit
The following
be displayed.
6.3.3>
2.
3.
4.
Press OK
Channels’.
menu will
<Figure
Press OK
channel
to edit.
Press OK
to rename
the keypad
on the
that you want
on ‘Edit Name’
the channel;
will be
displayed.
Similarly, you can edit the PID data using the NUMERIC keys.
✽ Note: The VIDEO PID, AUDIO PID and PCR PID are very important
for optimal satellite signal
reception. We recommend you
get professional advice where available.
44
Figure 6.3.3
45
6. Operation
6.3 Channels
➌ Move Channels
This submenu allows you to move channels. You can select TV or Radio
channels in an alternative way by pressing the TV/RADIO button. You
can choose a channel list group by pressing the GROUP button.
1.
2.
3.
4.
5.
Press OK on ‘Move Channels’. The following menu will be
displayed.<Figure 6.3.4>
Press OK on the channel that you want to move; a ‘move’ icon
will
be displayed.
After press , use the
,
buttons to move the selected channel.
Press OK again to place the channel.
Press
to
previous
,
,
, NUMERIC
the EXIT button
return to the
menu.
Figure 6.3.4
\
46
6.3 Channels
➍ Lock Channels
This submenu allows you to lock channels to control access to them.
Once a channel is locked, you will be asked to enter a password
whenever you try to watch it. You can select TV or Radio channels
in an alternative way by pressing the TV/RADIO button. You can choose
a channel list group by pressing the GROUP button.
✽ If you set ‘Lock Channel Confirm’ (refer to <6.2>security
setting) to OFF, you will not be asked to enter a password even
if the channel is locked.
1.
2.
3.
Press OK on ‘Lock Channels’. The following menu will be displayed.
<Figure 6.3.5>
Press OK on the channel that you want to lock/unlock; the lock
icon will be displayed/removed.
Press the EXIT button to return to the previous menu.
Figure 6.3.5
47
6.3 Channels
➎ Skip Channels
This submenu allows you to skip channels. Once a channel is set to
be skipped, it will be whenever you navigate channels using
in non-menu mode.
You can select TV or Radio channels in an alternative way by pressing
the TV/RADIO button. You can choose a channel list group by pressing
the GROUP button.
✽ Note: You can still access a ‘skipped’ channel if you enter its
number using the NUMERIC buttons in non-menu mode.
1.
2.
3.
Press OK on ‘Skip Channels’. The following menu will be
displayed.<Figure 6.3.6>
Press OK on the channel that you want to skip/un-skip; the skip
icon will be displayed / removed.
Press the EXIT button to return to the previous menu.
48
Figure 6.3.6
6.3 Channels
➏ Delete Channels
This submenu allows you to delete channels. You can select TV or Radio
channels in an alternative way by pressing the TV/RADIO button. You
can choose a channel list group by pressing the GROUP button.
✽ Note: Be careful! If you delete a channel, you will not be able
to access it again until you rescan.
1.
on
2.
3.
4.
Press OK
‘Delete
Channels’. The following menu will be displayed. <Figure 6.3.7>
Press OK on the channel that you want to set/unset for deletion;
the delete icon will be displayed/removed.
Press the INFO button to delete all channels in the current list;
you will be asked to enter your password.
Press the EXIT button to return to the previous menu and confirm
deletion.
49
Figure 6.3.7
6.3 Channels
➐ Add Channels
This submenu allows you to add channels.
1.
2.
Press on ‘Add Channels’. The following menu will be displayed.
<Figure 6.3.8>
Press
to change the parameter.
▪ Frequency: Select TP Frequency
▪ Channel Name: Press to display Keypad pop-up; Edit a channel’s name
▪ Channel Type: Select among TV / RADIO
▪ You can add specific channel of the transponder by setting its PID
data (Video, Audio and PCR).
▪ Video Type: Select the video type (MPEG1/2, H.264)
▪ Audio Type: Select the video type
50
(MPEG1/2, HE-AAC, Dolby Digital(AC3), MPEG4, AAC, Dolby Digital+(DD+))
Figure 6.3.8
6.4 Electronic Program Guide
➊ EPG
This submenu allows you to access the electronic program guide when
available.
1. Press the GUIDE button to display the guide menu. <Figure 6.4.1>
2. Press
3. Press to select another channel. <Figure 6.4.1>
4. Press OK to watch the selected channel and access its EPG data.
If you press OK in the right side of the screen (Event display
list).
▪ If the current time EPG is selected, you will return to the previous
menu and get signal from the selected channel.
51
▪ If a future time (next) EPG is selected, the selected program will
be reserved and the event color will change.
5.
6.
7.
8.
You can select TV or Radio channels by pressing the TV/RADIO
button
You can choose a channel list group by pressing the GROUP button.
You can access the timer menu by pressing the RED button. <Figure
6.4.2>
You can choose a EPG mode by INFO button
➋ Timer
This sub menu allows you to set the on/off time of your receiver.
1.
2.
3.
This submenu allows you to set on/off times of your receiver.
To display the timer menu, press the RED button while in the guide
menu. <Figure 6.4.2>
Press OK to select a timer’s parameter.
Press
to change the parameter.
▪ Timer No: Select the timer that you want to modify. (1- 32 )
▪ State: Select the timer frequency. (off/once/daily/Mon~Fri/weekly)
▪ Date: Press OK to display a Calendar pop-up; Select a date
▪ Start Time: Input the time for your receiver power-on; use the NUMERIC
buttons
▪ End Time: Input the time for your receiver power-off; use the NUMERIC
buttons
▪ Channel: Press OK to display a Channel list pop-up; Select a channel
▪ File Name: Press OK and enter file name using keypad.
▪ Record: Set the record mode (ON/OFF)by using the left and right arrow
button.
▪ Power Off: Select Power Off should you wish the receiver to turn to
standby after recording has finished.
6.4 Electronic Program Guide
52
Figure 6.4.1
Figure 6.4.2
▪ If you want to record a program in the right side of the screen, you
can select a program by using OK. The selected program will be reserved
and the event color text will change to red.
<Figure 6.4.3>.
▪ You can also see change the timer menu.<Figure 6.4.4>
Figure 6.4.3
Figure 6.4.4
6.5 Entertainment
53
➊ YOUTUBE
1.
: To select YouTube movie.
2. OK: To play movie.
▪ Option: To search by Category. Viewed,
Time, Location.
▪ Search: To search by key word.
▪ Next: To move Next page.
▪ Previous: To move previous page.
▪ REPLAY: To replay the current movie.
▪ PAUSE: To pause the movie.
▪ STOP: To stop the movie.
▪ Fullview: To view the movie in full
size.
➋ Internet Radio
▪ Search: To search by key word.
▪ Genres: To search by genre.
▪ Favorites: To set favorite channels.
▪ Record: To record Radio.
1. Search Radio channel by Key word or Genre.
2. Select a channel by
<Figure 6.5.2>
3. Press OK to play Radio.
✽ Note: To record Radio,
please install USB
storage.
Figure 6.5.1
Figure 6.5.2
Figure 6.5.3
54
6.5 Entertainment
➌ Weather
Searching the Weather for City,
Country.
1. Press
Blue button.
2. Enter the City or Country name.
3. Press EXIT to save and exit the
window.
▪ View List: To view the saved list.
▪ Fahrenheit/Celsius: To display the
temperature.
▪ Add City: To add City on list.
▪ Rename: To modify the City name.
▪ Save Info: To save the added City
name.
➍ MAP
Searching the MAP for City, Country.
Blue button.
1.
Press
2. Enter the City or Country name.
3. Press Exit to save and exit the window.
▪ View List: To view the saved list.
▪ Move:
▪ Zoom In: To enlarge MAP.
▪ Zoom Out: To reduce MAP.
▪ Add City: To add City on list.
▪ Rename: To modify the City name.
▪ Save Info: To save the added City name.
Figure 6.5.4
55
Figure 6.5.5
56
6. Operation
English
6.5 Entertainment
➎ Calculator
This feature allows you to use a calculator <Figure 6.5.6>
▪ Use the Numerical and the arrow buttons on the remote control.
Figure 6.5.6
➏ Calendar
Figure 6.5.7
57
6.6 External Device
➊ Disk Manager
Use the cursor keys to activate the desired functions from this menu.
▪ Default Disk: If you have additional Storage devices connected to
your receiver (i.e. USB HDD) you can select which storage device is
to be the default drive for playback and recording.
▪ Disk Information: Select the Hard disk volume, USB device.
Information of the storage devices will be displayed (i.e. used size, total
size, free size)
▪ Format Disk: Format disk enables you to delete all information stored
on the selected
storage device
✽ Warning: If you select Format Disk all data on the storage device
will be deleted.
▪ Testing USB Speed: Press to test USB speed for DVR.
▪ Timeshift Rec Time: Set the preferred Timeshift Recording Time.
(10Min/30Min/60Min/90min/120min)
▪ Skip Time:
amount of
Forward
time
playback
Set the
preferred
Skip
and Back
during
(30sec/1Min/2Min/3Min/5Min/10Min20Min/30Min)
Figure 6.6.1
58
6.6 External Device
➋ File Manager
[Display]
1.
BLUE KEY: To preview files.
2.
GROUP KEY: To filter files.
Figure 6.6.2
6.6.3
Figure
[File Management (Copy, Move, New Folder, Delete, Rename)]
1.
RED KEY: To select files.
2.
MENU KEY: To select a function.
3.
Copy (or Move): To copy(or Move) files.
4.
Paste: To paste the copied files to a folder.
59
Figure 6.6.4
Figure 6.6.5
6.6 External Device
[MP3 Play]
1.
OK in
2. Adjust
Select the MP3 file you want to play using the
the file list. <Figure 6.6.6>
,
the volume using ▲ / ▼
3. Press the button to display the MP3 file list.
4. Press the button to display information about the selected MP3
file.
▪ LIST: Displays / hides the file list.
▪ INFO: Shows information about the selected file.
▪ YELLOW: Selects the hard disk or usb device.
60
Figure 6.6.6
6.6
External Device
[JPG View]
1.
Press
to select a picture then press OK button to display
the selected picture. <Figure 6.6.7>
2. Press the EXIT button to hide the file list. Select and option
using
, OK. <Figure 6.6.8>
3. Press the
4. Press the
MP3 file.
button to display the JPG file list.
button to display information about the selected
▪ HIDE infobar: Hide all infos.
▪ LIST: Shows / Hides the JPEG file list.
▪ INFO: Shows information about the selected file.
▪ YELLOW: Selects the hard disk or usb device.
61
Figure 6.6.7
Figure 6.6.8
6.6 External Device
[VIDEO Play]
1.
Select the video file you want to play using the
,
62
OK in the file list.<Figure 6.6.9>
Figure 6.6.9
[Update (Firmware, Channel)]
1.
Select the software you want to download by using
in
the menu.
2. Press the OK button to start the download. <Figure 6.6.11>
✽ Warning: do not switch off your receiver before the download is
complete.
Figure 6.6.11
63
6.6 External Device
➌ Timer Manager
(Manage Existing or Add Manual Timers for Reserving or Recording of
Programs)
1.
Press the OK button on the desired timer number to access and
modify the timers’ parameters
2.
Press the
parameters
3. Press
the
and
arrow buttons to select timer
arrow buttons to change parameters
▪ Timer No: choose the desired timer using
buttons (1-32)
and
Arrows
▪ State: Select timer frequency (off/daily/Mon-Fri/Weekly)
▪ Date: Press the OK button to display the calendar and select the
desired date
▪ Start Time: Using the NUMERIC buttons input the required start time
▪ End Time: Using the Numeric buttons input the required end time
▪ Channel: Press the OK button to display the channel list and select
a channel
▪ File Name:
the OK
and enter
Name
keypad.
Press
button
File
using
▪ Record:
record
(ON/OFF)
the left
right
button
Set the
mode
by using
and
arrow
▪ Power Off:
Power Off
you wish
receiver
to
after recording
Select
should
the
to turn
standby
has finished <Figure 6.6.12>
64
Figure 6.6.12
6.7 System Information
Your receiver displays current information <Figure 6.7.1> regarding
model name, software version and date of manufacture. This info is
useful when downloading new software. Please note if you have
performed a software update you must also perform a factory reset
of the receiver. Please see Database Reset section in the Systems
settings menu for instruction on page 23.
65
Figure 6.7.1
6.8
Conditional Access System
➊ Card Initializing
To Enjoy CONAX CAS7 scrambled channels, you will need a Smart Card
from the service provider (program distributor). If you are
subscribing to services from more than one service provider, you will
need a Smart Card from each one. Since a Smart Card is connected to
a single service provider, a limited range of channels will be
available via it.
✽ Note: Without the Smart Card, you can watch only Free-To-Air
programs.
1.
2.
3.
Insert the Smart Card into the receiver’s slot designed for it.
The message ‘Smart Card Initializing’ will appear on the screen.
<Figure 6.8.1>
After the message ‘Smart Card Initializing’ has disappeared,
66
you will be able to watch the channels offered by the service
provider.
Figure 6.8.1
6.8 Conditional Access System
➋ The Status of the Smart Card
1.
You can access detailed information about the Smart Card using
the / keys in the Main Menu to select ‘CA’ and pressing OK. <Figure
6.8.2>
2.
Proceed with further instructions displayed on the screen to
check more detailed information depending on the Smart Card in
use.
✽ Note: Further detailed information is not mentioned in this
67
Figure 6.8.2
68
English
6.9 DVR
➊ File List
▣
File Playback
1. Press
to show the file list. Select the file you want to play
back by using OK
2 Press
In the left side of screen, detailed information
about the selected file will be displayed. (Recorded Date/Time, Used
size, Total Size) <Figure 6.9.1>
▪ To see a
screen,
And then the
time-bar
full
press OK.
following
will
appear.<Figure 6.9.2>
Figure 6.9.1
69
Figure 6.9.2
6.9 DVR
▣ Edit Menu You will be asked to enter a password whenever you try
to enter it. Press Menu.
The popup menu for selection will appear<Figure 6.9.3>. Select the
item that you want to edit, and set its parameters as desired
1.
2.
Normal Mode: Press OK on the file that you can see the preview
of a selected file.
Lock Mode: Press OK on the file that you want to lock/unlock.
3.
Delete Mode: Press OK on the file that you want to delete.
▪ GROUP: Select between, File Mode
Dir Mode
▪ ADVANCE: Shows all sorted files. Select between, Sort by name
by time.
Sort
✽ If you
set
‘Channel
Lock’
(refer to
<Figure
70
6.2.4>security setting) to OFF, you will not be asked to enter a
password even if the channel is locked.
4. Rename Mode: Press OK on the file that you want to rename.
Figure 6.9.3
6.9 DVR
➋ Trick Mode
You can operate the trick mode while you are playing the recorded
files. These functions are available in playback mode or time-shift
mode powerfully.
▣ PLAY
This button will display a time- banner.
If you want to show the play list while playing the file by using
▣ PAUSE
This button will pause the playing file until you play again with
or
<Figure6.9.4>
71
▣ ADVANCE
▪ If the time-shift mode is enabled, You can press
program.
▪ If the playback mode is enabled, You can press
playing file and
then jumping the live program.
to jump the live
to stop the current
▣ FF(Fast Forward)
▪ When playing the file, you can press
speed.<Figure 6.9.5>
to adjusting the playing
▪ The speed will change to x2, x4, x8, x16 and x32.
Figure 6.9.4
Figure 6.9.5
6.9 DVR
▣ RWD(Rewind)
When playing the file, you can press
speed. <Figure 6.9.6>
to adjusting the playing
The speed will change to x2, x4, x8, x16 and x32.
▣ Slow(1/2x, 1/4x)
72
When playing the file, you can press
speed. <Figure 6.9.7>
Figure 6.9.6
to adjusting the playing
Figure 6.9.7
▣ Jump
▪ You can locate the control position to the desired position by using
the
▪ If you press this key continuously, You can locate the control position
to the desired position very quickly.
▣ Skip
▪ You can skips and forward in 15 seconds using the
▪ You can skips and backward in 15 seconds using the
✽ Note: Jump & Skip used only playing at the time-bar.
6.9 DVR
▣ Bookmark
73
To mark a specific place in a file for later retrieval. <Figure 6.9.8>
▪ RED: Press this button and red small triangle cursor will be placed
at that position.
If you want to delete the bookmarked position,
press a this button once more when
red small triangle cursor
appear.
▪ GREEN: Press this button and the current position will jump to the
next bookmarked
position and playback starts from this point.
▪ YELLOW: Press this button and the current position will jump to the
pre-bookmarked
position and playback starts from this point.
✽ Note: The maximum number of the bookmark is 20 in a file.
Figure 6.9.8
6.9 DVR
74
➌ Instant Recording
1. You can record a current channel by using
If you then press
6.9.9>
, a time-banner will be displayed. <Figure
2. Press
once more. The following picture shows that you can
select item when you
record a current channel. <Figure 6.9.10>
▪ Channel: It shows a current channel.
▪ Name: It shows a current recording name.
▪ Duration: You can change the duration of recording time
using the
And current recorded time appear.
by
✽ Note: 1. Do not remove the USB device while recording a program.
Figure 6.9.9
Figure 6.9.10
➍ EPG (Electronic Program Guide) Recording
This method can be used if the program you wish to record is on within
the next 7 days.
▪ Press the
▪ Use the
button on your Strong remote.
or
buttons to highlight the channel for the
program you wish to record. Press OK.
▪ Use the
button to highlight the program name section of the
EPG menu.
▪ Use the
or
buttons to highlight the program you wish
to record.
75
▪ Press the
button while this program is highlighted.
The selected program will then appear in red.
▪ Press the EXIT key to return to normal viewing.
This program will automatically be recorded by the STRONG DVR.
6.9 DVR
➎ Timer Recording
This function is available when usb device is connected. You can
choose a channel to record the
Program Guide menu by using
. (Refer to 6.4 Electric Program Guide,
2)Timer)
✽ Timer Lead In and Lead Out Times
▪ Lead In and Lead Out Times can be set on your DVR to apply to all Timer
recordings. Lead In and Lead Out times add specified amounts of time
to the beginning and the end of Timer recordings so you don't miss
the beginning or end of recorded programs.
▪ To set Lead In & Out times press MENU and select System Settings, then
select Time Settings. Then highlight Timer Lead Time and press OK
the
button. This will allow you to set the Lead In & Out times
to
either 5,10 or 15minutes
➏ Time Shift
1. If you want to pause and resume live TV channel, press TIMESHIFT
button. The default time of Time-Shift is 60 min in your STB.<Fig
6.10.11>
2. If you want to resume live TV channel, press PLAY button. <Figure
6.9.12>
3. The trick-mode operations are provided. If you want to jump to
live channel, please press
76
Figure 6.9.11
Figure 6.9.12
77
7.Troubleshooting
Problem
The LED light on the
front panel does not
light
No Picture or sound
Black-and-white
screen or V-Hold
The remote controller
is not working
Possible causes
The AC power cord is
disconnected.
Wrong connection of the
video/audio output to the TV
input terminal. Wrong
connection of the satellite
antenna cable. Wrong
direction of the satellite
antenna. No signal or weak
signal. Wrong setting of
channel information in the
MENU screen.
Your TV mode (PAL/NTSC) is
different from the
satellite broadcasting
mode.
Batteries are exhausted.
Fluorescent light is
interfering with the remote
controller. Remote
controller is incorrectly
aimed.
Remedy
Connect the power cord
properly into the power
socket.
Connect the two terminals
correctly with RCA or HDMI
cable(s). Connect the antenna
cable correctly. Adjust the
direction of the antenna.
Check the cable connections,
the LNB and other equipment
connected between the LNB and
the receiver, or adjust the
antenna. Type the setting
values correctly.
Use a TV of the same mode.
Connect a NTSC/PAL converter
between the receiver and the
TV.
Change the batteries.
Switch off the light. Aim the
remote control at the
receiver.
78
8. Specifications
System
capabilities
satellite
LNB/Tuner input
Demodulator
Fully DVB compliant
Connector
Frequency range Signal
level LNB supply LNB
switch control DiSEqC
IEC 169-24, female
950MHz ~ 2150MHz -65dBm ~ -25dBm DC
13/18V, max 400mA 22KHz Ver
1.0/1.1/1.2/USALS Compatible
Front end
Symbol rate
DVB-S/S2 QPSK, 8PSK, 16APSK, 32APSK
DVB-S : 2~45Msps
DVB-S2 : 10~30Msps(QPSK)
10~30Msps(8PSK) 36Msps(16APSK),
27Msps(32APSK)
SCPC and MCPC Capable
System resource
Video decoder
Spectral inversion
Processor
DDR3
FLASH
MPEG 2
Data Rate
Resolution
Video format
Aspect Ratio
Auto conversion
32bit processor (550MHz, 850DMIPS)
128Mbyte
8Mbyte
MPEG-2, MPEG-4, H.264
up to 15M bits/s
1920 X 1080P/i, 1280 X 720P, 720 X
576P/i
PAL
4:3,16:9
Teletext
DVB compliant
MPEG Audio
MPEG 1 layer I/II, MPEG
2 layer II, AC3 Dolby
Digital
Type
Sampling rates
Code
Operating condition
Mono, Stereo, Joint Stereo
32, 44.1 and 48 KHz
NEC-IR
up to 7 Meter
USB Supply
DC 5V Max 500mA
Remote control
USB
79
Conditional
Access Interface
Power supply
Smart Card Reader
1 Slot
Power consumption
max 24W
Supply voltage
AC 100V ~ 250V
Supply frequency
50Hz ~ 60Hz
Rear Panel
connectors
Video
Audio L/R
S/PDIF
HDMI
LAN
Digital tuner input
Loop-through Digital tuner
RF modulator output
USB
1 X RCA cinch
2 X RCA cinch
1 X RCA cinch(Coaxial)
Digital Video/Audio Output
RJ-45
IEC 169 - 24
IEC 169 - 24
IEC 169 - 2
DC 5V Max 500A
RF modulator PAL
G/I/K TV Type
Connector
Frequency
IEC 169-2, female/male
470 ~ 860MHz
Output channel number
21 ~ 69
Specifications
Size (W x H x D)
Weight
250 x 45 x 195 (mm)
1.6 Kg
ver. 1.0
80
9. Warranty Information
The product comes with a 12 month manufacturer's warranty from the
date of purchase.
This unit has a 30 day replacement warranty for manufacturing
faults.
Within this period please return the faulty product with all its
supplied accessories to either the place of purchase or STRONG
Australia accompanied by the original purchase receipt.
After this 30 day period the unit must be returned to STRONG Australia
for testing, and if deemed faulty, will be repaired or replaced at
the discretion of STRONG Australia Pty Ltd.
The faulty product can either be sent to STRONG Australia directly
or via your place of purchase for evaluation.
STRONG Australia will cover any costs incurred in returning the
faulty product for evaluation should the product be deemed as
genuinely faulty. If the product is found to have no fault, the costs
incurred in delivering product to and from STRONG Australia will
be incurred by the customer.
Our goods come with guarantees that cannot be excluded under the
Australian Consumer Law. You are entitled to a replacement or refund
for major failure and for compensation for any other reasonably
foreseeable loss or damage. You are also entitled to have the goods
repaired or replaced if the goods fail to be of acceptable quality
and the failure does not amount to a major failure.
STRONG Australia PTY LTD.
60 WEDGEWOOD ROAD HALLAM, VICTORIA 3803
PH: +61 3 8795 7990 FAX: +61 3 8795 7991
81
82
83