1
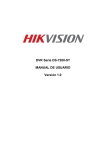
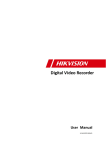
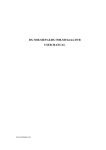
DS-7200HVI-ST Series DVR
USER MANUAL
Version 1.0.2
PDF created with pdfFactory Pro trial version www.pdffactory.com
Hikvision® Network Digital Video Recorder User’s Manual
This manual, as well as the software described in it, is furnished under license and may be used or copied only in
accordance with the terms of such license. The content of this manual is furnished for informational use only, is subject
to change without notice, and should not be construed as a commitment by Hikvision Digital Technology Co., Ltd.
(Hikvision). Hikvision assumes no responsibility or liability for any errors or inaccuracies that may appear in the book.
Except as permitted by such license, no part of this publication may be reproduced, stored in a retrieval system, or
transmitted, in any form or by any means, electronic, mechanical, recording, or otherwise, without the prior written
permission of Hikvision.
HIKVISION MAKES NO WARRANTIES, EXPRESS OR IMPLIED, INCLUDING WITHOUT LIMITATION THE
IMPLIED WARRANTIES OF MERCHANTABILITY AND FITNESS FOR A PARTICULAR PURPOSE,
REGARDING THE HIKVISION SOFTWARE. HIKVISION DOES NOT WARRANT, GUARANTEE, OR MAKE
ANY REPRESENTATIONS REGARDING THE USE OR THE RESULTS OF THE USE OF THE HIKVISION
SOFTWARE IN TERMS OF ITS CORRECTNESS, ACCURACY, RELIABILITY, CURRENTNESS, OR
OTHERWISE. THE ENTIRE RISK AS TO THE RESULTS AND PERFORMANCE OF THE HIKVISION
SOFTWARE IS ASSUMED BY YOU. THE EXCLUSION OF IMPLIED WARRANTIES IS NOT PERMITTED BY
SOME STATES. THE ABOVE EXCLUSION MAY NOT APPLY TO YOU.
IN NO EVENT WILL HIKVISION, ITS DIRECTORS, OFFICERS, EMPLOYEES, OR AGENTS BE LIABLE TO
YOU FOR ANY CONSEQUENTIAL, INCIDENTAL, OR INDIRECT DAMAGES (INCLUDING DAMAGES FOR
LOSS OF BUSINESS PROFITS, BUSINESS INTERRUPTION, LOSS OF BUSINESS INFORMATION, AND THE
LIKE) ARISING OUT OF THE USE OR INABILITY TO USE THE HIKVISION SOFTWARE EVEN IF
HIKVISION HAS BEEN ADVISED OF THE POSSIBILITY OF SUCH DAMAGES. BECAUSE SOME STATES
DO NOT ALLOW THE EXCLUSION OR LIMITATION OF LIABILITY FOR CONSEQUENTIAL OR
INCIDENTAL DAMAGES, THE ABOVE LIMITATIONS MAY NOT APPLY TO YOU.
1
PDF created with pdfFactory Pro trial version www.pdffactory.com
Preventive and Cautionary Tips
Before connecting and operating your DVR, please be advised of the following tips:
• Ensure unit is installed in a well-ventilated, dust-free environment.
• Unit is designed for indoor use only.
• Keep all liquids away from the DVR.
• Ensure environmental conditions meet factory specifications.
• Ensure unit is properly secured to a rack or shelf. Major shocks or jolts to the unit as a result of dropping it may
cause damage to the sensitive electronics within the unit.
• Use the DVR in conjunction with an UPS if possible.
• Power down the unit before connecting and disconnecting accessories and peripherals.
• A factory recommended HDD should be used for this device.
• Improper use or replacement of the battery may result in hazard of explosion. Replace with the same or equivalent
type only. Dispose of used batteries according to the instructions provided by the battery manufacturer.
2
PDF created with pdfFactory Pro trial version www.pdffactory.com
Overview
Developed on the basis of the latest technology, DS-7200HVI-ST Series Digital Video Recorder combines the latest in
advanced H.264 video encoding and decoding technologies delivering high performance rock-solid reliability and
longer recording times.
DS-7200HVI-ST Digital Video Recorder can be used as a standalone video surveillance product, as well as to build up
a powerful surveillance network making it is perfect for home or small business applications.
Figure 1. DS-7204HVI-ST Series DVR
Figure 2. DS-7208HVI-ST Series DVR
Figure 3. DS-7216HVI-ST Series DVR
Product Features
Compression
PAL/NTSC adaptive video inputs.
H.264 video compression with high reliability and superior definition.
OggVorbis audio compression standard.
Independent video encoding parameters, including frame rate, resolution, bit rate, video quality, etc.
Scheduled and event recording parameters configurable for per individual camera.
Support dual stream.
Encoding for both audio/video composite stream and video stream; audio and video synchronization during
composite stream encoding.
Compression, storage and network transmission of video image at 4CIF or CIF resolution.
Local Monitoring
Up to 1024×768 resolution for VGA output display.
Simultaneous VGA and CVBS output.
1/4/9/16-camera video live view, with the camera order adjustable.
Group switch, manual switch and automatic cycle modes selectable for video live view, with the auto cycle
period configurable.
Digital zoom in live view mode.
Shield of assigned channel for live view.
Privacy masking capability.
6
PDF created with pdfFactory Pro trial version www.pdffactory.com
Multiple PTZ protocols supported, and settings and callup of presets, patrols and patterns.
Video image zoom-in by clicking the mouse and tracing by dragging mouse in PTZ control mode.
Hard Disk Management
Connection to 1 SATA hard disk for DS-7204HVI-ST model and 2 SATA hard disks for DS-7208HVI-ST and
DS-7208HVI-ST model, with up to 2TB storage capacity for each HDD.
S.M.A.R.T technology.
HDD standby function.
HDD file system is compatible with Windows. Use pre-allocating hard disk management technology, and no disk
fragments.
Recording
Cycle and non-cycle recording mode.
Scheduled and event video encoding parameters.
Multiple recording types, including manual, continuous, alarm, motion, motion | alarm and motion & alarm
recording, etc.
8 recording time periods with separate recording types.
Pre-record and Post-record time for alarm and motion detection, and pre-record time for schedule and manual
recording.
Lock and unlock of video files.
HDD property can be set to read-only.
Video data search and playback by channel number, recording type, time etc.
Digital zoom function in playback mode.
Pause, play fast, play slow, skip forward, and skip backward when playback, locating in progress bar by dragging
the mouse.
Up to 4/8/16-channel synchronous playback.
Backup
Record files backed up via USB or SATA device.
Bunch backup by file or by time.
Record files edited for backup in playback.
Management and maintenance for backup devices.
Alarm & Exception
Configurable arming time for alarm in/out.
Various alarm types supported: alarms for video loss, motion detection, video tempering, video signal abnormal,
video in/out format unmatched, illegal access, network disconnection, IP conflict, hard disk error and hard disk
full.
Various alarm response actions supported: camera recording, relay out, on-screen warning, audible warning and
upload to center, etc.
Auto recovery from exceptions.
Others
Control of DVR via front panel keys, mouse, IR control and special keyboard.
Three-level user management, each user with individual operating permission for DVR and camera.
Powerful record and search for log of operation, alarm and exceptions.
Import/export of device configuration files.
Network
10/100M adaptive network interface.
TCP/IP protocol suites, PPPoE, DHCP, DNS, DDNS, NTP, SADP protocols, etc.
Unicast and multicast supported; TCP and UDP protocols applicable in unicast transmission.
Remote search, playback and download, lock/unlock of video files;
Support breakpoint resume.
Remote access and configuration of parameters; remote import/export of device configuration parameters.
Remote access of device running status, system log and alarm status.
Remote control of DVR via button operation.
Remote lock/unlock of panel buttons and mouse.
Remote formatting of hard disk, upgrade, reboot/shutdown and other system maintenance operations.
RS-232 and RS -485 transparent channel transmission.
Event alarm and exceptions upload to remote management host.
Remote manual recording.
7
PDF created with pdfFactory Pro trial version www.pdffactory.com
Remote video image capture in JPEG format.
Remote PTZ control.
Voice talk and broadcast.
Built-in WEB Server.
Development
Provision of SDK in Windows and Linux operating systems.
Application software source code of Demo.
Support and training service for application system development.
Product Application Diagram
Figure 4. Product Application Diagram
Operating Your DVR
There are numerous ways to navigate and operate your DVR. You may use the Front Panel Controls, the included IR
(Infrared) Remote, a Mouse and the Soft Keyboard.
Using the Front Panel Controls
Figure 5. DS-7204HVI-ST Front Panel
8
PDF created with pdfFactory Pro trial version www.pdffactory.com
The controls on the front panel include:
1. Status Indicators:
• POWER: the POWER indicator turns green when DVR is powered up.
• STATUS: the indicator lights when the compound key switches to numeric/letter input mode.
• Tx/Rx: TX/RX indictor flickers green when network connection is functioning normally.
2. IR Receiver: operation by IR remote control.
3. Compound Buttons:
• 1 MENU: (1) Enter numeral “1”; (2) Access the main menu interface
• 2ABC/F1: (1) Enter numeral “2”; (2) Enter letters “ABC”; (3) The F1 button when used in a list
field will select all items on the list. In PTZ Control mode, it will turn on/off PTZ light.
• 3DEF/F2: (1) Enter numeral “3”; (2) Enter letters “DEF”; (3) The F2 button is used to cycle
through tab pages. It will also bring up the Channel & OSD Position settings.
• 4GHI/ESC: (1) Enter numeral “4”; (2) Enter letters “GHI”
(3) Exit and back to the previous menu
• 5JKL/EDIT: (1) Enter numeral “5”; (2) Enter letters “JKL”; (3) Delete characters before cursor;
(4)Select the checkbox and ON/OFF switch; (5) Start/stop record clipping in playback
• 6MNO/PLAY: (1) Enter numeral “6”; (2) Enter letters “MNO”;
(3) Playback, for direct access to playback interface
• 7PQRS/REC: (1) Enter numeral “7”; (2) Enter letters “PQRS”; (3) Manual record, for direct
access to manual record interface; manually enable/disable record
• 8TUV/PTZ: (1) Enter numeral “8”; (2) Enter letters “TUV”; (3) Access PTZ control interface
• 9WXYZ/PREV: (1) Enter numeral “9”; (2) Enter letters “WXYZ”; (3) Multi-camera display in
preview
• 0/A: (1) Enter numeral “0”; (2) switch between input methods (upper and lowercase alphabet,
symbols and numeric input)
4. SHIFT: Switch of compound keys between the numeric/letter input and functional control.
5. Control Buttons:
• Directional buttons: In menu mode, the direction buttons are used to navigate between different
fields and items and select setting parameters. In playback mode, the Up and Down buttons are
used to speed up and slow down record play, and the Left and Right buttons are used to select the
recording 30s forwards or backwards. In preview mode, these buttons can be used to cycle
through channels.
• Enter: The Enter button is used to confirm selection in menu mode; or used to select checkbox
fields and ON/OFF switch. In playback mode, it can be used to play or pause the video. In
single-frame play mode, pressing the Enter button will advance the video by a single frame. And
in auto sequence preview mode, the buttons can be used to pause / resume auto sequence.
6. USB Interface: Connects USB mouse or USB flash memory devices.
Figure 6. DS-7208HVI-ST Front Panel
The controls on the front panel include:
1. USB Interface: Connects USB mouse or USB flash memory devices.
2. Status Indicators:
• POWER: the indicator lights in green when DVR is powered up.
• READY: the indicator lights in green when the device is running normally.
• STATUS: the indicator lights when the compound key switches to numeric/letter input mode.
• ALARM: the indicator lights in red when there is sensor alarm occurring.
• HDD: the indicator flickers in red when HDD is reading/writing.
• Tx/Rx: TX/RX indictor flickers green when network connection is functioning normally.
3. IR Receiver: operation by IR remote control.
4. Compound Buttons:
• 1 MENU: (1) Enter numeral “1”; (2) Access the main menu interface
• 2ABC/F1: (1) Enter numeral “2”; (2) Enter letters “ABC”; (3) The F1 button when used in a list
9
PDF created with pdfFactory Pro trial version www.pdffactory.com
field will select all items on the list. In PTZ Control mode, it will turn on/off PTZ light.
3DEF/F2: (1) Enter numeral “3”; (2) Enter letters “DEF”; (3) The F2 button is used to cycle
through tab pages. It will also bring up the Channel & OSD Position settings.
• 4GHI/ESC: (1) Enter numeral “4”; (2) Enter letters “GHI”
(3) Exit and back to the previous menu
• 5JKL/EDIT: (1) Enter numeral “5”; (2) Enter letters “JKL”; (3) Delete characters before cursor;
(4)Select the checkbox and ON/OFF switch; (5) Start/stop record clipping in playback
• 6MNO/PLAY: (1) Enter numeral “6”; (2) Enter letters “MNO”;
(3) Playback, for direct access to playback interface
• 7PQRS/REC: (1) Enter numeral “7”; (2) Enter letters “PQRS”; (3) Manual record, for direct
access to manual record interface; manually enable/disable record
• 8TUV/PTZ: (1) Enter numeral “8”; (2) Enter letters “TUV”; (3) Access PTZ control interface
• 9WXYZ/PREV: (1) Enter numeral “9”; (2) Enter letters “WXYZ”; (3) Multi-camera display in
preview
• 0/A: (1) Enter numeral “0”; (2) switch between input methods (upper and lowercase alphabet,
symbols and numeric input)
5. SHIFT: Switch of compound keys between the numeric/letter input and functional control.
6. Control Buttons:
• Directional buttons: In menu mode, the direction buttons are used to navigate between different
fields and items and select setting parameters. In playback mode, the Up and Down buttons are
used to speed up and slow down record play, and the Left and Right buttons are used to select the
recording 30s forwards or backwards. In preview mode, these buttons can be used to cycle
through channels.
• Enter: The Enter button is used to confirm selection in menu mode; or used to select checkbox
fields and ON/OFF switch. In playback mode, it can be used to play or pause the video. In
single-frame play mode, pressing the Enter button will advance the video by a single frame. And
in auto sequence preview mode, the buttons can be used to pause / resume auto sequence.
•
Figure 7. DS-7216HVI-ST Front Panel
1. IR Receiver: Operation by IR remote control.
2. USB Interface: Connects USB mouse or USB flash memory devices.
3. Status Indicators:
• POWER: the indicator lights in green when DVR is powered up.
• READY: the indicator lights in green when the device is running normally.
• STATUS: the indicator lights when the compound key switches to numeric/letter input mode.
• ALARM: the indicator lights in red when there is sensor alarm occurring.
• HDD: the indicator flickers in red when HDD is reading/writing.
• Tx/Rx: TX/RX indictor flickers green when network connection is functioning normally.
4. DVD-ROM: Space for DVD-ROM.
5. Control Buttons:
• Directional buttons: In menu mode, the direction buttons are used to navigate between different
fields and items and select setting parameters. In playback mode, the Up and Down buttons are
used to speed up and slow down record play, and the Left and Right buttons are used to select the
recording 30s forwards or backwards. In preview mode, these buttons can be used to cycle
through channels.
• Enter: The Enter button is used to confirm selection in menu mode; or used to select checkbox
fields and ON/OFF switch. In playback mode, it can be used to play or pause the video. In
single-frame play mode, pressing the Enter button will advance the video by a single frame. And
in auto sequence preview mode, the buttons can be used to pause / resume auto sequence.
6. SHIFT: Switch of compound keys between the numeric/letter input and functional control.
7. Compound Buttons:
10
PDF created with pdfFactory Pro trial version www.pdffactory.com
•
•
1 MENU: (1) Enter numeral “1”; (2) Access the main menu interface
2ABC/F1: (1) Enter numeral “2”; (2) Enter letters “ABC”; (3) The F1 button when used in a list
field will select all items on the list. In PTZ Control mode, it will turn on/off PTZ light.
• 3DEF/F2: (1) Enter numeral “3”; (2) Enter letters “DEF”; (3) The F2 button is used to cycle
through tab pages. It will also bring up the Channel & OSD Position settings.
• 4GHI/ESC: (1) Enter numeral “4”; (2) Enter letters “GHI”
(3) Exit and back to the previous menu
• 5JKL/EDIT: (1) Enter numeral “5”; (2) Enter letters “JKL”; (3) Delete characters before cursor;
(4)Select the checkbox and ON/OFF switch; (5) Start/stop record clipping in playback
• 6MNO/PLAY: (1) Enter numeral “6”; (2) Enter letters “MNO”;
(3) Playback, for direct access to playback interface
• 7PQRS/REC: (1) Enter numeral “7”; (2) Enter letters “PQRS”; (3) Manual record, for direct
access to manual record interface; manually enable/disable record
• 8TUV/PTZ: (1) Enter numeral “8”; (2) Enter letters “TUV”; (3) Access PTZ control interface
• 9WXYZ/PREV: (1) Enter numeral “9”; (2) Enter letters “WXYZ”; (3) Multi-camera display in
preview
• 0/A: (1) Enter numeral “0”; (2) switch between input methods (upper and lowercase alphabet,
symbols and numeric input)
8. JOG SHUTTLE Control: The JOG SHUTTLE control can be used to move the active selection in a
menu. The inner ring will move the selection up and down; the outer ring will move it left and right.
In the Playback mode, the inner ring is used to jump 30 seconds forward/backward in a video. The
outer ring can be used to speed up/slow down the video. In Preview mode, it can be used to cycle
through different channels.
IR Remote Control
Your DVR may also be controlled with the IR remote control, shown in Figure 8.
Batteries (2×AAA) must be installed before operation.
11
PDF created with pdfFactory Pro trial version www.pdffactory.com
Figure 8. IR Remote Control
The keys on the remote control closely resemble the ones found on the front panel, including:
1.
POWER: Turn on/off DVR.
2.
DEV: Enable/Disable Remote Control.
3.
Alphanumeric: Same as Alphanumeric buttons on front panel.
4.
EDIT: Same as JKL/EDIT button on front panel.
5.
A: Same as 0/A button on front panel.
6.
REC: Same as 7PQRS/REC button on front panel.
7.
PLAY: Same as 6MNO/PLAY button on front panel.
8.
INFO: Reserved.
9.
VOIP: Same as 2ABC/F1 button on front panel.
10. MENU: Same as 1/MENU button on front panel.
11. PREV: Same as 9WXYZ/PREV button on front panel.
12. DIRECTION/ENTER Buttons: Same as DIRECTION/ENTER buttons on front panel.
13. PTZ: Same as 8TUV/PTZ button on front panel.
14. ESC: Same as ESC button on front panel.
15. RESERVED: Reserved.
16. F1: Same as 2ABC button on front panel.
17. PTZ CONTROL Buttons: Buttons to adjust the iris, focus and zoom of a PTZ camera.
18. F2 Button: The F2 button is used to cycle through tab pages. It can also be used to enter the Channel
&OSD Position settings.
Aim the remote control at the IR receiver located at the front of the unit to test operation. If there is no response:
1. Using the front control panel or the mouse, go into Menu > Settings > General > More Settings.
2. Check and remember DVR ID#. The default ID# is 255. This ID# is valid for all IR remote controls.
3. Press the DEV button on the remote.
12
PDF created with pdfFactory Pro trial version www.pdffactory.com
4.
5.
Enter the DVR ID# from step 2.
Press the ENTER button on the remote control.
If the Status indicator on the front panel turns green, the remote control is operating properly. If the Status indicator
does not turn green and there is still no response from the remote, please check the following:
1.
2.
3.
4.
Batteries are installed correctly and the polarities of the batteries are not reversed.
Batteries are fresh and not out of charge.
IR receiver is not obstructed.
No fluorescent lamp is used nearby.
Using a USB Mouse
A regular 3-button (Left/Right/Scroll-wheel) USB mouse can also be used with this DVR. To use a USB mouse:
1.
2.
Plug USB mouse into one of the USB ports on the front panel of the DVR.
The mouse should automatically be detected. If in a rare case that the mouse is not detected, please refer
to the recommended device list from your provider.
The buttons on the mouse corresponds to:
1.
Left Button:
• Single-Click: Select a component of a menu, such as a button or an input field. This is similar to
pressing the ENTER button on the remote/front panel controls.
• Double-Click: Switch between single screen and multi-screen mode in Preview/ Playback mode.
• Click and Drag: Clicking and dragging the Left mouse button can be used to control the pan/tilt of a
PTZ camera as well as to vary the position of digital zoom area and camera OSD. It can also be used
to setup the alarm areas.
2. Right Button:
• Single-Click: Shows pop-up menu.
3. Scroll-Wheel:
• Scroll Up: In Preview mode, scrolling up will switch to the previous screen. In Menu mode, it will
move the selection to the previous item.
• Scroll Down: In Preview mode, scrolling down will switch to the next screen. In Menu mode, it will
move the selection to the next item.
Using the Soft Keyboard
When a mouse is used to perform task on the DVR, clicking on a text input field will bring up the Soft Keypad, shown
in Figure 9.
Figure 9. Soft Keypad
The buttons on the soft keyboard represents:
13
PDF created with pdfFactory Pro trial version www.pdffactory.com
Lowercase: Designates lowercase input is being used.
Uppercase: Designates uppercase input is being used.
Switch to Lowercase: Switch to lowercase input.
Switch to Uppercase: Switch to uppercase input.
Number: Designates number input is being used.
Symbols: Switch to symbols input.
Backspace: Delete the character in front of the cursor.
Enter: Confirm selection.
ESC: Exit out of Soft Keyboard.
Figure 8. Soft Keyboard Buttons
Rear Panel
Figure 10. DS-7204HVI-ST Rear Panel
No.
Item
Description
1
VIDEO IN
BNC connectors for analog video input
2
VIDEO OUT
VIDEO OUT1 is main video out, and VIDEO OUT2 is spot video out
3
AUDIO IN
RCA connectors for analog audio input
4
LINE IN
RCA connector for audio input
5
AUDIO OUT
RCA connector for audio output
6
LAN
Connector for LAN (Local Area Network)
7
VGA
DB15 connector for VGA output. Display local video output and menu
8
USB
Connector for USB devices
9
RS-232 Interface
DB9 connector for RS-232 devices.
10
ALARM IN
Connector for alarm input
ALARM OUT
Connector for alarm output
RS-485 Interface
Connector for RS-485 devices. T+, T- pin connects to PTZ
11
POWER
Switch for turn on/off the device
12
12V
12VDC power supply
13
GND
Ground(needs to be connected when DVR starts up)
14
PDF created with pdfFactory Pro trial version www.pdffactory.com
Figure 11. DS-7208HVI-ST Rear Panel
No.
Item
Description
1
MAIN VIDEO OUT
BNC connectors for main video out
SPOT VIDEO OUT
BNC connectors for spot video out
2
VIDEO IN
BNC connectors for analog video input
3
AUDIO IN
RCA connectors for analog audio input
4
LINE IN
RCA connector for audio input
5
AUDIO OUT
RCA connector for audio output
6
VGA
DB15 connector for VGA output. Display local video output and menu
7
RS-232 Interface
DB9 connector for RS-232 devices.
8
LAN
Connector for LAN (Local Area Network)
9
USB
Connector for USB devices
10
POWER
Switch for turn on/off the device
ALARM IN
Connector for alarm input
ALARM OUT
Connector for alarm output
11
RS-485 Interface
Connector for RS-485 devices. T+, T- pin connects to PTZ
12
12V
12VDC power supply
13
GND
Ground(needs to be connected when DVR starts up)
Figure 12. DS-7216HVI-ST Rear Panel
No.
Item
Description
1
MAIN VIDEO OUT
BNC connectors for main video out
SPOT VIDEO OUT
BNC connectors for spot video out
2
VIDEO IN
BNC connectors for analog video input
3
AUDIO IN
RCA connectors for analog audio input
4
LINE IN
RCA connector for audio input
5
AUDIO OUT
RCA connector for audio output
6
VGA
DB15 connector for VGA output. Display local video output and menu
15
PDF created with pdfFactory Pro trial version www.pdffactory.com
7
RS-232 Interface
DB9 connector for RS-232 devices.
8
LAN
Connector for LAN (Local Area Network)
9
USB
Connector for USB devices
10
RS-485 Interface
Connector for RS-485 devices. T+, T- pin connects to PTZ
11
ALARM IN
Connector for alarm input
ALARM OUT
Connector for alarm output
12
12V
12VDC power supply
13
POWER
Switch for turn on/off the device
14
GND
Ground(needs to be connected when DVR starts up)
16
PDF created with pdfFactory Pro trial version www.pdffactory.com
C HAPT E R 2
Getting Started
17
PDF created with pdfFactory Pro trial version www.pdffactory.com
Starting and Shutting Down Your DVR
Proper startup and shutdown procedures are crucial to expand the life of your DVR.
To start your DVR:
1.
2.
Please make sure the input voltage meets the requirements of DVR, and the GND is in grounding.
Please make sure the VGA port on its rear panel has connected with a display device or the VIDEO OUT port has
connected to a monitor, or else no prompt message will be displayed on screen after device startup and the menu
operation is inaccessible as well.
3.
In case the POWER indicator on the front panel does not light, please apply power to the device to start it.
After the power has been started up, the POWER indicator will light green, and the startup window will appear:
To shut down the DVR:
1.
Enter the Shut Down menu, shown in Figure 1 by clicking on Menu > ShutDown.
Figure 1. Shutdown Menu
2.
3.
Select the ShutDown button.
Click the Yes button.
Rebooting and Locking Your DVR
While in the Shutdown menu (Figure 1), you may also reboot or lock your DVR. Locking your DVR will return you to
the Live Preview mode, which will require a user name and password to exit out of it. The Reboot button will reboot
your DVR.
To reboot or lock your DVR:
1.
Enter the Shutdown menu by clicking Menu > ShutDown.
2.
Select the Lock button to lock the DVR or the Reboot button to reboot the DVR.
Using the Setup Wizard
Note: Please make the DVR has been installed with HDD before access to the Setup Wizard.
By default, the Setup Wizard will start once the DVR has loaded, as shown in Figure 2. The Setup Wizard will guide
you through some important settings of your DVR. Select Next if the DVR has been installed with HDD, or click
Cancel to access Live View window if no HDD is installed.
Note: If the checkbox is changed to
, then the Setup Wizard dialog box will not appear next time until the factory
18
PDF created with pdfFactory Pro trial version www.pdffactory.com
16.
17.
18.
19.
To configure network settings, click the Enter button.
Enter the IP Address, Subnet Mask and Default Gateway settings.
Click OK button to return to the Setup Wizard.
If all the settings have been entered, click Done to finish and exit the Setup Wizard.
You’ve completed the Setup Wizard. The next step in the initial setup process is to setup the system date and time.
After completion of Setup Wizard, enter the Live View window.
Setting Date & Time
It is extremely important to setup the system date and time to accurately timestamp recordings and events.
To setup date and time:
1.
2.
3.
Open the Menu window by clicking the MENU button on the remote or front panel. You can also go
to the Menu window by right clicking with the mouse and clicking the Menu button.
Click the Settings icon.
Click the General icon. You will be taken to the General Settings window, as shown in Figure 9.
Figure 9. General Settings
4.
5.
Enter the correct date and time in System Time.
Click the Apply button to save the setting.
22
PDF created with pdfFactory Pro trial version www.pdffactory.com
C HAPT E R 3
Live Preview
23
PDF created with pdfFactory Pro trial version www.pdffactory.com
Live Preview On-screen Display
The Live Preview mode is automatically started after the DVR boots up. It is also at the very top of the menu hierarchy,
thus hitting the ESC multiple times (depending on which menu you’re on) will bring you to the Live Preview mode.
Live Preview Icons
Some icons are provided on screen in Live Preview mode to indicate different camera status. These icons include:
Main Output
Aux Output
Event Alarm: Indicates video loss, video tampering, motion detection or relay alarm.
Record: Indicates the current channel is recording. The recording may have been started manually, from
a schedule, and/or triggered from motion or alarm.
Event Alarm & Record
Figure 1. Live Preview Icons
Note: Status for video loss alarm is only valid with analog cameras.
Live Preview Operation
In Live View mode, you can operate the following functions:
1.
2.
3.
4.
5.
Display Single Camera:
• By Front Panel/Remote: Use Alphanumeric buttons.
• By Mouse: Select Single Camera in right-click menu.
Multi-camera Preview:
• By Front Panel/Remote: Press PREV button.
• By Mouse: Select Multi Camera in right-click menu.
Manual Switch:
• By Front Panel/ Remote: Press the Left arrow button to access the previous screen; press the Right
arrow button to access next screen.
• By Mouse: Select Next Screen in right-click menu.
Auto Sequence:
• By Front Panel/Remote: Press Enter button.
• By Mouse: Select Start Auto-switch in right-click menu.
Digital Zoom:
• By Mouse: Select Digital Zoom in right-click menu.
24
PDF created with pdfFactory Pro trial version www.pdffactory.com
Mouse Operation in Live Preview
Some functions of the Live Preview can be quickly accessed by clicking the right-button of the mouse (shown in Figure
2). These functions include:
• Single Camera: Switch to a full-screen display of the selected camera by drop-down submenu.
• Multi Camera: Switch between different multi-camera display modes by drop-down submenu.
• Next Screen: When displaying less than the maximum number of cameras in Live Preview, select
•
•
•
•
•
this option to switch to the next camera display.
Playback: Enter Playback mode of the selected camera.
PTZ: Enter PTZ Control mode of the selected camera.
Digital Zoom: Enter Digital Zoom interface of the selected camera.
Menu: Enter Main menu.
Start Auto-switch: Enable multi-camera sequence in Live Preview mode.
Note: The dwell time of the preview configuration should be set before using Start Auto-switch function.
Figure 2. Live Preview Mouse Menu
Digital Zoom
To use digital Zoom in Live Preview mode:
1. Right-click the mouse in Live Preview mode.
2. Select Digital Zoom from drop-down submenu.
3. Left-click and drag the red box to the desired area for zooming. The zoomed image will be magnified
by 4 times. An example is given in the following figure:
Figure 3. Digital Zoom
25
PDF created with pdfFactory Pro trial version www.pdffactory.com
C HAPT E R 5
Playback
35
PDF created with pdfFactory Pro trial version www.pdffactory.com
Video Playback
The Client application allows all users to play back record files of the specified period. Multi-camera simultaneous
playback is supported.
Playback Interface
Multiple toolbar and buttons are provided on the playback interface to control the video playback. Refer to the
following figure:
ïêóïïóîððç Ó±² ïïæëëæïç
Playback Panel
Playback
Control Panel
Figure 1. Playback Interface
The Playback Control Panel, as shown in Figure 2, provides various control buttons for video playback.
Audio On/Off
Start/Stop
Clip
Previous
File/Day
Record Type
Line
Next
File/Day
Backward 30s
Time Line
Slow Forwrd
Pause
Stop
Quit Playback
Hide Panel
Fast Forwrd
Forward 30s
Figure 2. Playback Control Panel
Note: A blue bar
recording.
refers to the Normal recording (scheduled, manual), while the red bar
36
PDF created with pdfFactory Pro trial version www.pdffactory.com
indicates Event
Playback by Search
To play back record files by video search:
1.
2.
Enter the Video Search menu by clicking Menu > Video Search.
Set the search parameters by selecting cameras to search, video/file type and the start/end time (as
shown in Figure 3).
Figure 3. Video Search Menu
3.
4.
Click the Play button on the front panel to start playback of all the files found, or click the Search
button to access the list of search results. After search results are presented, select the file you want to
play back and press Play button.
Record files will automatically be played back in the Playback interface, shown in Figure 4.
Figure 4. Playback Interface
Playback in Live Preview Mode
The Client application also allows you to play back record files in Live Preview mode.
To play back by channel in Live Preview mode:
• By Using a Mouse:
37
PDF created with pdfFactory Pro trial version www.pdffactory.com
1.
2.
3.
Right-click the mouse on desired channel and select the Playback option.
Record video from the selected channel will start playing back in the Playback window. An Attention
message will appear if there are no recordings found in the previous 5 minutes.
You may also select additional channels for playback from the channel list on the right side of the
Playback interface, as shown in Figure 5.
Figure 5. Playback Interface
• By Using the Front Panel/Remote:
1. Press the PLAY button on front panel to access the Playback mode.
2. Enter the channel you want to view record video from the front panel or remote control (i.e. press
‘SHIFT’, the STATUS light will turn green, then press ‘1’ for channel 1, press ‘2’ for channel 2).
3. Recordings will start for the selected channel.
Note: the record video for playback is of the previous 5 minutes.
• Multi-camera Playback
1. Select the cameras from the camera list you want to have simultaneous playback.
2. Click
to stop the ongoing video playback.
3. Click
to start multi-camera simultaneous playback.
Note:
1. Up to 4 cameras can be played back simultaneously.
2. The camera list operation is accessible by mouse only. Please do not operate by front panel.
3. If the camera numbered the lowest among the multiple cameras selected for simultaneous playback
provides no record files of the current day selected from the calendar, then the warning message
“Playback failed” will be displayed on the screen.
4. The video for simultaneous playback by multiple cameras selected from the camera list refers to the
all-day record files of the selected day.
Playback by System Log
To play back video from the System Log:
1. Click Menu > Maintenance > Log Search to enter the Log Search dialog box, shown in Figure 6.
38
PDF created with pdfFactory Pro trial version www.pdffactory.com
Figure 6. Log Search Menu
2. Set Major Type to Information; set Minor Type to Start Record or End Record; and then select the
Start Time and End Time as well. Click the Search button.
3. Click the Search button. A list of search results will be displayed. Select the video log to play back
and click Play.
4. The selected recording then will begin to play in the Playback interface.
Playback Frame-by-Frame
To play back frame-by-frame in the Playback interface:
• By Using a Mouse:
1.
Click the Slow Forward button on the Playback Control Panel until the speed changes to Single
frame.
2.
Click the Pause button to advance the video frame by frame.
• By Using the Front Panel/Remote Control:
1.
Press the Down button to select the playback speed to Single frame.
2.
Press the Enter button to advance the video frame by frame.
Digital Zoom
To use digital zoom in Playback mode:
1.
Right click the mouse in Playback mode.
2.
Select Digital Zoom from drop-down submenu.
3.
Left click and drag the red box to the desired area for zooming. The zoomed image will be magnified
by 4 times. An example is given in the following figure:
39
PDF created with pdfFactory Pro trial version www.pdffactory.com
Figure 7. Digital Zoom in Playback Mode
40
PDF created with pdfFactory Pro trial version www.pdffactory.com
C HAPT E R 6
Backup
41
PDF created with pdfFactory Pro trial version www.pdffactory.com
Backing up Recorded Files
Recorded files can be backed up to various devices, such as USB flash drives, USB HDDs or a DVD writer.
Exporting Files
To export record files:
1.
Click Menu > Video Export to enter the Export Video menu, shown in Figure1.
Figure 1. Export Video
2.
3.
4.
Select desired parameters to search for files to export.
On the toolbar, press the Export button to enter the Record Backup menu.
Select the files to export, as shown in Figure 2. You may also click the Play button to confirm the
record file you want to export.
Figure 2. Video Search Results
42
PDF created with pdfFactory Pro trial version www.pdffactory.com
5.
The size of the currently selected files is displayed at the lower-left corner of the window. Click the
Next button to enter the Export menu, shown in Figure 3.
Figure 3. Export Menu
6.
7.
Select device to which the record file is exported from drop-down list (USB Flash Drive, USB HDD,
DVD Writer). If backup device is not recognized:
• Click the Refresh button.
• Reconnect device.
• Check for compatibility from vendor.
Click Start to begin backup process, shown in Figure 4.
Figure 4. Backup Progress
8.
After the backup process has completed (Figure 5), you may select the files from your device and
click the Play button to verify that it has been exported successfully.
43
PDF created with pdfFactory Pro trial version www.pdffactory.com
Figure 5. Export Successful Screen
Note: Video Player software will automatically be copied on to the device that the recorded files were exported on.
Export Video Clips
You may also select video clips to export directly in Playback status. A maximum of 30 clips can be selected for each
channel.
To export video clips during Playback:
• By Using the Mouse:
1.
Enter the Playback interface (See Video Playback).
2.
Click the Clip Start/Stop button on the Playback Control Panel, and select the start and end of the
video clip during playback.
3.
Repeat for additional clips.
4.
Click the Quit Playback button to exit from the Playback interface. You’ll then be prompted to save
the clips, as shown in Figure 6.
Figure 6. Video Clips Saving Prompt
5.
Click the Yes button to enter Backup interface or select No to exit Playback interface.
6.
At the Backup interface, select the Start button to begin the Backup process.
• By Using the Front Panel / Remote:
1.
Enter the Playback interface (See Video Playback).
2.
During playback, press the EDIT button to mark start of clip.
3.
Press the EDIT button again to mark end of clip.
4.
Repeat for additional clips.
5.
Press the ESC button to exit from the Playback interface. You’ll then be prompted to save the clips,
as shown in Figure 6.
44
PDF created with pdfFactory Pro trial version www.pdffactory.com
6.
7.
Click the Yes button to enter Backup interface or select No to exit Playback interface.
At the Backup interface, select the Start button to begin the Backup process.
Manage Backup Devices
To manage backup devices, you must first be in the Export menu, shown in Figure 7. The Export menu can be
accessed by following the steps shown in the previous section (See Exporting Files).
Figure 7. Export Menu
Once in the Export menu, you may:
•
•
•
•
•
Create New Folder: Creates a new folder on the export device.
Delete: Delete a file or folder from the export device.
Play: Play the selected video file from the export device.
Format: Format the export device.
Erase: Erase files from a re-writable CD/DVD.
45
PDF created with pdfFactory Pro trial version www.pdffactory.com