1
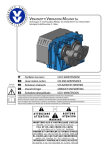
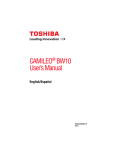
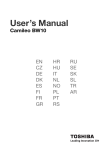
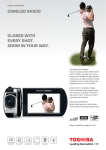
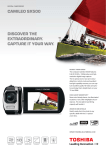
User’s Manual Camileo BW10 EN CZ DE DK ES FI FR GR HR HU IT NL NO PL PT RS RU SE SK SL TR AR INTRODUCTION Welcome and thank you for choosing a TOSHIBA product. For your convenience, your TOSHIBA product is furnished with two guides: a) Quick Start Guide, and b) this comprehensive PDF User’s Manual. Please read these instructions carefully before using the camcorder. Keep this Manual in a safe place for later reference. Symbols used in this manual HINT CAUTION (page xx) EN Points giving some extended instructions or special points to pay attention to. Points that require special attention. Refer to the page indicated for detailed information. i User’s Manual SHOOT, PLAY BACK AND SAVE BEFORE RECORDING IN WATER Make sure that the slot cover and the terminal cover are closed. If a cover is open, water will get inside the camcorder and damage it. When closing the slot cover and terminal cover, make sure that no foreign object such as sand, hair, dust, etc. is caught in the rubber seal. Terminal cover Slot cover There are places in the camcorder where water might accumulate, but this will not affect its waterproof properties. User’s Manual ii EN PREPARE THE BATTERY PACK AND CARD When using for the first time The battery pack is already installed in the camcorder. Remove the battery pack from the camcorder, remove the insulating seal, and reinstall the battery pack in the camcorder. EN iii User’s Manual Installing the battery pack and card Install the card and the supplied battery pack. i The card is not an included accessory. Please purchase a commercially sold card. i The camcorder has an internal memory, which means that you can record and save the recorded data even if no card is installed. 1 While pressing... 6 Close 2 Pull out 3 Open 4 Insert 5 Insert <Remove the battery pack> <Remove the card> 2 Pull out 2 Pull out 1 Press User’s Manual 1 Push in iv EN CAUTION Close the slot cover and terminal cover securely i If any cover is not closed or is not closed completely, the camcorder will no longer be waterproof. When closing a cover, make sure that no foreign object such as sand, hair, dust, etc. is caught in the rubber seal. Charging the battery pack 1 Press the power button to turn off the camcorder. h It is not possible to charge the battery pack while the camcorder is on. POWER button 2 Use the dedicated USB interface cable (supplied) to connect the camcorder to a computer. 1 While pressing 3 Connect 2 Open →To USB connector on computer 3 EN Turn on the computer. h Charging begins. h During charging, the multi-indicator is lit orange. h When charging is completed, the indicator turns off. h The charging time is approx. 220 minutes. v User’s Manual CAUTION During charging... i Do not turn on the camcorder while the battery pack is charging. It is not possible to charge the battery pack while the camcorder is on. i Do not turn off the computer while the battery pack is charging. It is not possible to charge the battery pack while the computer is off. i With certain computers, it may be possible to charge the battery pack even when the computer is turned off. User’s Manual vi EN Shooting 1 2 Press the POWER button for at least 1 second to turn the camcorder on. h If the screen to set the date and time appears, press the MENU button 2 times to cancel it. For how to set the date and time, see page 16. [ ] button (Video recording button) [ ] button (Photo shooting button) Record. To record a video clip: h Press the [ ] button to begin recording a video clip. h Press the [ ] button again to end the recording. To take a photo: h Press the [ ] button. h A still image is captured. MENU button POWER button Recording time 2M REC 00:00:09 5 Available recording time remaining EN vii User’s Manual Playback 1 2 3 Press the play [=] button. h The display changes to the Playback Screen. [=] button (Play button) Select the image to play back. h Use the arrow keys to move the orange frame to the image you wish to play back. h The image information for the framed image is shown in the bottom part of the monitor. Press the OK button. h The file you selected is played back. <To return to the recording mode> h Press the play [=] button. OK button MENU button Arrow keys 2010.12.24 14:25 100-0011 Orange frame User’s Manual viii Remaining battery power indication EN Deleting files 1 On the screen in step 2, move the orange frame to the file you wish to delete, and press the MENU button. 2 Select “DELETE SINGLE”, and press the OK button. h If you press [G] or [H], the screen to delete a different file will appear. 3 When you are finished deleting files, press the MENU button. When you are finished using the camcorder... Press the POWER button for at least 1 second to turn the camcorder off. EN ix User’s Manual Copy data from your camcorder to the computer Connect your camcorder to a computer, and copy the desired data to the computer. 1 Turn on the computer, and use the supplied dedicated USB interface cable to connect your camcorder to the computer. h Connect the cable between the camcorder’s USB terminal and the computer’s USB connector. Supplied dedicated USB interface cable To USB terminal To USB connector 2 Turn on the camcorder (page 13). h The USB Connection Screen appears on the camcorder’s monitor. USB CONNECTION COMPUTER PRINTER CANCEL CANCEL User’s Manual x OK OK EN 3 Select “COMPUTER”, and press the OK button. h The screen to select the computer connection mode appears. USB CONNECTION YouTube CARD READER MTP PC CAMERA CANCEL CANCEL OK 4 Select “CARD READER”, and press the OK button. 5 Copy data from your camcorder to a computer. EN xi OK User’s Manual Dismounting the camcorder CAUTION i To disconnect your camcorder, be sure to follow the procedure below. Failure to follow this procedure may cause faulty operation of your computer or corrupt the files in your camcorder. 1 2 Left-click on the icon for safely removing hardware in the task tray. h A list appears showing the devices connected to the computer’s USB connector. Left-click on the camcorder drive (E:). h The camcorder can now be disconnected. h The drive name (E:) may be different on your computer. HINT About the application software Concerning the application software, the following software is bundled in the supplied DVD-ROM. i CAMILEO Uploader With application installed, when your camcorder is connected to your computer in the YouTube mode, the camcorder is ready to upload to YouTube. i MAGIX Video deluxe 15 Plus Trial Software For editing movies. 30-day trial version. User’s Manual xii EN CONTENTS INTRODUCTION .................................................................................... i CHECKING THE INCLUDED ACCESSORIES ...................................... 3 SAFETY INSTRUCTIONS ..................................................................... 4 ABOUT THE CARD ............................................................................... 5 Media cards that can be used with this camcorder ......................... 5 What “card” means in this manual .................................................. 5 SETUP PARTS NAMES ..................................................................................... 6 Installing the battery pack and card ....................................................... 8 About recharging .......................................................................... 12 About the temperature alert icon \ .......................................... 12 TURNING THE CAMCORDER ON AND OFF ..................................... 13 Turning on the camcorder ............................................................. 13 Turning off the camcorder ............................................................. 13 Turning on the camcorder when the power save (sleep) mode is active ............................................................................... 14 DATE AND TIME SETTING ................................................................. 16 ACCESSING THE MENU SCREEN .................................................... 18 SHOOTING VIDEO CLIP RECORDING .................................................................. 20 SHOOTING SINGLE SHOTS .............................................................. 22 SHOOT A STILL IMAGE WHILE RECORDING A VIDEO CLIP .......... 25 MACRO-PHOTOGRAPHY (ZOOM) .................................................... 27 PLAYING BACK VIDEO CLIPS AND STILL IMAGES ......................... 28 How to save one frame from a video clip as a still image ............. 31 EN 1 User’s Manual CONNECTING TO A TV CONNECTING TO A TV .......................................................................32 Connecting to the HDMI terminal ..................................................33 PLAYING BACK ON A TV ....................................................................34 APPENDICES FREQUENTLY ASKED QUESTIONS ..................................................35 OVERVIEW OF THE MENU SCREEN .................................................40 SPECIFICATIONS ................................................................................42 Camcorder .....................................................................................42 Concerning the multi-indicator .......................................................43 Others ............................................................................................44 TOSHIBA SUPPORT ............................................................................45 REGULATORY INFORMATION ...........................................................46 ADDITIONAL INFORMATION ..............................................................49 User’s Manual 2 EN CHECKING THE INCLUDED ACCESSORIES i Software DVD + User’s Manual (DVD-ROM): 1 i Li-ion battery pack: 1 i Dedicated USB interface cable (page v, x, 9): 1 i Handstrap: 1 i Soft case: 1 i Quick Start Guide i Warranty Leaflet EN 3 User’s Manual SAFETY INSTRUCTIONS 1. Do not drop, puncture or disassemble the camcorder; otherwise the warranty will be voided. 2. Do not expose the camcorder to high temperature or leave it in direct sunlight. Doing so may damage the camcorder. 3. Use the camcorder with care. Avoid pressing hard on the camcorder body. 4. For your own safety, avoid using the camcorder when there is a storm or lighting. 5. Do not use batteries of different specifications. Doing so may lead to the potential for serious damage. 6. Remove the battery during long periods between usages, as a deteriorated battery may affect the functionality of the camcorder. 7. Remove the battery if it shows signs of leaking or distortion. 8. Use only the accessories supplied by the manufacturer. 9. Keep the camcorder out of reach of infants. CAUTION 10. Risk of explosion if battery is replaced by an incorrect type. 11. Dispose of used batteries according to the instructions. User’s Manual 4 EN ABOUT THE CARD Media cards that can be used with this camcorder The type of card that can be inserted into and used with this camcorder is: i SD Memory Card i SDHC Memory Card i SDXC Memory Card What “card” means in this manual i In this manual, SD Memory Cards, SDHC Memory Cards and SDXC Memory Cards that can be used in this camcorder are referred to as “card”. EN 5 User’s Manual SETUP SETUP PARTS NAMES Front Microphone LED light SETUP Lens Speaker Terminal cover Slot cover User’s Manual 6 EN Rear Multi-indicator Monitor OK button [ ] button (Video recording button) [ ] button (Photo shooting button) Arrow keys MENU button [ ] [=] button (Play button) POWER button EN 7 User’s Manual Installing the battery pack and card Install the card and the supplied battery pack. i The card is not an included accessory. Please purchase a commercially sold card. i The camcorder has an internal memory, which means that you can record and save the recorded data even if no card is installed. 1 While pressing... SETUP 6 Close 2 Pull out 3 Open 4 Insert 5 Insert <Remove the battery pack> <Remove the card> 2 Pull out 2 Pull out 1 Press User’s Manual 1 Push in 8 EN CAUTION Close the slot cover and terminal cover securely i If any cover is not closed or is not closed completely, the camcorder will no longer be waterproof. When closing a cover, make sure that no foreign object such as sand, hair, dust, etc. is caught in the rubber seal. Charging the battery pack 1 Press the power button to turn off the camcorder. h It is not possible to charge the battery pack while the camcorder is on. POWER button 2 Use the dedicated USB interface cable (supplied) to connect the camcorder to a computer. 1 While pressing 3 Connect 2 Open →To USB connector on computer 3 EN Turn on the computer. h Charging begins. h During charging, the multi-indicator is lit orange. h When charging is completed, the indicator turns off. h The charging time is approx. 220 minutes. 9 User’s Manual CAUTION During charging... i Do not turn on the camcorder while the battery pack is charging. It is not possible to charge the battery pack while the camcorder is on. i Do not turn off the computer while the battery pack is charging. It is not possible to charge the battery pack while the computer is off. i With certain computers, it may be possible to charge the battery pack even when the computer is turned off. User’s Manual 10 EN SETUP HINT To format a card 1 Insert the card in the camcorder, and press the POWER button (pages 8 and 13). 2 Press the MENU button. 3 Select “FORMAT” and press the OK button. i The Format Screen appears. Follow the instructions on the screen to format the card. Shooting without a card installed i When a card is installed, images are recorded to and played back from the card. When no card is installed, images are recorded to and played back from the camcorder’s internal memory. When the camcorder is turned on with no card installed, the internal memory icon is shown on the monitor to let you know that the images you capture will be saved to the camcorder’s internal memory. CAUTION Do not charge the battery pack immediately after the camcorder has been in continuous use for a long time i The battery pack becomes hot when the camcorder is used continuously for a long time. If you attempt to charge the battery pack in this state, the multi-indicator may flash orange and it may not be possible to charge the battery pack. Wait until the battery pack has cooled down before attempting to charge it. Does the battery pack appear swollen? i The lithium-ion battery used in this camcorder may expand slightly when stored in a hot environment or repeatedly used, but this is not a safety hazard. However, a battery that is difficult to insert because it has become swollen may then be impossible to extract from the battery compartment. In this case, please discontinue its use and replace it with a new battery. Do not use the battery with the outer covering or label removed i Doing so may result in malfunction. HINT About the internal backup battery i This camcorder’s internal battery serves to maintain the date and time settings, as well as the shooting settings. The backup battery will be fully charged when the battery pack is kept in the camcorder continuously for about 2 days. In the fully charged state, the backup battery will maintain the camcorder settings for about 7 days. When not using the camcorder for a long time, remove the battery pack i A small amount of power is still used even if the camcorder is turned off, and it is therefore recommended that the battery pack be removed from the camcorder if it is not going to be used for a long time. Note that when the battery pack is removed for a long period, the time and date settings may be cleared. Before using your camcorder again, be sure to confirm that the camcorder settings are correct. Recharging when connected to the USB terminal i The battery can be recharged while the camcorder is connected to a computer. i Note, however, that the time it takes to recharge will differ depending on the camcorder’s operating condition. i Connect the dedicated USB interface cable to the USB connector on your computer. Do not connect it to the USB connector on the monitor or the keyboard, or to the USB hub. i If the camcorder is not going to be used for an extended period of time, please disconnect the dedicated USB interface cable from the camcorder. EN 11 User’s Manual About recharging Recharging takes place only when the camcorder is turned off, or when the power save function or the sleep function has been activated. Recharging does not take place when the camcorder is in the recording mode or playback mode. About the temperature alert icon \ k When the battery or internal camcorder (excluding battery) temperature rises during use h During camcorder use, if the temperature of the battery or inside the camcorder (excluding the battery) rises, a \ icon lights on the monitor. It is still possible to record and play back even when the \ icon is lit; however it is advised that you discontinue use as soon as possible and turn the camcorder off. h If the temperature rises further, the \ icon will start to flash, and the camcorder will turn off automatically. The camcorder cannot be turned on until the temperature has dropped (or as long as the \ icon remains flashing). Please wait until the temperature has dropped before resuming use. h During video recording, a countdown indicator will show the time starting about 15 seconds before shutdown. When the indicator shows 0 seconds, recording stops. h If the camcorder is turned off while the temperature is high (that is, while the \ icon is flashing), it cannot be turned on again until the temperature has dropped (or as long as the \ icon remains flashing). User’s Manual 12 EN SETUP During camcorder use, if the temperature of the battery or inside the camcorder (excluding the battery) rises, a temperature alert icon \ will appear as described below. TURNING THE CAMCORDER ON AND OFF Turning on the camcorder 1 Press the POWER button for at least 1 second. h If you briefly press the POWER button, once, the camcorder will switch to the power save mode. h When the [I] arrow key is used to turn on the camera, the screen to set the operation sounds appears. POWER button Turning off the camcorder 1 Press the POWER button for at least 1 second. h The camcorder turns off. HINT To adjust the operation sounds i If you turn on the camcorder by pressing the POWER button while holding down the [J] arrow key, the screen to change the operation sounds will appear. EN 13 User’s Manual Turning on the camcorder when the power save (sleep) mode is active In order to preserve battery pack power, the power save (sleep) function will automatically turn off the camcorder after about 1 minute of no use during shooting, or about 5 minutes of no use during playback (factory-preset setting). User’s Manual 14 EN SETUP i When the power save mode is active, you can restore the power by any of the following methods: h Press the POWER button. i After the power save mode has been active for about 10 minutes, the camcorder will switch to the standby mode. In this case, you can restore the power by pressing the POWER button. i When the camcorder is connected to a computer or printer, the camcorder turns off after about 12 hours. HINT To immediately activate the power save mode i Press the POWER button briefly to activate the power save function. CAUTION If the K icon appears... i When a picture is taken, the date and time it was captured are recorded with it. If the date and time settings have not been completed (page 16), the date and time cannot be recorded with the captured images. For this reason, immediately after the camcorder is turned on, the “Set date and time” reminder briefly appears, after which the K icon is shown on the Recording Screen. To have the date and time recorded with the images, please complete this setting before capturing images. <Caution> i Due to the characteristics of the camcorder, the outer surface may become warm during use, but this does not indicate a malfunction. i If the camcorder starts to feel uncomfortably hot during use, you might temporarily discontinue use until it cools down, or try holding it in your other hand for a while. Please use a tripod or other support when using the camcorder for a long time. EN 15 User’s Manual DATE AND TIME SETTING When the camcorder is first turned on after purchase, the Clock Set Screen appears. Proceed from step 4 to set the date and time. 1 2 4 5 6 Press the MENU button. h The Setting Menu appears. OK button SETUP 3 Press the power button to turn on the camcorder. Use the [I] and [J] arrow keys to select “CLOCK SET”, and press the OK button. h The Clock Set Screen appears. Set the date and time. h To select the desired setting: Press the [G] and [H] arrow keys. h To change the assigned value: Press the [I] and [J] arrow keys. POWER button Arrow keys CLOCK SET Press the OK button. h Assign the desired value to each setting. Press the MENU button. h The date and time settings are completed, and you are returned to the Setting Menu. User’s Manual DATE 2010/06/01 TIME 00:00 DISP D/M/Y OK OK 16 EN HINT i Under normal conditions, while the battery pack is being replaced, an internal battery will maintain the date and time settings. However, there is a small chance the settings may be lost (the backup will last for about 7 days). It is recommended to check that the date and time settings are still correct after replacing the battery pack and before shooting or recording of any type (follow step 1). To correct the date and time settings 1 Turn on the camcorder. 2 Press the MENU button. 3 Select “CLOCK SET” and press the OK button. h The screen to set the date and time appears. h The current date and time settings are shown. 4 Select the line you wish to change, and make the correction. EN 17 User’s Manual ACCESSING THE MENU SCREEN 1 2 Turn on the camcorder (page 13). MENU LED LIGHT FACE CHASER PHOTO VIEW CLOCK SET LANGUAGE TV OUTPUT OK User’s Manual SETUP Press the MENU button. h The Menu Screen appears. h To cancel the Menu Screen, press the MENU button. MENU button 18 EN 3 Press [I] or [J] to select the item you wish to change, and press the OK button. h The Setting Screen for the selected item appears. h To return to the Menu Screen, press the MENU button. Select an item to change MENU LED LIGHT FACE CHASER PHOTO VIEW CLOCK SET LANGUAGE TV OUTPUT OK Press [I]/ [J] Applicable mode FACE CHASER Press OK button ON OFF OK <Setting Screen> EN 19 User’s Manual SHOOTING SHOOTING VIDEO CLIP RECORDING 1 2 [ ] button (Video recording button) Press the [ ] button. h Recording begins. h It is not necessary to keep the [ ] button pressed while recording. h When the remaining recording time available for the currently recording clip becomes little, a countdown of the remaining recording time appears on the display. SHOOTING 3 Turn on the camcorder (page 13). End the recording. h Press the [ ] button again to stop recording. POWER button Recording time 2M REC 00:00:09 5 Available recording time remaining User’s Manual 20 EN HINT To change the video settings 1 With the Recording Screen displayed, press the [H] arrow key. h The screen to change the video settings appears. h To return to the Recording Screen without changing the settings, press the MENU button. VIDEO 1920x1080 30fps SHQ 2 Use the [G] and [H] keys to select a setting, and press the OK button. h The video settings are changed, and you are returned to the recording screen. To record using the action mode (video self-timer) 1 Press and hold the [ ] button until the Action Mode Screen appears. h About 10 seconds after the Action Mode Screen appears, recording begins. h After recording begins, it ends in about 60 seconds. EN 21 User’s Manual SHOOTING SINGLE SHOTS Capture a still image (single-shot). 1 2 Turn on the camcorder (page 13). [ ] button (Photo shooting button) SHOOTING Press the [ ] button. h The shutter releases and the image is captured. h You can view the captured image on the monitor by keeping the [ ] button depressed when you capture the image. POWER button 13 User’s Manual 22 00:00:19 EN To change the photo settings 1 With the recording screen displayed, press the [G] arrow key. h The screen to change the photo settings appears. h To return to the recording screen without changing the settings, press the MENU button. PHOTO 2592x1944 2 Use the [G] and [H] keys to select a setting, and press the OK button. h The photo settings are changed, and you are returned to the recording screen. EN 23 User’s Manual User’s Manual 24 EN SHOOTING HINT If the camcorder shake icon > appears... i During still image shooting, if the shutter speed is slow and the possibility that the image may be blurred due to camcorder shake becomes high, the camcorder shake icon may appear on the monitor. In this case, use a tripod to stabilize the Camcorder shake icon camcorder when shooting. Does it seem to take a long time to save images? i When shooting in dimly lit conditions, it may take some time to save the data to the card. SHOOT A STILL IMAGE WHILE RECORDING A VIDEO CLIP You can capture a still image (a single-shot) while recording a video clip. 1 2 3 4 Turn on the camcorder (page 13). Press the [ [ ] button ] button. When you see a scene you’d like to capture as a still image, press the [ ] button. Press the [ ] button to end the video clip recording. [ ] button REC 00:00:09 HINT i When the remaining video recording time becomes approximately 50 seconds, it will no longer be possible to capture a still image while recording a video clip. The exact remaining recording time at which this occurs will differ depending on the subject and on the recording size, as well as on the video clip recording mode. If you intend to capture a still image while recording a video clip, it is suggested that you take note of the remaining video recording time. EN 25 User’s Manual About the recording size of still images i The size of a still image captured during video clip recording depends on the video clip recording size. Video clip recording size setting Still image recording size Y 1920 × 1080 pixel & 1280 × 720 pixel ) 640 × 480 pixel SHOOTING User’s Manual 26 EN MACRO-PHOTOGRAPHY (ZOOM) 1 2 3 Point the camcorder lens at the subject. Press [I]/[J] Press [I] or [J]. [I]: Zoom in on the subject. [J]: Zoom out. h When the zoom switch is pushed, the zoom bar appears on the monitor. Take the picture. For video clip recording, see page 20. For shooting single shots, see page 22. Monitor EN 27 User’s Manual PLAYING BACK VIDEO CLIPS AND STILL IMAGES 1 2 [=] button (Play button) Select the image to play back. h Use the arrow keys to move the orange frame to the image you wish to play back. h The image information for the framed image is shown in the bottom part of the monitor. SHOOTING 3 Press the play [=] button. h The display changes to the Playback Screen. Press the OK button. h The file you selected is played back. <To return to the recording mode> h Press the play [=] button. OK button MENU button Arrow keys 2010.12.24 14:25 100-0011 Orange frame Remaining battery power indication HINT Slideshow playback i In step 3, if you press the OK button for about 1 second or more, a slideshow playback will start. i The slideshow playback will stop when any button is pressed. User’s Manual 28 EN Deleting files 1 2 On the screen in step 2, move the orange frame to the file you wish to delete, and press the MENU button. Select “DELETE SINGLE”, and press the OK button. h If you press [G] or [H], the screen to delete a different file will appear. 3 EN When you are finished deleting files, press the MENU button. 29 User’s Manual Video clip playback operation To do this... Normal forward playback Stop playback Pause To play back one image at a time (singleframe step) During playback, press [J]. During playback, press the OK button. Forward playback After pausing playback, press [H]. Reverse playback After pausing playback, press [G]. Forward playback Reverse playback After pausing playback, press and hold [H]. After pausing playback, press and hold [G]. Forward playback During forward playback, press [H]. h The playback speed changes each time [H] is pressed, as follows: Normal playback → 2× → 5× → 10× → 15× Press [G] to resume normal playback speed. Reverse playback During forward playback, press [G]. h The playback speed changes each time [G] is pressed, as follows: 15× ← 10× ← 5× ← 2× Press [H] to resume normal playback speed. To accelerate playback Return to normal playback speed Adjusting the volume Press the OK button. Louder: During playback, press [ Softer: During playback, press [ ]. ]. HINT If the a appears on the playback Screen... i The a icon appears when playing back a file that was saved in segments. User’s Manual 30 EN SHOOTING Slow playback Do this Press the OK button. How to save one frame from a video clip as a still image 1 2 Play back the video clip. Pause the playback at the point you wish to “snap” a photo. Press the [ ] button. h The screen to select the aspect ratio of the still image appears. Select the desired aspect ratio, and press the [ ] button. Note, however, that if the video clip aspect ratio is 4:3, you cannot select 16:9. HINT The file size for a video clip is very large i Therefore, be aware that if the video clip is uploaded to a computer to be played back, the computer may not be able to play back the video fast enough, making it appear jerky. (The video will always be displayed properly on the camcorder monitor or a television.) i Depending on the card, recording may end even before the possible recording time indicated. Display the video clip playback point i During video clip playback, press the MENU button for at least 1 second to display a bar showing the current playback point in the video clip. i Press the MENU button for about 1 second to cancel the bar. CAUTION During video clip playback, the sound of a motor is audible... i During recording, the sound of the optical zoom movement or autofocus movement was recorded. This is not a malfunction. If no audio is heard... i The audio is not played back when the video clip is played back in the frame-by-frame, slow-motion, fast playback or reverse playback mode. EN 31 User’s Manual CONNECTING TO A TV CONNECTING TO A TV CONNECTING TO A TV By connecting the camcorder to a TV, you can play back the recorded files on the TV. About image output: The image output destination differs depending on the camcorder status. Connection cable HDMI cable* Recording mode Standby Recording Playback mode Camcorder monitor n m n TV m n m Image output destination m: Images are output n: Images are not output * When an HDMI cable is used to connect the camcorder to a TV, 1080p video mode images are output as 1080i images. Separately sold or commercially available mini-HDMI cable. User’s Manual 32 EN CONNECTING TO A TV CAUTION Insert and pull out the cable carefully i When connecting the cables, make sure that the cable plugs are correctly oriented and that they match the shapes of the terminal sockets on the devices. Push the plugs in straight when connecting them. If undue force is used to connect a cable, it may permanently damage the connector pins in the terminal socket. i Do not use excessive force when connecting and disconnecting cables. Connecting to the HDMI terminal Use a separately sold or commercially available mini-HDMI cable to connect to a TV. Set the input to [HDMI] To HDMI terminal Mini HDMI cable EN To HDMI terminal on the TV 33 User’s Manual PLAYING BACK ON A TV i After connecting the camcorder to the television, switch the TV input to the terminal to which the camcorder is connected. i The playback method is the same as when viewing images on the camcorder’s monitor. (Use the TV controls to adjust the volume.) i The same playback procedure as when playing back with the camcorder is used to play back audio recordings as well. User’s Manual 34 EN CONNECTING TO A TV CAUTION Insert and pull out the cable carefully i When connecting the cables, make sure that the cable plugs are correctly oriented and that they match the shapes of the terminal sockets on the devices. Push the plugs in straight when connecting them. If undue force is used to connect a cable, it may permanently damage the connector pins in the terminal socket. i Do not use excessive force when connecting and disconnecting cables. APPENDICES APPENDICES FREQUENTLY ASKED QUESTIONS If you have a question about the camcorder operation, you might find the answer in this compilation of frequently asked questions. Question Why doesn’t the power turn on? Why is the battery pack consumed so quickly even after it was fully recharged? Answer Due to cold temperatures, the battery pack temporarily lost its power. The ambient temperature is very low. The battery pack life has expired. Power Why doesn’t recharging end? The battery pack life has expired. Why does the The remaining battery pack power is low. icon Shooting EN appear? Why does the multi-indicator flash orange? A recorded file is being saved on the card. 35 Action Place the camcorder in your pocket to warm it up before using it. Keep the battery pack in an environment of 10 to 40 °C (50 to 104 °F). If a battery becomes depleted quickly even after it was sufficiently charged, it should be assumed that the battery has reached the end of its service life. Please replace it with a new battery. Replace with a new battery pack. If this is not effective, consult your dealer. Recharge the battery pack. Not a malfunction. Wait until the multiindicator turns off. User’s Manual Question Are the settings retained even after the camcorder is turned off? Which resolution setting should I use? Answer — — Shooting User’s Manual Condition due to the monitor characteristics. 36 Select the resolution setting according to the intended use. f: Appropriate for printing letter-size or larger, and for printing a close-up of part of a photo (trimming). +: For printing standard photo (photo service) sizes. ,, [: For photos displayed on a web page, or sent as e-mail attachments. Not a malfunction. Spots that appear in the monitor only appear in the monitor and will not be recorded with the images. EN APPENDICES Monitor When used in cold weather, why does the image seem to leave traces as it moves? Why does the displayed image contain some red, blue and green dots, or why are black spots visible? Action The settings are retained even after the camcorder is turned off. Viewing images Question Why is the image too bright? Answer The subject was too bright. Why is there no image (z is shown)? This may happen when trying to play back images stored on a card from a different digital camcorder. If the subject moves or the camcorder is moved during recording, a distorted image may sometimes occur. Due to the characteristics of the camcorder, magnified images appear less clear. — Why is the playback image distorted? Why isn’t the magnified image clear? Can I play back image and sound files that I edited using my computer? EN 37 Action When capturing an image, devise a way to compensate for a bright subject, for example, by changing the shooting angle. Play back images that were recorded on a card using this camcorder. Not a malfunction. This is a characteristic of the CMOS sensor. Not a malfunction. We cannot guarantee the accurate playback of files that have been edited using a computer. User’s Manual Question Why is there a Viewing motor-like sound images during video clip playback? Why is there no Connecting sound? to a TV Printing A problem such as inability to record or play back occurs. User’s Manual Action Not a malfunction. There is no more available memory on the card or in the camcorder’s internal memory. Delete unnecessary files, or use a card that has more memory available. The lock switch on the card is in the locked (protect) position. A temporary internal circuitry problem may be the cause. Move the lock switch to the unlocked position. The card contains files that were saved using a device other than this camcorder. 38 Adjust the volume on the TV. Please refer to the instruction manual for your printer. Remove the battery pack from the camcorder, wait a few minutes, then reinstall the battery pack and try again. After saving your files to a different medium, format the card. EN APPENDICES Misc. Why does a message appear during PictBridge printing? Why does the “Insufficient card memory” or “Insufficient internal memory” message appear? Why does the “Card is protected” message appear? Why can’t the camcorder be operated? Answer The sound of the camcorder’s mechanical action was recorded. The volume on the TV is set to the minimum. There is a problem with the printer. Question Can I use my camcorder abroad? Misc. EN Why does the “System error” message appear? Answer — A problem has occurred within the camcorder or card. 39 Action When the camcorder is connected to a TV, you can switch the camcorder’s video output to NTSC or PAL. If you have questions about accessories etc., please consult with a dealer near you for advice. Check the following items: 1 Remove the card and then install it again. 2 Remove the battery pack and then install it again. 3 Install a different card. If “System error” still appears after performing the above steps, then take the camcorder to the dealer for service. User’s Manual OVERVIEW OF THE MENU SCREEN MENU LED LIGHT FACE CHASER PHOTO VIEW CLOCK SET LANGUAGE TV OUTPUT OK OK FORMAT 1 2 3 4 5 6 8 7 APPENDICES User’s Manual 40 EN 1 LED light setting /: The LED light operates regardless of the shooting conditions. .: The LED light is disabled regardless of the shooting conditions. 2 Face chaser -: Enable face chaser. .: Disable face chaser. 3 PHOTO VIEW h Switch the field of view. 4 CLOCK SET setting h Set the camcorder’s clock. 5 LANGUAGE setting h Select the language in which the monitor messages are displayed. 6 TV output setting 7 FORMAT 8 Remaining battery power indication EN 41 User’s Manual SPECIFICATIONS Camcorder Camileo BW10 5Mega Pixel CMOS Sensor Movie Record, Picture Record f=4.1mm;F2.8 Normal:30cm~infinite 10×Digital Electronic 2.0"LCD SD/SDHC/SDXC 2592 × 1944 5M 1920 × 1080 2M(16:9) Image Resolution 1280 × 720 0.9M(16:9) 640 × 480 0.3M <HD>1920 × 1080p 30fps Movie Resolution <HD>1280 × 720p 30fps <VGA>640 × 480p 30fps White Balance Auto Exposure Auto Light On/Off Picture:JPEG File-Format Movie:Mpeg-4 AVC/H.264 Image play Single Image/Slideshow PC interface USB 2.0 Port TV out mini HDMI Battery Lithium-ion Rechargeable Battery Dimension 55.0(H)*22.8(W)*107.0(D) mm Weight 98.5g(Without battery) Li-ion battery pack Type name PX1686 Compliant with JIS protection grade 8 standards (according to tests conducted Water-resistant in-house by manufacturer) Can be submerged at a maximum depth of 2.0m (6.56ft.), for up to 60 minutes. Image Sensor Operation Modes Lens Focus Range (wide) Zoom Shutter LCD monitor Storage Media 42 EN APPENDICES User’s Manual Concerning the multi-indicator The camcorder’s multi-indicator will light, flash, or be off, depending on the different camcorder operations. Multi-indicator status Lit Slow Slow/Fast Flashing Fast Very fast EN Camcorder status Connected to a computer or printer Charging Battery charge error or rise in internal temperature During sleep mode Connected to a computer or printer Connected to a TV During self-timer photography Accessing card 43 User’s Manual Others Mac OS is a trademark of Apple Inc., registered in the U.S. and other countries. Microsoft and Windows are registered trademarks of Microsoft Corporation in the USA and other countries. Intel and Pentium are registered trademarks of Intel Corporation (USA). In this manual, the Microsoft® Windows® 2000 operating system, Microsoft® Windows® XP operating system, Microsoft® Windows® Vista operating system, and Microsoft® Windows® 7 operating system are collectively referred to as “Windows”. Software Red Eye by FotoNationTM 2003-2005 is a trademark of FotoNation® Inc. Red Eye software© 2003-2005 FotoNation In Camcorder Red Eye - covered by U.S. Patent No. 6,407,777. Other patents Pending. APPENDICES SDXC logo is a trademark of SD-3C, LLC. All other company and product names are registered trademarks or trademarks of their respective owners. CAUTION i It is forbidden to copy this manual, whole or in part, without prior written permission. i All images and illustrations given in this manual are for explanation purposes and may differ slightly from that of the actual product. Also, actual specifications are subject to change without prior notice and therefore may differ from the contents of this manual. User’s Manual 44 EN TOSHIBA SUPPORT Need help? For the latest driver updates, User’s Manuals & FAQs please have a look at the TOSHIBA options & services support page: computers.toshiba.eu/options-support Please see computers.toshiba.eu/options-warranty for the TOSHIBA hotline numbers. EN 45 User’s Manual REGULATORY INFORMATION CE compliance This product is CE marked in accordance with the requirements of the applicable EU Directives. Responsible for CE marking is Toshiba Europe GmbH, Hammfelddamm 8, 41460 Neuss, Germany. A copy of the official Declaration of Conformity can be obtained from following website: http://epps.toshiba-teg.com. Medical environment: The compliance to the Medical Product Directive has not been verified by Toshiba, therefore this product cannot be used as a medical product without further verification. The use in usual office environments e.g. in hospitals should be no problem if there is no restriction by the responsible administration. Automotive environment: Please search the owner instructions of the related vehicle for advices regarding the use of this product (category). Aviation environment: Please follow the instructions of the flight personnel regarding restrictions of use. User’s Manual 46 EN APPENDICES Working Environment The Electromagnetic Compliance (EMC) of this product has been verified typically for this product category for a so called Residential, Commercial & Light Industry Environment. Any other working environment has not been verified by Toshiba and the use of this product in these working environments is maybe restricted or cannot be recommended. Possible consequences of the use of this product in non verified working environments can be: Disturbances of other products or of this product in the nearby surrounding area with temporarily malfunction or data loss/corruption as result. Example of non verified working environments and related advices: Industrial environment (e.g. where 3-phase 380V mains is being used mainly): Danger of disturbances of this product due to possible strong electromagnetic fields especially near to big machinery or power units. Additional environments not related to EMC Outdoor use: As a typical home/office equipment this product has no special resistance against ingress of moisture and is not strong shock proofed. Explosive atmosphere: The use of this product in such special working environment (Ex) is not allowed. REACH Following information is only valid for EU-member States: REACH - Compliance Statement The new European Union (EU) chemical regulation, REACH (Registration, Evaluation, Authorization and Restriction of Chemicals), entered into force on 1 June 2007. Toshiba will meet all REACH requirements and is committed to provide our customers with information about the chemical substances in our products according to REACH regulation. Please consult the following website http://www.toshiba-europe.com/ computers/info/reach for information about the presence in our articles of substances included on the candidate list according to article 59(1) of Regulation (EC) No 1907/2006 (“REACH”) in a concentration above 0.1 % weight by weight. WEEE Following information is only valid for EU-member States: Disposal of products The crossed out wheeled dust bin symbol indicates that products must be collected and disposed of separately from household waste. Integrated batteries and accumulators can be disposed of with the product. They will be separated at the recycling centres. The black bar indicates that the product was placed on the market after August 13, 2005. By participating in separate collection of products and batteries, you will help to assure the proper disposal of products and batteries and thus help to prevent potential negative consequences for the environment and human health. EN 47 User’s Manual For more detailed information about the collection and recycling programmes available in your country, please visit our website (http:// eu.computers.toshiba-europe.com) or contact your local city office or the shop where you purchased the product. Disposal of batteries and/or accumulators The crossed out wheeled dust bin symbol indicates that batteries and/or accumulators must be collected and disposed of separately from household waste. If the battery or accumulator contains more than the specified values of lead (Pb), mercury (Hg), and/or cadmium (Cd) defined in the Battery Directive (2006/66/EC), then the chemical symbols for lead (Pb), mercury (Hg) and/or cadmium (Cd) will appear below the crossed out wheeled dust bin symbol. By participating in separate collection of batteries, you will help to assure the proper disposal of products and batteries and thus help to prevent potential negative consequences for the environment and human health. User’s Manual 48 EN APPENDICES For more detailed information about the collection and recycling programmes available in your country, please visit our website (http:// eu.computers.toshiba-europe.com) or contact your local city office or the shop where you purchased the product. ADDITIONAL INFORMATION © 2010 TOSHIBA Europe GmbH. All rights reserved. TOSHIBA reserves the right to make technical changes. TOSHIBA assumes no liability for damages incurred directly or indirectly from errors, omissions or discrepancies between this product and the documentation. EN 49 User’s Manual BW10_UM__AB_V01_0510 For more information, please visit: www.toshiba-multimedia.com CAMILEO BW10 TOSHIBA SUPPORT Need help? For the latest driver updates, user’s manuals & FAQ’s please have a look at the TOSHIBA options & services support page: www.mytoshiba.com au www.mytoshiba.co.nz Toshiba Support Centre: Australia :13 30 70 New Zealand: 0800 445 439 Expert staff provides technical assistance during normal business hours, 5 days a week, excluding public holidays. Be sure to have the following information available before you call: - Product serial number and part number - Place of purchase - Applicable error messages or fault symptoms - Operating system (if applicable) - Installed third-party hardware and software (if applicable) ©2010 Toshiba (Australia) Pty Limited. Camileo™ is a trademark of Toshiba Corporation. Product specifications, configurations, prices, system/component/options availability are all subject to change without notice. All products and names are the property of their respective owners. Reseller / Retailer pricing may vary. All rights reserve. EN Fig. 1 ■ How to remove all moisture from Fig. 2 CZ ■ Jak odstranit veškerou vlhkost z povrchů videokamery che des Camcorders entfernen • If moisture adhering to the crevices in the slot • Pokud není dostatečně odstraněna vlhkost, • Wenn an den Spalten der Steckplatzabdeckung und cover and terminal cover is not sufficiently wiped off, moisture may get inside the camcorder when the cover is opened. Please heed the following points to completely remove all moisture from the camcorder. která ulpívá ve štěrbinách krytu zásuvky a krytu konektoru, může vniknout do videokamery, když je kryt otevřený. Věnujte pozornost následujícím bodům a odstraňte veškerou vlhkost z videokamery. 1 Gently shake the camcorder to shake off any 1 Jemně videokamerou zatřeste, abyste setřásli veškeré kapky vody. (Obr. 1) 2 Wipe off any moisture from the area around 2 Odstraňte veškerou vlhkost z oblasti kolem the terminal cover. krytu konektoru. • Take care that water does not get inside the camcorder when opening the cover. (Fig. 2) • If there is any moisture adhering inside the slot cover, wipe it off completely from every crevice. * This moisture is not due to exposure to water. (Fig. 3) • Dávejte pozor, aby voda při otevření krytu nevnikla do videokamery. (Obr. 2) • Pokud uvnitř krytu zásuvky ulpívá nějaká vlhkost, zcela ji odstraňte ze všech štěrbin. * Tato vlhkost nepochází z vystavení videokamery vodě. (Obr. 3) Fig. 3 ■ Quick Start Guide content change • On page 17, the numerical value has been changed as follows: ■ Změna obsahu Stručné základní příručky • Na straně 17 se numerické hodnoty mění - Output 65 μW (internal 34 mW) ↓ޓ - Output 110 μW (internal 34 mW) následovně: 1AG6P1P6071-- 0610 DK ES ■ Cómo eliminar toda la humedad de ■ Kaiken kosteuden poistaminen FI las superficies de la videocámara videokameran pinnoilta • Si no se limpia suficientemente la humedad • Jos videokameran aukkojen tai liitäntöjen 1 Ryst forsigtigt camcorderen for at ryste eventuelle vanddråber af. (Fig. 1) 1 Sacuda suavemente la videocámara para eliminar las gotas de agua. (Fig. 1) 2 Tør eventuel fugt af området omkring • Pas på, at der ikke trænger vand ind i camcorderen, når låget åbnes. (Fig. 2) • Hvis der er fugt inden i slotlåget, skal det tørres helt væk fra alle revner. * Denne fugt skyldes ikke, at camcorderen har været i nærheden af vand. (Fig. 3) ■ Ændring i hurtigvejledningens indhold • På side 17 er den numeriske værdi blevet ændret, som følger: alrededor de la tapa del terminal. • Tenga cuidado para que el agua no penetre en el interior de la videocámara al abrir la tapa. (Fig. 2) • Si hay humedad adherida en el interior de la tapa de la ranura, límpiela por completo en cada una de las grietas. * Esta humedad no procede de una exposición al agua. (Fig. 3) ■ Modificación del contenido de la GR 2 Pyyhi kosteus liitäntöjen kannen ympäriltä. • Varmista, että videokameran sisään ei pääse vettä, kun avaat kannen (kuva 2). • Jos aukon kannen sisäpuolella on kosteutta, pyyhi se pois huolellisesti jokaisesta syvennyksestä. * Tämä kosteus ei johdu vedelle altistumisesta (kuva 3). ■ Pikaoppaan sisällön muutos • Numeroarvoa on muutettu seuraavasti sivulla 17: • En la página 17, se ha modificado el valor - Teho 65 μW (sisäinen 34 mW) ↓ޓ - Teho 110 μW (sisδinen 34 mW) - Salida de 65 μW (interna 34 mW) ↓ޓ - Salida de 110 μW (interna 34 mW) ■ Τρόπος απομάκρυνσης της υγρασίας 1 Poista vesipisarat ravistamalla videokameraa Guía de inicio rápido numérico del siguiente modo: - Udgangseffekt 65 μW (intern 34 mW) ↓ޓ - Udgangseffekt 110 μW (intern 34 mW) kansien syvennyksiin joutunutta kosteutta ei pyyhitä pois riittävän huolellisesti, kosteus voi päästä videokameran sisään, kun kansi avataan. Poista kaikki kosteus videokamerasta noudattamalla seuraavia ohjeita. varovasti (kuva 1). 2 Limpie la humedad de la zona situada terminallåget. ■ Kako odstraniti svu vlagu s 1 Schütteln Sie den Camcorder leicht, um alle Wassertropfen abzuschütteln. (Abb. 1) 2 Wischen Sie jegliche Feuchtigkeit im Bereich um die Buchsenabdeckung ab. • Achten Sie darauf, dass beim Öffnen der Abdeckung keine Feuchtigkeit ins Innere des Camcorders gelangt. (Abb. 2) • Wenn Feuchtigkeitsreste an der Innenseite der Kartensteckplatzabdeckung anhaften, wischen Sie diese sorgfältig aus jeder Spalte der Abdeckung ab. * Diese Feuchtigkeit rührt nicht daher, dass das Gerät mit Wasser in Berührung gekommen ist. (Abb. 3) ■ Änderung des Inhalts der Kurzanleitung • Auf Seite 17 wurde der numerische Wert wie - Leistungsabgabe 65 μW (intern 34 mW) ↓ޓ - Leistungsabgabe 110 μW (intern 34 mW) • Hvis fugt i revnerne i slot- og terminallåget adherida a las grietas en la tapa de la ranura y la tapa del terminal, la humedad puede penetrar en la videocámara al abrir la tapa. Tenga en cuenta los puntos siguientes para eliminar por completo toda la humedad de la videocámara. an der Buchsenabdeckung anhaftende Feuchtigkeit nicht sorgfältig abgewischt wird, kann beim Öffnen der Abdeckung Feuchtigkeit ins Innere des Camcorders eindringen. Bitte beachten Sie die folgenden Punkte, um sicherzustellen, dass jegliche Feuchtigkeit von der Oberfläche des Camcorders entfernt wird. folgt geändert: - výstup 65 μW (interní 34 mW) ↓ޓ - výstup 110 μW (interní 34 mW) rens overflader ikke aftørres grundigt, kan der trænge fugt ind i camcorderen, når låget åbnes. Vær opmærksom på følgende for at fjerne al fugt fra camcorderen. ■ Jegliche Feuchtigkeit von der Oberflä- the camcorder surfaces water drops. (Fig. 1) ■ Sådan fjernes al fugt fra camcorde- DE FR ■ Comment ôter toute l’humidité présente sur les surfaces du caméscope • Si l’humidité présente dans les ouvertures du cache de la fente et du cache du connecteur n’est pas essuyée de manière correcte, elle peut pénétrer dans le caméscope lors de l’ouverture du cache. Veuillez procéder comme suit pour ôter toute l’humidité présente sur le caméscope. 1 Secouez légèrement le caméscope pour faire tomber les gouttes d’eau (ill. 1). 2 Essuyez l’humidité présente autour du cache du connecteur. • Veillez à ce que l’eau ne pénètre pas dans le caméscope lors de l’ouverture du cache (ill. 2). • En présence d’humidité à l’intérieur du cache de la fente, essuyez bien toutes les ouvertures. * Cette humidité n’est pas liée à l’exposition à l’eau (ill. 3). ■ Modification dans le Guide de démarrage rapide • À la page 17, la valeur numérique a été modifiée comme suit : - Puissance de 65 μW (puissance interne de 34 mW) ↓ޓ - Puissance de 110 μW (puissance interne de 34 mW) HR HU ■ Minden nedvessé eltávolítása a IT ■ Come rimuovere l'umidità dalle από τις επιφάνειες της βιντεοκάμερας površina video kamere kamera felületéről superfici della videocamera • Εάν η υγρασία από τις εσοχές του καλύμμα- • Ako vlaga koja se zadržava u šupljinama • Ha a nyílás fedelének hasadékaiban • Se l'umidità presente negli interstizi del coperchio della τος υποδοχής και τερματικού δεν απομακρυνθεί εντελώς, ενδέχεται η υγρασία να μεταφερθεί στο εσωτερικό της βιντεοκάμερας όταν το κάλυμμα είναι ανοικτό. Ακολουθήστε πιστά τα παρακάτω βήματα για την πλήρη απομάκρυνση της υγρασία από την βιντεοκάμερα. 1 Τινάξτε απαλά τη βιντεοκάμερα για την απομάκρυνση τυχόν σταγόνων νερού. (Εικ. 1) 2 Σκουπίστε την υγρασία που τυχόν υπάρχει στην περιοχή γύρω από το κάλυμμα του τερματικού. • Προσέξτε ώστε να μην μπει νερό στο εσωτερικό της βιντεοκάμερας κατά το άνοιγμα του καλύμματος. (Εικ. 2) • Εάν υπάρχει τυχόν υγρασία εντός του καλύμματος της υποδοχής, σκουπίστε το εντελώς από κάθε εσοχή. * Η υγρασία δεν οφείλεται στην έκθεση σε νερό. (Εικ. 3) ■ Αλλαγή περιεχομένου στον Οδηγό poklopca utora i poklopca priključka nije u potpunosti odstranjena, ona može ući u kameru prilikom otvaranja poklopca. Molimo slijedite daljnje korake da biste u potpunosti odstranili vlagu iz video kamere. 1 Lagano protresite kameru da biste otresli kapljice vode. (Sl. 1) 2 Obrišite svu vlagu iz područja oko poklopca priključka. • Pazite da prilikom otvaranja poklopca u kameru ne uđe voda. (Sl. 2) • Ako se unutar poklopca utora zadržala vlaga, dobro osušite sve šupljine. * Ova vlaga nije nastala uslijed izloženosti vodi. (Sl. 3) ■ Izmjena sadržaja Vodiča za brzi γρήγορης εκκίνησης početak • Στη σελίδα 17, η αριθμητική τιμή έχει αλλάξει • Na str. 17 izmijenjena je brojčana vrijednost: ως εξής: - Ισχύς 65 μW (εσωτερική 34 mW) ↓ޓ - Ισχύς 110 μW (εσωτερική 34 mW) - Izlazna jačina 65 μW (unutarnja 34 mW) ↓ޓ - Izlazna jačina 110 μW (unutarnja 34 mW) megmaradt a nedvesség és a csatlakozó fedele sincs megfelelően letörölve, a kamerába a fedél kinyitásakor víz kerülhet. Kérjük, járjon el az alábbi módon a nedvesség maradéktalan eltávolításához. 1 Finoman rázza le a kameráról a vízcseppeket. (1. ábra) 2 Törölje szárazra a csatlakozófedél környékét. • Ügyeljen arra, hogy ne kerülhessen víz a kamerába a fedél kinyitásakor. (2. ábra) • Ha a nyílás fedelén belül némi víz található, törölje ki azt minden résből. * Ez a nedvesség nem azért került be, mert víz érte a készüléket. (3. ábra) ■ Gyorsindítási útmutató tartalomváltozás • A 17. oldalon a számérték a következőképp módosult: - Teljesítmény: 65 μW (belső: 34 mW) ↓ޓ - Teljesítmény: 110 μW (belső: 34 mW) fessura e del coperchio del terminale non viene rimossa in modo appropriato, essa potrebbe penetrare all'interno della videocamera quando si apre il coperchio. Attenersi alle istruzioni seguenti per rimuovere completamente l'umidità dalla videocamera. 1 Scuotere delicatamente la videocamera per eliminare eventuali gocce d'acqua. (Fig. 1) 2 Asciugare le aree umide intorno al coperchio del terminale. • Prestare attenzione affinché non penetri acqua all'interno della videocamera quando si apre il coperchio. (Fig. 2) • Se la parte interna del coperchio della fessura è umida, asciugarla completamente rimuovendo l'umidità da ogni interstizio. * Questa umidità non è dovuta all'esposizione all'acqua. (Fig. 3) ■ Modifiche apportate al contenuto della Guida rapida • A pagina 17, il valore numerico è stato modificato nel modo seguente: - Intensità 65 μW (interna 34 mW) ↓ޓ - Intensitΰ 110 μW (interna 34 mW) NL Fig. 1 ■ Alle vocht van de oppervlakken van powierzchni kamery • Als er vocht achterblijft in de kieren van het • Hvis du ikke tørker godt av fukten som har • Jeśli wilgoć znajdująca się na szczelinach w de aansluitingen. • Zorg ervoor dat er geen water in de camcorder binnendringt bij het openen van het klepje. (Afb. 2) • Als zich vocht aan de binnenkant van het afdekklepje van de kaartsleuf bevindt, veegt u dit volledig weg. Sla hierbij geen hoekje over. * Dit vocht wordt niet veroorzaakt door blootstelling aan water. (Afb. 3) ■ Wijziging in inhoud van snelstartgids • Op pagina 17 is de numerieke waarde als • Påse at vann ikke trenger seg inn i videokameraet når du åpner dekselet. (Fig. 2) • Hvis det finnes fukt på innsiden av spordekselet, må du tørke den helt bort fra alle sprekker. * Denne fukten skyldes ikke eksponering for vann. (Fig. 3) ■ Endring av innhold i hurtigveiledningen • På side 17 har tallverdien blitt endret som 1 Delikatnie potrząśnij kamerą, by wytrząsnąć z niej krople wody. (Rys. 1) 2 Wytrzyj dokładnie wilgoć wokół pokrywy terminalu. • Zwróć uwagę, by woda nie dostała się do wnętrza kamery po otwarciu pokrywy. (Rys. 2) • Jeśli w gnieździe pod pokrywą jest wilgoć, wytrzyj ją dokładnie z każdej szczeliny. * Tej wilgoci nie wolno narażać na kontakt z wodą. (Rys. 3) ■ Zmiana treści przewodnika szybkiego startu ne jak poniżej: - Moc wyjściowa 65 μW (wewnętrzna 34 mW) ↓ޓ - Moc wyjściowa 110 μW (wewnętrzna 34 mW) 0610 RS pokrywie gniazda na kartę i pokrywie terminalu nie zostanie dostatecznie wytarta, może ona dostać się do wnętrza kamery, gdy pokrywa zostanie otwarta. Aby usunąć całą wilgoć z kamery, należy wykonać opisane poniżej czynności. • Na str. 17 wartości liczbowe zostały zmienio- - Effekt 65 μW (internt 34 mW) ↓ޓ - Effekt 110 μW (internt 34 mW) - Uitvoer 65 μW (intern 34 mW) ↓ޓ - Uitvoer 110 μW (intern 34 mW) ■ Kako da uklonite svu vlagu sa let. følger: volgt gewijzigd: PT 1 Rist videokameraet forsiktig for å fjerne ev. 2 Tørk av fukt fra området rundt terminaldekse- 2 Veeg alle vocht weg rond het afdekklepje voor ■ Como remover toda a humidade lagt seg i sprekkene i kortsporet, kan den trekke seg inn i videokameraet når dekselet åpnes. Følg punktene nedenfor for å fjerne all fukt fra videokameraet. vanndråper. (Fig. 1) eventuele waterdruppeltjes te verwijderen. (Afb. 1) 1AG6P1P6071-- ■ Jak usunąć całą wilgoć z meraets overflater: 1 Schud voorzichtig met de camcorder om Fig. 3 ■ Slik fjerner du all fukt fra videoka- PL de camcorder verwijderen afdekklepje van de kaartsleuf en het afdekklepje niet voldoende droog is geveegd, kan er vocht in de camcorder binnendringen wanneer het klepje wordt geopend. Ga als volgt te werk om alle vocht te verwijderen van de camcorder. Fig. 2 NO RU ■ Как удалить всю влагу с поверх- SE ■ Så här tar du bort all fukt utanpå das superfícies da câmara spoljnih površina kamkordera ности видеокамеры videokameran • Se a humidade que aparecer nas reentrâncias da • Ukoliko se vlaga na zazorima unutar poklopca • Если влага, задержавшаяся в щелях крышки • Om fukt i springorna vid kortluckan och tampa de encaixe e da tampa do terminal não for bem limpa, pode entrar na câmara de vídeo quando a tampa for aberta. Tenha atenção aos pontos que se seguem para remover completamente a humidade da câmara de vídeo. ležišta i priključaka ne obriše u potpunosti, prilikom otvaranja poklopca vlaga može prodreti u kamkorder. Obratite pažnju na sledeća mesta kako biste u potpunosti uklonili svu vlagu sa kamkordera. 1 Agite suavemente a câmara de vídeo para libertar quaisquer gotas de água. (Fig. 1) 2 Limpe a humidade da área à volta da tampa 1 Blago protresite kamkorder kako biste sa njega otresli kapljice vode. (Sl. 1) гнезда и крышки разъемов, была недостаточно тщательно вытерта, то она может попасть внутрь видеокамеры при открытии крышки. Примите во внимание следующие указания, чтобы полностью удалить всю влагу с поверхности видеокамеры. 1 Несильно потрясите видеокамеру, что стряхнуть с поверхности воду. (Рис. 1) 2 Obrišite svu vlagu sa područja oko poklopca 2 Вытрите поверхность камеры вокруг do terminal. priključaka. крышки разъемов. • Tenha cuidado para não deixar entrar água para o interior da câmara de vídeo quando abrir a tampa. (Fig. 2) • Se existir humidade no interior da tampa de encaixe, limpe-a completamente de todas as reentrâncias. * Esta humidade não se deve a exposição a água. (Fig. 3) • Vodite računa da voda ne prodre unutar kamkordera prilikom otvaranja poklopca. (Sl. 2) • Ukoliko na poklopcu ležišta ima vlage, obrišite je u potpunosti, iz svakog zazora. * Vlaga koja se ovde nađe nije nastala usled izlaganja vodi. (Sl. 3) • Внимательно проследите за тем, чтобы вода не попала внутрь видеокамеры при открывании крышки. (Рис. 2) • Если некоторое количество воды все же задержалось внутри отсека гнезда, тщательно протрите все углубления и щели. * Эта влага образуется не в результате попадания воды. (Рис. 3) ■ Alterações ao conteúdo do Guia de ■ Promena sadržaja vodiča za brzi Início Rápido početak • Na página 17, o valor numérico foi alterado • Na strani 17, numeričke vrednosti su da seguinte forma: promenjene prema sledećem: - Potência útil de 65 μW (interna de 34 mW) ↓ޓ - Potκncia ϊtil de 110 μW (interna de 34 mW) - Izlaz 65 μW (interno 34 mW) ↓ޓ - Izlaz 110 μW (interno 34 mW) SK ■ Odstránenie vlhkosti z povrchu ■ Kako iz površine kamkorderja ■ Изменения в содержании Краткого руководства • На странице 17 численные значения изменены на следующие: - Выходная мощность 65 мкВт (внутренняя 34 мкВт) ↓ޓ - Выходная мощность 110 мкВт (внутренняя 34 мкВт) SL ■ Kameranızdaki nemi tamamen TR kamery odstraniti vso vlago giderme • Ak nie je vlhkosť, ktorá zostala v štrbinách • Če vlage, ki je v špranjah v pokrovu reže in • Yuva kapağındaki ya da terminal kapağındaki krytu otvoru a krytu konektora, dostatočne utretá, pri otvorení krytu sa môže vlhkosť dostať dovnútra kamery. Pri úplnom odstraňovaní vlhkosti z kamery postupujte podľa nasledujúcich bodov. 1 Jemne otraste z kamery všetky kvapky vody. (Obr. 1) 2 Utrite vlhké miesta okolo krytu konektora. • Pri otváraní krytu dávajte pozor, aby sa do kamery nedostala žiadna voda. (Obr. 2) • Ak je na vnútornej strane krytu karty vlhkosť, úplne ju otrite z každej štrbiny. * Táto vlhkosť nevzniká v dôsledku vystavenia vode. (Obr. 3) ■ Zmena v obsahu Stručnej príručky • Na strane 17 bola zmenená číselná hodnota takto: - Výstup 65 μW (vnútorný 34 mW) ↓ޓ - Výstup 110 μW (vnútorný 34 mW) pokrovčku priključkov, ne odstranite v zadostni meri, ta pri odprtju pokrovčka vstopi v kamkorder. Za popolno odstranitev vse vlage iz kamkorderja upoštevajte naslednje točke. 1 Kamkorder nežno stresite, da odstranite vse kapljice vode. (Sl. 1) 2 Odstranite vso vlago v območju okoli pokrovčka priključkov. • Pazite, da voda pri odprtju pokrovčka ne vstopi v notranjost kamkorderja. (Sl. 2) • Če se notranjosti pokrovčka reže drži vlaga, jo popolnoma obrišite iz vsake špranje. * Ta vlaga ne nastane zaradi izpostavitve vodi. (Sl. 3) ■ Sprememba vsebine vodnika za hiter začetek • Na strani 17 so bile spremenjene številčne oluklarda bulunan nem yeterince silinmemişse, kapak açıldığında kameranın içerisine girebilir. Kameranızdaki nemi tamamen gidermek için lütfen aşağıdaki maddeleri yerine getirin. 1 Su damlalarının düşmesi için kamerayı hafifçe sallayın. (Şek. 1) 2 Terminal kapağının etrafındaki alanda bulunan nemi silin. • Kapağı açarken kameranın içerisine su girmemesine dikkat edin. (Şek. 2) • Yuva kapağının içerisinde nem kalmışsa silerek oluklardaki tüm nemi giderin. * Bu nemin sebebi kameranın suya maruz kalması değildir. (Şek. 3) ■ Hızlı Başlangıç Kılavuzu içeriğinde değişiklik • Sayfa 17'deki sayısal değerler şu şekilde vrednosti: değiştirilmiştir: - Izhodna moč 65 μW (notranja 34 mW) ↓ޓ - Izhodna moč 110 μW (notranja 34 mW) - Çıkış 65 μW (dahili 34 mW) ↓ޓ - Çıkış 110 μW (dahili 34 mW) kontaktskyddet inte torkas bort ordentligt kan det komma in fukt i videokameran när de öppnas. Följ följande punkter för att få bort all fukt från videokameran ordentligt. 1 Skaka försiktigt videokameran för att få bort eventuella vattendroppar. (Fig. 1) 2 Torka bort eventuell fukt från området kring kontaktskyddet. • Var försiktig så att det inte kommer in vatten i videokameran när du öppnar skyddet. (Fig. 2) • Om det finns fukt på insidan av kortluckan torkar du bort den ordentligt från alla springor. * Fukten uppkommer inte genom att enheten utsätts för vatten. (Fig. 3) ■ Ändring i snabbstartsguiden • På sidan 17 har det numeriska värdet ändrats enligt följande: - Uteffekt 65 μW (34 mW internt) ↓ޓ - Uteffekt 110 μW (34 mW internt) AR