1
WiFi OPERATION
Handset includes rechargeable battery with a running time of approximately 4 hours of continuous usage. To
avoid the battery going flat, always switch OFF the appliance when not in use. The Charging LED will be on
when the battery is charging, when the battery is at full charge or depleted, the red LED will be OFF.
1.Download and install the recommended App (IP Cam Viewer) in App Store
(iPhone) and Google Play Store (Android Smartphone).
2.Set Handset to OFF
3.Set Handset to WiFi and then turn ON. Wait for a second for the WiFi LED to
blink with GREEN color. You should have Wi-Fi on on your smartphone, and
be able connect to TheFibres AP.
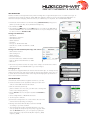
Settings for iOS iPhone:
- click Menu
- click Manage Cameras
- click Add Camera
- click IP Camera
- set Name
- set Type to “Unknown IP-06”
- set IP/Host to 10.10.1.1 and HTTP to 8196
- click Save
Settings for Android Smartphone App and camera:
- click Camera Control
- click Setting Icon
- click IP Camera
- set Camera Name
- set Camera Model to “Unknown IP-06”
- set IP to 10.10.1.1 and HTTP Port to 8196
- click Save
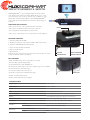
4. Insert the tip until it reaches the edge of the adaptor or female side of fibre
optic devices. Rotate FOCUS 360° to get clear images.
Changing the tip:
The handset is supplied with both the SC and LC female tips. To change the tip
simply unscrew the tip and replace with the appropriate tip.Take extra care not
to touch the lens in handset when removing and changing the tip. Ensure the
lens is clean and free from dirt.
USB OPERATION
a.Download and install the supplied software to your PC.
b.Connect Handset to PC by USB to mini 5-pin cable and
switch on the USB and then ON switch.
c.Run the software (click icon).
[If the software does not start, you will need to change the
name of the Imaging Device.]
d.Select Check button to analyze Pass/Fail and Resume to
return.
e.Select Single Mode or Multi Mode button.
f. Set Acceptance Criteria
g.Parameter Setting button: To control Video Process and
Camera Control (Setting 1, Setting 2)
h.Change Core/Clad Threshold (recommend 70~90)
according to your PC condition.
i. Save & Print button: After click Check button, you can
save (or print) the analysis report by bmp or jpg file. After
click the Resume button, you can capture (or print) the
inspected image only automatically like Capture_0001,
Capture_0002....