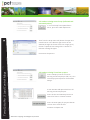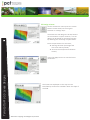
1
Gateway 6.2: Map Math
User Manual
TerraCutta Pro User Release Version 2.0
© 2014 Precision Cropping Technologies Pty Ltd.
No part of this publication may be reproduced, transmitted, transcribed, stored in a retrieval system, or
translated into any language or computer language, in any form or by any means, electronic, mechanical,
magnetic, optical, chemical, manual, or otherwise, without the prior written permission of Precision Cropping
Technologies Pty Ltd.
The information in this courseware title is distributed on an ‘as is’ basis, without warranty. While every
precaution has been taken in the preparation of this course, neither the authors nor PCT. shall have any liability
to any person or entity with respect to any loss or damage caused or alleged to be caused directly or indirectly
by the instructions contained in this book or by the computer software and hardware products described in
it.
We make a sincere effort to ensure the accuracy of the material described herein; however, PCT makes no
warranty, expressed or implied, with respect to the quality, correctness, reliability, accuracy, or freedom from
error of this document or the products it describes. Data used in examples and sample data files are intended
to be fictional. Any resemblance to real persons or companies is entirely coincidental.
All information in this manual was correct at the time of writing. PCT is not affiliated with nor has any control
over changes made to the product described in this manual. These include, but are not limited to, changes in
the application’s colour scheme, icon appearance and locations, addition or removal of program features,
online templates, and help content. PCT reserves the right to make corrections to the courseware at any time
and without notification.
If the version of courseware that you are viewing is marked as NOT FOR TRAINING, SAMPLE,
or similar, then it is made available for content and style review only and cannot be used in any part of a
training course. Sample versions may be shared but cannot be re-sold to a third party.
: This document may only be used under the terms of the license agreement from PCT. PCT
reserves the right to alter the licensing conditions at any time, without prior notice.
Contents
Home..............................................................................................................................7
1: Installation & Licensing.............................................................................................9
2: Updating & Installing Apps.......................................................................................11
2.1: Options & Settings............................................................................................12
3.0 TerraCutta Pro........................................................................................................15
3.1 Control Maps.....................................................................................................17
3.2 Load an existing control map............................................................................18
3.3 Load an existing TerraCutta project..................................................................18
3.4 Collecting elevation points using the TerraCutta Pro wizard............................19
4.0 Surface elevation points to create a control map..................................................22
5.0 Designing a Landforming application.....................................................................24
5.1 Creating field regions to define design areas....................................................25
5.2 Best-fit Field Design..........................................................................................26
5.3 Multi-fit Field Design.........................................................................................28
5.4 Drain Design......................................................................................................30
5.4.1 Best-fit Drain Design...................................................................................30
5.4.2 Multi-fit Drain Design.................................................................................30
©Precision Cropping Technologies Pty Ltd 2014.
5.5 Design a Levee...................................................................................................32
5.5.1 Exporting Drain and Levee designs as John Deere Guidance lines............33
5.6 Design check, using the Water Flow Simulation...............................................35
6.0 Applying design surfaces using John Deere iGrade™.............................................36
6.1 Additional tools for applying design surfaces....................................................38
6.1.1 Marker Points............................................................................................38
6.1.2 Setting the benchmark drive.....................................................................38
©Precision Cropping Technologies Pty Ltd 2014.
1: Installation & Licensing
Gateway can be dowloaded from on the Precision Cropping Technologies Pty Ltd (PCT); website
http://pct-ag.com/tools/download/. To install Click the Install Gateway link and follow the default
install steps.
Note that Gateway requires the
framework. Errors in the installation could occur if
failed
to install. The installation procedure should take the user through .Net4 installation. However, if this
does not occur then the .
framework can be downloaded amd installed from the Microsoft
website.
Step 1
After the initial installation has completed, the following
procedure will be initiated.
Or double click the Gateway icon on your desktop if the
software does not run automatically.
Step 2
The loading screen will appear as the program opens.
Step 3
Note: The default data directory can be changed at any time by
clicking Home>Options and Settings>Set Data Folder.
Step 4
A login is required to download licenses and applications
(apps). The login and password are provided by a PCT
Distributor or Dealer.
Username................................….…………………………………………….
Password.................................….……………………………………………..
Click OK to accept.
©Precision Cropping Technologies Pty Ltd 2014.
Gateway 1: Getting Started
Location of data is critical to the smooth operation of the software.
By accepting the default settings of the program, a folder named
PCT_Data will be created on the users hard drive at the location
shown.
Step 5
After the username and password has been entered and
validated the licensing screen will appear.
Click Ok to move to the Download Licenses screen.
Click Cancel if you don't have any licenses and just intend to use
Gateway for viewing your data.
Step 6
Click Download Licenses.
Step 7
Gateway 1: Getting Started
This screen will inform the user which licenses have been
installed.
Click Ok.
Step 8
Finally, the licenses available will be displayed in the
License Manager screen.
Click the Close button to continue.
©Precision Cropping Technologies Pty Ltd 2014.
2: Updating & Installing Apps
Unlike existing spatial analysis software Gateway consists of a series of Applications (apps) designed
to perform a specific function (or set of functions) and provide a complete data analysis solution. The
apps are grouped into four categories:
1. Analysis
2. Agronomy
3. Landforming
4. Irrigation
Each app is discussed in greater depth further in the relevant sections of the manual.
Follow these steps to install the apps.
Step 1
When Gateway displays the message ([Updated Modules
Available]) at the top of the software window; there have been
software updates loaded to the program server. If you are
installing the software for the first time, this message will be
appear as there are apps available for download.
Step 2
Select the Home>App Browser to open the Apps Download
screen.
Clicking the Download All button will initiate the download of
all available Apps.
A progress bar is displayed for each app and the total number
of downloads is shown at the bottom of the window.
Step 4
Once the downloads have completed the Restart VA Gateway
button will become active (no longer grayed out).
By restarting Gateway the installation of the apps will begin
and the program will automatically restart.
©Precision Cropping Technologies Pty Ltd 2014.
Gateway 2: Installing apps
Step 3
2.1: Options & Settings
Before using the Gateway software, there are several settings which should be customised to suit
users operations.
These settings include the location of data storage folder, print operations, classification methods,
units of measure, sampling options and GPS settings.
If no changes are made to these settings, factory default settings will be applied.
Step 1
To change the default settings, select Home>Options and
Settings>More Options and Settings.
Step 2
Gateway 2.1: Options & Settings
The General tab is used to set;
● Location of the Data Folder (this must be one folder
above the grower names).
● App updates and licence manager redirection - the
default settings alert the user that app updates are
available for download and the license manager will
automatically appear if licences have expired.
Step 3
Select the Printing tab to choose a print template and add a
logo to any printed material.
A footer file can also be added if desired.
Step 4
Select the Classification tab to set the classification method to
zone data for apps such as Pro Rx. The default zoning method
uses Standard deviation (Std Dev) however an experienced user
may prefer another option.
The minimum zone area can also be set (on this tab) to remove
zones which are smaller than application machinery can
accommodate.
©Precision Cropping Technologies Pty Ltd 2014.
Step 5
The Units tab allows the user to set the appropriate units for
their system.
Step 6
The Sampling tab allows the sample density to be adjusted.
This changes the suggested number of sample points
automatically generated in apps such as Sample Test Rx.
Field Viewer and TerraCutta are field mapping apps which
require a GPS connection. The connection can be tested and
set in the GPS and Port Settings tab.
Step 8
The Disk areas tab exists for support purposes and should have
the default settings maintained.
©Precision Cropping Technologies Pty Ltd 2014.
Gateway 2.1: Options & Settings
Step 7
Gateway 3: TerraCutta Pro
Incorporating;
TerraCutta
TerraCutta Lite
TerraCutta Pro
©Precision Cropping Technologies Pty Ltd 2014.
3: TerraCutta Pro
TerraCutta Pro is PCT’s proprietary landforming software package that is designed to
enhance the capability and efficiency of John Deere’s iGrade™. TerraCutta Pro enables the
user to collect and process terrain (elevation) data, then design appropriate landforming
solutions. The program creates output maps and connects to John Deere iGrade™,
streamlining and modernizing agricultural landforming operations.
Click on the Landforming tab and select TerraCutta Pro from
the menu.
TerraCutta Pro requires a control map as a basis for all landforming designs. Users have
three options for using elevation points to create a control map;
1. Use a pre-created surfaced elevation layer from an external source (e.g.
OptiSurface™ design file)
2. Lload an existing project file (.pcti or .tci), or
3. Collect and process elevation points into a control map using the TerraCutta Pro
wizard .
©Precision Cropping Technologies Pty Ltd 2014.
Gateway 3: TerraCutta Pro Introduction
3.1 Control maps
3.2 Load an existing control map (collected and
processed points)
If a control map from OptiSurface™
exists, press the Load map button.
Then from the drop down tab (above the open and
cancel button in the bottom right corner of the
window) change the format from PCT Image (.pcti)
format to OptiSurface™ Design file to search for
relevant existing file types.
TerraCutta Pro 3: Load Control Maps
Proceed to chapter 4.0
3.3 Load an existing TerraCutta project
Press Load proj. button to load an
existing TerraCutta project file (.tci). This
includes projects exported from Grade
Design.
A new window will open which lists all
existing TerraCutta projects.
Press the the Find manually button to
search for files in a known location.
Press the Scan again for projects button
to scan the C drive for files.
Proceed to Chapter 4.0
©Precision Cropping Technologies Pty Ltd 2014.
3.4 Collecting elevation points using the
TerraCutta Pro wizard
If no control map exists, users can collect elevation
points and create a control map in TerraCutta Pro
using the wizard. The wizard will guide the user
through:
1. Collecting the elevation data
2. Processing the elevation data
3. Analyzing the data and designing a control
surface map (Chapter 4.0).
4. Connecting to John Deere iGrade™ to implement the design (Chapter 6.0).
The wizard will outline the steps and highlight the
completed tasks in green.
it is recommended that users also
map the boundary as part of the data
collection process.
TerraCutta Pro requires a GPS
connection. This can be sourced
from John Deere iGrade™ by pressing
the GPS toggle button.
The GPS info window will open and the output
parameters will populate when a connection is
established.
Click Close this window.
©Precision Cropping Technologies Pty Ltd 2014.
TerraCutta Pro 3: Control Map Wizard
On the wizard main menu; press the
Collect button to begin collecting elevation
data for a field or drain.
Press the Start button to begin collecting
elevation data for a field or drain.
The collection process should be paused if
the tractor becomes stationary, by
pressing the Pause button. This avoids
collecting multiple points for a single
location.
TerraCutta Pro 3: Control Map Wizard
When data collection is complete, press
the Stop button
Press the Close button to exit the mapping
window.
The Keep this design surface? window will
open. Press Yes.
©Precision Cropping Technologies Pty Ltd 2014.
TerraCutta Pro uses slightly different
internal parameters to collect data for
drain and field surveys.
Toggle between Field survey and Drain
survey modes by pressing the Survey mode
button.
The background control map is
transparent when the drain survey mode is
active.
When data collection is complete, press
the Save button to save the elevation data
as a (.pctxyz) file.
If an incomplete .pctxyz file already exists,
the above step can be skipped by pressing
the Load button.
A new window will open prompting the user
to;
Choose to delete the existing elevation points,
Or
Add to or edit the existing elevation points.
©Precision Cropping Technologies Pty Ltd 2014.
TerraCutta Pro 3: Control Map Wizard
Then press the Close button to exit the
collection screen and return to the wizard
main menu.
4.0 Surface elevation points to create a control map
The raw elevation points of a control map
require surfacing to create a clean,
workable map to be used for future field
designs. The surface tool uses an
interpolation method to create a surfaced
map.
Drain survey points do not require
surfacing.
The Surface button will open the Surface
elevation data window.
Press the Surface button to surface the
elevation data.
TerraCutta Pro 4: Surface Elevation Data
If there are gaps in the surfaced map,
increase the search radius by pressing and
dragging the slider bar and resurface the
map by pressing the Surface button again.
Once the elevation data has been
surfaced press the Close button in the
top right corner of the window to return
to the wizard main menu.
The Keep this design surface? window will
open. Press Yes.
©Precision Cropping Technologies Pty Ltd 2014.
Projects can be stopped and saved as a
project (.tci) file at any time by pressing
the Save proj. button.
©Precision Cropping Technologies Pty Ltd 2014.
TerraCutta Pro 4: Surface Elevation Data
To re-open and continue working on an
existing project; press the Load proj.
button and browse to the location of the
file.
5.0 Designing a Landforming application
TerraCutta Pro 5: Design landforming applications
A surfaced control map is used as a base
map to design a new landforming
application map. TerraCutta Pro allows
users to design a variety of landforming
applications maps including;
● Levees
● Drains or
● Single, dual or multi plane of best
fit for fields
To begin designing press the design button
at the bottom of the wizard.
The best-fit calculation optimises the height and slope of a design plane to
minimize the amount of dirt that has to be moved to achieve a plane of best fit.
To create a simple plane of best fit for the entire field, press the Best-fit
button.
Multi-fit builds multiple smaller planes that follow the contours of the ground
to drain water in a single direction, usually in the direction of irrigation and or
wheel tracks.
The minimum and maximum slope influence the individual plane design which
will improve the drainage on a field.
To create a more complex advanced multi-fit design for the field, press the
Multi-fit button.
To design a field drain, press the Drains button.
● Linear drains are formed by designing a straight line or a grade between
areas where water is likely to pool and where water should drain from the
field.
● Multi-fit drains achieve the same outcome as linear drains however a nonlinear line is designed. The line is calculated so the least amount of soil is
moved from the field yet ensuring water drains from the field.
To design a field based Levee, press the Levees button.
The levee mode can be used to create single or a series of levees at a specific
elevation. Designs can be made on either the original elevation surface or
design surface.
©Precision Cropping Technologies Pty Ltd 2014.
5.1 Creating field regions to define design areas
Often only a section of a field may benefit from a landforming operation. Alternatively, the
field may benefit from applying multiple designs. The Regions tool (within the Wizard) allows
the user to split the field into (up to 5) working regions for different landforming designs.
A Best
Multi-plane fit is applied to the entire field. Users can only change the primary and
secondary slope directions in the different regions within the design. Users can not apply both
a best-fit and multi-fit design within the same project.
A region is defined by moving Point A and Point B of
the ‘split’ line. Pressing the up, down, left or right
arrow button will orientate Point A or Point B to the
desired location.
Press the Split button to confirm the
field ‘split’.
The Clear regions button will clear the
split line and allow the user to start
again.
Press Finish to finalize the regions.
Press the Close button in the top right
corner of the window to return to the
wizard main menu window.
©Precision Cropping Technologies Pty Ltd 2014.
TerraCutta Pro 5.1: Field design regions
Press the Regions button above the main
map viewer.
5.2 Best-fit Field Design
On the main wizard menu press the Best-fit
button to create a single plane of best fit
for a field.
Use the Region drop down menu to apply
your design to each region.
TerraCutta Pro will auto calculate
optimized settings for a plane of best fit.
However, users with a good understanding
of Laser Plane systems may wish to
manually set primary and secondary slopes.
Check the box (by pressing) to Manually set
primary slope direction.
Press the Apply button (bottom right
corner) to apply the design for each region.
TerraCutta Pro 5.2: Best-fit Field Design
The slide bar will increase the transparency
of the design surface over the original
elevation surface.
If multiple regions exist; repeat these steps
for each region.
If no other design additions (Levee or
drain) are required, a cut and fill
application map can now be created using
the design.
Press the Create cut/fill button.
The slide bar (right of the button) will
increase the transparency of the cut and
fill map over the original elevation surface.
If required, enter a cut/fill ratio.
©Precision Cropping Technologies Pty Ltd 2014.
Press the Close button to save the cut and fill map using a plane of best- fit
design.
The file is saved as a TerraCutta project (.tci).
TerraCutta Pro 5.2: Best-fit Field Design
The Keep this design surface? window will open.
Press Yes.
©Precision Cropping Technologies Pty Ltd 2014.
5.3 Multi-fit Field Design
On the main wizard menu press the Multifit button to create a plane of multi-fit for
a field.
Only users with a good understanding of
Laser Plane systems should use this option.
Use the Region drop down menu to apply
your design to each region.
TerraCutta Pro 5.3: Multi-fit Field Design
1. Manually enter the Direction (degrees),
Or
2. Press on the end of the arrow in the map window
and drag the arrow to outline the correct direction.
3. Set the minimum and maximum slope range.
4. A preliminary side slope adjustment can be made by
checking the box.
5. Enter a cut/fill ratio if required.
Press the Apply button (bottom right corner) to apply the design for each region.
The slide bar will increase the transparency of the design surface over the original
elevation surface.
If multiple regions exist; repeat these steps for each region.
The details of the strip parameters are outlined in the
bottom right window.
©Precision Cropping Technologies Pty Ltd 2014.
Press the Create cut/fill button.
A cut and fill application map using a multifit design is created and saved as a
TerraCutta project (.tci).
Press the Close button to save the cut and fill map using a multi-fit design.
The file is saved as a TerraCutta project (.tci).
The Keep this design surface? window will open.
Press Yes.
©Precision Cropping Technologies Pty Ltd 2014.
TerraCutta Pro 5.3: Multi-fit Field Design
The details of the proposed earthworks are
displayed in the bottom right box.
5.4 Drain Design
On the main wizard menu press the Drains
button to create your drain design.
The drain parameters window can be
increased by pressing the Expand button
(bottom right).
Field drains can be designed using a plane of Best-Fit
or a Multi-fit design.
Choose the option appropriate to the outcome.
5.4.1 Best-fit Drain Design
Choose the Best-fit type.
Manually enter the slope and offset.
A negative number in the offset box will create a drain
or a positive number will create a road.
TerraCutta Pro 5.4:Drain Designs
If required, enter a cut/fill ratio
5.4.2 Multi-fit Drain Design
Choose the Multi-fit type.
Manually enter the minimum and maximum slope.
Set the minimum and maximum cut for drain depth.
A negative number in the offset box will create a drain or
a positive number will create a road.
Enter the width of the drain.
If required, enter a cut/fill ratio.
In situations where surface designs contain both
field and drain designs a cut/fill ratio will balance the soil
removal. I.e. the soil removed from the site of the drain
will be transferred to the field.
©Precision Cropping Technologies Pty Ltd 2014.
Press Apply.
A new window will open showing the Drains
Surface Statistics.
Press the Create cut/fill button.
A new window will open showing the Drains Surface
Statistics.
The Keep this design surface? window will open.
Press Yes.
©Precision Cropping Technologies Pty Ltd 2014.
TerraCutta Pro 5.4: Drain Designs
Press the Close button to save the cut and fill map for drain design.
The file is saved as a TerraCutta project (.tci).
5.5 Design a Levee
On the wizard main menu press the Levees
button to add Levee/s to the original
elevation or a design layer.
TerraCutta Pro will design the levee/s based
on the elevation surface. However, a Levee
design can be based on the Design Surface
by checking the Use design surface button.
Enter the parameters for the levee;
● Starting elevation (the height the
first levee will be placed).
● Vertical interval (distance between
levees).
TerraCutta Pro 5.5: Levee Designs
Press the Apply button to view the levee
placement.
The levees are displayed on the map and are
identified by consecutive numbers down the slope of
the field.
©Precision Cropping Technologies Pty Ltd 2014.
Press the Close button to save the levee design.
The file is saved as a TerraCutta project (.tci).
The Keep this design surface? window will open.
Press Yes.
5.5.1 Exporting Drain and Levee designs as John
Deere Guidance lines
When both drain and levee designs
exist, each design is required to be
exported separately.
Press the Browse button and select the
location of a GS2/GS3 compatible
removable storage device to save the new
RCD folder.
Enter the Client, Farm and Field.
©Precision Cropping Technologies Pty Ltd 2014.
TerraCutta Pro 5.5.1: Export designs
Created drains or levees can be exported
to a GreenStar Display as either a GS2
(2600) or a GS3 (2630) as Greenstar ready
guidance lines. On the wizard main menu;
press the Export button.
Select the Curve type used to import the file.
Select:
Ditch Track for Drains,
Levee Track for Levees.
Choose the Display type.
TerraCutta Pro 5.5.1:Export Designs
Press Ok.
©Precision Cropping Technologies Pty Ltd 2014.
5.6 Design check, using the Water Flow
Simulation
A water flow simulation can be activated
for any original or design surface created
in TerraCutta Pro.
The tool visually models the flow of
water over a flat fallowed surface
highlighting infiltration and movement of
water.
Apply the simulation to either the
Original surface or Design Surface by
pressing the circle.
Press the Start button to activate the
water flow simulation.
The percentage of Water remaining and
Counter will display the progress of the
simulation.
Press the Finish button to exit the Water
flow simulation screen.
Press the Close button to exit the mapping window.
The Keep this design surface? window will open.
Press Yes.
©Precision Cropping Technologies Pty Ltd 2014.
TerraCutta Pro 5.6: Water flow simulation
In any of the active design windows,
press the Water flow button to simulate
water flow for the active design.
6.0 Applying design surfaces using John Deere
iGrade™
In the main wizard menu, press the Apply
button.
TerraCutta Pro 6.0: Connecting to John Deere iGrade™
Then press the Apply button in the centre
of the screen.
A new Disclaimer window will appear. The user
acknowledges understanding of and agrees to the
disclaimer by clicking Ok.
This will also initiate a connection between
TerraCutta Pro and John Deere iGrade™.
The GPS info window will open.
If the GPS is functioning correctly the output
parameters will be populated.
If the output parameters are not populated, the GPS
is most likely not functioning correctly. Refer to the
GS2/GS3 User Manual for troubleshooting.
Press Close this window.
©Precision Cropping Technologies Pty Ltd 2014.
Press the Start button to send TerraCutta
Pro design surface/s (command output)
to John Deere iGrade™.
TerraCutta Pro 6.0: Linking to John Deere iGrade™
: If the start button is not visible on
the screen. Check the GPS connection.
©Precision Cropping Technologies Pty Ltd 2014.
6.1 Additional tools for applying design surfaces.
6.1.1 Marker Points
The Marker button can be used to create a
point mark on the map screen.
Press the Marker icon and then press on
the correct position on the map within the
window.
The Marker label naming window will open.
TerraCutta Pro 6.1: Additional tools
Enter a name for the marker and press Ok.
6.1.2 Setting the benchmark drive
To set a benchmark drive; navigate to a
wheel track and location within the field
(that the data was collected on) where the
Cut/fill value is “0.00m” as indicated on the
screen.
Place the cutting edge of the bucket on the
ground and ‘zero’ the TerraCutta Pro
system by pressing the Set Offset – Zero
Error button on the John Deere iGrade™
interface screen.
©Precision Cropping Technologies Pty Ltd 2014.