1
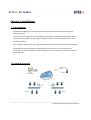
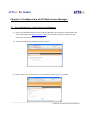
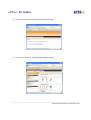
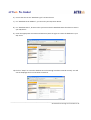
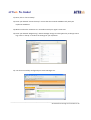
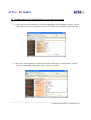
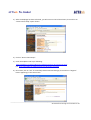
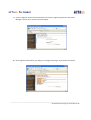
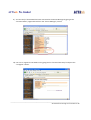
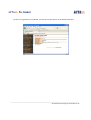
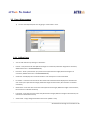
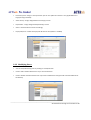
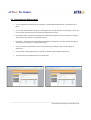
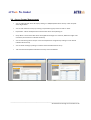
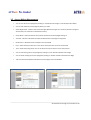
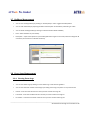
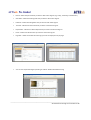
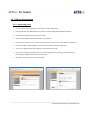
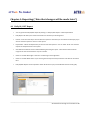
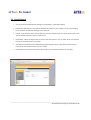
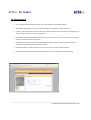
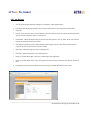
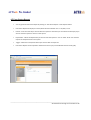
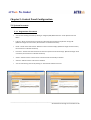
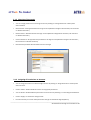
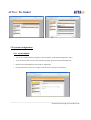
ACTAtek Access Manager
Lite
User Manual
_____________________________________________________________________________________________
ACTAtek Access Manager Lite User Manual 1
Revision History
Revision
Date
Description
Author
1.0
2011/01/24
Initial Release
Justin
_____________________________________________________________________________________________
ACTAtek Access Manager Lite User Manual 2
ACTAtek Access Manager Lite User Manual
Copyright 2010 ACTAtek Pte Limited, All rights reserved.
No part of this document may be reproduced, transmitted, transcribed, stored in a retrieval system, or translated
into any language, in any form or by any means, electronic, mechanical, magnetic, optical, chemical, manual or
otherwise without the prior written permission of ACTAtek Pte Limited.
ACTAtek is a registered trademark of ACTAtek Pte Limited
All trademarks, registered trademarks, and service marks are the property of their respective owners.
Offices:
Asia and the Rest of the World:
Unit 901-2, 9/F, Fo Tan Industrial Centre,
26-28 Au Pui Wan Street, Fotan, Shatin, Hong Kong.
Phone: (852) 2319 1333
Fax: (852) 2776 8997
Email: [email protected]
Americas (North & South America):
Suite 230, 10691 Shellbridge Way,
Richmond, BC, V6X 2W8, Canada
Phone: (604) 278 8888
Fax: (604) 278 6082
Email: [email protected]
Europe, Middle East, Africa:
351 Pershore Road,
Edgbaston, Birmingham. B5 7RY. U.K.
Phone: (44) 121 472 3991
Fax: (44) 121 472 3990
Email: [email protected]
Singapore & Malaysia:
18, Boon Lay Way, #09-96/97/98
Tradehub 21,
Singapore 609966
Phone: (65) 6515 4520
Fax: (65) 6515 4521
Email: [email protected]
_____________________________________________________________________________________________
ACTAtek Access Manager Lite User Manual 3
Table of Contents
ACTAtek Access Manager Lite User Manual ........................................................ 1
Revision History .................................................................................................. 2
Chapter 1: Installation ..................................................................................... 6
1.1 Introduction ............................................................................................ 6
1.2 Network Overview .................................................................................. 6
1.3 Before using ACTAtek Access Manager Lite............................................. 7
1.4 Points to take note for Operation of Access Manager Lite....................... 8
Chapter 2: Configuration of ACTAtek Access Manager ..................................... 9
2.1 Accessing Interface of ACTAtek Access Manager..................................... 9
2.2 Configuration of ACTAtek Unit for Access Manager Usage.................... 13
Chapter 3: Administration of Access Manager ............................................... 18
3.1 Terminals Management ........................................................................ 18
3.2 Users Management .............................................................................. 19
3.2.1 Adding Users................................................................................. 19
3.2.2 Modifying Users............................................................................ 20
3.3 Departments Management................................................................... 21
3.4 Access Groups Management ................................................................. 22
3.5 Access Rights Management .................................................................. 23
3.6 Triggers Management .......................................................................... 24
3.7 Holidays Management.......................................................................... 25
3.8 Event Logs Management ...................................................................... 25
3.8.1 Viewing Event Logs ....................................................................... 25
3.9 Utilities Management ......................................................................... 27
_____________________________________________________________________________________________
ACTAtek Access Manager Lite User Manual 4
3.9.1 Importing Users ............................................................................ 27
Chapter 4: Reporting (*Note that changes will be made later*) ..................... 28
4.1 Daily IN/OUT Report ............................................................................. 28
4.2 Detail Report ........................................................................................ 29
4.3 Absent Report ....................................................................................... 30
4.4 Late Report ........................................................................................... 31
4.5 User Status Report ................................................................................ 32
Chapter 5: Control Panel Configuration .......................................................... 33
5.1 System Accounts ................................................................................... 33
5.1.1 Registration of Accounts ............................................................... 33
5.1.2 Changing of Passwords ................................................................. 34
5.1.3 Assigning of Permissions to Accounts............................................ 34
5.2 System Configuration............................................................................ 35
5.2.1 System Update ............................................................................. 35
5.3 System Utilities ..................................................................................... 36
5.3.1 Audit Log ...................................................................................... 36
_____________________________________________________________________________________________
ACTAtek Access Manager Lite User Manual 5
Chapter 1: Installation
1.1 Introduction
ACTAtek Access Manager is an integrated user administration and monitoring management
software program.
To enhance user management across ACTAtek units globally, ACTAtek Access Manager is able to
synchronize users and extract event logs in different networks, even if ACTAtek units are using
private IP addresses.
Access Groups, Departments and Triggers Management can be done via ACTAtek Access Manager.
ACTAtek Access Manager supports Dial-up Modems as well. Hence even if ACTAtek unit is
connected to a location without any TCP/IP communication, it is still able to connect to ACTAtek
Access Manager.
1.2 Network Overview
_____________________________________________________________________________________________
ACTAtek Access Manager Lite User Manual 6
1.3 Before using ACTAtek Access Manager Lite
Hardware Requirements:
•
CPU Processor: Intel Core 2 Duo 2.6GHz or higher.
•
At least 4 GB of system memory.
•
At least 20 GB of available hard disk space.
•
Ethernet Card 100 Base-T is recommended.
Software Requirements:
•
Windows XP Professional (32bits only) & Windows Vista Business/Win 7 Professional (both
32bits and 64bits supported).
•
Microsoft SQL Server for Database Server (SQL Server 2005 and 2008 are supported).
•
Microsoft .Net 2.0 and 3.5 runtime have to be installed.
•
The following web browsers are supported :1) Internet Explorer v7.0 and above
2) Chrome v6 and above
3) Fire Fox v3.5 and above
Points to take note of:
•
Access Manager Firmware is not compatible with ACTAtek Time Attendance Software
•
Access Manager Firmware is not compatible with ACTAtek Agent
•
Access Manager Firmware is not compatible with ACTAtek Sync
•
Access Manager Lite is limited to supporting 10 ACTAtek units per installation.
_____________________________________________________________________________________________
ACTAtek Access Manager Lite User Manual 7
1.4 Points to take note for Operation of Access Manager Lite
1) For the first ACTAtek unit registered with Access Manager Lite, all the data in the unit will be
sent to Access Manager.
2) As for subsequent units registered with Access Manager Lite, all the data in the units will be
erased and overwritten with the data from Access Manager Lite instead.
3) Firmware and FAM versions must be the same for all ACTAtek units registered with Access
Manager Lite.
4) You are now able to un-register any registered ACTAtek unit as the Access Manager itself acts as
the Primary Database.
5) Ensure that time zone and time settings are set correctly for both ACTAtek units and PC/Server
(installed with Access Manager Lite).
_____________________________________________________________________________________________
ACTAtek Access Manager Lite User Manual 8
Chapter 2: Configuration of ACTAtek Access Manager
2.1 Accessing Interface of ACTAtek Access Manager
1) Login to the web-based console menu of Access Manager Lite by going to a web browser and
enter the following URL (http://localhost:7780). Do take note that you can change the web
server port via Cassini Web Server Explorer.
2) You will see the below screenshot. Click on “Log In”.
3) Enter “admin” for Username and “1” for Password. Click on “Log In” to proceed.
_____________________________________________________________________________________________
ACTAtek Access Manager Lite User Manual 9
4) You will see the below screenshot once successfully login.
5) Click on “Control Panel” tab and select “Database Config”.
_____________________________________________________________________________________________
ACTAtek Access Manager Lite User Manual 10
6) Ensure that the correct “Database Type” has been chosen.
7) For “Database Server Address”, you can enter your SQL Server Name.
8) For “Database Name”, do ensure that you have entered a Database Name that does not exist in
your SQL Server.
9) Enter the appropriate User Name and Password, with the rights to create the database in your
SQL Server.
10) Click on “Setup” to create the database once the settings have been entered correctly. You will
see the webpage similar to the below screenshot.
_____________________________________________________________________________________________
ACTAtek Access Manager Lite User Manual 11
11) Next, click on “Server Setup”.
12) Enter your desired “Terminal Group”. Ensure that the Terminal IP Address tally with your
PC/Server IP Address.
13) Make sure that the Time Zone is in accordance with your region’s time zone.
14) Enter your desired “Magic String”. Note that Magic String is the decryption key to decrypt event
logs. Click on “Setup” to confirm the settings for your PC/Server.
15) You have successfully configured your Access Manager Lite.
_____________________________________________________________________________________________
ACTAtek Access Manager Lite User Manual 12
2.2 Configuration of ACTAtek Unit for Access Manager Usage
1) Firstly, ensure that your ACTAtek unit has been upgraded to Access Manager Firmware. You can
check so by looking at the “Firmware Version” via” Terminal Status” page of the Web Interface.
2) Next, go to “Terminal Setup” and make sure that the checkbox for “Terminal Mode” has been
set to “Access Manager”. Once done, click on “Submit” to confirm.
_____________________________________________________________________________________________
ACTAtek Access Manager Lite User Manual 13
3) After the webpage has been refreshed, you will notice on the left hand menu, there will be an
“Access Client Setup” option shown.
4) Click on “Access Client Setup”.
5) Enter the Endpoint URL as per following http://IP-Address-of-Access-Manager:7780/AccessServer/AccessService.asmx
(i.e. http://192.168.3.16:7780/AccessServer/AccessService.asmx).
6) Once done, click on “Set”. If successfully detected Access Manager, there will be a “Register”
button appearing on the same screen.
_____________________________________________________________________________________________
ACTAtek Access Manager Lite User Manual 14
7) Click on “Register” button and the ACTAtek unit will start registering itself with the Access
Manager. You will see a similar screenshot below.
8) Once registered successfully, you will get a message indicating so as per below screenshot.
_____________________________________________________________________________________________
ACTAtek Access Manager Lite User Manual 15
9) You can verify if the ACTAtek has been connected to the Access Manager by going to the
“Terminal Status” page and check from the “Access Manager” portion.
10) You can un-register the ACTAtek unit by going back to “Access Client Setup” and press the
“Unregister” button.
_____________________________________________________________________________________________
ACTAtek Access Manager Lite User Manual 16
11) Once un-registration is completed, you will see a screen similar to the below screenshot.
_____________________________________________________________________________________________
ACTAtek Access Manager Lite User Manual 17
Chapter 3: Administration of Access Manager
3.1 Terminals Management
•
You can view Terminals by clicking on “View Terminal List” under Terminal menu.
•
You can click on URL Link to go directly to that terminal’s web interface
•
To view more information of that particular terminal, click on “Details” beside individual terminal
•
ID & Serial Number – Serial Number of ACTAtek unit
•
Group – Display which Access Manager group this ACTAtek unit belongs to
•
Name – Terminal Description of ACTAtek unit
•
Registered User – Current number of users that exist in that unit
•
Automatch User – Current number of automatch users that exist in that unit
•
Last Update – Timing of last update with Access Manager
•
Last Log – Timing of last event log sent over to Access Manager
•
Pending Sync Requests – Display pending synchronization of information for that particular unit
_____________________________________________________________________________________________
ACTAtek Access Manager Lite User Manual 18
3.2 Users Management
1) You can view add/view/edit users by going to “User Admin” menu.
3.2.1 Adding Users
•
You can add new users by clicking on “Add Users”
•
User ID – Unique User ID for User (Minimum length of 3 characters; Maximum length of 15 characters;
Allowed characters = 01234567890ABCabc)
•
Password – Enter a password for your password user (No minimum length; Maximum length of 9
characters; Allowed characters = 01234567890ABCabc)
•
Smartcard – Will display the card serial number if user already has a smartcard enrolled
•
First Name – Enter the first name of the User. Note that First Name will be displayed on the LCD when
user clocks in/out. (No minimum length; Maximum length of 19 characters; No restriction on allowed
characters)
•
Other Name – Enter the other name of the User (No minimum length; Maximum length of 19 characters;
No restriction on allowed characters)
•
Last Name – Enter the last name of the User (No minimum length; Maximum length of 19 characters; No
restriction on allowed characters)
•
Admin Level – Assign designated Admin Level to User (default : User)
_____________________________________________________________________________________________
ACTAtek Access Manager Lite User Manual 19
•
FP Security Level – Assign a security level for your FP users (take note that this is only applicable for ID +
Fingerprint login method)
•
Access Group – Assign designated Access Group(s) to User
•
Department – Assign designated Department(s) to User
•
Status – Select the Status of User accordingly
•
Expiry Date/Time – Select the Expiry Date & Time for User (default : disabled)
3.2.2 Modifying Users
•
You can view/edit existing users by clicking on “View/Edit User”
•
Click on “Edit” beside individual user if you want to edit them
•
Click on “Delete” beside individual user if you want to delete them away (Do take note that A999 cannot
be deleted)
_____________________________________________________________________________________________
ACTAtek Access Manager Lite User Manual 20
3.3 Departments Management
•
You can add/edit/view Departments by clicking on “Add/Edit/Delete Department” under Department
Menu.
•
You can add new Department by typing a new Department name & Description and clicking on “Add”. (Do
take note that there should not be any duplicated Department names.)
•
Department Name – Name of the New Department (Minimum length of 1 character; Maximum length of
10 characters; No restriction on allowed characters)
•
Description – Description for the New Department (Minimum length of 1 character; Maximum length of
50 characters; No restriction on allowed characters)
•
You can edit existing departments’ names and descriptions by clicking on “Edit” beside individual
department
•
You can delete existing departments by clicking on “Delete” beside individual department
•
Take note that General Department cannot be deleted
_____________________________________________________________________________________________
ACTAtek Access Manager Lite User Manual 21
3.4 Access Groups Management
•
You can add/view/edit Access Groups by clicking on “Add/Edit/Delete Access Group” under Groups &
Access Rights Menu.
•
You can add new Access Group by entering a department & group name and click on “Add”
•
Department – Select the Department which the New Access Group belongs to
•
Group Name – Name of the New Access Group (Minimum length of 1 character; Maximum length of 20
characters; No restriction on allowed characters)
•
You can edit existing Access Groups’ names and departments assigned to by clicking on “Edit” beside
individual Access Group
•
You can delete existing by clicking on “Delete” beside individual Access Group
•
Take note that General/General Staff Access Group cannot be deleted
_____________________________________________________________________________________________
ACTAtek Access Manager Lite User Manual 22
3.5 Access Rights Management
•
You can view Access Group Rights by clicking on “View/Edit Access Right” under Administration Menu.
•
You can add new Access Group Right by clicking on “Add”
•
Access Right Name – Name of the new Access Right (Minimum length of 1 character; Maximum length of
20 characters; No restriction on allowed characters)
•
Group Name – Select the Access Group which the New Access Group Right belongs to
•
Terminal – Select the ACTAtek unit which the New Access Group Right is assigned to
•
Quick Access – Whether Smart Card Option can be enabled
•
Days – Select the days which users in this Access Group are allow to access the terminal
•
Time – Select the timing which users in this Access Group are allow to access the terminal
•
You can edit existing Access Group Rights by clicking on “Edit” beside individual Access Right
•
You can delete existing Access Group Rights by clicking on “Delete” beside individual Access Right
•
Take note that General/General Staff Access Group Rights cannot be deleted
_____________________________________________________________________________________________
ACTAtek Access Manager Lite User Manual 23
3.6 Triggers Management
•
You can view Triggers by clicking on “Edit Triggers” under Triggers & Holidays Menu.
•
You can edit existing Triggers by clicking on “Edit” beside individual Trigger
•
Trigger Name – Edit name of Existing Trigger (Minimum length of 1 character; Maximum length of 8
characters; No restriction on allowed characters)
•
Status – Enable/Disable Existing Trigger
•
Terminal – Select the Terminal this trigger schedule is for
•
Days – Select the days which this trigger is to be displayed on LCD of terminal
•
Time – Select the timing which this trigger is to be displayed on LCD of terminal
_____________________________________________________________________________________________
ACTAtek Access Manager Lite User Manual 24
3.7 Holidays Management
•
You can view existing Holidays by clicking on “Holiday Setup” under Triggers & Holidays Menu.
•
You can add new Holiday by inputting the Date and Description of the Holiday and clicking on “Add”
•
You can delete existing Holiday by clicking on “Delete” beside individual Holiday
•
Date – Select the Date for your Holiday
•
Description – Input a Description for your Holiday (Minimum length of 1 character; Maximum length of 50
characters; No restriction on allowed characters)
3.8 Event Logs Management
3.8.1 Viewing Event Logs
•
You can view Event Logs by clicking on “View Event Logs” under Event Logs Menu
•
You can view the total number of event logs by checking “Event Logs in System” on top of the screen
•
User ID – Enter the User ID of the user that you want to filter event logs for
•
Last Name – Enter the Last Name of the user that you want to filter event logs for
•
First Name – Enter the First Name of the user that you want to filter event logs for
_____________________________________________________________________________________________
ACTAtek Access Manager Lite User Manual 25
•
Period – Select the period which you want to filter event logs for (e.g. Today, Yesterday, Last Week etc)
•
Start Date – Select the Starting Date that you want to filter event logs for
•
End Date – Select the Ending Date that you want to filter event logs for
•
Terminal – Select from which terminals you want to view event logs for
•
Department – Select from which departments you want to view event logs for
•
Event – Select from which events you want to view event logs for
•
Page Size – Select the number of event logs you want to display out for per page
•
You can view Captured Images by clicking on “Select” beside individual Event log
_____________________________________________________________________________________________
ACTAtek Access Manager Lite User Manual 26
3.9 Utilities Management
3.9.1 Importing Users
•
You can import users by clicking on “Data Import” under Utilities Menu
•
Importing of Users will add/update users into the current ACTAtek Access Manager database
•
Browse the file (in CSV format) and click on “Load”
•
Choose which delimiter separates the fields in your CSV file
•
Do take note to check on “First row contains field names” if the first row of your CSV file is field name.
•
Once loaded, go to “Data Mapping” and choose which column belongs to which field.
•
You can auto generate User ID by clicking on “Auto Generate User ID”
•
You can also configure all loaded users to a certain configuration by choosing your desired settings
(General, Status & Expiry, Departments and Groups).
•
Once done, click on “Import” to start importing.
_____________________________________________________________________________________________
ACTAtek Access Manager Lite User Manual 27
Chapter 4: Reporting (*Note that changes will be made later*)
4.1 Daily IN/OUT Report
•
You can generate Daily IN/OUT Report by clicking on “Daily In/Out Report” under Reports Menu
•
Daily Report will take your First IN and Last OUT to calculate your working hours.
•
User ID – Enter the User ID you want to filter the report for. Note that you can leave this field empty if you
want to view the report for all users in the system.
•
Department – Select the department you want to filter the report for. You can select All to view the
reports for all departments in the system.
•
Start Date and End Date must be selected before generating the report. Take note that the maximum
range for the start and end date is only for 3 months.
•
Check on “Include Overnight” if the users are working on overnight shifts.
•
Check on “Include blank dates” if you want to generate report for days which the users did not clock IN or
OUT.
•
Daily IN/OUT Report can be exported to either Excel Format (.xls) or Portable Document Format (.pdf).
_____________________________________________________________________________________________
ACTAtek Access Manager Lite User Manual 28
4.2 Detail Report
•
You can generate Detail Report by clicking on “Detail Report” under Reports Menu
•
Detail Report will take your every interval between IN and OUT as your working hour. The total working
hours would be calculated by adding up all the intervals.
•
User ID – Enter the User ID you want to filter the report for. Note that you can leave this field empty if you
want to view the report for all users in the system.
•
Department – Select the department you want to filter the report for. You can select All to view the
reports for all departments in the system.
•
Start Date and End Date must be selected before generating the report. Take note that the maximum
range for the start and end date is only for 3 months.
•
Detail Report can be exported to either Excel Format (.xls) or Portable Document Format (.pdf).
_____________________________________________________________________________________________
ACTAtek Access Manager Lite User Manual 29
4.3 Absent Report
•
You can generate Absent Report by clicking on “Absent Report” under Reports Menu
•
Absent Report will display on the days selected whether you have been Present or Absent.
•
User ID – Enter the User ID you want to filter the report for. Note that you can leave this field empty if you
want to view the report for all users in the system.
•
Department – Select the department you want to filter the report for. You can select All to view the
reports for all departments in the system.
•
Start Date and End Date must be selected before generating the report. Take note that the maximum
range for the start and end date is only for 3 months.
•
Day Filters (Removal) – Select the days that you do not want to display for Absent Report
•
Absent Report can be exported to either Excel Format (.xls) or Portable Document Format (.pdf).
_____________________________________________________________________________________________
ACTAtek Access Manager Lite User Manual 30
4.4 Late Report
•
You can generate Late Report by clicking on “Late Report” under Reports Menu
•
Late Report will display the number of hours that you have come to work early/late and leave work
early/late.
•
User ID – Enter the User ID you want to filter the report for. Note that you can leave this field empty if you
want to view the report for all users in the system.
•
Department – Select the department you want to filter the report for. You can select All to view the
reports for all departments in the system.
•
Start Date and End Date must be selected before generating the report. Take note that the maximum
range for the start and end date is only for 3 months.
•
Start Time – Select Starting Time of your working hours
•
End Time – Select Ending Time of your working hours
•
Check on “Include Overnight” if the users are working on overnight shifts.
•
Check on “Include blank dates” if you want to generate report for days which the users did not clock IN or
OUT.
•
Late Report can be exported to either Excel Format (.xls) or Portable Document Format (.pdf).
_____________________________________________________________________________________________
ACTAtek Access Manager Lite User Manual 31
4.5 User Status Report
•
You can generate User Status Report by clicking on “User Status Report” under Reports Menu
•
User Status Report will display last status/event ID of the selected users i.e. IN, OUT, F1 etc
•
User ID – Enter the User ID you want to filter the report for. Note that you can leave this field empty if you
want to view the report for all users in the system.
•
Department – Select the department you want to filter the report for. You can select All to view the
reports for all departments in the system.
•
Trigger – Select the status/event ID that you want to filter the report for.
•
User Status Report can be exported to either Excel Format (.xls) or Portable Document Format (.pdf).
_____________________________________________________________________________________________
ACTAtek Access Manager Lite User Manual 32
Chapter 5: Control Panel Configuration
5.1 System Accounts
5.1.1 Registration of Accounts
•
You can view existing accounts by clicking on “Register/Edit/Delete Account” under System Accounts
Menu
•
Login ID – ID for the new Account to Login by. Note that there shall be no duplication of Login ID.
(Maximum length of 15 characters; No restriction on allowed characters)
•
Name – Name of the new Account. Note that name cannot be empty. (Maximum length of 20 characters;
No restriction on allowed characters)
•
Password – Password for the new Account. Note that password cannot be empty. (Maximum length of 10
characters; No restriction on allowed characters)
•
Admin – Allows account to have access to Control Panel functionality if checked
•
Activate – Allows account to be active if checked
•
You can edit existing accounts by clicking on “Edit” beside individual account
_____________________________________________________________________________________________
ACTAtek Access Manager Lite User Manual 33
5.1.2 Changing of Passwords
•
You can change password of current login account by clicking on “Change Password” under System
Accounts Menu
•
Old Password – Existing Password for this login account (Maximum length of 10 characters; No restriction
on allowed characters)
•
New Password – New Password for this login account (Maximum length of 10 characters; No restriction
on allowed characters)
•
Confirm Password – Re-type the new password for this login account (Maximum length of 10 characters;
No restriction on allowed characters)
•
Note that this password will take effect from the next login
5.1.3 Assigning of Permissions to Accounts
•
You can assign permissions to individual login accounts by clicking on “Assign Permission” under System
Accounts menu.
•
Click on “Select” beside individual accounts to assign/edit permissions
•
You can allow or disallow different permission for the account by checking or un-checking the checkboxes.
•
Click on “Apply” to confirm the changes made.
• Do take note that you cannot make permissions changes for the default login ID (Admin).
_____________________________________________________________________________________________
ACTAtek Access Manager Lite User Manual 34
5.2 System Configuration
5.2.1 System Update
•
You can do a system update by clicking on “System Update” under System Configuration menu.
•
To do a system update, you must first download the patch given by authorized ACTAtek staff.
•
Browse to the downloaded patch and click on “Upload file”
•
Do take note that you must do a re-login of the account for the patch to take effect.
_____________________________________________________________________________________________
ACTAtek Access Manager Lite User Manual 35
5.3 System Utilities
5.3.1 Audit Log
•
You can view the audit trails by clicking on “Audit Log” under System Utils menu. Note that the audit log
will keep track of all committed changes made to the database and user accounts login.
•
Start Date – Starting Date of the Audit Log you want to view for
•
End Date – Ending Date of the Audit Log you want to view for
_____________________________________________________________________________________________
ACTAtek Access Manager Lite User Manual 36