1
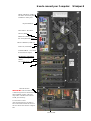
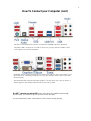
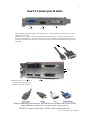
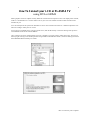
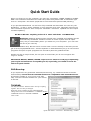
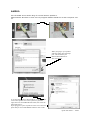
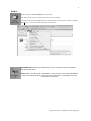
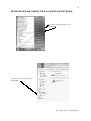
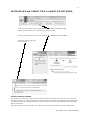
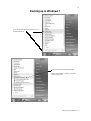
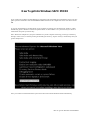
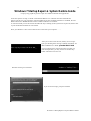
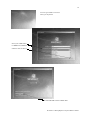
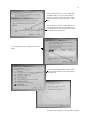
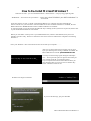
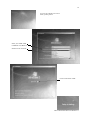
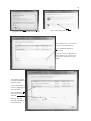
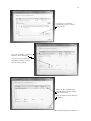
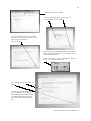
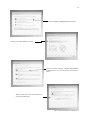
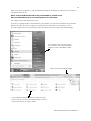
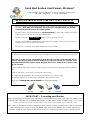
Quick Start Guide & User Manual—Windows 7
1
Congratulations on your purchase of a new computer system from
GR-TEK Computers — www.gr- tek.com.au
READ TH IS PAGE BEFORE STARTING YOUR COMPUTER
•
DO NOT connect all your old existing USB items to the system when starting your new system for the
first time. USB items, even though they may work on your old system/laptop, can and often
create booting issues on brand new computer systems.
•
DO NOT connect your Keyboard & Mouse (especially RAZER) or other USB 2.0 items to the BLUE
(USB 3.0) ports. Doing this can create freezing/boot issues.
•
DO NOT remove the
•
DO NOT press the RESET CMOS Button on the back of the computer. This will only reset all major
settings and may stop your system from starting.
•
We DO NOT recommend using SLEEP MODE as it can be unreliable.
NOT IN USE
Stickers —they are there for a reason.
Your system has been tested using some of the hardest tests that are available to us. This is to not only ensure
that all parts are working correctly but that the system should be able to handle most programs & games reliably.
7 DAY D.O.A. period. It is your responsibility to check that your compute r is fully functional, such as
Audio etc. and report any faults to GR -TEK within the first 7 Days of receiving your computer. Hardware failures within the D.O.A pe riod MUST be logged with GR -TEK within the first 7 days of receiving your compute r.
If you encounter freezing /blue screening /crashing during a particular game or program, Google the problem
first.
(Check all USB items as well, as they can cause these same issues)
For example Googling BATTLEFIELD 3 crashing will result in over 1 million results!
Check for patch updates etc with the Game manufacturer and check the forums.
Please go to www.gr-tek.com.au/support for more information.
IMPORTANT— Connecting your Monitor
When connecting your monitor you will need to connect the Power Cable plus either the HDMI, DVI
or Dsub cable only (DATA) Connect only ONE of the above DATA cables only. If you connect
more than one DATA cable at a time it is highly likely you will receive a screen WITHOUT the Taskbar and/or Icons.
Please make certain that the monitor’s INPUT has been selected correctly according to the cable you are using
before turning on the computer. ie If using HDMI cable, make certain HDMI is the selected input on the
monitor, usually the Enter button on the monitor will give you that option. Please refer to monitor manual.
2
Table Of Contents
How To Connect your Computer
3
How To Connect your Monitor — IMPORTANT
5
How To Connect your LCD or PLASMA TV
6
Quick Start Guide —Anti-Virus - DVD Burning - Taskbar
7
Quick Start Guide — Audio
8
Quick Start Guide —EMAIL & Office Programs
9
Quick Start Guide —NETWORKING
10
Backing Up In Windows 7
12
Restoring Your System to an Earlier Date
13
How To get into Windows SAFE MODE
14
Windows 7 Startup Repair & System Restore Guide
15
How to Re-Install Microsoft Windows 7
18
Frequently Asked Questions & Troubleshooting
25
12 Month ON-SITE Warranty
27
For more information please visit
www.gr-tek.com.au/support.php
Your computer has been assembled using brand new parts that have been thoroughly tested prior to shipment. We pride ourselves in quality and reliability and try ensure that every system purchased from us is of the highest quality and built to last you many years.
Please make certain that all the accompanying driver discs, manuals and invoice are
stored safely for future reference.
This manual is intended for a computer system bought from GR-TEK Computers that has
WINDOWS 7 installed on it.
For more information please visit www.gr -tek.com.au/support.php
Thi s m anual Copyright G R-TE K Com puters 20 07-2012
How to connect your Computer:
BLUE USB Ports (USB 3.0)
DO NOT connect Keyboard
& Mouse to these ports
Keyboard/Mouse
CLR CMOS —DO NOT
ESATA (RED)
USB Ports (USB 2.0-Black)
Use for Keyboard & Mouse
BLUE USB Ports (USB 3.0)
LAN Port (to Modem)
AUDIO PORTS —Use Green
Port for Stereo Output
GRAPHICS OUTPUTS
DVI PORTS —(preferred)
HDMI
DP (Display Port)
ON/OFF Switch
WARNING The ON/OFF switch
is NOT designed to be turned ON and
OFF hundreds of times. This will
only lead to a malfunction and will
VOID your warranty.
I is ON and O is OFF.
After switching this to ON there is
also an On/Off switch at the front of
the case which will turn the computer
ON.
Power Cable
Windows
8
3
4
How To Connect your Computer (cont)
The above Green/Purple PS/2 connector is intended for EITHER a Mouse or Keyboard.
The BLUE USB 3.0 outputs are for USB 3.0 items only, you may find some USB 2.0 items
such as printers are not fully compatible.
BEWARE: The above RED output looks very much like a USB port (also coloured Red), it is in
fact an Esata port. Connecting a USB item to it may cause damage. (Please refer to your motherboard manual)
This motherboard has integrated (onboard) graphics. Use these ports only if you do not have a
separate graphics card installed. Otherwise these ports will not work.
Do NOT connect any extra USB items other than the standard keyboard &
mouse when you first boot up the system for the first time.
It is not unusual for other USB items to create issues during bootup.
5
How To Connect your Monitor
DSUB
HDMI
Most Graphics cards have outputs similar to the above. It is preferable to use either the DVI or the
HDMI connection first.
Most of today’s Graphics cards can run 2 Monitors simultaneously—2 of the 3 connections will
work (any combination). You may need to use a converter or different cable depending on the connections your monitor has. Most new LCD monitors come with both the DSUB cable and at least the
DVI cable.
DVI
DISPLAY PORT —A new type of
connection still unavailable on
current LCD & LED monitors.
HDMI
When connecting your monitor you will need to connect the Power Cable
plus either the HDMI, DVI or Dsub cable only (DATA)
DO NOT connect more than 1 DATA cable at the same time.
How To Connect your Computer
6
How To Connect your LCD or PLASMA TV
using DVI or HDMI.
While graphics cards are capable of many different resolutions and computer screens can display most of them,
LCD TV’s and Plasma TV’s cannot. Please refer to your TV’s user manual to find out what resolutions are
available to you.
You can usually boot the system into 800x600 or 1024 x 768 resolution for most TV’s and then adjust the resolution according to what your TV can do.
If you get into a problem where you get a blank screen, then hit the F8 key a few times during boot up and select ENABLE VGA mode from the MENU.
Once you have selected a resolution that your TV is capable of you may need to adjust the screen. This can be
done by right clicking on the desktop and selecting NVIDIA CONTROL PANEL (Advanced Settings) and then
Select RESIZE HDTV Desktop or similar
How To Connect your Computer
7
Quick Start Guide
When you first turn on the computer you may see a message: 128Mb, 256MB or 512Mb
RAM. This indicates the RAM of the VGA Card, NOT the System RAM. In Windows right
click on “Computer” and select properties to see the actual System RAM (Memory)
If you purchased Windows 7 it has been fully installed and activated. You can only use
Windows 7 (or XP or Vista) software on one computer at a time. Microsoft requires you
have individual copies for each computer. Windows 7 has been updated but will require
constant updating.
DO NOT INSTALL anything unless it is 100% Windows 7 COMPATIBLE
AntiVirus: AVGFree AntiVirus has already been installed and updates should
automatically download. AVGFree will do an entire system scan at 12pm
every day or immediately when you switch on your computer. (You can cancel this if you need to)
Please note, No Anti-Virus is 100% safe. There is always a risk that you can
get a Virus/Trojan/Malware etc. This all depends on what websites you go to. Bit Torrent
programs and peer to peer programs like Limewire pose the greatest threat.
Emails are also a major threat, do not open an email that you do not recognise the
origin or sender.
PHISHING: NEVER, NEVER, NEVER respond to an email or web page requesting
your Login and Password to anything at all, especially your bank account details or PayPal details.
DVD Burning:
If you experience any problems with DVD/CD burning, try a different brand of media.
Unfortunately not all brands of blank media are compatible with all DVD burners.
A firmware update to your burner may also
help. Visit the relevant website for your burner
to do this.
TASKBAR:
You may find that the Taskbar tends to Group everything
together. This can easily be changed.
Right click on the Taskbar and select PROPERTIES
Change from ALWAYS COMBINE to COMBINE WHEN
TASKBAR IS FULL or NEVER COMBINE.
Click on OK
Quick Start Guide —Anti-Virus - DVD Burning - Taskbar
8
AUDIO:
Use the REAR Green Audio Plug for normal Stereo Speakers.
Please NOTE: Windows 7 does not fully support FRONT AUDIO on certain computer cases.
When you plug in your speaker
cable this dialog box should appear. This should be your
FRONT SPEAKER OUT.
Just click on OK
To set the audio output within Windows 7 correctly, right
click on the Speaker Icon in the System tray (bottom
right) and select PLAYBACK DEVICES, then select the
appropriate device.
If you plugged in a pair of speakers in the rear of the computer then just select SPEAKERS and then click on OK
Quick Start Guide — Audio
9
EMAIL:
We have installed THUNDERBIRD for your emails.
Just double click on the icon which can be found on your desktop.
In Internet Explorer and in FIREFOX you will find the link “Setting up Your Email in Mozilla
Thunderbird” . Click on this link and follow the directions.
OpenOffice3.1 has been installed and is fully functional and compatible
with Microsoft office.
IMPORTANT: For Microsoft compatibility, when saving a file with OpenOffice,
please use SAVE AS and select the file format that is compatible with Microsoft Office products.
Quick Start Guide —EMAIL & Office Programs
10
NETWORK ING and CONNECTING to a WIRELESS NETWORK :
Click on the Start Button and click on
COMPUTER
This window should open. Click on
NETWORK
Quick Start Guide —NETWORKING
11
NETWORK ING and CONNECTING to a WIRELESS NETWORK :
At the top of the window click on NETWORK & SHARING CENTER and this
window will open where you can set up your network options.
To set up your Wireless LAN just click on MANAGE WIRELESS NETWORKS
The below window will open.
Click on ADD.
Wireless Connection Problems:
The further away and the more walls in between the computer and wireless router can only cause low signal
strength and possible connection problems. Just because another computer or your laptop picked up the signal
fine doesn't mean every computer and laptop will do the same. Dead spots and interference from other equip-
ment is not unusual
Move the computer around the room or move the wireless router around until you receive a better signal.
Quick Start Guide —NETWORKING
12
Backing up in Windows 7
Click on the Start Button and then click on
MAINTENANCE
Click on BACKUP AND RESTORE
Follow the prompts to backup your entire
system and/or files
Backing Up In Windows 7
13
Restoring Your System to an Earlier Date
Click on the Start Button and then click
on ACCESSORIES and then Click on
SYSTEM TOOLS
Now click on SYSTEM RESTORE and
follow all the prompts to restore your system to an earlier date when everything was
working fine.
Restoring Your System to an Earlier Date
14
How To get into Windows SAFE MODE
If you experience problems, SAFE MODE can often help. Enter Safe Mode and uninstall the most recent programs you have installed or start SYSTEM RESTORE and restore the computer back to a time when all was
OK.
To get into the Windows Vista Safe mode, as the computer is booting press and hold your "F8 Key" which
should bring up the "Windows Advanced Options Menu" as shown below. Use your arrow keys to move to
"Safe Mode" and press your Enter key.
Note: With some computers if you press and hold a key as the computer is booting you will get a stuck key
message. If this occurs, instead of pressing and holding the "F8 key", tap the "F8 key" continuously until you
get the startup menu.
Once you restart out of Safe Mode the system will reboot into normal Windows Mode automatically.
How To get into Windows SAFE MODE
15
Windows 7 Startup Repair & System Restore Guide
A step by step graphical guide to repair an installation that has startup problems.
On all the systems we ship, we make certain that the BIOS is set to BOOT from the CD/DVD first.
If this is not the case you will need to enter the BIOS and set the 1st BOOT DEVICE to CD/DVD, the 2nd
BOOT DEVICE to HARD DRIVE and the 3rd BOOT DEVICE to FLOPPY.
To enter the BIOS you will need to hit the DELETE key at startup, (Some systems will require F2) Please refer
to your motherboard manual for more details.
Place your Windows 7 disc in the DVD/CD drive and restart your computer……...
After you see the LOGO Screen (usually Asus or Gigabyte) you should get the message “PRESS ANY KEY TO
BOOT FROM CD or DVD” press the SPACE BAR
If your computer does not boot from the CD when you
press the Space Bar, you may need to use another keyboard other than a wireless one.
Windows will begin to load files
If you see this message, just press ENTER
Windows 7 Startup Repair & System Restore Guide
16
You will get a blank screen for a
while, just be patient.
Select your TIME AND
CURRENCY FORMAT
and then click on NEXT
Click on REPAIR YOUR COMPUTER
Windows 7 Startup Repair & System Restore Guide
17
When you reach this screen click on REPAIR
AND RESTART. The system will attempt to
repair itself and then restart the system. If this
works then you will find yourself back in Win-
dows.
If this fails then you need to repeat this process
from the beginning until you reach this screen
and then CLICK on NO instead and then contin-
ue with the below instructions
To use the System recovery Option just click on
NEXT
Select SYSTEM RESTORE and then follow
all the prompts to Restore the system back to
an earlier time.
Windows 7 Startup Repair & System Restore Guide
18
How to Re-Install Microsoft Windows 7
When all else fails - you can reinstall Windows 7 and start fresh . A step by step graphical guide.
WARNING —You will lose all your DATA— please refer to How To BACKUP your DATA in Windows 7 in
this manual
On all the systems we ship, we make certain that the BIOS is set to BOOT from the CD/DVD first.
If this is not the case you will need to enter the BIOS and set the 1st BOOT DEVICE to CD/DVD, the 2nd
BOOT DEVICE to HARD DRIVE and the 3rd BOOT DEVICE to FLOPPY.
To enter the BIOS you will need to hit the DELETE key at startup, (Some systems will require F2) Please refer
to your motherboard manual for more details.
Before you start make certain you have your Motherboard Disc (ASUS or GIGABYTE) and your VGA/
Graphics card disc ready. The drivers from these discs will need to be loaded at the completion of installing
Windows 7.
Place your Windows 7 disc in the DVD/CD drive and restart your computer.……...
After you see the LOGO Screen (usually Asus or Gigabyte) you should get the message “PRESS ANY KEY TO
BOOT FROM CD or DVD” press the SPACE BAR
You may see this message again during the install process — do not press the space bar again as the install process will start from the very beginning again.
If your computer does not boot from the CD when you
press the Space Bar, you may need to use another keyboard other than a wireless one.
Windows will begin to load files
If you see this message, just press ENTER
How to Re-Install Microsoft Windows 7
19
You will get a blank screen for a
while, just be patient.
Select your TIME AND
CURRENCY FORMAT
and then click on NEXT
Click on INSTALL NOW
How to Re-Install Microsoft Windows 7
20
Click on CUSTOM (Advanced)
Accept the License terms and click on NEXT
You should receive a screen showing your current hard drive(s)
Click on DRIVE OPTIONS
(Advanced)
If you do not see any Hard Drives,
check that they are connected correctly and/or contact us for SUP-
PORT
The operating system
is usually on DRIVE 0
Partition 1 and 2.
To get a fresh install it
is best to delete both of
these partitions
Click on DRIVE 0
Partition 2 and click on
DELETE
Warning: This will
delete all information
on the hard drive.
How to Re-Install Microsoft Windows 7
21
You will receive a warning/
confirmation message. Click on
OK to proceed.
Now click on DISK 0 —Partition 1
and then click on DELETE.
You will receive the warning/
confirmation message as above.
Click on OK to proceed.
When you have completed this,
your Hard Drive (Disk 0) should
look similar to this.
Click on NEXT to begin installing
Windows 7
How to Re-Install Microsoft Windows 7
22
Windows will begin to install
When you reach the below screen, type in a
Username and click on NEXT
You will then be prompted to add a Password, you can do it now or leave it to later
when you are in Windows.
Click on NEXT
You will require your PRODUCT KEY next. This can
usually be found on the side of your computer case or
with your Windows disc.
NOTE: 8’s and B’s, 6’s & G’s look similar—there are
no 0’s or O’s, it is most likely a D
Enter your Product Key and click on
NEXT
You can leave this field blank and do
it later in Windows by clicking on
the START Button and right clicking
on COMPUTER and select Properties. Then click on Change Product
Key.
How to Re-Install Microsoft Windows 7
23
Click on USE RECOMMENDED SETTINGS
Change your TIME ZONE if needed
Choose your Network Type —HOME NETWORK is
probably best to use if you don’t know which one to
select.
Windows will detect your network and will
continue automatically.
How to Re-Install Microsoft Windows 7
24
When you are back in Windows 7, put your Motherboard disk in the DVD drive and wait for the Autorun to
start. Install all the drivers.
NOTE: Some of the Motherboard Discs may include ENERGY SAVER drivers.
DO NOT install these drivers if you wish the system to run at full speed.
The computer may restart during this process.
If you have a separate Graphics card installed in your computer, you will need to install the drivers from the
disk provided. We do, however suggest you download the very latest drivers from nVidia. (or ATI)
Just enter nVidia into your favourite search engine to find the nVidia site and go to the download page.
To check that all of your devices have
been installed, click on the Start Button
and then click on CONTROL PANEL
Click on and Select LARGE ICONS
Click on DEVICE MANAGER and a window will open.
Look for any devices with an exclamation mark in yellow.
These are the drivers you need to install.
How to Re-Install Microsoft Windows 7
Frequently Asked Questions & Troubleshooting
25
My computer seems to be running slowly/shutting down or rebooting on its own.
This is usually caused by Spyware, Malware, Viruses, Trojans or incompatible software.
Please check that the programs you have installed are fully Windows 7 compatible.
Even though you have an Anti-Virus program running, nothing is 100%.
You can always try a System Restore
Before we can determine that it is a hardware problem on your computer, a full software reinstall needs to be done. If the problem continues on a fresh install of Windows, then it is
likely that it is a hardware warranty issue. We strongly recommend a fresh install of windows before you contact us.
The DVD drive does not read/burn my DVD/CDs
If you experience any problems with DVD/CD burning, try a different brand of media. Unfortunately not all brands are compatible with all DVD burners.
Try playing an Original CD or DVD to verify that the DVD drive works.
A firmware update to your burner may also help. Visit the relevant website for your burner
to do this. It is not unusual for a Trojan or Virus to stop the DVD from working.
Even though you may be running an anti-virus program, nothing is 100% secure.
You may need to Re-install Windows entirely
I have had my computer for a while and the fans are getting louder and louder.
Open up the side of the case and (while the computer is switched off) and use a small brush
(or compressed air) and clean the fans. You will usually find a build up of dust.
I turned on the computer and nothing happened, no lights, nothing at all.
Try a different power board/socket. Change the surge protector.
Disconnect everything from the back of the computer and let it stand for at least 1 hour and
then reconnect everything
If all else fails, please contact us.
I get an error message on the screen, what does it mean?
Copy the error message in a search engine such as Google. Very often you will find many
pages and websites explaining the issue and how to resolve it.
My monitor does not seem to work.
Make certain your Monitor is switched on first before you switch on the computer.
Try your monitor on a different computer if possible.
All monitors carry a 3 year manufacturers warranty. Please refer to the monitors manual for
contact and warranty information.
I changed the BIOS settings and cannot get into the system.
We do not recommend changing the BIOS settings at all.
Please refer to your motherboard manual on how to reset the CMOS.
My Printer does not work properly.
Please download the most recent Vista drivers for your printer. Refer to the manufacturers
website.
Frequently Asked Questions & Troubleshooting
Frequently Asked Questions & Troubleshooting (cont)
26
The system hangs when trying to boot up.
Remove any discs from the DVD drive or any USB devices (flash drives, external hard
drives, card readers etc) and then try and boot the system. If this does not work refer to Windows 7 Startup Repair Guide, or Windows 7 System Restore.
My computer went into a sleep/hibernate mode and I couldn’t turn it back on.
Press the on button at the front of the computer once, This will usually take the system out of
sleep mode.
To switch this mode off, right click on the desktop and select PERSONALIZE then
SCREEN SAVER and then POWER SETTINGS.
My computer "freezes" during bootup, ie it hangs before booting into Windows.
This is commonly caused by USB items.
Unplugging all unnecessary USB items will resolve this issue.
Items that are found to be causing this issue can be plugged in after Windows has booted up, or an external
USB hub can sometimes resolve this issue.
My Compute r "freezes" (and/or Bluescreens) during operation in Windows.
There are only a few reasons a computer will freeze during operation.
One reason is a hardware issue.
A faulty stick of RAM can cause freezing while in Windows.
This can easily be resolved by removing all the RAM from the computers motherboard and replacing just one
stick of RAM and running Windows for a while to see if it still freezes or runs correctly.
If Windows runs without the same problem then that stick of RAM is OK.
This is just a process of elimination.
It is extremely rare for more than one stick at a time to be faulty.
Faulty sticks of RAM can be sent back to us for replacement.
The other reason and the cause for 99% of freezing (and/or Bluescreens) while in Windows is Software .
The first thing to do is to reinstall Windows, deleting all partitions and installing a fresh copy of Windows onto
the hard drive. This will eliminate software conflicts, trojans etc.
Don't forget to install the motherboard drivers and graphics card drivers after installing Windows.
Another cause of freezing is changing the settings in the BIOS (CMOS)
Changing the CPU frequency & multipliers beyond the CPU and motherboard specifications can and will in
fact create these problems. Systems that are found with this, will be deemed out of warranty immediately.
Please be aware that, we DO NOT wa rrant software and cannot guarantee that the computer will run each
and every piece of software flawlessly. We only warrant HARDWARE and can only replace hardware that is
found to be faulty.
If you find that the freezing issue happens during a particular program or game, simply Google it. For example;
MINECRAFT CRASHING or star wars SWTOR crashing
You will find some 900,000+ results for these particular searches.
Among these results you should also find ways that could resolve these issues.
Frequently Asked Questions & Troubleshooting
Logging Warranty Calls
27
Call National Warranty Services on -
1300 765 860
When you call the above number for warranty service, your Warranty ID is validated and the call is logged. For
on-site warranties, your Authorised NWS Reseller, or an Authorised NWS Service Agent will then call you and
arrange high priority on-site service.
For Return To (Nearest) Service Agent (RSA) warranties, you take the item to a convenient Authorised NWS
Service Agent for high priority service (please note, you must call & log a warranty service call with the NWS
Service Centre at the time, not afterwards); we will give you the name & location of a convenient Authorised
NWS Service Agent. If your warranty is a 'Pick -up & Return' warranty, we arrange a free 'same day' courier
service. If your warranty is a 'Mail -In' warranty, you pack item and mail-in to a specified NWS Service Centre.
All warranty service work must be authorised prior to any warranty service. National Warranty Services accepts no liability for service or service fees if any service is carried out prior to National Warranty Services
authorization.
This NWS warranty is a hardware warranty, and has been purchased for a particular equipment category, and
up to a particular retail price point. Warranties found to have been purchased for equipment with a higher price
point, or incorrect type, than stated on this warranty, will be void.
This NWS Wa rranty includes:
* Replacement parts or items of same or better specification
* All service for diagnosis & replacing faulty parts or items
* 'Instant' or overnight parts replacement
* All freight & travel (if not excluded)
This NWS Wa rranty does not cover:
* Faults with any component or item in the first seven days of usage (which are covered by your Reseller)
* Damage caused by people, animals, or vermin
* Damage caused by any environmental factors
* Damage caused by power spikes or lightning
* Damage caused by an unreasonable level of usage
* Damage caused by usage for purposes or manner not intended for those components' or item's type or specifi
cation, or which is excluded by Manufacturer
* Items of type or cost not covered by the warranty purchased
* Additional components added after sale
* Any external or removable media, peripherals, or batteries
* Software & data
* Settings or configuration
* Backing -up or recovering data
* Software & parts compatibility
* Network & Internet connectivity
7 DAY D.O.A. period.
If you report a problem that happened within the first 7 days that you received your computer it will be deemed
by NWS as a D.O.A and your warranty may be void. Hardware failures within the D.O.A period must be
logged with GR -TEK within the D.O.A period.
Under the Australian Consumer Law, most retail go ods no w come with Consumer Guarantees that cannot be excluded by your Reseller o r
the M anufacturer. For those goods, if the item purchased has what is defined by the ACL as a ‘m ajor' fault or sho rtcoming, yo u are entitled
to a replacement or refund by your Reseller or the M anufacturer, and, possibly, compensatio n for any reasonably foreseeable loss or damage. The usual ‘m ajor' faults relate to ‘unacceptable quality', ‘not fit fo r the purpose', or ‘not matching description'. These 'major' faults are
not covered by this warranty. For ‘non - major' faults, for a ‘reaso nable' perio d after purchase (based on the price, quality, and function of
the item), yo u are entitled to have faults repaired, depending on the cause of the fault. All these repairs are included as part o f this NW S
warranty.
NWS Details
National Warranty Services
6 Gomersall St
Redcliffe Qld 4020
Ph: 07 3117 0950
Fax: 07 3283 7867