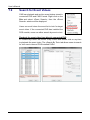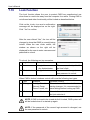
1
Central Management System User’s Manual Version 3.8.0 User’s Manual Table of Contents 1. Overview .......................................................................................................................3 1.1 System Requirement ...........................................................................................4 1.2 Supported IP Cameras ........................................................................................5 2. Software Installation.....................................................................................................6 3. Software Upgrade....................................................................................................... 11 3.1 Automatic Software Upgrade ............................................................................. 11 3.2 Manual Software Upgrade .................................................................................12 4. Start Up CMS...............................................................................................................13 4.1 Starting Up .........................................................................................................13 4.2 Login..................................................................................................................14 5. CMS Main Window......................................................................................................15 5.1 CMS Icon in the System Tray ............................................................................20 6. Configure CMS ...........................................................................................................21 6.1 Setup Groups.....................................................................................................22 6.2 Manage the Sites...............................................................................................25 6.2.1 Add/Remove a Site ...............................................................................25 6.2.2 Setup the Site via Device Search..........................................................26 6.2.3 Setup the DVR Site Manually................................................................28 6.2.4 Setup the IP Camera Site Manually ......................................................29 6.2.5 Setup the CMS Central Site Manually ...................................................30 6.3 Setup the File Path ............................................................................................32 6.4 Alert Events .......................................................................................................34 6.5 CMS User ..........................................................................................................38 6.6 Sequence ..........................................................................................................42 6.7 Login Setting......................................................................................................43 6.8 Network Setting .................................................................................................45 6.9 Log Data ............................................................................................................46 6.10 Export or Import Settings ...................................................................................47 7. Operation of CMS .......................................................................................................48 7.1 View Live Image / Assign Camera .....................................................................49 7.2 Camera Setting / Camera Info. ..........................................................................52 7.3 Display Mode .....................................................................................................54 7.4 Zoom In/Out Control via Mouse .........................................................................56 7.5 Sequence Display..............................................................................................57 7.6 Adjust the Image................................................................................................58 7.7 Playback Recorded Video..................................................................................59 7.8 Configure the OSD Menu of the Connected Site ...............................................66 1 User’s Manual 7.9 Search for Event Videos ....................................................................................68 7.10 CMS Motion Detection.......................................................................................71 7.11 Missing/Foreign Object Detection ......................................................................73 7.12 Take a Snapshot ................................................................................................75 7.13 2-Way Audio Talk ...............................................................................................76 7.14 Instant Record Function.....................................................................................77 7.15 Dome Setting / Dome Control ............................................................................78 7.16 Schedule Record Function ................................................................................80 7.17 E-MAP Function.................................................................................................85 7.18 Health Function..................................................................................................89 7.19 Lock Function ....................................................................................................90 7.20 Joystick Control Function...................................................................................91 Appendix A: CMS Player .................................................................................................93 Appendix B: Troubleshooting.......................................................................................102 2 User’s Manual 1. Overview The Central Management System (CMS) offers a simple and centralized monitoring interface for the video surveillance equipments. It gives the user access to monitor multiple DVRs, and allows the user to simultaneously monitor 64 sites per group (up to 10 groups) within several clicks. Features: z Monitor Multiple Sites - Supports up to 10 groups, each group can add up to 64 sites z Alert Function (LAN Only) - Sends live/event video clips and messages to the local computer from all connected DVR(s) z Connected Configuration - Configures the settings of the connected DVR(s) z Remote Playback – Allows the user to view recorded video stored in the connected DVR(s) z HDD Information – Displays information of all disk drives that are being used on the local computer z Dome Control - Remotely operates the speed domes via the Internet z Search (Devices) - Searches the LAN network for any available connected DVR z Search (Video) - Searches the connected DVR for any recorded video z Record - Records live or playback videos to the local computer 3 User’s Manual 1.1 System Requirement The following chart shows recommended computer system: Operating Systems Windows XP, Windows Vista, Windows 7 CPU Minimum: Pentium 4 RAM Memory Minimum: 1GB (Connects ≦ 32ch) Recommended: 2GB (Connects 64ch) Bandwidth Minimum: 256K Recommended: 1536K HDD Minimum 80GB HDD space is required if there is need to record video to the local computer. Video Card Recommended: Pre-installed with more than 64MB RAM 2.0GHz Recommended: Pentium 4 3.0GHz CPU: Intel® Core™ 2 Quad CPU Q6600 @2.4GHz, RAM: 2GB, OS: WinXp, Display: NVDIA GrForce 8400GS 512M, Ethernet: Gigabit LAN, HUB: Gigabit HUB Tested Connection Extreme With the above system, the tested PC can stably connect up to 512 channels, which is the same as 32 units of 16-ch DVRs. NOTE: This system is required when 16 Megapixel IP cameras with 1280x960 resolution are going to be connected. NOTE: If the operating system is Windows Vista, some functions (such as Record, Auto Reboot, etc) will not work properly due to User Account Control (UAC). Follow steps below to solve this problem. Step 1. If a previous version of CMS is installed, export setting files of CMS servers (1~4) before installing the new version CMS. Step 2. Due to UAC, user account in Windows Vista cannot properly run applications that will write in “C:\Program Files\” folder. Therefore, CMS will be installed in “C:\” folder instead. Step 3. Once the new version CMS is installed, import the setting files back to CMS servers (1~4). 4 User’s Manual 1.2 Supported IP Cameras The following chart shows the models of IP cameras recognized by CMS: Brand/Model Streaming Protocol Video Stream Format Audio Stream Format DynaColor Video Server (D7521) HTTP RTP+RTSP DynaColor MegaPixel (Intranet) IP Camera RTP_Over RTSP (NH Series) (Internet) MPEG4 / MJPEG MPEG4 / MJPEG / H264 MPEG4 / MJPEG / H264 MS-ADPCM (2-Way Audio) g.711 a-law / g.711 u-law (2-Way Audio) g.711 a-law / g.711 u-law HTTP MJPEG / H264 RTP+RTSP MJPEG / H264 Adpcm / g.711 a-law / g.711 u-law g.711 a-law / g.711 u-law RTP/RTSP MJPEG / H264 g.711 a-law / g.711 u-law RTP+RTSP MPEG4 / MJPEG PCM HTTP MPEG4 / MJPEG PCM RTP/RTSP MPEG4 Unsupported VIVOTEK 7000 Series RTP/RTSP MPEG4 Unsupported DynaColor (NW Series) ACTi AXIS 200 Series NOTE: Each group can only connect up to 16 IP cameras. 5 User’s Manual 2. Software Installation After acquired the installation file, follow the steps below to install CMS to the local computer. Step 1. Double click the zipped file to unzip it. Step 2. There are 3 ways to start the installation. Option 1. After the zip file is opened, click on the Setup.exe file to start the installation. Option 2. After the zip file is opened, click on the AutoRun.exe file to start the installation. Option 3. If the program will be installed using the CD, the installation will run automatically when the CD is inserted into the CD-Rom. If the installation will be started either via Option 2 or Option 3 of Step 2, the <CMS Setup Menu> window will be displayed. Choose <INSTALL CMS> to start installing the CMS. Choose <CMS USER’S MANUAL> to open the user’s manual. Choose <EXIT> to exit the <CMS Setup Menu>. NOTE: If an older version of the CMS had been installed in the local computer, a message box will be shown during the installation. Click <OK> to uninstall the previous version. 6 User’s Manual After clicking <OK>, an <CMS Installation Uninstall: Confirmation> dialog will be displayed. Click <Uninstall> to uninstall the older version and continue with the next step. Step 3. Select the components that are going to be installed. It is strongly recommended to select the <Start Menu Shortcuts> to create shortcuts in the Start Menu and on the Desktop. Otherwise whenever the program is to be opened, it will have to be found under the path: “\CMS\EXE\CMS.exe”. Click <Next> to go to next step. The components of the CMS Installation Setup are: a. CMS: The CMS main program must be installed (default). b. Start Menu Shortcuts: Check the box to create shortcuts in the Start Menu and on the Desktop. c. NTP (Network Time Protocol) Server: Check the box to install the NTP server. d. Default Setting (Old setting will be deleted!): Check the box to load default setting, or uncheck it to load the old setting of previous installed CMS. e. Ext2Fsd (ext2 file system driver for Windows): Check the box to install driver in order to be able to read raw files in DVR HDD. 7 User’s Manual NOTE: If users have already installed the EXT2IFS driver and software, please uninstall it beforehand, for there might be confliction occurs while installing Ext2Fsd driver during CMS installation. Step 4. The CMS main program will be the first program to be installed. Choose a folder to install the CMS or it will be installed to a default destination folder “\CMS\”. Click <Install> to start the Installation; or click <Back> to go back to the previous step. NOTE: The installation program will check whether if the PC has installed “Microsoft Visual C++ 2008 SP1 Redistributable Package (x86)”. If the upgrade package is found not yet installed, a web browser will automatically be started and the download webpage will be loaded for users’ quick access. Click <Download> to download and install the upgrade package. Step 5. The NTP Server will be the next program to be installed. The NTP Server enables the local computer, which is running the CMS, to become a central NTP Server for the connected DVR(s) so the time for the local computer and the connected DVR(s) is synchronized. Click <OK> to start installing the NTP Server. 8 User’s Manual Step 6. Click <Close>, and the Software Installation is complete. NTP Service (Server) The NTP Service (Server) enables the local computer, which is running the CMS, to become a central NTP server for the connected DVR(s) so the time for the connected DVR(s) and the local computer is synchronized. To do so, the IP address of the local computer is needed. Go to Start menu, select Run. Type in cmd and click OK. 9 User’s Manual Type in ipconfig to get the IP Address of the local computer. Write down the IP address on a piece of paper for later use. After the IP address is found, setup the connected DVR(s). First, go to <Main Menu> Æ <System Setup> Æ <Date/Time> Æ <Time Zone> to setup time zone. To find out the local time zone, please visit www.greenwichmeantime.com NOTE: The <Time Zone> must be set or the <Network Time Protocol Setup> will not be accessible. After entered the local time zone, the <Network Time Protocol Setup> option will be accessible. Go to <Main Menu> Æ <System Setup> Æ <Date/Time> Æ <Network Time Protocol Setup>, and the following menu will be displayed. Network Time Protocol Setup NTP Server time.nist.gov Automatically Time Sync On Manually Time Sync No In this example, the NTP server should be set to “192.168.7.122” which is the IP address of the local computer. After the NTP server is set, select <Yes> for <Manually Time Sync> to immediately sync the time with the local computer. The time sync can also be updated periodically. Select <On> for <Automatically Time Sync>, and the time will be automatically synced once an hour. 10 User’s Manual 3. Software Upgrade CMS software can be upgraded automatically or manually. Refer to the following sections for details. 3.1 Automatic Software Upgrade To enable automatic software upgrade, right click on CMS icon in the system tray and check “Auto Upgrade”. If automatic software upgrade is enabled, CMS will connect to the FTP Server and check for upgrade once a month. If no upgrade is available, CMS will continue normal process. If upgrade is detected, please follow the steps below to proceed. Step 1. A message box will pop up to inform that there is upgrade available. Click <OK> to download the upgrade software and continue to the next step. Otherwise, click <Cancel> to abort and continue to normal CMS process. Step 2. Choose a destination folder to save the file. Then a window will pop up and show the downloading status. Click <Abort> to terminate the download and CMS will be started as usual. 11 User’s Manual Step 3. When the download is completed, the installation of the new version of CMS can be started following the same procedures described in section Software Installation. NOTE: If the upgrade file is not completely downloaded, an error message will be displayed as below. NOTE: A release note will also be downloaded together with the setup file. The following message will be displayed to show the file path where the release note is saved. 3.2 Manual Software Upgrade To manually upgrade software, click on the <Setting> button and click on <Software Upgrade> at the bottom. Then follow the steps in the previous section to complete the download and installation. 12 User’s Manual 4. Start Up CMS There are 3 ways to start CMS. Note that method A and B are only available if the “Start Menu Shortcuts” component is installed. Please see section Software Installation for more information. Method A: Click Start menu and select Programs; find “CMS” from the listed programs. Method B: Double click on the shortcut icon on the desktop. Method C: Go to “\CMS\EXE\” and double click on CMS icon. 4.1 Starting Up If CMS is started for the first time, select a desired language for the interface. The available languages are listed in the scroll box. Click <OK> to confirm the selection. If the system memory or CPU frequency is less than the requirement, the error message shown as below will be displayed. 13 User’s Manual 4.2 Login The default User Name & Password are listed below. User Name: admin Password: 1234 Check <Save user name and password> to save time from entering username and password every time CMS starts. Click <OK> to login. The username and password accounts can be added or removed under the <CMS User> tab in <Setting> configuration window. Refer to the CMS User section for more information. NOTE: If the wrong username or password is entered for 3 times, the message below will be shown, and CMS will be closed automatically after <OK> is clicked. Restart CMS to enter the correct username and password. 14 User’s Manual 5. CMS Main Window After started up CMS, the main window of CMS will be shown as the figure below. The name of each button is indicated as follows. Display Mode: 4-windows, 16-windows, 25-windows, 36-windows, 1 49-windows, 64-windows, 8-windows, 10-windows, 13-windows, Sequence, Full Screen 2 Left to Right: Live, Playback, CMS Player, Snapshot, Emap 3 Left to Right: Schedule Record, Setting, Health, Lock 4 Site Tree 5 Bandwidth – Normal/Dual Stream 6 Left to Right: Audio, Smooth Adjustment, Deflicker, Recording 7 HDD Info The usage and function of each button will be briefly described as follows. 15 User’s Manual Display Mode Click on any <Mode> icons to view the image in a multiple window mode. The selections are 4-windows, 9-windows, 16-windows, 25-windows, 36-windows, 49-windows, 64-windows, 8-windows, 10-windows, and 13-windows. Refer to section Display Mode for more details on operation. Click on <Sequence> to start displaying the sequence list. See section Sequence Display for more detailed information. Click on <Full Screen> to extend the current viewing grids to full screen. Hit <Esc> to exit. Live Click on the <Live> icon to view the live video. Note that after viewing recorded video, this button needs to be clicked to switch back to the live mode. Playback Click on the <Playback> icon to view recorded video stored in the HDD of the connected DVR. Please refer to section Playback Recorded Video for more information about playing back the video. CMS Player Click on the <CMS Player> icon to start up CMS Player. CMS Player is an enriched version of the standard DVRPlayer. Please refer to the Appendix A for more information. Snapshot Click on the <Snapshot> icon to save a snapshot of the current window(s). Refer to section Take a Snapshot for detailed information. Emap Click on the <Emap> icon to open the E-Map program. The E-Map is a program that allows the user to illustrate the positions of the cameras on a self selected image. Schedule Record Click on the <Schedule Record> icon to schedule the recording time frame for the sites. 16 User’s Manual Setting Click on the <Setting> icon to set up the configuration. Refer to section Configure the CMS for detailed information. Health Click on the <Health> icon to see the HDD information of the connected DVR(s). The data will be updated every 5 minutes. The following figure is an example. See section Health Function for more detailed information. NOTE: If more than half of the connected devices are not our products, a warning message as below will be shown and CMS will be closed automatically. Lock Click on the <Lock> icon to lock CMS to protect the works on CMS when users need to be away from the computer for a while. This function is the same as the computer’s screensaver. See section Lock Function for more detailed information. Site Tree The site tree displays the site(s) that are currently being viewed. If the connection to a certain camera is failed, there will not be image displayed on its assigned grid. Right click on the “site” and click <ReConnect> to try to establish the connection to the site. The <DisConnect> option allows the user to only disconnect a certain site. 17 User’s Manual The user can also rename the camera directly by right clicking on the camera and selecting <Rename>. The new name will be shown on the upper left corner of the camera’s assigned grid. Note that group and site cannot be renamed at the site tree. By right clicking on the group icon, the options shown as on the right allows the user to expand or collapse the site tree. If the group is connecting to CMS Central, the right click options are as show on the right. Select <Reconnect> to re-establish the connection to CMS Central. Select <Talk> to initiate two-way communication between CMS and CMS Central. Bandwidth – Normal/Dual Streaming For different networks with different bandwidths, two streaming options are provided – normal streaming and dual streaming. Users who are using high-speed networks, normal streaming will be a recommended choice. Depending on the HDD capacity and network usage, set to high, middle, or low bandwidths. For networks with limited bandwidth, dual streaming will be a better choice. It enables coexistence of high quality streaming at local DVR site and lower quality streaming but faster transmission for CMS site. To select dual streaming, click on the bandwidth icon and the icon will change color. Then users can furthermore choose different bit rates to adjust for the best displaying quality. The setting will be applied immediately, and is going to be saved for CMS next startup. NOTE: Dual streaming will only be available when DVR’s total PPS is set to one-half of the max PPS, for example, set 30PPS for D1 recording. The reserved half of the max PPS will be handling the low rate streaming for transmission to the remote monitoring site. 18 User’s Manual Audio Click on the audio button to switch on/off the audio. NOTE: Switching ON/OFF the audio on CMS will not affect the audio setting of the connected DVR(s). Smooth Adjustment Click on the smooth adjustment button to switch on/off the smooth adjustment function. Switching on the function helps to give the image more sharpness. Deflicker Click on the deflicker button to turn on/off the deflicker function. Switching on the function helps to avoid gleaming of images. Recording Click on the recording button to start recording videos of all connected sites. The recorded data will be stored in the preset file path specified in settings. HDD Info The pie chart displays the HDD information. This is especially useful when users use CMS to record the video to the local computer. Scroll down the menu to see the information of all the HDD(s) installed on the local computer, such as C drive, D drive…etc. The blue part of the pie chart indicates the used space, and the yellow part indicates the available space. The information will be updated every 30 seconds. If file circular is enabled, the circulation will as well be updated every 30 seconds. 19 User’s Manual 5.1 CMS Icon in the System Tray When CMS is started up, CMS icon will always be shown in the system tray. Right click on CMS icon and the menu items will be as shown on the right. If <Minimize To Tray> is checked, CMS window will shrink to CMS icon in the system tray when it is minimized. The task button will also disappear. To restore CMS window, click on CMS icon and the task button will appear again. Then click on the task button to maximize CMS window. Alternatively, right click on CMS icon and select <Open CMS> and CMS window will be restored. Right click on CMS icon and select <Help> will display CMS User’s Manual. Details of <Auto Upgrade> is described in section Automatic Software Upgrade; <Alert Info.> is explained in section Alert Event; <Show joystick function> and <Joystick control (On/Off)> are introduced in section Joystick Control Function. 20 User’s Manual 6. Configure CMS CMS supports up to 10 groups, and at most 64 sites can be added to each group. The following sections guide users to setup CMS step by step. Click on the <Setting> icon and a window as below figure will be displayed. NOTE: The configuration in “Groups” tab and “Import” function will be unable to be saved when CMS is detecting network connection or is connecting to some sites. Error messages will be shown to inform the users. NOTE: When the setting of connecting group or sites is changed, users can directly click on <Save and Connect> to re-establish the connection. 21 User’s Manual 6.1 Setup Groups Up to 10 groups can be set in CMS. This section guides the user to add or remove a group, and also shows the user how to set “start group”. Add a group Click button to add a group. Double click on the group to rename it. The other way to add a group is to right click on <Groups>, and select <Add a group>. 22 User’s Manual Set Start Group “Start Group” is the group that will be connected after started up CMS. Right click on the group to be set as “start group”, and select <Set as start group> from the pull-down menu. NOTE: If a group is set as the “start group”, the icon will be changed as shown in the figure below. 23 User’s Manual Expand / Collapse a Group There are two ways to expand or collapse a group. One way is to use the buttons; the other way is to right click on the group and select <Expand> or <Collapse> from the pull-down menu. Remove a Group To remove a group, click on the group to be removed, and then click the button directly to remove the group. The other way to remove a group is to choose <Remove> after right clicked the group. 24 User’s Manual 6.2 Manage the Sites The following sections are instruction of the management of the sites, including add or remove sites and configuration. 6.2.1 Add/Remove a Site This section describes how to add or remove a site. Up to 10 groups can be created with a capacity of 64 sites. Add a site Choose a group to add a new site. Click the button to add a site to this group. The next section will show how to setup the site step by step. The other way to add a new site to a group is to right click on the group, and select <Add a site>. 25 User’s Manual Remove a site To remove a site, click on the site that is to be removed, and click the button directly to remove the site. The other way to remove a site is to right click on the site, and select <Remove> from the pull-down menu. A new site can be a DVR, an IP Camera, or a CMS Central. The number of sites equals to the total number of the DVRs and IP Cameras. However, the CMS Central can only be individually added to a new group all alone by itself. The following sections will show how to setup configuration of the sites. 6.2.2 Setup the Site via Device Search There are two ways to setup a site. The simple way is via Device Search. CMS is able to search for IP addresses of DVRs, IP Cameras, and CMS Centrals connected to the PC’s LAN network. The ports used for device search are 6666 and 6667. Please make sure that these two ports are not in-use nor blocked by firewall or virus scan software. 26 User’s Manual Follow steps below to search for DVR(s) or IP Camera(s): Step 1. If there are DVRs, IP Cameras, and/or CMS Centrals installed in the LAN network, CMS can search for IP addresses of the installed devices. Click the Search button (on the bottom right) to open the Search window. Step 2. The list will show the IP addresses of DVR(s), IP Camera(s), and CMS Central(s) available in the LAN network. Select from the list and Double Click on the IP address to add it to a site. Then enter the username and password of the selected DVR or IP Camera. For CMS Central, refer to section Setup the CMS Central Site Manually for further configurations. NOTE: The Device Search function can only be used to search for addresses within the same LAN. For example, if the local computer uses an IP address of 192.168.1.5, and a connected DVR has an IP address of 192.168.1.7, CMS will be able to find the IP address of the DVR. However, if there is another DVR connected to another LAN network such as 192.168.3.6, CMS (whose IP is 192.168.1.5) will not be able to find the IP address of the DVR in another LAN network. 27 User’s Manual Search UPnP devices: Check the box in front of “Search UPnP Devices” and click <Refresh> to start searching for UPnP devices within the LAN network. While the search is in process, <Refresh> button and “Search UPnP Devices” option will be grayed out and cannot be clicked or selected, in addition the window cannot be closed. <Refresh> button will be changed to <Search UPnP> to remind the user of the status. Everything will work only after the searching process is done. If the user double clicks on the list or tries to close the window, a warning message will be shown. 6.2.3 Setup the DVR Site Manually If the detailed information (IP address, port, username, and password) of the connected DVR is provided, a site can be setup manually. Add a new site and enter the Site name, IP address, Port, Username, and Password. Select <DVR> and click <SAVE> to complete the setting. NOTE: If the entered Username and Password is a user account instead of an administrator account, the same DVR account restriction will be applied. When a user account accessed a function that is restricted, a warning message will be displayed. 28 User’s Manual If the DDNS information of the DVR is known, the DDNS data can be used to setup a site. Check the box <(D)DNS> circled below, and type in the DDNS data. Click <SAVE> to complete the setting. An example of the DDNS address looks like: *******.ddns.iview-ddns.com 6.2.4 Setup the IP Camera Site Manually If an IP Camera is going to be added to CMS, the required information includes the IP address, port, username, password, and brand/model type of the IP Camera. Enter the data and select <IP Camera> as circled below. Then choose the <Model> and <Stream Type> of the IP Camera. Click <SAVE> to complete the setting. 29 User’s Manual NOTE: If the added IP Camera is NW series, users can set the resolution to be 640x480 or 1280x1024. Supported IP Cameras: Brand/Model Streaming Protocol Video Stream Format Audio Stream Format DynaColor Video Server (D7521) HTTP RTP+RTSP DynaColor MegaPixel (Intranet) IP Camera RTP_Over RTSP (NH Series) (Internet) MPEG4 / MJPEG MPEG4 / MJPEG / H264 MPEG4 / MJPEG / H264 MS-ADPCM (2-Way Audio) g.711 a-law / g.711 u-law (2-Way Audio) g.711 a-law / g.711 u-law HTTP MJPEG / H264 RTP+RTSP MJPEG / H264 Adpcm / g.711 a-law / g.711 u-law g.711 a-law / g.711 u-law RTP/RTSP MJPEG / H264 g.711 a-law / g.711 u-law RTP+RTSP MPEG4 / MJPEG PCM HTTP MPEG4 / MJPEG PCM RTP/RTSP MPEG4 Unsupported VIVOTEK 7000 Series RTP/RTSP MPEG4 Unsupported DynaColor (NW Series) ACTi AXIS 200 Series NOTE: Each group can only connect up to 16 IP cameras. 6.2.5 Setup the CMS Central Site Manually If users want to add a CMS Central site, it has to be the only site in the group. Select <Central> as circled below. The site name will be automatically changed to “Central” and it cannot be renamed. 30 User’s Manual A setup window will be popped up as below. Input CMS Central’s IP, port, username, and password. Then click on <Testing Central Connection> to test if the connection to CMS Central is successful. The testing result will be displayed on the right. Note that “()” next to site 2 of CMS Central means site 2 is not connected by CMS Central. Users can check or uncheck in front of the sites to select whether to display their videos. Click <OK> to confirm and save the setting. NOTE: If IP address of CMS is not added to the White List of CMS Central, a message “Not In White List!” will be popped up. NOTE: If IP address of CMS is added to the Black List of CMS Central, a message “In Black List!” will be popped up. For further details of CMS Central settings, please refer to the User’s Manual of CMS Central. When users wish to edit the settings of CMS Central site, select <Central> again or right click on the Central site and select <Set Central> to pop up the Set Central window. 31 User’s Manual 6.3 Setup the File Path The file path menu defines stored destination of snapshot, archive files, and recorded videos. It is recommended to use the default folders. Record Path The recorded videos can be stored in more than one folder. Click on <Advance> and the following window will be shown: The number of selectable folders equals to the number of HDDs the PC connects to, excluding HDDs with capacity less than 1GB. Check the “Enable” box and click <Browse> to set more destination folders. Each folder should be from different HDD or an error message will be displayed. Note that if a HDD with less than 1GB capacity is selected, an error message will be shown. Click on <Clear All> will delete all folders except the first preset folder. 32 User’s Manual In each folder, subfolders will automatically be created with folder name “RecordFolder********”, which ******** represents an 8-digit serial number. Each subfolder can stores up to 500 videos. Once a subfolder is full, a new subfolder with a subsequent number will be created and new files will be stored to the new subfolder. Circular Function The <Circular> function is used to adjust the HDD space usage of CMS. For example, when the threshold is set to 1GB, and there are 20GB free disk space remaining in the HDD, CMS can only access the HDD no more than 19GB. When the free disk size is smaller than threshold: 1. If the circulation of files is performed at first time, CMS will start to overwrite the earliest recoded data. Next time when CMS starts up, the circulation of files will continue from where it was up to. 2. If the destination folders are reset, new folders will be created to store new files. The old files will be deleted and rewritten with new files. Record Videos from IP Cameras to Remote Network Disks When videos from IP cameras will be recorded to a remote network disk, the DRV file is going to be stored under a temporary folder “\CMS\TEMP_REC\” if the file size is less than 100MB. Once the file size reached 100MB, the file will automatically be transfer to the designated remote network disk. If the recording is interrupted (either connection reset, disconnected, stops recording, etc), a progress bar will be shown to inform the user that the DRV file is being transfer to the designated remote network disk. NOTE: For CMS servers 2~4, the temporary folders will be named as TEMP_REC2, TEMP_REC3, and TEMP_REC4. Snapshot Type CMS has a snapshot function, and the file type for snapshot can be defined here. Note that if more than one type are selected, take 2 types for example, then each snapshot is saved to 2 types of files. They are the same image, but in different formats. For instance, if Bmp & Tif are selected and the snapshot is taken, two types of image files of the same snapshot image will be created. 33 User’s Manual 6.4 Alert Events The alert function enables the connected DVR(s) to send alert signals to CMS within the network. This section describes how the alert function works. Setting up the alert function: Step 1. Find the IP address of the local computer. Go to Start menu, select Run. Type in cmd and click OK. Type in ipconfig to get the IP Address of the local computer. Write down the IP address on a piece of paper for later use. 34 User’s Manual Step 2. Setup the <Alert Notification Setup> on the connected DVR(s). The <Alert Notification Setup> allows the user to send alert notifications to CMS program which had been installed to the computer. Alert Notification Setup 1 Alert Configuration Set OFF Alert Notification 192.168.7.122 Alert IP 999 Alert Port 120 Sec Alive Interval - Alert Configuration Set <Alert Configuration Set> provides 3 combinations of Alert Notification, IP, and Port. The user can match the connected DVR to at most 3 different CMS servers. - Alert Notification 4 options are included in this item; <OFF>, <Event>, <Alive>, and <Both>. <OFF>: The Alert Notification is turned off. <Event>: When the alarm is triggered, the DVR will send an alert message to CMS. <Alive>: The DVR will send an alive message to CMS every N second just to show that the connection between the DVR and CMS is in effect. The time interval N can be adjusted in <Alive Interval>. <Both>: This enables the DVR to send both Event and Alive alert messages to CMS. - Alert IP The Alert IP must match the IP address of the local computer. In this example, the IP address of the local computer is 192.168.7.122. - Alert Port The Alert Port is the port used for sending and receiving alert signals. Choose any port that is not restricted by the network. The ports for both connected DVR and CMS Alert must be the same. In this example, the port is set to 9999. NOTE: If 2 configuration sets are corresponding to 2 different CMS servers, each CMS server must have its own unique port number. - Alive Interval Time interval (1 to 255 sec) between each alive message can be set here. 35 User’s Manual Step 3. Setup the Alert of CMS. Click on the <Setting> icon and go to Event tab to setup the port. Port 9999 is used in this example. Select <ON> to enable the alert function. <Event Full Screen> is used to display full screen of the alerted channel. Select <ON> to activate this function, or <OFF> to deactivate it. <Event Recording Duration> is for users to define recording duration of event videos, when schedule is set and/or when motion recording is enabled. In addition, users can send notice to a specific email via a SMTP server by selecting <CMS Event>, <Local Event>, <Local Alarm>, or <Local Video Loss> next to <Enable>. Then enter all required SMTP information. If the format of the email address is entered incorrectly, an alert message will be displayed. NOTE: If users reconnect or disconnect the sites, the list of the event full screen will be cleared. NOTE: Once the list of the event full screen finished playing, the window will return to former viewing status. Step 4. Alert Action The connected DVR sends 4 types of alert message (State) to CMS: Alive, Alarm, Motion, and Video Loss. Alive messages are sent when the notification option is set to <Alive> or <Both> in the connected DVR. Alarm, Motion, and Video Loss messages are sent when the notification option is set to <Event> or <Both> in the connected DVR. 36 User’s Manual Viewing the alert events: When an alert is triggered while the alert function is enabled, CMS icon shown in the system tray will change to Alert icon to indicate that an alert is being triggered. Right click on CMS icon and choose <Alert Info> to show the Alert Info window. Alternatively, double click on the blinking CMS icon can also display the Alert Info window. Users can click on the <Save> button to save the alert information list. NOTE: The maximum number of items can be kept on the alert list is 1,000. When the list reached 1,000 items, the earliest alert messages will be deleted while the new ones are being saved. Double click on the Event Messages (Alarm, Motion, or Video Loss) to view the event video in full screen. If the DVR sending the Event Messages is not currently connected to CMS, a message box will be displayed as the following. Connect the DVR and the event video will be available. NOTE: The Alert function works ONLY within LAN network. (Please refer to the note of the Search function) NOTE: If the alert event has not yet been added to the database of the DVR, a warning message will be shown to notify the user. 37 User’s Manual 6.5 CMS User The <CMS User> is for the management of user accounts in CMS. Users can set users’ account information and privileges. The default username and password are: Username: admin Password: 1234 NOTE: Only users under the <Admin> group have the privilege to change the settings in <CMS User>. To add a user, users must first add a group. Right click on <User List> and select <Add Group> from the pull-down menu. 38 User’s Manual After the group is added, the first user account of the group will also be created. Users MUST set the password for this account before users can go to the next step. Right click on <NewGroup01> to add a user, remove a group, or rename the group. NOTE: The account currently used to login cannot be deleted. 39 User’s Manual Right Click on <Group01User01> to remove a user or rename the username. The <Group Attribution Setting> is for setting up the privileges of the selected user. Users can give each user account different privileges by configuring this function. 40 User’s Manual After entering the <Group Attribution Setting>, the following diagram will be shown. Select a user account in <Select CMS Group>, and users can click on the buttons to enable or disable its privileges. Purple buttons are CMS menu controls including: Playback, CMS Player, Emap, Schedule Record, Setting, and Lock. Gray buttons are site controls including: ReConnect/DisConnect, Record, Configuration, Event Search, and Camera Setting. Yellow buttons are camera controls including: Sequence, Rename, Dome Setting, Dome Control, Remove, and Sound Notification. Each camera can be set to enable/disable Live, Play, or Record function individually after clicked on <Advance Setting>. Refer to the following figure for details. NOTE: The preset is 16 cameras for all sites. The real number of cameras per each site will not be detected. NOTE: These settings will affect the whole operation of CMS. Please be very careful while configuring the settings. Next time when users login, users can choose to enter CMS either as the admin or the user. 41 User’s Manual 6.6 Sequence This function is used to set the displaying sequence. Before starting sequence display, users need to add channels to the sequence list. Right click on any channel and select <Add to Sequence> to add, or <Remove from Sequence> to remove. Note that when the channel is added to the sequence, a capital “S” will be shown on the icon. After the channels are added to the sequence, click on the <Setting> icon and choose <Sequence> to setup the sequence. Under the <Sequence Setup> option, users can setup the dwell time (1 to 120 seconds), and split mode (2*2, 3*3, 4*4, or 5*5). <Sequence Order> lists the channels that have been added to the list in order. Click <SAVE> to save the settings. Click <Clear Sequence List> to empty the list. A message window will be shown for confirmation. 42 User’s Manual 6.7 Login Setting The user can edit options regarding login settings in this section. Administrator username and password is required to edit the setting. As shown in the above picture, the box marked “1” is where the user can enter a set of username and password to be used for auto login. The “Verify” button can help the user to check if the username and password are correct. The following messages boxes will show to inform the result of verification. Correct Wrong 43 User’s Manual The box marked “2” contains the options regarding automatic actions. Clicking the first option “Start CMS when I start Windows” to request the computer to open CMS in the mean time when the system startup. Note that the other two options “Auto Login” and “Auto retrieve Live image When Login” will be checked at the same time. Nonetheless, it is still the user’s choice to determine the favorite setting. The following message will be shown when CMS is auto opening after the system started up. Click “Cancel” can terminate opening CMS. Click the second option “Auto Login” to automatically login when CMS starts. Remember to enter and verify username and password in box 1. Click the third option “Auto retrieve Live image When Login” to automatically connect to the sites in the start group when CMS starts. Detection of internet connection will be performed before hand and the following message will be displayed. Click <Stop> to terminate the detection and AutoLive will not be initiated. 44 User’s Manual 6.8 Network Setting CMS provides the option of connection via proxy server for our DVRs and Video Servers (D7521). Click <Network> tab and the setting items are shown as the following. If users wish to create the connection via a proxy server, check the box “Use a proxy server for your CMS connection.” Then enter the IP address and port of the proxy server. Enter username and password if authentication is required. NOTE: CMS supports the most common authentication keys “Digest” and “Basic”. The authentication will be automatically detected and performed. Check the box “Bypass proxy for local address” to disable connection via the proxy server for local LAN network. The <Advance> button allows the user to edit an exception list where addresses in the list will not be connected via the proxy server. The addresses can be subnets. Refer to the picture on the right for an example of the exception list. NOTE: All functions of the proxy server are tested with the most common “Squid Proxy Server”. Some other proxy servers may not work properly. 45 User’s Manual 6.9 Log Data The step by step operation of CMS will be recorded by CMS log function. Refer to the following picture for data kept in the log file. The list will display 1,000 items with latest ones shown at the bottom. The list can store up to 10,000 items in circulation, which means the oldest ones will be deleted when the number of items exceeds 10,000. Save button: Click this button to save the log file to a desired destination. Previous button: Click this button to show previous 1,000 items. Next button: Click this button to show next 1,000 items. 46 User’s Manual 6.10 Export or Import Settings The export/import function provides users the option to backup the settings as needed. To export the configuration, click <Export> and select a directory to save the *.zip file. To import a previous saved configuration, click <Import> and find the *.zip file that was previously saved. NOTE: After a setting is imported and saved, the imported setting will be loaded immediately and CMS will reconnect to the sites in the live group. 47 User’s Manual 7. Operation of CMS There can be at most 4 CMS instances opened simultaneously. If the PC is connected to more than one monitor, for example 4, then the PC can open up to 4 CMS instances at the same time on the 4 monitors respectively. However the processor and RAM of the PC will limit the number of CMS instances as well. Note that all monitors have to be set to the same resolution. CMS multiple instances limitation according to the PC: Dual Core or Hyper-Threading Single Core and Frequency > 2.0GHz Single Core and Frequency ≤ 2.0GHz RAM ≥ 512MB Open 1 CMS RAM ≥ 1GB Open up to 2 CMS RAM ≥ 1.5GB Open up to 3 CMS RAM ≥ 2GB Open up to 4 CMS RAM ≥ 512MB Open 1 CMS RAM ≥ 1GB Open up to 2 CMS RAM ≥ 1.5GB Open up to 3 CMS RAM ≥ 2GB Open up to 4 CMS RAM ≥ 512MB Open 1 CMS NOTE: It is recommended to keep the connected channels within 512 channels if multiple CMS instances are opened. Network Connection Detection CMS will auto detect network connection status. If CMS lost network connection, the following error message will be displayed. When CMS detected the restore of network connection, the error message will disappear. Click on <Stop> to cancel this function. 48 User’s Manual 7.1 View Live Image / Assign Camera The user can view live video or connect to the connected DVR using the live button. Click on the <Live> button to see the live view. Connect/Reconnect/Disconnect the Sites If the connection between CMS and the connected DVR has been interrupted, users can reconnect to it by right clicking on the Site, and select <ReConnect> from the pull-down menu. Users can also disconnect specific sites by selecting <DisConnect> from the pull-down menu. Auto Detection of Disconnected Sites: CMS will automatically detect if any sites that are connected at the beginning are disconnected for some reason later on in every 3 minutes. A list will be shown (as on the right) when there are sites detected to be disconnected. The list can be saved as a TXT file by clicking on <SAVE> at bottom left. NOTE: Besides auto-reconnect, a progress bar will be displayed as below. The connecting process will take at most 30 seconds. 49 User’s Manual Auto-Reconnect of Specific Disconnected Sites: CMS will automatically reconnect to specific disconnected sites every 7 minutes. Refer to the following table for all cases. Situation Auto-Reconnect Sites that are not connected at the beginning: Yes Sites that are disconnected manually No Sites that are connected at the beginning but disconnected for some reason later on Yes Assign a Channel/Site to Certain Window(s): CMS allows users to assign any channel/site in the site tree to any grid of CMS main window. Follow steps below to complete assignment. Step 1: Click and hold the channel/site users want. Step 2: Drag and drop it onto the window that users want to assign in. Resort/Remove Display Window Grids: Right click on any channel and select <Re-sort> to rearrange camera images of connected sites in order, up to 512 channels. Alternatively, users can also remove any channel by right clicking on the grid and select <Remove>. Or users can select any grid and press <Delete> key on the keyboard to remove the channel. Note that clicking <Re-sort> will restore the removed channels, or users can add the channels back to any grid via drag and drop. NOTE: These functions will not be accessible in sequence mode. 50 User’s Manual Save Layout Files: The layout arrangement can be individually memorized for each connect group. Also, CMS will keep the layout arrangement when it’s closed and restore the same layout when it starts up again. Each login account can save it’s own layout files. Right click on any mode icons and the pull-down menu will be shown, as on the right. After selected <Layout file> the setting window will be displayed, as below: The layout files are for backup or other users’ use. Once the file name is entered and clicked <Save>, the new layout file will be shown on the file list. Select a layout file from the list and click <Delete> to delete the file, or press the “Delete” key on the keyboard can also delete the selected file. A message will be shown to confirm the deletion. To load a layout file, select a file and click <Load>, or double click on the file. Show Covert Camera Images: When a camera is set to covert at DVR site, an icon “C” will be shown at bottom left of the grid. Right click on the grid to set the camera to be covert or not at CMS site. The preset is set to covert. This function is only available when CMS is logged in using accounts under admin group. 51 User’s Manual 7.2 Camera Setting / Camera Info. Configure Camera Setting: Camera setting can be configured by right clicking on a site and select <Camera Setting>. Camera viewing setting enables the user to set the display of Site Name, Channel Name, or Time on the top-left corner of the image. Camera sound notification enables preset sound file to be played when an alert event occurs. It can be set via Site Base or Channel Base: Setting via Channel Base: Select <Channel Base> from the menu and click <Load> to select a sound file. Then click <OK> to save the setting. Next right click on a channel grid to apply the sound setting by selecting <Sound Notification(On/Off)> from the pull-down menu. Note a message window will arise if sound file is not selected yet. Quick Hot Key: Click a channel grid and press the following keys: z Ctrl + n: Sound Notification ON z Ctrl + f: Sound Notification OFF NOTE: The sound files selected will be saved in CMS folder \Setting\SoundNotification\. NOTE: On the top-left of the grid will show [SN] to indicate sound notification is turned on. 52 User’s Manual Setting via Site Base: Select <Site Base> from the menu and check the option <Sound Notification enabled for All Channel> and/or <Same sound for all sites> as needed. Click <Load> to select a sound file. Then click <OK> to save the setting. The sites have the option <Same sound for all sites> checked will play the same sound, and the latest set sound will be played. Quick Hot Key: 1. Click a channel grid and press the following keys: z Ctrl + Alt + n: Sound Notification ON for all sites z Ctrl + Alt + f: Sound Notification OFF for all sites 2. Click a site in the Site Tree and press the following keys: z Ctrl + Alt + n: Sound Notification ON for the selected sites z Ctrl + Alt + f: Sound Notification OFF for the selected sites View Camera Info: The Camera Info can be viewed both in CMS and CMS Player. Right click on any channel grid and select <Camera Info.> from the pull-down menu to view the information. Refer to the following for examples: Camera Info of CMS Camera Info of CMS Player 53 User’s Manual 7.3 Display Mode The available display modes are single channel, 4-windows, 9-windows, 16-windows, 25-windows, 36-windows, 49-windows, 64-windows, 8-windows, 10-windows, and 13-windows. There are two arrow buttons at the left and right hand sides of the screen, as shown below. Click on the left arrow button to display images of the previous page. On the other hand, click on the right arrow button to display images of the next page. To view in single channel, double click on the channel in the site tree or on the grid. To view in multiple-window mode, right click on the desired icon and a menu will be display as on the right. The selections are described as the following. 54 User’s Manual Select from preview dialog: Choose this option and the picture as below will be shown. When the mouse pointed to any item, the preview display will be shown on the right. Double click on any item to display it on the viewing area. Select from page number: Choose this option and the picture as on the right will be shown. Select any page number to display the chosen page on the viewing area. Since the maximum channel connection is 512ch, the choices of page numbers for 4-windows display mode will be from 1 to 128. A control icon <X> is provided to exit without selection. 55 User’s Manual 7.4 Zoom In/Out Control via Mouse Both in CMS and CMS Player, zoom in/out can be easily control via mouse scroll wheel. Either in CMS or CMS Player, click on any grid that users wish to zoom in viewing area. Move the scroll wheel away from users to zoom in and the screen will show like the following picture. On the upper left-hand corner will show zoom-in multiple. The maximum multiple is X7. Also on the lower right-hand corner will show the position of current viewing area, shown as an inner white rectangle, comparing with the original screen, shown as an outer rectangle frame. In addition, the viewing area can be dragged and moved by left clicking and holding the mouse while moving. On a zoomed-in screen, the mouse pointer will change to and when the mouse is clicked the pointer will become to indicate that the image is dragged. NOTE: This function is not available in Dome Camera Control mode. Scrolling the wheel of the mouse will zoom in/out the camera lens of the dome camera. NOTE: This function will use up a lot of CPU resources. It is recommended not to open too many programs at the same time to avoid crash of CPU. 56 User’s Manual 7.5 Sequence Display To start displaying the sequence list, click on the <Sequence> icon to start the sequence. The color of the icon will change to red color when the sequence mode starts. The initial display mode will be what was set in sequence setting (2*2, 3*3, 4*4 or 5*5). Another way to start displaying the sequence list is by right clicking on the sequence icon and a list will be displayed as shown below. Move the mouse to any item and the preview window will be displayed on the right. This list gives choices to the user to begin displaying the sequence from any item. Double click on the desired item to start sequence mode. After the sequence is started, users can still change the split mode by clicking on the display mode icons for 2*2, 3*3, 4*4 or 5*5. However, the initial split mode set in <Sequence> will remain the same. Note that icons for 6*6, 7*7 or 8*8 will not be accessible because they are not allowed to be shown in sequence mode. The following functions are disabled in sequence mode: 1. Right click to see channel menu 2. Zoom In/Out 3. Drag and drop channels or sites to the display grids 4. Remove any channel grids on the display windows NOTE: If users enabled the <Event Full Screen> and an event is triggered while running the sequence, CMS will display event full screen. The sequence will not resume until event full screen ends. Click on the <Sequence> icon or the <Live> icon to exit the sequence mode 57 User’s Manual 7.6 Adjust the Image Both CMS and CMS player provide image adjustment function. Double click on a channel, then right click on it. Select <Image Adjustment> from the pull-down menu, and the image adjustment window will be displayed. Users can change the brightness, saturation, hue, and contrast of the channel. NOTE: The <Image Adjustment> option will only be available when viewing single-channel screen. Click the <Default> button to reset the value to the original preset. NOTE: The <Image Adjustment> function has no effect on the recorded video. Whatever changes made to the <Image Adjustment> will not be applied to the recorded video. 58 User’s Manual 7.7 Playback Recorded Video This function allows CMS users to retrieve and play videos stored in the connected DVR. Click on the <Playback> icon, a window will be displayed as below. <Valid Time> indicates that the connected DVR starts recording from a certain period of time and ends at a certain period of time. The other way to display the above windwo is to right click on the site in the site tree and select <Playback> Æ <Remote Playback> from the pull-down menu. Playback the video stored in HDD of the connected DVR Follow steps below to playback the video stored in the connected DVR. Step 1. First select <Playback> in “Function” area. Step 2. Specify the starting time for playback in “Selected time” area or by moving the arrow of the slider bar at the bottom. Then click <OK> to playback the video. 59 User’s Manual Save the *.drv files to the local computer Follow steps below to save the video to the local computer. Step 1. First select <Archive> in “Function” area. Then “Selected channel” area will be available for users to choose desired channels. Step 2. Specify the Start Time in “Selected time” area and click <set start> in “Function” area. Then specify the End Time and click <set end>. Alternatively, use the slider bar to select start time and end time. Click <OK> and specify the filename of the DRV file. Then CMS will start to download the video data. Close the <Archive> window to exit. Remote Playback of CMS Central Sites If users selected remote playback of CMS Central sites, two extra options will be displayed as below. When CMS Central is recording from the connected DVRs, users can playback and archive directly from CMS Central. The steps are the same as described above. 60 User’s Manual Playback video stored in the HDD of local computer If users wish to playback videos that have already been saved to the local computer, launch CMS Player. NOTE: CMS Player can only be started through CMS. If users try to start up the CMSPlayer.exe, an error message will be displayed. There are two ways to launch CMS Player. One way is to click on the <CMS Player> icon. Alternatively, right click on a site in the site tree and select <Playback> Æ <Local Playback>. Then CMS Player will be displayed. Click on the <Open Video File> icon as marked below. 61 User’s Manual The “Playback Search” window will be displayed as below. The following steps will guide users to playback designated videos. Step A. Select <CMS Data> and choose CMS server & group. Alternatively, select <DVR Data> and allocate a folder containing DVR HDD files. Step B. Select <Playback Video>. Step C. Select date of designated videos. Today’s date is in blue box, the date with video data is highlighted in brown, and the selected date is highlighted in blue. Step D. For playback of CMS Data, select sites. Click on <+\-> to select or deselect all sites. The selected site will change to gray color. For playback of DVR Data, there is no need to select sites, since it’s just the DVR itself. Step E. Scroll the slider bar to zoom in/out the displaying time. Step F. Point the cursor at designated time and double click to start playback the video. 62 User’s Manual Step G. Click on the <Open Video File> button to search for videos via file list. Users can also convert DRV files to AVI files here. Refer to the next page for instruction of conversion. NOTE: The recorded video of IP camera can only be played back by CMS player. Some errors might occur if playing back with DVRPlayer. Convert *.drv files to *.avi files Click on the <Open Video File> button in the “Playback Search” window, then the “Select a folder” window will be displayed. On the top center of this window, select <Convert To AVI> and double click on the file which users wish to convert. A “Conversion List” window will pop up and the file will be added to the list. The other way to add files to the list is to right click on the file and select <Add To List> or <Add All To List>. NOTE: The list can contain files from different folders. The messages shown on the conversion list windows are very important. If the duration of a DRV file is less than 3 seconds, the file will not be successfully converted. In addition, a link is provided for users to download and install video codec in order to playback the converted AVI files. 63 User’s Manual If users wish to remove any file from the conversion list, right click on the file and select <Remove> or <Remove All> to delete files from the list. Click <Convert> to start conversion of files on the list. A small window will be displayed as on the right to show the progress of conversion. If users wish to terminate the conversion, click <STOP> to abort. If the conversion is aborted, the status column will show “Break Off” for the specific file aborted. If the file failed to be converted, the status column will show “Fail”. If the conversion is completed, the message as on the right will be displayed. The converted files will be stored in the folder specified in file path setting of CMS Player. For more information about other CMS Player operations, please refer to the Appendix A. 64 User’s Manual Install required codec to playback converted AVI files In order to correctly playback converted AVI files, install K-Lite Codec Pack and select codec options as described below. 1. Check <Mu-law, A-law> & <MS ADPCM> under <Other audio formats (ffdshow)>. 2. Check <Microsoft> for <AVI splitter> under <DirectShow source filters:>. 65 User’s Manual 7.8 Configure the OSD Menu of the Connected Site The OSD menu of the connected site contains a list of items that are used to configure the connected site. Right click on the Site and select <Configuration> to open the OSD menu. When the mouse was not clicked or the keyboard was not typed for 5 minutes, the configuration window will be closed automatically. The OSD menus for DVR, IP camera, and Video Server are different from each other. Refer to the following for examples. OSD Menu of a DVR The pop-up window will show the OSD Menu of a DVR. Some items are not available in CMS setting condition. Please refer to User’s Manual and OSD Setup Manual of the DVR for detailed instruction. 66 User’s Manual OSD Menu of a IP Camera Please refer to User’s Manual of the IP Camera for detail instruction. OSD Menu of a Video Server Please refer to User’s Manual of the Video Server for detail instruction. 67 User’s Manual 7.9 Search for Event Videos CMS can playback and archive event videos stored in connected DVR and CMS Central. Right click on the Site and select <Event Search>, then the <Event Search> window will be displayed. Users can scroll down the event list to look for target event video. If the connected DVR has installed the POS module, users can either search by event or text. Playback the event video from directly connected DVR In <Search By Event> tab, select <Play Event> and double click on any item to playback the event video. The <Search By Text> tab allows users to search for text event videos of POS installed DVRs. 68 User’s Manual Playback the event video from CMS Central In <Search By Event(DVR)> tab, users can search and playback the event video stored in the DVR site. In <Search By Event(Central)> tab, users can search and playback the event video stored in CMS Central. The <Search By Text> tab is the same as on the previous page, which retrieve data from the DVR site. NOTE: CMS Central does not support the <Search By Text> function. 69 User’s Manual Archive the event video Select <Archive Event> and press the “Ctrl” key to select multiple event videos to be archived. The maximum items can be selected is 1,000, which is the capacity of the list. Click on <Start Archive> and an <Event Archive> window will pop up. The progress bar shows current downloading position. The status column shows the event is under “Archive”, “Wait”, or “Done” condition. NOTE: The event archive or normal video archive for different sites can be performed simultaneously. 70 User’s Manual 7.10 CMS Motion Detection Users can setup motion detection at CMS site individually. Right click on a desired grid and select <Motion Detection> from the pull down menu. The motion detection setting window is shown as below. Users can choose to monitor the complete screen or select up to 8 boxed areas after clicked on <Regional>. Click on <Clear> button to delete all selected areas. Alternatively, right click on any selected area to delete it individually. 71 User’s Manual Refer to the following for description of motion detection settings. Enable Function: Check on it to start monitor motion detection. Motion recording: Check on it and CMS will record event video when motion is detected. The length of event video will follow <Event Recording Duration> specified in Event setting. Show Motion Detection Region: Check on it to display the detection area visually on the monitoring screen. The boxes will also be captured and displayed on the snapshot images. Start Simulation: Click on it to start simulating motion detection. As shown above, red boxes will mark the motion areas. Stop Simulation: Click on it to stop simulation. Sensitivity: Setup a desired sensitivity level. Click on <OK> to apply the settings, or click on <Cancel> to disregard and return to Live mode. 72 User’s Manual 7.11 Missing/Foreign Object Detection The purpose of Missing/Foreign Object Detection function is for users to keep an eye on the important objects and areas. Right click on a desired grid and select <Missing/Foreign Object Detection> from the pull down menu. The object detected search window is shown as below. Users can setup at most 8 monitoring areas. Click on <Clear All> button to delete all boxes. Alternatively, right click on any single box to delete it individually. Sensitivity: Setup a desired sensitivity level. Interval: The time specified here is for determining the lost of objects. If an object is removed from the selected areas for more than the time specified here, lost of object alert will be triggered. Enable Function: Check on it to start monitor motion detection. 73 User’s Manual Show Region: Check on it to display the detection area visually on the monitoring screen. The boxes will also be captured and displayed on the snapshot images. Clear All: Click on it to clear all selected boxes. Apply: Click on it to save and apply settings in the configuration section. Start Simulation: Click on it to start simulating object detection. As shown in the previous page, green boxes will mark the lost of objects. Stop Simulation: Click on it to stop simulation. Live: Click on it to restore the Video Preview frame to live image. Lost of Object Alerts When lost of object alerts are detected, restore the object detected search window and the list on the left-hand side will show area number and time of the lost of object alerts. If the connected site is a DVR, double click on any item to playback video that is 15 seconds before the alert triggered. However, if the video is not added to the database yet, an error message will be displayed. NOTE: Only the configuration of area positions, sensitivity, and interval will be permanently saved. The default image will be replaced by the initial image every time when CMS restarts. Therefore, please check the configuration every time CMS starts up. NOTE: CMS Player also has Missing/Foreign Object Detection function, and it is slightly different from what’s in CMS. Refer to the appendix A for more details. Click on <OK> to apply the settings, or click on <Cancel> to disregard and return to Live mode. The selected boxes will not be shown on the live monitoring screen. NOTE: The “Motion Detection” function and “Missing/Foerign Object Detection” function can be enabled simultaneously. 74 User’s Manual 7.12 Take a Snapshot The Snapshot function is a simple screen capture tool. When users click on the <Snapshot> icon, it will capture the screenshot of the window that users are currently viewing. Users can save the screenshots to the default path “\CMS\Snapshot\” or the folder that users have previously set in the file path. Please refer to <Setup the File Path> for more information about changing the file paths. There are 2 ways to take the snapshot. One is to click on the <Snapshot> icon, and the snapshot window will be displayed. Select <OK> to save the file. The other way is to right click on the window, and select <Snapshot>. Note that it will only capture the image of the selected channel. The file will be saved without displaying the image. NOTE: The default image format is *.jpg. If users have selected more than one file types and took the snapshot, users will get more than one files of the same snapshot image. Please go to <Settings> to setup the snapshot file type. 75 User’s Manual 7.13 2-Way Audio Talk 2-way audio talk function enables the user to communicate with the camera side. Currently the only supported camera types are NH Series IP Camera and Video Server. Right click on the channel and select <Talk(On/Off)> from the pull-down menu. If the talk function is successfully enabled, “Talk” will be shown on button left of the image. The user can speak through the microphone now to communicate with the camera side. Currently supported 2-way audio types are: Camera Type Audio Type Video Server PCM audio type NH Series IP Camera ALaw and uLaw audio type NOTE: RTP OVER RTSP Stream Protocol of NH Series IP Camera and all other audio types currently do not support 2-way audio. NOTE: The communication mode is one to one. Broadcasting function currently is not available. 76 User’s Manual 7.14 Instant Record Function While the videos are usually recorded to the connected DVR, the user can choose to instantly record live and playback video clips to the local computer as an option. Right click on the Site and select <Start Recording> to start recording, and <Stop Recording> to stop recording. If time difference between CMS and the recording site is more than 1 day, a message will be displayed as below. While recording video and the mode is change from “Live” to “Playback”, the recording will be temporary stopped. The following message will be shown: When returning from “Playback” mode to “Live” mode, the recording will be resumed from stopping point. When the channels are being recorded, the title of the channels will show a capital letter “R” ( ) at the end. The recorded files will be saved to the default folder “\CMS\Record\”. NOTE: If the connection to the recording site is disturbed and then reconnected, the recording will be terminated without resumption. 77 User’s Manual 7.15 Dome Setting / Dome Control The users can also set/control the dome camera in CMS. Right click on the channel where a dome camera is properly installed. Refer to the following picture to see how they look like. Dome Setting: Select <Dome Setting> to setup the Dome ID or Dome Protocol. Note that dome protocol changed at this interface is only temporary. To permanently change dome protocol, please modify it in the configuration. Dome Control: The function of each button on the <Dome Control> panel is described below. A.F. (Auto Focus) Click on to focus the camera automatically. Set/Go Preset Point Click on to set a present point, and to go to the preset point. ID Click on to setup the Dome ID/Protocol. This function resembles to the <Dome Setting>. Focus This is used to manually focus on the objects. Click on the <Focus Near> / <Focus Far> icons to adjust the focus. Iris This is used to setup the iris. Click on the <Iris Open> icon let in more light, or the <Iris Close> icon to reduce the light. 78 User’s Manual Zoom This is used to zoom in/ out to the object. Click on the <Zoom In> / <Zoom Out> icons to adjust. It can also be adjusted by scrolling the wheel of the mouse. CMS zoom function will be disabled in dome camera control mode. Scroll toward the user to zoom out and away from the user to zoom in. Direction Button Click on the arrows to pan and/or tilt the dome camera. Speed Slider Bar The slider bar is used to adjust the speed of the pan/tilt movement. 0 is the slowest and 100 is the fastest. Mouse Control If the mouse is moved to the top/ bottom/ left/ right edge of the screen, a red triangle as in the picture on the right will show up. At this time left clicking the mouse can move the screen toward the direction where the red triangle points to. Zoom In/ Out using the scroll wheel of the mouse. NOTE: The <Dome Control> panel is different if the dome camera is connected through a Video Server. Refer to the following figures for detail information. There is an extra button (as circled in the picture on the right) that allows the user to enter and edit the OSD setup menu of the Video Server Camera. Click on <Enter> at center of the button to display the OSD setup menu on the camera screen. Then click on the arrows to make selection and changes. 79 User’s Manual 7.16 Schedule Record Function Users can schedule specific time to record the videos to the local computer. Schedule Record window will be displayed after clicked on the <Schedule Record> icon. The current setting site will be shown on the top of the Schedule Record window, as circled in the picture below. Alternatively, users can click on the <Select All> or <Clear All> buttons to setup all sites to always record or always not record at once. The scroll-down menu circled below shows the recording types. <OFF> Select this to switch off the schedule record function. <NORMAL AND EVENT> Schedule to record both the normal and event videos within the selected time frame. <EVENT ONLY> Schedule to record only the event videos within the selected time frame. 80 User’s Manual The scroll-down menu circled below shows the selecting options. <SELECT CELL> Choose this to select any cell from the table. <CLEAR CELL> Choose this to clear any cell from the table. <SELECT ALL CELL> Choose this to select all cells from the table. <CLEAR ALL CELL> Choose this to clear all cells from the table. Follow steps below for an example of setting schedule record for CMS. Schedule Recording Times Step 1. Select a site or a channel from the box on the right by a single click. When a site is selected, the same setting of schedule record will be applied to all channels. Click on a channel to set unique schedule record for the particular channel. In this example, schedule of a site will be set. Select a site in box 1, and set the recording option to <NORMAL AND EVENT> in box 2. 81 User’s Manual Step 2. Assuming that the site will be scheduled to start recording video from 2:00 to 4:30 on Tuesday and Wednesday. Since the duration of each cell is 30 minutes, click on the cell under 02 for Tuesday and drag to the cell under 04 for Wednesday; and the color of the cells will be changed to purple indicating that both normal and event videos are going to be recorded during the selected times. Step 3. After the time frames are selected, click <OK> to save and exit the Schedule Record window. Cancel Scheduled Recording Times If the user want to cancel a time frame from selected schedule, for instance, 3:00~3:30, set the selecting option to <CLEAR CELL> in box 1. Click and drag the cells under 03 from Tuesday to Wednesday. The cells will be blank which indicates that CMS is not going to record anything. Click on <OK> to save and exit the Schedule Record window. 82 User’s Manual Select/Clear All Cell If users want to set the schedule to record at all times, click on the circled blank cell located on top left corner of the table or set the selecting option to <SELECT ALL CELL>. If users want to reset the schedule of the site, set the selecting option to <CLEAR ALL CELL>. Click on <OK> to save and exit Schedule Record window. Select/Clear Cell by Date/Time Another way to select or clear time frame is by clicking on the Day or Time tabs. For example, when users click on <Tue> tab, the color of all Tuesday cells will be changed and the site is scheduled to record normal and event videos every Tuesday. When users click on 5:00~5:30 tab, color of all 5:00~5:30 from Monday to Sunday will be changed. Click on <OK> to save and exit Schedule Record window. 83 User’s Manual Special Schedule of a Specific Date If users wish to setup a special schedule for a specific date, simply select a date from the pull-down menu of <Holiday Setup> and click on <Add> button. At the bottom of the <Schedule Record> window, users can find a new row of the added date as shown below. Setup the schedule for that date, and the schedule record will only run once for that special day. 84 User’s Manual 7.17 E-MAP Function E-MAP is a function that allows users to illustrate the positions of the cameras on a self-selected image. Click on the <Emap> icon to open E-MAP window. Please follow the steps below to setup the E-MAP. Step 1. First load an image file by clicking on <Load Image> icon. NOTE: The image shown in the window is the default picture. It will only be available when default is installed. Step 2. The figure below is the Load Image window to add or delete images, and undo or confirm settings. Click on <Add> to add an image. Note that E-MAP only supports *.bmp, *.jpg, and *.gif files. 85 User’s Manual Step 3. After the image is added, the filename of the image will be displayed on the list. Index indicates the order, starting from “0”, of the files. After the image is loaded, click <Ok> to confirm and save the setting. Step 4. Select the image file that was loaded to E-MAP from the scroll menu <Please Select Image>. Step 5. The chosen image will be displayed in the E-MAP main window. The image of a grocery store is used in the following example. Drag and drop a channel from the site tree to any desired position of the image. Right click on a camera icon can remove it or rotate its pointing direction, including North, Northeast, East, Southeast, South, Southwest, West, and Northwest. 86 User’s Manual Step 6. When the mouse pointer moves over a camera icon in the image, an information dialog box will be displayed as below picture marked #1. Double click on any camera will display the live preview image of the camera. When a camera icon is clicked, the camera live preview window will be highlighted if it’s been displayed, as above picture marked #2. Otherwise, the corresponding channel in the site tree will be highlighted as shown in below picture. 87 User’s Manual NOTE: The camera live preview window is limited up to three instances at the same time. Step 7. Right click on the camera preview window to display the camera control menu. The menu items includes: Snapshot, Talk(On/Off), Dome Setting, Dome Control, Sound Notification(On/Off), and Camera Info. Camera Icons: There are three different types of camera icons in E-MAP: dome camera, fixed camera, and alert icons. Dome Camera icon Fixed Camera icon Alert icon Dome camera icon will be displayed when the selected camera is a PTZ (pan/tilt/zoom) dome camera. Fixed Camera icon will be displayed when the selected camera is a fixed camera. Alert icon will be displayed when an alert is triggered to the camera on the image. The alert icon will blink to attract attention. Change Emap Size: Users can adjust the display size of the image on E-MAP by clicking on the icons described as below. <Original>: To display the original size of the image. <Double>: To double the size of current displayed image. <Half>: To reduce current displayed image size by one half. <Fill>: To adjust the image to fit display window (refer to figure on the right). NOTE: If there is no image file loaded on the Emap window, an error message will be shown when clicked on any of the four buttons above. NOTE: When the image is very large, or when users cannot see the entire image in the display window on the right, click on a channel in the site tree and the E-MAP will automatically move to the location of the selected channel. 88 User’s Manual 7.18 Health Function This is a function that verifies the HDD status of the DVR sites in current connected group. Click on the <Health> icon and a progress bar will be shown to indicate that the information is being retrieving. The following figure is an example. Note that since IP cameras do not have connected HDD, they will not be shown in the chart. The information items shown in the chart are described as below: Device Name This item shows the model name of the HDD. Internal/External This item indicates whether the HDD is an internal or external device. Total Size This item indicates the total size of the HDD. Active/Non Active This item indicates whether the HDD is active or non-active. Temperature This item indicates the current temperature of the HDD in Celsius degree. NOTE: Temperature data is not retrievable for some specific models. Under Temperature column, it will show “Not available”. 89 User’s Manual 7.19 Lock Function The Lock function allows the user to protect CMS from unauthorized use when there is need to be away from the computer for a while. Closing CMS is not allowed and other functionality will be limited as described below. Click on the <Lock> icon and a confirmation message will be displayed as on the right. Click “Yes” to confirm. After the user clicked “Yes”, the icon will be changed to show that CMS is currently being locked. When the user clicks unlock, the window as shown on the right will be displayed for the user to enter username and password to unlock. To unlock, the following are two scenarios: Login Account Unlock Account Note 1 User - Login User - Any Administrator The access authority will still be User’s limit. 2 Administrator - Login Administrator If password is changed, use new password to unlock. When CMS is locked, windows control will be as the following two types: Type 1 Setting Example Windows Control Setting, Schedule Record, Emap, Dome Control, etc The windows will be closed without saving changes. It is recommended to save settings before locking up CMS. 2 Monitoring Archive, Alert, etc. It is not allowed to close the window but just minimize it. NOTE: If CMS is forced to be closed while it’s locked, CMS system will still be locked when it is started up again. NOTE: If the password of the current login account is changed, use the new password to unlock. 90 User’s Manual 7.20 Joystick Control Function When a joystick is connected, it can work in Mouse Control mode and Dome Camera Control mode. Refer to the picture on the right for a sample of joystick. The requirement of the joystick is as the following: 1. 2. 12 buttons X, Y, and Z axis Press button “8” to change between mouse or dome camera control modes. However, if the selected camera is not a dome camera, the joystick can only be in Mouse Control mode. NOTE: Only the first launched CMS server can use joystick control function. When CMS detects an available joystick, CMS icon in the system tray icon will change to a joystick icon. In addition, a message will be shown to tell current control mode: mouse control or dome camera control. Right click on the joystick icon and a menu will be shown as on the right. Select <Joystick control (On/Off)> to switch on/off joystick control. Select <Show joystick function> will display a hint screen showing functions of the keys according to the control mode, either mouse control or dome camera control. 91 User’s Manual Whenever the joystick control mode changes, a message will be shown at the system tray to inform the user. Refer to the following tables for controlling options: Under Mouse Control Mode: X axis Left / Right movement Y axis Up / Down movement Z axis Clockwise to speed up; Counterclockwise to slow down movement 8 Change to Dome Camera Control mode 11 Left clicking key 12 Right clicking key Under Dome Camera Control Mode: X axis Move dome / OSD menu selecting left or right Y axis Move dome / OSD menu selecting up or down Z axis Clockwise to zoom in; Counterclockwise to zoom out 1 Slow down movement 2 Speed up movement 3 Focus Far 4 Focus Near 5 Iris Close 6 Iris Open 7 Auto / Manual Focus 8 Change to Dome Camera Control mode 9 Enter OSD Menu (IP Dome) 10 Function as ENTER key in OSD Menu (IP Dome) 11-12 92 No function User’s Manual Appendix A: CMS Player CMS Player is a compact version of the standard DVR Player. When multiple CMS instances are opened in multiple monitors, each CMS can launch 1 CMS Player. The main window of CMS Player is shown below with the name of the buttons. 1 Slider Bar 2 Playback Speed Indicator 3 Site Tree 4 Audio 5 Display Modes: 2X2, 3X3, 4X4, and FULL SCREEN 6 Open Video File, Frame View Setting, File Path Setting, and Snapshot 7 Playback Controls: Fast/Step Backward, Play/Pause, and Fast/Step Forward The usage and function of each button will be described in the following paragraphs. 93 User’s Manual Slider Bar Click and drag the bar to search through the video. ▼Slider Bar Playback Speed Indicator▲ Playback Speed Indicator The Speed Indicator shows playback speed in forward or backward direction. z > indicates forward playback while < indicates backward playback. z The playback speed can be *1, *2, *4, *8, *16, or *32. Site Tree The site tree shows the channels of the opened DRV file. Double click on a channel to view the selected channel in one screen. Right click on the site tree can choose to expand or collapse site tree. Audio Click on the <Audio> icon located underneath the site tree to enable or disable the audio of the opened DRV file. Display Modes Click on the <2X2>, <3X3>, or <4X4> icons to view the camera images in multiple window mode. Click on the <FULL SCREEN> icon will enlarge CMS Player window to fit full screen. The other way to change CMS Player window to normal or full screen mode is by right clicking on any grid and selecting the option <Full/Normal Screen>. Note that by pressing <Esc> key on the keyboard, CMS Player window can also return to normal screen mode from full screen mode. NOTE: Image Adjustment and Camera Info. are described in the previous sections. Missing/Foreign Object Detection will be introduced later on. 94 User’s Manual Open Video File Click on the <Open Video File> icon to display the “Playback Search” window. Users are allowed to playback, export, or delete videos. The instruction of video playback is illustrated in section Playback Recorded Video. The followings will be details about video exportation and deletion. Export Video: Refer to below for steps of video exportation. Step A. Select <CMS Data> and choose CMS server & group. Alternatively, select <DVR Data> and allocate a folder containing DVR HDD files. Step B. Select <Export Video>. Step C. Select date of designated videos. Today’s date is in blue box, the date with video data is highlighted in brown, and the selected date is highlighted in blue. Step D. Click and drag the cursor to select designated videos. Step E. The start and end time of the selected video will be displayed here. 95 User’s Manual Step F. Click on the <Start> button. A window will pop up, and users are allowed to enter a filename and select video type (AVI or DRV) through the window. Then click on <Save> to start the exportation. Delete Video: Only when the current CMS login account is in the admin group, will the video deletion function be available. Refer to the following for step by step instruction. Step A. Select <CMS Data> and choose CMS server & group. Note that DVR data does not support purge function. Step B. Select <Purge>. Step C. Select date of designated videos. Today’s date is in blue box, the date with video data is highlighted in brown, and the selected date is highlighted in blue. Step D. Click and drag the cursor to select designated videos. Step E. The start and end time of the selected video will be displayed here. Step F. Click on the <Start> button and a confirmation dialog will be displayed. Enter correct username and password to start the deletion. 96 User’s Manual Event List: In addition, users can also playback and export event videos via searching through the event list. Click on the <Event List> button on the upper right hand corner of the “Playback Search” window. The “Event List” window will be displayed as on the right. Refer to below for the instruction. First set searching criteria in Box A and click on the <Search> button. The event videos satisfied the searching criteria will be listed in Box B. If the list contains more than 1000 event videos, click on the <Previous> and <Next> buttons in Box D to see more selections. In Box C, users can choose to playback or export event videos. Select <Play Event> and double click on any item in Box B to playback the event video. Alternatively, select <Export event> and a <Start> button will appear at the bottom. Press Ctrl key to select multiple files and click on the <Start> button to begin exporting the event video(s). NOTE: For event search of DVR data, the <CMS>, <Group> and <Site> in Box A will be inaccessible. Video Type Display: The chart in the middle of the “Playback Search” window allows users to assign unique color displays to represent different types of video data. Double click on any cell under the “Color” column and choose a preferred color to represent the corresponding video type. 97 User’s Manual Frame View Setting The user can choose to show/hide the time and alert text on the video. Click on the <Frame View Setting> icon, and the View Setting window will be displayed. Check <ShowTime>, and the time will be shown on the screen. Check <Show Frame State>, and the alert text such as motion, or video loss will be shown. Uncheck to hide the information. File Path Setting Click on the <File Path Setting> icon to preset file paths for AVI conversion files and snapshot files. Click on <Browse> to select desired folders. In addition, file type of snapshot pictures can also be selected: Bmp, Jpg, Gif, or Tif formats. After the settings are selected, click on <Save> to save. 98 User’s Manual Snapshot Click on the <Snapshot> icon to capture a snapshot of the screen. When the snapshot window is opened, users can choose to rename the filename or leave it as it is. Click on <OK> to save the snapshot or <CANCEL> to discard it. Playback Controls Play/Pause: Click on to start playing back the video. The icon will change to video is now playing. Click on to pause playing back the video. showing that the Fast/Step Backward: Click on to play the video fast backward. When the playback of the video is paused, click on this icon to move one step backward. Fast/Step Forward: Click on to play the video fast forward. When the playback of the video is paused, click on this icon to move one step forward. 99 User’s Manual Missing/Foreign Object Detection Right clicking on any grid with video and select the option <Missing/Foreign Object Detection>. The basic configuration of Missing/Foreign Object Detection function in CMS Player is the same as what is in CMS. Please refer to section Missing/Foreign Object Detection for more details. This section will introduce the different part of the Missing/Foreign Object Detection function in CMS Player. Quick Search: Click on it to quick skim through the video for object search of the selected area(s). The list will be filled when foreign or lost of object alert(s) found. Stop Quick Search: Click on it to stop quick search. 100 User’s Manual Assign a Channel to Certain Grid Similar to CMS, CMS Player also allows users to assign any channel in the site tree to any grid of CMS Player main window. Follow steps below to complete assignment. Step 1: Click and hold the channel users want. Step 2: Drag and drop it onto the window that users want to assign in. Resort/Remove Displaying Grid Right click on any channel and select <Re-sort> to restore the original layout. In addition, users can also remove any channel by right clicking on the grid and select <Remove>. Alternatively, users can select any grid and press <Delete> key on the keyboard to remove the channel. NOTE: Selecting <Re-sort> will restore the removed channels, or users can add a channel back to any grid via drag and drop. Image Adjustment Image adjustment function in CMS Player is the same as in CMS. Please refer to section Adjust the Image for more details. Camera Info. Camera Info. function in CMS Player is the same as in CMS. Please refer to section Camera Setting / Camera Info. for more details. 101 User’s Manual Appendix B: Troubleshooting The followings are some common situations when the user is having difficulty with CMS server. 1. CMS server does not work properly. How can it be recovered or where can I ask for help? Please try the following ways to recover it first. A. Please check if the computer meets the system requirement. B. If CMS automatically closes when it’s starting up or connecting to sites, please send the files stored in \CMS\Setting\ under improper operation condition. Afterwards, re-install CMS and check to install Default Setting during installation. Remember not to import old setting files. This will tell whether if the old setting data are corrupted. C. If CMS cannot successfully connect to sites, check the followings. Confirm IP, port, username, and password of the site. Users can connect to the site via IE browser to verify the site exists and is connectable. z Close firewall and virus scan software and try to connect again. If the problem is due to firewall or virus scan software, please change their settings. z If the connection still failed, please send the IP address to our engineer. z NOTE: When users need to ask for the engineer’s help, please send a copy of the files stored in \CMS\Log\ as well. 102 User’s Manual 2. CMS server takes up too many HDD space. We have found that the preset of the virus scan software “NOD32” will automatically create a temporary file under windows system temporary folder when CMS connects to sites. This temporary file will automatically increase the size which causes the HDD became lack of space. Please go to the control center of the NOD32 and disable IMON. Then the problem should be resolved. The following pictures are examples. 3. The PC crashed while playing back the AVI file exported from DVR or converted by CMS Player. Click <Start Menu> and select <Run>. Then input “cmd regsvr32 /u shmedia.dll” and click <OK>. Playback the AVI file again and the problem shall be solved. 103