1
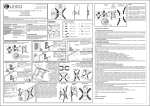
USER MANUAL
ROOF EDGE PROTECTION
Australian Scaffolds
Tel: 1300 919 905
www.australianscaffolds.com.au
[email protected]
Table of Contents
Page
1.
Design Information and Duty Ratings ................................................. 3
2.
Storage & Maintenance ...................................................................... 3
3.
Access & Safety.................................................................................. 4
4.
Transport ............................................................................................ 8
5.
Erection............................................................................................... 8
6.
Safe Working Practice ...................................................................... 13
7.
Adverse Weather .............................................................................. 13
8.
Dismantling ....................................................................................... 13
Disclaimer ................................................................................................. 14
2
Australian Scaffolds
Roof Edge Protection
Information & User Manual
1.
Design Information and Duty Ratings:
1.1 - Live Impact Rating Load : 600N
- Maximum Span between Hand Rail Posts : 2.4 metres
- Maximum roof slope 35 degrees
- Note: the live load duty ratings are as specified by
AS/NZS 4994.1: 2009
2.
Storage & Maintenance:
2.1 All components must be stored off the ground and in an area
away from corrosive substances.
2.2 While in storage all components must be provided with suitable
protection from mechanical damage.
2.3
When Roof Edge Protection is not being used, it should be stacked
in a neat and safe manner in a way that is not dangerous to others.
2.4 Components left in the weather, should be stacked in such a way
as not to collect rain water.
2.5 Report any damaged components to your employer or the owner of
the scaffold for repairs or replacement. Stack damaged items
separately.
2.6 Components should be cleaned regularly as they can become
blocked with cement or other debris, which may obstruct the
component parts from going into each other.
2.7 All components are galvanized, any build-up of mortar and other
materials must be cleaned off.
.
2.8 Carry out regular maintenance and inspection of all component
parts to ensure they are free of damage and operate freely.
2.9 All component parts are to be inspected before use and any
damaged items should be tagged “out of service”.
2.10 Damaged items should be returned to your supplier for assessment
and repair recommendations. Repairs to be carried out only by
authorized personnel.
3
3.
Access & Safety:
3.1 Although the required access may vary with each scaffold
arrangement, it will be necessary for all access ladders to comply
with Australian Standards, be of sound condition and be secured at
each landing.
3.2 Ladder access can be made by installing Ladder Access at
appropriate intervals in the Roof Edge Protection guard rails.
3.3 A scaffold must not be erected within 4 metres of low voltage
power lines, such as to a residence. Where it is necessary to erect
a scaffold closer than 4 metres to low voltage power lines or where
there is doubt of the voltage, do not proceed without written
authority from the local power supply authority. Note: Victorian
regulations require clearances of 4.6 metres horizontally and 5
metres vertically from the overhead wires.
3.4 Make sure you are wearing appropriate Personal Protective
Equipment.
3.5 Do not lift any gear up on a scaffold using a pulley, block, hook or
fitting that is visibly worn, cracked, rusted or otherwise damaged
3.6 Do not lift any gear up on a scaffold if the hoisting rope is frayed,
torn or visibly damaged.
3.7 Do not use any scaffold tagged “Out of Service” or “Scaffold
Incomplete”.
3.8 Do not sit or climb on the guardrails.
3.9 Do not lean out from the guardrails.
4
4.
Roof Design Type and System Selection :
5
5.
Transport:
5.1 Roof Edge Protection components can be easily damaged during
transport so care must be taken when arranging their loading and
placement on the vehicle. Components may be transported in
either the vertical or horizontal position but must always be lashed
in bundles of not more than 10.
5.2 Note: Where suitable mechanical protection cannot be provided,
top loading should be considered.
5.3 Roof Edge Protection components are best transported and stored
in the S1 Stillage provided.
6.
Erection Guidelines:
6.1 Roof Edge Protection over 4.0 metres high must be erected by a
competent licensed (ticketed) scaffolder.
6.2 Hand Rail Posts must not exceed a 2.4 metre span.
6.3 Where a roof slope exceeds 35 degrees, roof edge protection
should be specifically designed.
6.4 All Guard Rails should be secured on each corner with a Swivel
Coupler. All guard rails meeting mid span must be secured with a
Double Coupler.
6.5 A minimum of two people are required to erect an Australian Scaffolds
system. A component list and unit weight is provided on Page 10.
6.6 Make sure the base structure, roof rafters and/or wall studs are
secure and soundly fixed.
A Roof Edge Protection system must not be erected on any
structures that have not been completed.
6.7 Do not use any component that shows signs of damage. Always
check to make sure all components are well maintained and
suitable for use.
6.8 Seek expert advice if the roof edge protection system is to be set
up in an unusual, dangerous or unfamiliar work area.
6.9 Select the Roof Edge Protection system that will best fit the job and
proceed to Erection Steps
6
Australian Scaffolds
Component List and Unit Weights
Stock
Item No.
Component Description
Size mm
Weight
(Kgs)
Drawing
Number
400
401
402
403
404
405
406
407
S Bend
L Bend
Hand Rail Post
Swivel Coupler
Universal Bracket
Gable Bracket
Ladder Access
Z Bend
620x260x40
790x450x40
1060x100x30
125x80x50
310x170x160
135x100x35
1200x620x30
565x350x40
3.1
3.1
2.6
0.5
3.8
0.6
4.3
2.3
H8/400
H8/401
H8/402
H8/403
H8/404
H8/405
H8/406
H8/407
408
409
410
411
412
054
Iron Roof Bracket
WA Bracket
4.0M Guard Rail
Double Coupler
Retaining Wall Bracket
S1 Stillage
700x420x240
400x220x100
4000x30x30
125x80x50
620x220x40
680x680x695
6.5
3.6
4.0
0.5
4.8
17.
H8/408
H8/409
H8/410
H8/411
H8/412
HS/S1
7
6.9 SIMPLE STEPS TO ERECTING AUSTRALIAN SCAFFOLD
ROOF EDGE PROTECTION SYSTEM
Step 1
Start with the bracket to suit the system chosen, most commonly
Universal Bracket. Attach to roof rafter or wall stud using the tightening
bolts to position it and enable fitting either the L Bend, S Bend or Z
Bend.
Step 2
* Secure the Universal Bracket to timber rafter / wall stud using three
10x50mm self-tapping roofing screws through the holes provided in the
Universal Bracket.
* When anchoring to steel rafters or wall studs use 10x30mm self
tapping drilling screws for metal.
* When anchoring to concrete use 10x30mm self tapping drilling screws
for concrete.
Step 3
Select next rafter / wall stud anchor point no more than 2.4m span.
Step 4
Secure the next Universal Bracket and repeat along the perimeter of the
roof.
Step 5
Insert extra Universal Brackets at corners to ensure span does not
exceed 2.4 metres .
Step 6
Insert the L Bend or S Bend or Z Bend as system selected to be used to
complete the mounting bracket
Step 7
Insert the Hand Rail Post into all completed mounting brackets around
the perimeter of the roof with loops facing inward.
Step 8
Insert bottom Guard Rail sliding it through to the next Hand Rail Post.
Repeat for mid and top Guard Rails
Step 9
Cut Guard Rail at corners to fit. Do not leave any protruding Guard Rails
that could interfere with workers on the roof.
Step 10
Connect all mid span Guard Rails using a Double Coupler so that Guard
Rails are joined by overlapping 300mm
8
Step 11
Connect all corner Guard Rails using a Swivel Coupler making sure
internal protrusions are no more than 100mm
Step 12
Select and provide space for ladder access. Fit 3 x Ladder Access
Brackets, one each to the top, middle and bottom guard rails, using
Double Couplers. At no time should access be attempted through or
over the Guard Rails.
Step 13
Tighten all hand bolts on Hand Rail Posts to make the complete system
secure
.
Step 14
Check when using the L Bend that more self-tapping roofing screws may
be required in the holes provided for extra stability.
Step 15
Check all Universal Brackets and the completed mounting with the Hand
Rail Posts in place are secure.
Step 16
Check all Guard Rails are secure and cannot slide.
Step 17
For gable ends, attach the Gable Bracket using 4 x 10x50mm selftapping roofing screws and repeat steps above. Span not to exceed 2.4
metres. Check and follow Step 2 when installing on Steel or Concrete
gable ends.
Step 18
For existing iron roofs use an Iron Roof Bracket placed on top of the
existing roof cladding. Use spacer bar to correctly position bracket
over the roof battens and secure by tek screw using 10x50mm roofing
screws. Repeat steps above to achieve a secure roof edge protection.
Span not to exceed 2.4 metres.
Step 19
For retaining wall protection, fit a Retaining Wall Bracket and repeat
steps above to achieve a secure barrier edge protection. Span not to
exceed 2.4 metres.
7.
Safe Working Practice
7.1 Once the Roof Edge Protection system has been erected and
accepted as a safety barrier, the users are responsible for using the
barrier in a manner that minimises risk to themselves and others.
Your employer must ensure you have sufficient knowledge or
experience to do so.
9
7.2 Do not lean any working materials on the Guard Rail or use them
for any sort of leverage.
7.3 Any building debris and waste material should be progressively
removed. Debris generated during use should be confined within
the working platform. Working debris must not be allowed to
fall from the working area. Use chutes for debris or lower
materials/debris by hoist.
7.4 Electrical leads or equipment used erecting the Roof Edge
Protection system must be tagged with a recent date inspection tag
and are in good working order.
7.5 Where the Roof Edge Protection is in close proximity to power
lines, the handling of reinforcing steel rods and other long metal
items should be carried in a manner that preserves the safe
minimum distance of 4 metres from the power lines.
7.6 Roof Edge Protection is made from steel and is electrically
conductive. Any faulty electrical equipment used could result
in a fatal injury.
8.
Adverse Weather
8.1 In adverse weather conditions such as rain or snow, special
precautions should be taken to ensure that work can be done
safely. You may need a safety harness when working on slippery
surfaces.
8.2 DO NOT work installing Roof Edge Protection in high winds.
9.
Dismantling
9.1 Once finished with the Roof Edge Protection make sure any
unused material, debris and rubble are cleaned or removed to
ensure a clear working area
9.2 When dismantling the Roof Edge Protection work from top to
bottom starting at one end and working towards the other end one
bay at a time. All pieces must be passed or lowered down one bay
at a time.
9.3 Do not drop or throw scaffolding as it could result in the injury
of others or damage to the equipment.
9.4 The first items removed should be the top guard rails, followed by
the mid guard rails and the bottom guard rails.
10
9.5 The Hand Rail Posts are removed and lowered down followed by
the L Bend, S Bend or Z Bend whichever was used.
9.6 The Universal Bracket can now be detached and lowered.
Safety glasses are recommended to avoid loose debris getting
into your eyes and helmets must be worn.
Complete the removal of all items from one level before starting on
the lower levels. The remainder of the scaffold is dismantled
following this pattern, working from one end to the other and then
going down to the next level.
Disclaimer
This guide provides general information about the obligations of
employers and users of Australian Scaffold’s Edge Protection
Systems to maintain safe work practices. However, this guide is not
intended to represent a comprehensive statement of the law or
substitute for legal advice. Should legal advice be required you
should contact WorkCover / Worksafe in your state.
11