1
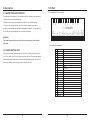
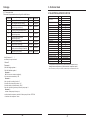
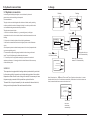
HH8 Domestic Heat Pump
Installation and Operation
Manual
code:20111102-0001
Contents
8-Maintenance
8.1 Malfunction table
You could determine or remove failures according to the following malfunction table:
Malfunction
Reason
Solution
WATER IN
Temp. Sensor is open or
Short circuit.
Check or replace the water inlet
temp. Sensor.
WATER OUT
Temp. Sensor is open or
Short circuit.
Temp. Sensor is open or
Short circuit.
Check or replace the water
outlet temp. Sensor.
Check or replace the Coil 1temp.
Sensor.
PIPE TEMP 2
Temp. Sensor is open or
Short circuit.
Check or replace the Coil 2temp.
Sensor.
AMBIENT TEMP
Temp. Sensor is open or
Short circuit.
Check or replace the ambient
temp. Sensor.
TEMP DIFFERENCE
PROTECT
Outlet water
temperature is too low.
Check the flow volume to see
whether it meets the requirements.
TOO COOL FAILURE
Check the flow volume to see
whether it meets the requirements.
FROSTBITE 1 PROTECT
Outlet water
temperature is too low.
Ambient temperature
is too low.
FROSTBITE 2 PROTECT
Ambient temperature
is too low.
PIPE TEMP 1
SYSTEM 1 PROTECT
SYSTEM 2 PROTECT
WATER FLOW
System protection failure
of system 1
System protection failure
of system 2
1. Water flow volume is not enough.
2.No water in water loop.
Check all the protection devices of
system 1.
Check all the protection devices of
system 2.
Check the flow volume to see the
water system is block or not.
POWER PHASE
(SYSTEM PROTECT)
Power supply connection
failure
Check the power supply connection.
TEMP DIFFERENCE
ERROR
Outlet water
temperature is too low.
Check the flow volume to see
whether it meets the requirements.
Communication failure
between remote wire
controller and main board
Check the wire connection between
remote wire controller and main board.
FROSTING
COMMUNICATION
FAILURE
8.2 You can judge and remove the malfunctions according to the malfunction code display
on the PROTECT 300
Display
Name
Refrigerant freezing
Refrigerant leakage
Action
Reason
Refrigerant temp. too
low from tube outlet
Refrigerant temp. before
tube inlet too low
Unit stops
and alarm
Unit stops
and alarm
Unit stops
and alarm
Unit stops
and alarm
Recover
(yes or no)
Revolution
Yes
Reduce refrigerant
Yes
Increase refrigerant
Yes
Check through the pressure
switch and return system
Yes
Check through the refrigerant
system
Compressor exhaust
temp. too high
Over-current
on compressor
Low pressure
switch action
Compressor exhaust
temp.too high
Current through
compressor too heavy
High pressure
High pressure
switch action
Unit stops
and alarm
Unit stops
and alarm
Yes
Check through the power supply
for compressor or short circuit
Check through the pressure
switch and return system
Temp. sensor before
tube failure
Temp. Sensor open
or short circuit
Unit stops
and alarm
Yes
Check and renew the sensor
Tube outlet temp.
sensor failure
Temp. Sensor open
or short circuit
Unit stops
and alarm
Yes
Check and renew the sensor
Exhaust temp.
sensor failure
Power supply
wrong connection
Temp. Sensor open
or short circuit
Unit stops
and alarm
Yes
Check and renew the sensor
Wrong connection
or lack of connection
Unit stops
and alarm
Yes
Check the connections
Low pressure
24
Yes
Pages
1 SAFETY PRECAUTIONS
Warnings .............................................................................................2
2 DESCRIPTION
2.1 Dimensions ....................................................................................3
2.2 Inspection and storage ....... ....... ....................................................4
2.3 Handling the unit ....... .......... .........................................................4
3 TECHNICAL DATA
3.1 Electrical specifications.................................................. ................ 5
4 INSTALLATION
4.1 Installation location ............... ........................................................6
4.2 Fitting the unit ................... . ..........................................................6
5 HYDRAULIC CONNECTIONS
5.1 Hydraulic connections .............................................. .....................6
5.2 Connection of the chilled water loop ................................................ 9
5.3 Drainning.......................................................................... .......... 9
5.4 Treminal insulation ........................................................................ 9
5.5 Starting operation ......................................................................... 9
5.6 Saffety differencial pressostat ........................................................ 10
5.7 Hydraulic module ..................................................................... ..... 10
6 ELECTRICAL CONNECTION
6.1 Electrical connection ..................................................................... 11
6.2 Appearance & terminal meaning of Chiller 300 ..................................12
6.3Appearance & terminal meaning of PROTECT 300 .............................13
7 ELECTRICITY
7.1 The displaying of the wire controller ................................................ 14
7.2 How to use wire controller ......................................................... .....14
7.3 how to choose mode ...................................................................15
7.4 how to know the current status? .......................................................15
7.5The unit`s operation data .............................................................. 16
8 Maintenance .............................................................................. .....17
1
1-Safety precautions
8-Maintenance
ELECTRICAL POWER MUST BE SWITCHED OFF
BEFORE STARTING ANY WORK ON JUNCTION BOXES
The aim of this manual is to provide instructions for installation, commissioning, operation.
WARNING !
Take care !
The installation, commissioning and
maintenance of these machines should be
performed by qualified personnel having a
good knowledge of standards and local
regulations, as well as experience of this
type of equipment.
The unit should be handled using lifting and
handling equipment appropriate to the unit's
size and weight.
Take care !
It is forbidden to start any work on the
electrical components without switching off
the electrical supply to the unit.
WARNING !
Any wiring produced on site must comply
with local electrical regulations.
Take care !
It is forbidden to start any work on the
electrical components if water or high
humidity is present on the installation site.
WARNING !
Ensure that the electrical supply
corresponds to the specification indicated
on the unit's maker's plate before
proceeding with the connection in
accordance with the wiring diagram
supplied.
Take care !
When the unit is being connected, ensure that
no impurities are introduced into the pipe
work and the water circuits.
Take care !
WARNING !
A mesh filter must be provided on the
hydraulic pump and in exchanger water inlets.
The unit must be EARTHED to avoid any
risks caused by insulation defects.
TAKE CARE !
Before proceeding with any intervention on the machine,you must be sure that
the electrical supply is switched off.
Servicing and maintaining the units must be carried out by qualified refrigeration
technicians.
Repeated triggering of safety and control devices must be thoroughly investigated
and corrected before any further re-occurrence.
The simplicity of the cooling circuit isolates it from any problem that might occur
during operation. Thus, no work on the cooling circuit is required providing that the
unit operates satisfactorily.
However, it is advisable to carry out a certain number of preventive operations in
order to maintain the unit in optimum working order.
These operations essentially consist of standard checks (checking operating
temperature settings, checking voltages and currents, checking water flow and
temperatures, etc...) and should be carried out every 6 months and after the unit has
been out of service for prolonged period (during the winter).
PREPARATION FOR SHUTTING DOWN THE UNIT FOR A PROLONGED PERIOD
The following recommendations should be taken intoconsideration:
After stopping the compressor, stop the circulation pump.
If the installation does not contain glycol, the evaporator and the chilled water
pipes need to be carefully and completely drained of water.
FAN BEARINGS
The fan bearings are of the¡greased for life¡type. These bearings require no
greasing. However, check every 6 months, that there is no abnormal wear on these
moving parts.
ELECTRICAL TERMINALS
However, check the screw terminal block every 6 months.
WARNING !
No wiring must come in contact with the
heat source or the fan rotating parts.
CONDENSER COILS
The condenser coils do not require any special maintenance,except when they are
clogged by paper or any other foreign bodies. In corrosive atmospheres, provide
for suitable protection. Cleaning is by washing with detergent and water at low
pressure, and then rinsing with clean water.
WARNING !
Preparation for shutting down the unit for a
prolonged period if the installation does
not contain glycol, the evaporator and the
chilled water pipes need to be carefully and
completely drained of water.
EVAPORATOR
The direct expansion evaporator comprises a tube in tube exchanger . These
evaporators require no specific maintenance, but a mesh filter (mesh < 1 mm) must
be fitted on the evaporator chilled water inlet in order to prevent the ingress of
impurities which could clog the evaporator.
The Manufacturer ' s warranty will not apply if the installation
recommendations listed in this manual are not followed.
2
EXPANSION
The capillary expansion device requires no specific maintenance.
PUMP
The pump requires no specific maintenance.
23
7-I/O Port
2-Description
6.2 Connection of PCB illustration
1
µ
Á
¼
²
2
µ
Á
¼
²
3
4
T
R
S
N
Models :HH8
PROTECT 300
Front view
Top view
Water inlet
(1 inch)
Pressure gauge
760
Drainage
(1/2 inch)
Connections explanation:
MEANING
NO.
SYMBOL
1
HINGH2 GND
2
LOW2 GND
Low pressure protection for system2£normal close£
3
HINGH1 GND
High pressure protection for system1£normal close£
4
LOW1 GND
Low pressure protection for system1£normal close£
5
SYS GND 12V
6
SW
7
CMP2
8
OUTW2
Tube temp. Of system 2
9
INW2
Tube temp. Of system 2
10
CMP1
Exhausting temp. Of compressor1
11
OUTW1
Tube temp. Of system 1
12
INW1
Tube temp. Of system 1
High pressure protection for system2(normal close)
Protection signal
Current setting(handest)
Exhausting temp. Of compressor2
22
1115
Water outlet
(1 inch)
470
1INW
1OUTW
1CMP
2INW
2OUTW
SW
2CMP
GND
SLCT
V12
GND
SYS
GND
1LOW
GND
1HIGH
GND
2LOW
GND
2HIGH
Electric wire hole
3
850
µ
Á
¼
²
440
µ
Á
¼
²
2.1 DIMENSIONS
2-Description
7-I/O Port
2.2 INSPECTION AND STORAGE
7.1 Connection of PCB illustration
On receiving the equipment, all the elements should be checked with the packing
N-AC
N-AC
N-AC
L-AC
1COMP
1VAL
WARNING !
The sharp edges and surfaces of the coils can cause injury. Avoid contact
with them.
Connections explanation£
2.3 HANDLING THE UNIT
Take care to avoid any sharp movements during the unloading and moving of the
unit. Do not push or pull it by any other means than its base. Place a safety wedge
between the unit base and the fork lift truck to avoid damaging the unit's structure
and casing. Wedge required along the entire length of the unit.
4
No.
symbol
meaning
1
2
3
4
5
6
7
8
9
HEAT
PUMP
FAN
VAL2
VAL1
COMP2
COMP1
Auxiliary electrical heating£220VAC£
Water pump£220VAC£
Fan motor£220VAC£
Solenoid valve £220VAC£
4way valve of system1£220VAC£
Compressor of system2£220VAC£
Compressor of system1£220VAC£
Fire wire
Neutral Wire
10
11
12
13
14
15
16
17
18
19
20
KYOUT GND
MDOUT GND
NET GND 12V
KYIN
MDIN
WATER GND
FROST GND
SYS GND 12V
ROOMT
PIPE2
PIPE1
21
22
OUTWT
INTWT
AC-L
AC-N
On/Off switch
Mode
Wire controller
On/Off Switch(input)
Model(input)
Flow switch (input)( normal close)
Defrost signal
System protection(normal close)
Ambient temp.(input)
Temp. Of fan coil2( input)
Temp. Of fan coil11( input)
Water out temp.(output)
Water in temp.(output)
21
SENSOR
ROOMT
SENSOR
2PIPE
SENSOR
1PIPE
SENSOR
OUTWT
INWT
SENSOR
V12
GND
SYS
GND
FROST
GND
GND
MDIN
KYIN
V12
GND
NET
GND
MDOUT
KYOUT
WATER
300CHILLER
complaint by registered letter with acknowledgement of receipt. The manufacturer
is not liable for physical damage to the unit after acceptance.
2COMP
In the event of shipping damage, inform the shipping company and lodge a
2VAL
All units should be carefully inspected on receipt for any possible damage.
FAN
HEAT
PUMP
list to ensure that no items are missing.
6-Usage
3-Technical data
6.3 Parameter table
Please set the parameters according to the table below.
Parameter
Meaning
0
3.1 ELECTRICAL SPECIFICATION
Un it Mo del
Default
Remarks
COOL TEMP( Set value for cooling )
12→
Adjusted
1
HEAT TEMP( Set value for heating )
40→
Adjusted
2
DEF.CYC( Turnround of dehumidifying
under heating mode£frost£ )
MIN45
Adjusted
3
DEF.IN( Defrosting start temperature )
-7→
Adjusted
Ru nning Cur rent(Co oling/He ating)
4
DEF.OUT( Terms of exit defrost
under heating model )
13→
Adjusted
Co mp ressor Qua ntity
DEF.TIME( Time of exit defrost
under heating mode )
MIN?
5
6
SYSTEM( System quantity )
7
SAVE( Automatic restarting )
8
TYPE( Model(cooling only/heat pump/
auxiliary electrical heating/hot water£ )
9
PUMP( Water pump model )
Co oling Ca pacity
HH8
kW
7. 1
Bt u/h
24200
kW
8. 2
Bt u/h
28000
Co oling Po we r Input
kW
2. 5
He ating Po we r Input
kW
2. 0
A
10.9/ 8. 7
He ating Ca pacity
Po we r Su pply
230V ~/50Hz
1
Co mp ressor
Adjusted
Fa n Qua ntity
Fa n Po we r Input
1/2
Adjusted
NO/YES
Adjusted
C/H
Adjusted
NORMAL
Adjusted
Note £ Parameter? ?
?
modified by the professionals.
: Remark *
Rot ary
1
W
120
Fa n ro tate sp eed
RP M
850
No ise
dB( A)
56
kW
0. 2
m
8
Water Pu mp Input
Water head
Water Con nection
inch
1
Water Fl ow Volume
m 3/h
1. 4
Water Pr essure Dr op
kPa
17
Ca pacity Of Water St orage
L
Un it Ne t Di me nsions(L/W/ H)
mm
23
See the drawing of the units
See package label
Un it Sh ipping Di me nsions(L/W/ H)
mm
Ne t Wei ght
kg
See nameplate
Sh ipping Weight
kg
See package label
Cooling: Ambient temperature:35¡/24¡,Inter/outlet water temperature:12¡/7¡
: Parameter 6
Heating: Ambient temperature:7¡/6¡,Inter/outlet water temperature:30¡/35¡
; Unit with single system : 1
. Unit with double system : 2
(Above information just for your reference, Please subject to nameplate on the unit)
Parameter 7:
NO: Unit can not restart automatically;
. Unit can restart automatically: YES
Parameter ?:
; Unit only with the cooling function: C
; Unit with all the heat pump function: H/C
; Unit with auxiliary electrical heating: E/H/C
. Unit with only heating function produced by heat pump: H
Parameter 9:
NORMAL : Water pump is always on;
s earlier than the compressor and shut60Water pump will start : SPECIAL
. s later than the compressor30down
20
5
6-Usage
4-Installation
4.1 Installation location
6.2.6 Keyboard locking
The units are air cooled. Because of this, they must be installed outdoors in an area with
sufficient clearance to provide free air circulation through the condenser coil. Any free air
circulation restrictions will reduce the air flow, decrease the cooling capacity, increase the
power input and, in certain cases, prevent the group from operating by excess condensation
To avoid any faulty operations by others, please lock the keyboard after finishing settings.
In the ON/OFF state, press¡
¡till the screen shows the keylock symbol as blow. Under
such condition, you cannot change any settings on the unit.In the locking state, press ¡
¡
till the keylock symbol dismissed and now you can make any modifications to the unit by
pressing the key board.
pressure.
Keylock symbol
It is prohibited to connect the helicoid fan units to duct networks because of the pressure
drops created by such networks. In the event that the unit is located in an area exposed to
high wind, avoid the wind striking the fan surfaces directly. The arrows show the direction
of air circulation through the unit (refer to diagram opposite).
STATUS:Standby
20.
30.
Inlet water temp¡
Outlet water temp¡
4.2 Fitting the unit
After installation, all sides of the unit must be accessible for regular maintenance
16/02/2011
15:3?
STATUS:Standby
Long press
Prg
Esc
¡
¡
20.
30.
Inlet water temp¡
Outlet water temp¡
16/02/2011
15:3?
Prg
Esc
operations.Removal of Panel 1 provides access to the electrical junction box, the
Note: When the keyboard is locked before power supply is cut, the keyboard will be unlocked
automatically as you reset the unit when it is power on.
compressor and the cooling circuit.
Note:
Panel 1 is removable independently of the other panels and enables the unit to be run
maintaining its normal operating characteristics. To disengage the panel after
removal, extract the controller and its support bracket .
2.7 Malfunction
If there is something wrong with the unit, the system will display malfunction code according to
the fault reasons.
Refer to malfunction table for any code meanings.
When siting the unit, take care to leave sufficient free space all around it for carrying
out maintenance. The minimum free distances are shown and must be adhered to, both
for ensuring correction operation and for providing access.
ALARM
WATER IN
500mm
Prg
Esc
500mm
There is something wrong
with the temperature sensor
of inlet water .
400mm
400mm
800mm
200mm
¢
6
19
4-Installation
6-Usage
6.2.5 TEMP CURVE
You can check temperature curves of water inlet, water outlet, coil 1, coil 2, coil 3 and coil 4.
At main interface, press ¡
CURVE and ¡
Prg
¡ to enter menu interface, then press ¡
¡ to select TEMP
¡ to enter this interface. Choose parameters and press ¡
¡ to check it.
Esc
WARNING !
The grille is intended to protect operators from risks of injury from the exchanger
during handling and installation operations.
However, it can create a risk of clogging with frost or ice on heat pump machines
installed in cold or mountainous regions and exposed to the elements.
STATUS:Standby
20.
30.
Press¡ Prg¡
Inlet water temp¡
Outlet water temp¡
16/02/2011
MAIN MENU
PARAMETER
TIME
TIMP CURVE
Prg
Esc
15:3?
Press¡
OUT TEMP
IN TEMP
PIPE 1
PIPE 2
Press¡
¡
Prg
Esc
Press¡
To avoid such a risk, a shelter must be provided, or the protective grille can simply
Esc
be removed.
¡
MAIN MENU
PARAMETER
TIME
TIMP CURVE
Prg
Esc
¡
OUT TEMP
64
48
32
16
0
-16
Prg
25.5¡
Press¡ Esc¡
Prg
3
0
Esc
back to the
former
interface
OUT TEMP
IN TEMP
PIPE 1
PIPE 2
Prg
Esc
Press¡ Esc¡back to the
former interface
STATUS:Standby
20.
30.
Inlet water temp¡
Outlet water temp¡
16/02/2011
15:3?
Press¡ Esc¡
Prg
Esc
back to the
former
interface
18
MAIN MENU
PARAMETER
TIME
TIMP CURVE
Prg
Esc
7
5-Hydraulic connections
6-Usage
5.1 Hydraulic connection
Flashing
In choosing and installing water pipes, current local safety rules and
Flashing
precautions must be consulting and respected.
Recommendations:
The pipe circuits must be designed with a minimum of bends, and by reducing
DATE
CLOCK
TIMER ON
TIMER OFF
25/04/2011
16:02
08:00
22:30
as far as possible the number of changes in height, in order to provide the best
Press¡
or¡
¡
Prg
¡
DATE
CLOCK
TIMER ON
TIMER OFF
25/04/2012
16:02
08:00
22:30
Esc
cost installation and guarantee the best performance.
Prg
Esc
The pipe network must include:
1. A device to eliminate vibrations (e.g. connecting hoses) on all pipes
Press¡
¡
connected to the unit in order to reduce vibration and noise transmission to the
building.
2. Stop cocks to isolate the hydraulic circuit during maintenance.
3. Automatic or manual bleed valves at the highest points on the chilled water
circuit.
MAIN MENU
PARAMETER
TIME
TIMP CURVE
Press¡ Esc¡
Prg
back to the
former
interface
Esc
4.An adequate system to maintain water pressure in the circuit (expansion tank
or pressure regulating valve).
5.Thermometers and pressure gauges installed on the exchanger inlet and
outlet. They will facilitate regular checks and maintenance.
Press¡ Esc¡back to
the former interface
on the machine¡s inlet .
WARNING !
Inlet water temp¡
Outlet water temp¡
16/02/2011
Prg
Esc
Means that the unit shuts
down at 23:00 automatically.
STATUS:Standby
20.
30.
25/04/2012
16:02
22:00
23:00
Means that the unit turns
on at 22:00 automatically.
6. To avoid any risk of foreign bodies entering the system and to maintain
optimum performance, it is strongly advised to install the water filter accessory
DATE
CLOCK
TIMER ON
TIMER OFF
15:3?
Prg
Esc
The evaporator is equipped with a heating mattress (automatically controlled
by the main controller) to prevent any ice intake during periods of low outside
temperature. When the unit is not running in the winter, it is necessary to leave
the power supply connected for this protection system to function.
The water filter / stop cock assembly is to be connected to the machine inlet,
Note: When there is a ¡
¡shows in Time on and Time off option as shown above, it means
that the unit will not turn on or shut down automatically. When there is a clock icon shown as
blow, it means that the timer restart or shutdown is set.
taking care to keep the water filter mesh towards the bottom.
STATUS:Standby
20.
30.
Inlet water temp¡
Outlet water temp¡
16/02/2011
15:3?
Prg
Esc
The unit will
turns on or
shuts down
automatically.
8
17
6-Usage
5-Hydraulic connections
5.2 Connection of the chilled water loop
6.2.4 Time setting
press, OFF state/In the ON¡ Prg¡ Press. and you will see the Timer option¡
¡then press, to
Check, before connecting the unit, that the installation is leak free and clean.
choose the Timer option¡
¡£up£or¡
Install, manually controlled isolating valves (not provided) with a diameter
¡Use. to enter into the time setting interface¡
¡£down£Press. to choose the value that you need to modify¡
er is flashing¡
¡Press. and the target numb
¡£increase£or¡
¡£decrease£Press.
for changing the value¡
Esc
¡to return to former interface without any modification.
o save the setting ¡
¡Press. t
corresponding to the diameter of the main pipework on the Water Inlet and Outlet
connection of the unit without needing to the drain installation.
It is also recommended to install valves of the water supply lines and on the return
of
each terminal treatment unit so to allow work on each appliance without affecting
Status:Standby
20.
30.
Inlet water temp¡
Outlet water temp¡
16/02/2011
15:3?
MAIN MENU
PARAMETER
TIME
TIMP CURVE
Prg¡
Press¡
Prg
Esc
other parts of the installation. These valves allow also to adjust the flow arriving at
Prg
Esc
each terminal units.
It is important to verify that the pressure in the water supply network is adequate to
fill the installation.
Press¡
¡
5.3 Draining
Units are equipped with couplings to fill and drain the hydraulic circuit according to
DATE
CLOCK
TIMER ON
TIMER OFF
24/03/2011
16:02
08:00
22:30
Press¡
MAIN MENU
PARAMETER
TIME
TIMP CURVE
¡
Prg
Esc
standards in force.
Prg
The water should come from a distribution network, either to the unit directly, or to
any other point on the circuit linking the terminal units together.
Esc
5.4 Terminal insulation
Press¡
Flashing
Flashing
¡
In order to proper keep power consumption lox and to comply with standards in
force, all chilled water pipes must be insulated.
DATE
CLOCK
TIMER ON
TIMER OFF
24/03/2011
16:02
08:00
22:30
Press¡
¡
Prg
Esc
or¡
DATE
CLOCK
TIMER ON
TIMER OFF
25/03/2011
16:02
08:00
22:30
¡
For appropriate insulation with a conductivity of 0,04 W/mK a radial thickness of
25 to 30 mm is required.
Prg
Esc
5.5 Starting operation
The installation being finished, the water circuit should be filled, until the service
Press¡
Flashing
DATE
CLOCK
TIMER ON
TIMER OFF
25/04/2011
16:02
08:00
22:30
Flashing
pressure is reached which should not exceed 2,5 bar .
Check that the air purge valves are open .
Press¡
¡
Prg
Esc
Press¡
¡
or¡
¡
DATE
CLOCK
TIMER ON
TIMER OFF
25/03/2011
16:02
08:00
22:30
Air in the circuit should be completely expelled for proper operation.
Once the hydraulic circuit is correctly filled,
Prg
the filling valve should be closed.
Esc
¡
16
9
6-Usage
5-Hydraulic connections
6.2.3 Parameter setting
WARNING !
It is not the manufacturer¡s policy to issue recommendations relating to
water treatment. The user or the owner is responsible for contacting a
specialised
water treatment enterprise. However, water treatment is a very critical subject
and special consideration should be given to it to ensure that water treatment
In OFF state, you could enter into the option selection interface by pressing the key ¡ Prg ¡.
Press¡
¡to find out the Parameter option, then press¡
¡to go to parameter setting.
Choose the value you want to change by pressing the key ¡
¡and the number stands for
the value will be flashing. Modify the value by using the key¡ ¡(increase)or¡
¡(decrease).
Press ¡
¡once to Esc
save your setting and twice for returning back to the former interface.
For example£
is properly carried out to avoid problems linking to fluid circulation. A clogged
hydraulic circuit will systematically lead to premature wear in the machine¡s
STATUS:Standby
components.
MAIN MENU
PARAMETER
TIME
TIMP CURVE
Press¡ Prg¡
20.
30.
Inlet water temp¡
Outlet water temp¡
WARNING !
Take care not to damage the hydraulic connections by over-tightening. A
16/02/2011
Prg
Esc
15:3?
Prg
Esc
second wrench is required to compensate for tightening torque.
Press¡
The use of a counter wrench is necessary for tightening the valves.
5.6 Safety differential pressostat
COOL TEMP
HEAT TEMP
DEF.CYC
DEF.IN
DEF.OUT
DEF.TIME
SYSTEM
SAVE
A safety differential pressostat is fitted as standard on the water inlet pipe into the
Press¡
MAIN MENU
PARAMETER
TIME
TIMP CURVE
¡
Prg
Esc
Prg
Esc
Next page
evaporator in order to ensure adequate water flow to the evaporator before starting
Press¡
the unit.
12¡
40¡
45M
-7¡
13¡
8M
4
YES
¡
¡
Flashing
Flashing
It acts both in the event of partial blockage (starting to take in ice) and in the event of
a drop in water flow due to pump failure. This is the machine's main protection
device.
5.7 Hydraulic module
COOL TEMP
HEAT TEMP
DEF.CYC
DEF.IN
DEF.OUT
DEF.TIME
SYSTEM
SAVE
12¡
40¡
45M
-7¡
13¡
8M
4
YES
Press¡
Prg
Esc
or¡
¡
The hydraulic module requires no special maintenance. Fitting a mesh filter
Comment: Ensure that all of the various components are protected against freezing
failure,ensure that account is taken of ice protection requirements.
WARNING !
MAIN MENU
PARAMETER
TIME
TIMP CURVE
Press¡ Esc¡
Prg
Esc
back to the
former
interface
In all air conditioning installations with chilled water distribution, the entire network
must be dimensioned to provide a volume of 15 litres per kW of installed capacity.
10
15¡
40¡
45M
-7¡
13¡
8M
4
YES
Prg
Esc
Press¡ Esc¡
to save setting
(accessory) on the unit inlet is strongly advised (refer to 5.1)
caused by the outside temperature. In the event of any accidental power
COOL TEMP
HEAT TEMP
DEF.CYC
DEF.IN
DEF.OUT
DEF.TIME
SYSTEM
SAVE
¡
15
COOL TEMP
HEAT TEMP
DEF.CYC
DEF.IN
DEF.OUT
DEF.TIME
SYSTEM
SAVE
15¡
40¡
45M
-7¡
13¡
8M
4
YES
Prg
Esc
6-Electrical connection
6-Usage
Heating mode
MAIN MENU
PARAMETER
TIME
TIMP CURVE
Prg
Esc
Press¡ Esc¡
back to the
former
interface
6.1-Electrical connection
Status:Heating
20.
30.
Inlet water temp¡
Outlet water temp¡
16/02/2011
Prg
Esc
15:3?
Before starting any electrical connection,
WARNING !
check that the electrical supply
On site wiring must be carried out in
corresponds to the specification
accordance with the wiring diagram
indicated on the unit's maker's plate and
affixed to the unit's junction box.
to the unit's electrical characteristics
(2)State of unit
In ON/OFF state, you can find the MENU option by pressing the key ¡ Prg
¡. Press¡
¡to go
to menu interface. Press¡
¡for changing unit status. Press ¡
¡to check the unit state and
Escback to the former interface.
press ¡
¡ to return
For example:
table.
The power cables for general power
supply to the unit must have a copper
Important: It is the responsibility of the
core, and be dimensioned in
installer to provide circuit breaker
accordance with current IEC
protection, corresponding to the
standards.
machine's capacity (refer to the unit
STATUS:Heating
Press¡ Prg¡
20.
30.
Inlet water temp¡
Outlet water temp¡
16/02/2011
15:3?
Prg
MAIN MENU
PARAMETER
TIME
TIMP CURVE
Esc
Press¡
electrical characteristics table ), near to
Prg
The unit must be earthed via a
the machine.
terminal block provided inside the
junction box.
Esc
¡
Connection to the electrical network
must comply with current electrical
The supply voltage must not vary by
standards.
more than 10%.Imbalance between
To carry out electrical connection:
3%
the phases must not be greater than
MODE SELECT
UNIT STATUS
Press¡
¡
Prg
Esc
MAIN MENU
PARAMETER
TIME
TIMP CURVE
Prg
Esc
Open the inspection panel which
allows access to the junction box. To
All the connections are made on
remove the inspection panel, extract the
screw terminals.
controller from its support bracket .
Press¡
The wires should be stripped back 10
Thread the power supply cable
¡
mm.
through the cable guide provided on the
unit .
MODE SELECT
UNIT STATUS
Prg
Press¡
¡
WATER IN
WATER OUT
PIPE 1
PIPE 2
AMBIENT PEMP
17¡
25¡
26¡
26¡
23¡
Esc
Power supply
Prg
Esc
Press¡ Esc¡back to the
former interface
MAIN MENU
PARAMETER
TIME
TIMP CURVE
Press¡ Esc¡
Prg
Prg
Esc
MODE SELECT
UNIT STATUS
back to the
former
interface
14
Esc
11
6-Usage
6-Usage
6.2 Usage of wire controller
6.1 Function of wire controller
6.2.1 Turn ON/OFF the unit
When the unit is off, press the key¡
versa.
AIR COOLED WATER
STATUS:Standby
CHILLER
Prg
20.
30.
HEAT PUMPCONTROL
Inlet water temp¡
Outlet water temp¡
16/02/2011
Esc
Mode
Press¡
STATUS:Cooling
¡
20.
30.
Prg
Esc
15:3?
¡ , then the unit is turned on, and vice
Press¡
¡
Inlet water temp¡
Outlet water temp¡
16/02/2011
Standby interface
6.2.2MAIN MENU
Prg
Esc
15:3?
Running interface
(1)MODE SELECT
Key
Key name
ON/OFF
Prg
Key function
Press this key to turn on or turn off the unit
Menu
In ON/OFFstate, press this key to enter into menu
interface.
Enter
Function 1: Enter next interface.
Function 2: Change parameter value. The number
stands for the value will be flashing if it is changeable.
Up
Press this key to select the upward option or increase
the parameter value.
Down
Press this key to select the downward option or
decrease the parameter value.
you can find the MENU option by pressing the key, OFF state/In ON ¡ Prg ”
. Press¡
¡then p
ress, to go to menu interface¡
¡Now you can select the operation mode for the unit
Esc
by pressing. for mode select interface ¡
¡. Press ¡
¡once to save your setting and
twice for returning back to the former interface.£the AUX HEATING mode is invalid, he
at-If the unit systemis without electrical.t be changed'COOL or HEAT mode can, heat-only or
electrical-If the unit system is cool.£
Cooling mode
STATUS:Cooling
20.
30.
Press¡ Prg¡
Inlet water temp¡
Outlet water temp¡
16/02/2011
Prg
Esc
15:3?
Esc
Press¡
Function 2: Save the settings when they are
finished.
COOL/HEAT
AUX HEATING
Press¡
COOL
OFF
Press¡
¡
¡
MODE SELECT
UNIT STATUS
Prg
Prg
Esc
Esc
¡
COOL/HEAT
AUX HEATING
HEAT
OFF
Prg
Esc
12
Prg
Esc
Function 1: Return to the former interface.
Escape
MAIN MENU
PARAMETER
TIME
TIMP CURVE
Press¡ Esc¡
back to the
former
interface
13
MODE SELECT
UNIT STATUS
Prg
Esc
Press¡ Esc¡
back to the
former
interface