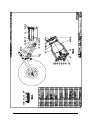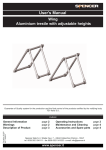
1
Aircraft Service Manual
______________________________________________
Ø Service Schedule
______________________________________________
Ø Inspection Schedule
______________________________________________
Ø Engine Instruction and Maintenance Manual
______________________________________________
Ø Propeller Instruction Manual
______________________________________________
Ø
Airworthiness Limitations -
Mandatory Replacement Times
Structural Inspection Intervals
Structural Inspection Procedures
______________________________________________
Page: 0/1
Issue: 3
Date: 040401
FOREWORD
This manual contains JABIRU recommended procedures and instructions for ground
handling, servicing and maintaining. The following Jabiru aircraft models:
LSA 55/2J
Jabiru 1600 powered
LSA 55/3J
Jabiru 2200 powered
Jabiru ST
Jabiru 1600 powered
Jabiru ST3
Jabiru 2200 powered
SK
Either Jabiru 1600 or 2200 powered
UL450C
Jabiru 2200 powered
SP
Jabiru 2200 powered
UL6
Jabiru 3300 powered
SP6
Jabiru 3300 powered
SP4
Jabiru 2200 powered
SP-T
Jabiru 2200 powered
SP-T
Jabiru 3300 powered
The Jabiru models:
LSA 55/2J
LSA 55/3J
Jabiru ST
Jabiru ST3
UL450C
-
Jabiru 2200 powered
Jabiru 2200 powered
Jabiru 2200 powered
Jabiru 2200 powered
Jabiru 2200 powered
are Type Certificated by the Australian Civil Aviation Safety Authority (CASA) under
Civil Aviation Order (CAO) 101.55. In Australia, the LSA 55/2J and LSA 55/3J
models may be registered with the Australian Ultralight Federation (AUF). Models
Jabiru ST and Jabiru ST3 are registered with CASA.
The Jabiru model SK is the Amateur-Built (or ‘Experimental’) Kit aircraft. In
Australia, it may either be registered by CASA or the AUF. The Jabiru UL has been
developed to meet the FAI “Microlight” definition. In countries other than Australia,
other registration requirements will apply. It is the owner’s responsibility to become
fully aware of the particular maintenance requirements and limitations applicable to the
appropriate registration.
The information in this manual is based upon data available at the time of publication,
and is supplemented and kept current by Service Bulletins & Service Letters published
by JABIRU AIRCRAFT Pty Ltd. These are sent to all JABIRU owners (as recorded by
JABIRU) so that they have the latest authorised recommendations for servicing the
aircraft. New owners of pre-owned aircraft should ensure that the transfer of their
aircraft has been advised to JABIRU AIRCRAFT Pty Ltd. Existing owners should
ensure that their postal address remains current.
In addition to the information in this Service Manual, vendor publications will
periodically be available from JABIRU which describe disassembly, overhaul and
parts breakdown of some of the various vendor equipment items. A listing of the
available publications is issued from time to time in service letters.
Page: 0/2
Issue: 3
Date: 040401
IMPORTANT
All maintenance should be undertaken with careful regard for the
procedures outlined in this manual. A detailed record of maintenance
undertaken should be recorded in the Aircraft Log Books.
The JABIRU is a CAO 101.55 Type Certified Aircraft. In accordance
with Civil Aviation Regulations and Orders and the Australian
Ultralight Federation Operations Manual, NO MODIFICATIONS
ARE PERMITTED.
In the interests of product development, we encourage owners to make suggestions
related to design improvements. However, the final decision on their adoption or
otherwise rests with JABIRU AIRCRAFT Pty Ltd.
Page: 0/3
Issue: 3
Date: 040401
SERVICE MANUAL
Table of Contents
Paragraph
General Description .................................................................................. 1.1
Aircraft Specifications .................................................................... 1.2
Centre of Gravity Limitations ......................................................... 1.3
Torque Values ................................................................................. 1.4
Ground Handling, Servicing, Lubrication and
Inspection ....................................................................................... 2.0
Ground Handling............................................................................. 2.1
Servicing (incl. Servicing Schedule)............................................... 2.2
Cleaning .......................................................................................... 2.3
Lubrication ...................................................................................... 2.4
Inspection (incl. Inspection Schedule) ........................................... 2.5
Fuselage...................................................................................................... 3.1
Windshield and Windows ............................................................... 3.2
Cabin Doors .................................................................................... 3.3
Seats ................................................................................................ 3.4
Cabin Upholstery............................................................................. 3.5
Soundproofing................................................................................. 3.6
Safety Provisions............................................................................. 3.7
Wings and Empennage ............................................................................. 4.1
Wings .............................................................................................. 4.2
Wing Struts...................................................................................... 4.3
Fin ................................................................................................... 4.4
Horizontal Stabiliser........................................................................ 4.5
Landing Gear and Brakes ........................................................................ 5.0
Landing Gear................................................................................... 5.1
Trouble Shooting............................................................................. 5.2
Main Gear........................................................................................ 5.3
Main Wheel..................................................................................... 5.4
Nose Gear........................................................................................ 5.5
Nose Wheel ..................................................................................... 5.6
Nose Wheel Steering System .......................................................... 5.7
Brake System .................................................................................. 5.8
Aileron Control System ............................................................................ 6.1
Control Column............................................................................... 6.2
Control Cables................................................................................. 6.3
Ailerons ........................................................................................... 6.4
Rigging............................................................................................ 6.5
Wing Flap Control System....................................................................... 7.1
Operational Check........................................................................... 7.2
Flap Handle Assembly .................................................................... 7.3
Flap Common Shaft Assembly ....................................................... 7.4
Flap.................................................................................................. 7.5
Rigging............................................................................................ 7.6
Page: 0/4
Issue: 3
Date: 040401
Table of Contents (Continued)
Paragraph
Elevator Control System .......................................................................... 8.1
Control Column............................................................................... 8.2
Elevator ........................................................................................... 8.3
Control Cable and Attachments ...................................................... 8.4
Rigging............................................................................................ 8.5
Elevator Trim Control System ........................................................ 8.6
Rudder Control System............................................................................ 9.1
Rudder Pedal Assembly .................................................................. 9.2
Rudder ............................................................................................. 9.3
Control Cable and Attachments ...................................................... 9.4
Rigging............................................................................................ 9.5
Engine (See also Appendix 1)................................................................ 10.0
Engine Cowlings ........................................................................... 10.1
Engine ........................................................................................... 10.2
Baffles ........................................................................................... 10.3
Engine Mount................................................................................ 10.4
Engine Fuel System (See also Section 11)................................... 10.5
Spark Plugs.................................................................................... 10.6
Engine Controls............................................................................. 10.7
Exhaust System ............................................................................. 10.8
Extreme Climatic Conditions........................................................ 10.9
Fuel System.............................................................................................. 11.0
Description .................................................................................... 11.1
Fuel Tank ...................................................................................... 11.2
Fuel Vent....................................................................................... 11.3
Fuel Shut-off Valve....................................................................... 11.4
Fuel Filter ...................................................................................... 11.5
Fuel Pumps.................................................................................... 11.6
Instruments and Instrument Systems ................................................... 12.0
General .......................................................................................... 12.1
Instrument Panel............................................................................ 12.2
Instruments.................................................................................... 12.3
Pitot and Static Systems ................................................................ 12.4
Tachometer.................................................................................... 12.5
Oil Pressure Gauge........................................................................ 12.6
Oil Temperature Gauge................................................................. 12.7
Cylinder Head Temperature Gauge .............................................. 12.8
Exhaust Gas Temperature Gauge (Option) .................................. 12.9
Hourmeter ................................................................................... 12.10
Magnetic Compass ...................................................................... 12.11
GYRO Instrument Package …………………………………….12.12
Page: 0/5
Issue: 3
Date: 040401
Table of Contents (Continued)
Paragraph
Electrical Systems ................................................................................... 13.0
Electrical Power Supply System ................................................... 13.1
Battery Power System ................................................................... 13.2
Battery Box ................................................................................... 13.3
Starter Solenoid............................................................................. 13.4
Voltage Regulator ......................................................................... 13.5
Strobe System (Option .................................................................. 13.6
Electrical Load Analysis ............................................................... 13.7
Wiring Diagram ............................................................................ 13.8
Radio Wiring Diagram (Option) .................................................. 13.9
UHF Antenna Installation ……………………………………… 13.10
Painting .................................................................................................... 14.0
Interior ………………………………………………………….. 14.1
Exterior …………………………………………………………. 14.2
Placards....................................................................................................... 15
Appendices:
Jabiru Engine Instruction and Maintenance Manual .....................Appendix 1
Jabiru Propeller Instruction Manual...............................................Appendix 2
Airworthiness Limitations .............................................................Appendix 3
1. General
2. Mandatory Replacement Times
3. Structural Inspection Intervals
4. Structural Inspection Procedures
Jabiru Parts Catalogue....................................................................Appendix 4
Jabiru Engine Parts Catalogue………………………………….…Appendix 5
Page: 0/6
Issue: 3
Date: 040401
JABIRU AIRCRAFT PTY LTD
SERVICE MANUAL
LIST OF EFFECTIVE PAGES
The following pages are current:
Original Effective Date
Latest Amendment Date
010493
130302
Page No.
0/1 – 0/6
0/7 – 0/8
1/1 – 1/4
2/1 – 2/16
3/1 – 3/6
4/1 – 4/4
5/1 – 5/22
6/1 – 6/5
7/1 – 7/6
8/1 – 8/8
9/1 – 9/7
10/1 – 10/12
11/1 – 11/6
12/1 – 12/14
13/1 – 13/7
14/1
15/1
App.1/1
App.2/1
App.3/1
2/14 – 2/16
0/7 – 0/8
Effective Date
040401
040401
040401
040401
040401
040401
040401
040401
040401
040401
040401
040401
040401
040401
040401
040401
…040401
040401
040401
040401
130302
130302
Page: 0/7
Issue: 4
Issue
3
3
3
3
3
3
3
3
3
3
3
3
3
3
3
3
...3
3
3
3
2
4
Date: 130302
THIS PAGE IS INTENTIONALLY LEFT BLANK
Page: 0/8
Issue: 4
Date: 130302
SECTION 1
GENERAL DESCRIPTION
Table of Contents
Paragraph
General Description………………………………………………….
Aircraft Specifications………………………………………………..
Centre of Gravity Limitations……………………………………….
Torque Values…………………………………………………………
1.1
1.2
1.3
1.4
1.1 GENERAL DESCRIPTION
The JABIRU aircraft described in this manual are 2-seat, high-wing monoplane composite
aircraft of monocoque construction. They are equipped with fixed tricycle landing gear of
composite construction. The steerable nose gear is a welded metal, trailing link assembly
with rubber springs.
The aircraft is equipped with JABIRU, 4 cylinder, 4 stroke engines driving a wooden fixed
pitch propeller.
1.2 AIRCRAFT SPECIFICATIONS
Leading particulars of this aircraft, with dimensions based on gross weight, are given in
Figure 1-1. If these dimensions are used for constructing a hangar or computing
clearances, remember that such factors as tyre pressure, tyre size and load distribution may
result in some dimensions that may be somewhat different from those listed.
1.3 CENTRE OF GRAVITY LIMITATIONS
The JABIRU is a very light aircraft. The installation of equipment may significantly alter
the approved CG limits of the aircraft. Therefore, all proposed fixed installations must be
approved by JABIRU AIRCRAFT Pty Ltd.
1.4 TORQUE VALUES
A chart of recommended torque values is shown in Figure 1-2. These torque values are
recommended for all service procedures contained in this manual, except where other
values are stipulated. They are not to be used for checking tightness of installed parts
during service.
Page: 1/1
Issue: 1
Date: 040401
MODEL
LSA 55/2J &
Jabiru ST
LSA 55/3J &
Jabiru ST3
SK
UL450C
UL6
AIRCRAFT
SPECIFICATIONS
GROSS WEIGHT
430 kg (946 lb)
430 kg (946 lb)
430 kg (946 lb)
450 kg (990 lb)
500 kg (1100 lb)
FUEL CAPACITY
50 litres
65 litres
50 or 65 litres
50 litres
85 litres
OIL CAPACITY
ENGINE MODEL
(Refer to Appendix
I for Engine Data)
PROPELLOR
(Fixed Pitch)
PROPELLOR
(Fixed Pitch)
2.3 litres
2.3 litres
2.3 litres
2.3 litres
3.4 litres
Jabiru 1600
Jabiru 2200
Jabiru 2200
Jabiru 2200
Jabiru 3300
Jabiru 54” dia
(1371mm)
Jabiru 38” pitch
(965mm)
60”
(1524mm)
42”
(1040mm)
60”
(1524mm)
42”
(1040mm)
60”
(1524mm)
42”
(1040mm)
60”
(1524mm)
48”
(1040mm)
11” dia x 4” rim
11” dia x 4” rim
11” dia x 4” rim
11” dia x 4” rim
11” dia x 4” rim
4” wide
(4 Ply Rating)
4” wide
(4 Ply Rating)
4” wide
(4 Ply Rating)
4” wide
(4 Ply Rating)
4” wide
(4 Ply Rating)
10.25 dia x 4” rim
10.25 dia x 4” rim
10.25 dia x 4” rim
10.25 dia x 4” rim
10.25 dia x 4” rim
NOSE WHEEL
TYRE
STANDARD
(Options Available)
TYRE
PRESSURES
STANDARD Mains
TYRE
PRESSURES
STANDARD Nose
WHEEL
ALIGNMENT (at
Gross Weight)
Camber
Toe In
PRINCIPAL
DIMENSIONS
Wing Span
Length
Fin Height
Track Width
(Wheel Centres)
Tail Span
4” wide
(4 Ply Rating)
4” wide
(4 Ply Rating)
4” wide
(4 Ply Rating)
4” wide
(4 Ply Rating)
4” wide
(4 Ply Rating)
170 kpa (25 psi)
170 kpa (25 psi)
170 kpa (25 psi)
170 kpa (25 psi)
170 kpa (25 psi)
82 kpa (12 psi)
82 kpa (12 psi)
82 kpa (12 psi)
82 kpa (12 psi)
82 kpa (12 psi)
0”
0”
0”
0”
0”
0”
0”
0”
0”
0”
8034 mm (26’4”)
5040 mm (16’5”)
2013 mm ( 6’7”)
1600 mm ( 5’3”)
2350 mm ( 7’81/2”)
8034 mm (26’4”)
5040 mm (16’5”)
2013 mm ( 6’7”)
1600 mm ( 5’3”)
2350 mm ( 7’81/2”)
8034 mm (26’4”)
5040 mm (16’5”)
2013 mm ( 6’7”)
1600 mm ( 5’3”)
2350 mm ( 7’81/2”)
9398mm (30’10”)
5640mm (18’6”)
2013 mm ( 6’7”)
1600 mm ( 5’3”)
2350 mm ( 7’81/2”)
9398mm (30’10”)
5640mm (18’6”)
2013 mm ( 6’7”)
1600 mm ( 5’3”)
2350 mm ( 7’81/2”)
BATTERY
LOCATION
In Engine
Compartment
In Engine
Compartment
In Engine
Compartment
In Engine
Compartment
In Engine
Compartment
MAIN WHEEL
TYRES
STANDARD
(Options Available)
MAIN WHEEL
TYRES
STANDARD
(Options Available)
NOSE WHEEL
TYRE
STANDARD
(Options Available)
Page: 1/2
Issue: 1
Date: 040401
MODEL
AIRCRAFT SPECIFICATIONS
GROSS WEIGHT
FUEL CAPACITY
OIL CAPACITY
ENGINE MODEL (Refer to Appendix
I for Engine Data)
PROPELLOR (Fixed Pitch)
PROPELLOR (Fixed Pitch)
MAIN WHEEL TYRES STANDARD
(Options Available)
MAIN WHEEL TYRES STANDARD
(Options Available)
NOSE WHEEL TYRE STANDARD
(Options Available)
NOSE WHEEL TYRE STANDARD
(Options Available)
TYRE PRESSURES STANDARD Mains
TYRE PRESSURES STANDARD Nose
WHEEL ALIGNMENT (at Gross
Weight)
Camber
Toe In
PRINCIPAL DIMENSIONS
Wing Span
Length
Fin Height
Track Width (Wheel Centres)
Tail Span
BATTERY LOCATION
SP
SP6
SP-T
SP-T6
430 kg (946 lb)
50 litres
2.3 litres
430 kg (946 lb)
65 litres
2.3 litres
430 kg (946 lb)
50 or 65 litres
2.3 litres
430 kg (946 lb)
65 litres
2.3 litres
Jabiru 2200
60”
(1524mm)
42”
(1066.8mm)
Jabiru 3300
60”
(1524mm)
48”
(1219.2mm)
Jabiru 2200
60”
(1524mm)
42”
(1040mm)
Jabiru 3300
60”
(1524mm)
48”
(1040mm)
11” dia x 4” rim
4” wide
(4 Ply Rating)
11” dia x 4” rim
4” wide
(4 Ply Rating)
11” dia x 4” rim
4” wide
(4 Ply Rating)
11” dia x 4” rim
4” wide
(4 Ply Rating)
10.25 dia x 4”
rim
4” wide
(4 Ply Rating)
170 kpa (25 psi)
10.25 dia x 4”
rim
4” wide
(4 Ply Rating)
170 kpa (25 psi)
10.25 dia x 4”
rim
4” wide
(4 Ply Rating)
170 kpa (25 psi)
10.25 dia x 4”
rim
4” wide
(4 Ply Rating)
170 kpa (25 psi)
82 kpa (12 psi)
82 kpa (12 psi)
82 kpa (12 psi)
82 kpa (12 psi)
0”
0”
0”
0”
0”
0”
0”
0”
8034 mm (26’4”)
5040 mm (16’5”)
2013 mm ( 6’7”)
1600 mm ( 5’3”)
2350 mm ( 7’81/2”)
In Engine
Compartment
8034 mm (26’4”)
5040 mm (16’5”)
2013 mm ( 6’7”)
1600 mm ( 5’3”)
2350 mm ( 7’81/2”)
In Engine
Compartment
8034 mm (26’4”)
5040 mm (16’5”)
2013 mm ( 6’7”)
1600 mm ( 5’3”)
2350 mm ( 7’81/2”)
In Engine
Compartment
9398mm (30’10”)
5640mm (18’6”)
2013 mm ( 6’7”)
1600 mm ( 5’3”)
2350 mm ( 7’81/2”)
In Engine
Compartment
Figure 1-1
Page: 1/3
Aircraft Specifications
Issue: 1
Date: 040401
RECOMMENDED TORQUE VALUES (in fibreglass)
Bolt Size
Inch/lbs
AN3………………………………………………………………………20 - 25 (2 ft lb)
AN4………………………………………………………………………50 - 70 (4-5 ft lb)
AN5………………………………………………………………………100 –140 (8-12 ft lb)
AN4 Propellor………………………..………………………………….. 84
(7 ft lb)
Table 1-1
These values relate only to steel nuts on oil-free cadmium plated threads.
For Engine Bolt Torque Values see Engine Instruction & Maintenance Manual at
Appendix 1.
The above values are recommended for all installation procedures contained in this
Manual, except where other values are stipulated.
The above values are not to be used for checking tightness of installed parts during
service.
CAUTION
DO NOT REUSE SELF-LOCKING NUTS
Figure 1-2 Recommended Torque Values
Page: 1/4
Issue: 1
Date: 040401
SECTION 2
GROUND HANDLING, SERVICING, LUBRICATION AND INSPECTION.
Table of Contents
Paragraph
çGROUND HANDLING......................................................................................... 2.1
Towing.................................................................................................................... 2.1.1
Jacking.................................................................................................................... 2.1.2
Hoisting .................................................................................................................. 2.1.3
Levelling................................................................................................................. 2.1.4
Parking.................................................................................................................... 2.1.5
Tie-Down................................................................................................................ 2.1.6
Flyable Storage ....................................................................................................... 2.1.7
Returning Aircraft to Service ................................................................................. 2.1.8
Temporary or Indefinite Storage ............................................................................ 2.1.9
Inspection During Storage .................................................................................... 2.1.10
Returning Aircraft to Service ............................................................................... 2.1.11
SERVICING ............................................................................................................ 2.2
Servicing Schedule ................................................................................................. 2.2.1
Fuel ......................................................................................................................... 2.2.2
Fuel Drain............................................................................................................... 2.2.3
Carburettor Air Filter.............................................................................................. 2.2.4
Battery .................................................................................................................... 2.2.5
Tyres ....................................................................................................................... 2.2.6
Hydraulic Brakes .................................................................................................... 2.2.7
CLEANING.............................................................................................................. 2.3
Windshield and Windows....................................................................................... 2.3.1
Interior Surfaces ..................................................................................................... 2.3.2
Exterior Surfaces .................................................................................................... 2.3.3
Aluminium Surfaces............................................................................................... 2.3.4
Engine and Engine Compartment........................................................................... 2.3.5
Propeller ................................................................................................................. 2.3.6
Wheels .................................................................................................................... 2.3.7
LUBRICATION ...................................................................................................... 2.4
Wheel Bearings – Mains and Nose......................................................................... 2.4.1
INSPECTION .......................................................................................................... 2.5
Inspection Guidelines ............................................................................................. 2.5.1
Inspection Chart...................................................................................................... 2.5.2
Page: 2/1
Issue: 3
Date: 130302
2.1
GROUND HANDLING
2.1.1
Towing
The JABIRU aircraft is very light and should always be moved by hand.
Moving the aircraft is accomplished by using the wing struts or prop hub or landing gear
struts as push points together with the solid rear fuselage join of the fin to the tail plane.
CAUTION
Do not use control surfaces to move the aircraft
--Damage to the control system may result
When pushing at the join of the fin and Tail Plane,
Watch that you do not jam your fingers under the
Rudder or in the rudder hinge – Remember that it is
Connected to the Nose Wheel.
CAUTION
When moving the aircraft, never turn the Nose Wheel
more than 15 degrees either side of centre or Nose
Gear may be damaged.
The aircraft may also be moved by placing the propeller in the horizontal and then placing
one hand on the propeller on either side of the spinner. The aircraft can then be pulled
forward and nose wheel lifted off the ground if necessary.
CAUTION
Never move the aircraft in this manner whilst the
engine is hot as it may fire when the propeller is
moved and result in severe injury!
Always ensure that the Master and Ignitions are OFF!
Never approach the propeller when anyone is in the
aircraft.
Always treat the propeller as LIVE! IT KILLS!
2.1.2
Jacking
JABIRU is a very light aircraft. Before jacking, ensure that it is as light as possible by
removing luggage and any unnecessary fuel.
Jacking Main Gear
1.
Remove main gear spat on the side to be jacked or both spats if both wheels to be
jacked.
2.
The aircraft can be lifted on one side by a person of reasonable strength (or 2 of
lesser strength) by lifting on the Wing Spar, around the outboard part of the wing
strut attachment. Be careful lifting at the Wing Tip.
Page: 2/2
Issue: 3
Date: 130302
3.
Place a solid block (preferably wood) under the bottom of the composite glass leg
which will result in the wheel being off the ground when the aircraft is lowered. Be
careful not to interfere with brake components or Wheel Spat attachments.
4.
Repeat for other side if necessary.
The above procedure is useful for wheel/brake servicing or repairs, but is of no value in
removing the main undercarriage. If the removal of the main undercarriage is necessary,
adopt the following procedure.
1.
Obtain a tressel, 20ltr drum or similar object 600mm metre high.
2.
Mount a solid foam block, sandbag, pillow or similar compliant material on top of
the tressel. (compliant material should distribute load over minimum 150 square
centimetres) Place under the lower wing strut attachment.
3.
Support under both wings at the Wing Spar to prevent the aircraft from rocking.
Ensure that no fittings are strained.
Jacking Nose Gear
1.
Push down on tail Plane (NOT THE ELEVATOR) until nose gear is off the ground.
2.
Place tressel or drum under rear fuselage together with absorbent material such as
foam block, sandbags or a pillow.
CAUTION
Ensure tressel does not foul Ventral Fin.
3.
Weigh down tail plane with sandbags or similar heavy absorbent material.
CAUTION
Do not lift using control surfaces. Damage to
the control surface or control system may
result.
2.1.3
Hoisting
This procedure should not be necessary for most service or maintenance procedures. Should
hoisting be necessary:
1.
2.
3.
4.
Remove wings. See Paragraph 4.2.1.
Fit shackles to wing support brackets (4 off).
Fit cables/rope to shackles and to a centre lift shackle.
Hoist only from this point ensuring that cables/ropes do not mark the top of the
fuselage at corners above wing support brackets.
Page: 2/3
Issue: 3
Date: 130302
2.1.4
Levelling
Method 1
For both lateral and longitudinal levelling use a spirit level on either side of the lower door
sills or the fuselage cowl flange line.
Method 2
Use the join line of the cowl top & bottom cowl as one point. As the second measuring
point, use the join where the top & bottom fuse meets, which should be the leading edge of
the horizontal stabiliser.
2.1.5
Parking
Parking precautions depend principally on local conditions. As a general precaution, check
the wheels and tie the control handle back firmly with a seat belt to lock the controls. Park
into the wind and tie down the aircraft as outlined in Paragraph 2.1.6 if a hangar is not
available.
2.1.6
Tie Down
When mooring the aircraft in the open, head into wind if possible. Secure control surfaces
by tying the control handle back firmly with a seat belt.
Then:
1. Tie ropes to the top end of each wing strut. Secure opposite end of the ropes to
ground anchors located at approximately 30 degrees to the vertical, outboard of
the top wing attachment point. Ensure that the ropes have sufficient slack to not
strain the wing attachments should a tyre deflate while the aircraft is tied down.
2. Tie rope to the Tail Tie-down Hole in the Ventral Fin. Secure the opposite end of
rope to ground anchors.
2.1.7
Flyable Storage
Flyable storage is defined as a maximum of 30 days non-operational storage.
Ensure that the engine has been stopped by turning off the fuel valve, thereby not leaving
any fuel in the carburettor bowl.
Every 7th day the propeller should be rotated through 5 revolutions, without running the
engine. Leave the propeller in the horizontal position to ensure even distribution of liquids
in the wood. If left in the vertical position, liquids will drain to the lower tip resulting in an
unbalanced propeller.
CAUTION
Ensure that the Master and Ignition Switches are OFF!
Store under cover, away from direct sunlight as ultra-violet rays damage composite
structures.
Page: 2/4
Issue: 3
Date: 130302
In addition, the pitot tube, static air vent, air vents, openings in the engine cowl and other
similar openings should have protective covers fitted to prevent entry of foreign materials
and beings (especially wasps).
2.1.7
Returning Aircraft to Service
After flyable storage, returning the aircraft to service is accomplished by performing a
thorough pre-flight inspection. Ensure all protective covers are removed.
2.1.9
Temporary or Indefinite Storage
Temporary storage is defined as aircraft in non-operational status for a maximum of 90 days.
Treat as for flyable storage (see Paragraph 2.1.7), plus:
-
For temporary storage, fill fuel tank with correct grade of gasoline (to prevent moisture
accumulation).
-
For indefinite storage, drain fuel tank, ensure carburettor bowl is empty by running
engine with fuel valve off until it stops or by draining bowl.
Then:
1.
2.
3.
4.
5.
6.
7.
Clean aircraft thoroughly.
Clean any dirt, oil or grease from tyres and coat tyres with a tyre preservative. Cover
tyres to protect against dirt and oil.
Either block up undercarriage/fuselage to relieve pressure on tyres or rotate wheels
every 30 days to prevent flat spotting the tyres.
Seal or cover all openings.
Remove battery and store in a cool dry place. Service the battery periodically and
charge as required.
NOTE 1:
It is recommended that a battery which is not used should be
charged every 30 days.
NOTE 2:
The battery serial number is recorded in the aircraft equipment
list. To assure accurate warranty records, the battery should
be reinstalled in the same aircraft from which it was removed.
If the battery is returned to service in another aircraft,
appropriate changes must be made and JABIRU AIRCRAFT
Pty Ltd must be notified.
Disconnect spark plug leads and remove spark plugs from each cylinder.
Using an oil can or spray atomiser, spray preservative oil through a spark plug hole
of each cylinder with the piston in the down position.
NOTE: Use shell ENSIS Engine Oil 30 or similar engine preservative.
8.
Rotate the propeller 10 – 12 times, leaving it in the horizontal position.
CAUTION
Page: 2/5
Issue: 3
Date: 130302
Ensure that the Master and Ignition Switches are OFF!
9.
10.
11.
12.
13.
Install spark plugs and connect leads.
Seal exhaust pipes.
Attach a red streamer to each. DO NOT seal fuel tank breathers.
Place protective covers over pitot tube, static source vents, air vents and openings in
engine cowl to prevent the entry of foreign material or beings (especially wasps).
Attach a warning placard to the propeller stating that vents and breathers have been
sealed. The engine must not be started with the seals in place.
Every 7 days the propeller should be rotated through 5 revolutions without running
the engine – leave propeller in the horizontal position.
CAUTION
Ensure that the Master and Ignition Switches are OFF!
2.1.10 Inspection During Storage
1.
2.
3.
Generally inspect airframe and clean as necessary.
Inspect the interior of at least one cylinder through the spark plug hole for corrosion
at least once a month.
If, at the end of the 90 day period, the aircraft is to be continued in non-operational
storage – repeat Steps 1-13 above (most will only need to be checked).
2.1.11 Returning Aircraft to Service
After temporary storage, the procedures for returning the aircraft to service are as follows:
1.
2.
3.
4.
5.
6.
7.
Remove aircraft from blocks and check tyres for proper inflation.
Check battery and install.
Check carburettor air filter and service if necessary.
Remove warning placard from propeller.
Remove materials used to cover openings.
Remove, clean and gap spark plugs.
While spark plugs are removed, rotate propeller several revolutions to clear excess
preservative oil from cylinders.
CAUTION
Ensure that the Master and Ignition Switches are OFF!
8.
9.
10.
11.
12.
13.
14.
15.
Install spark plugs – torque to 20 nm (180 inch/lbs).
Check fuel filter – replace if necessary.
Check brake fluid level.
If returning to service after indefinite storage, fill fuel tank with correct grade of fuel.
Check fuel tank and fuel lines for moisture and sediment.
Drain enough fuel to eliminate any moisture and sediment.
Check fuel tank breather is clear.
Perform a thorough pre-flight inspection.
Start and warm engine.
Page: 2/6
Issue: 3
Date: 130302
2.2 SERVICING
Servicing requirements are shown at Paragraph 2.2.1. The following paragraphs supplement
this table by adding details not included.
Note that Inspection Requirements are detailed at Paragraph 2.5.
2.2.1 Servicing Schedule
Pre-Flight:
Refer to Flight Manual
25 Hour Service:
Refer to Engine Instruction & Maintenance Manual
50 Hour Service:
Refer to Engine Instruction & Maintenance Manual
100 Hour Service:
Refer to Eng. Instruction & Maintenance Manual
Other Inspection & Maintenance Procedures:
Refer to Engine Instruction & Maintenance Manual.
Replace flexible oil & fuel line in engine compartment every 2 years.
2.2.2 Fuel
The fuel tank should be filled immediately after flight to lessen condensation of moisture.
The tank capacity is listed in Section 1.
2.2.3 Fuel Drain
A fuel drain is located in the fuel tank. Drain fuel after each refueling to ensure moisture and
contaminants are not present.
2.2.4 Carburettor Air Filter
The Carburettor air filter keeps dust and dirt from entering the induction system. The value
of maintaining the air filter in a good clean condition cannot be overstressed. More engine
wear is caused through the use of a dirty or damaged air filter than is generally believed. The
frequency with which the filter should be removed, inspected and cleaned will depend on the
operating conditions. A good general rule, however, is to remove, inspect and clean the filter
ever 50 hours of engine operating time and more frequently if warranted by the operating
conditions. Clean only with compressed air. Under extreme operating conditions, daily
servicing of the filter is recommended.
2.2.5
Battery
The Battery is not a serviceable item as it is a gel. Use bicarbonate of soda (baking soda) and
clean water to neutralise electrolyte of corrosion. Follow with a thorough flushing with
clean water. Do not allow bicarbonate of soda to enter the battery. Remove battery and
clean residue from aircraft.
Tighten cable and terminal connections with a wire brush, then coat with petroleum jelly
before connecting cables. Check the battery every 50 hours (or at least every 30 days), more
Page: 2/7
Issue: 3
Date: 130302
often in hot weather. Add only distilled water, not acid or “rejuvenators”, to maintain
electrolyte level in the battery. Inspect the Battery Box and attachments and clean and
remove any signs of spillage or corrosion.
2.2.6
Tyres
Maintain tyre pressure at the air pressure specified in Figure 1.1. When checking tyre
pressure, examine tyres for wear, cuts, bruises and slippage. Remove oil, grease and mud
from tyres with soap and water.
NOTE:
2.2.7
Recommended tyre pressures should be maintained, especially
in cold weather. Remember that any drop in temperature of
the air inside the tyre causes a corresponding drop in tyre
pressure.
Hydraulic Brakes
Check brake master cylinder and refill with automotive brake fluid (.3/.4) Bleed the brake
system of any trapped air whenever there is a spongy response on the brake lever.
Refer to paragraph 5.8 for filling and bleeding of the brake system.
CAUTION
The JABIRU uses automotive brake fluid(.3/.4). DO NOT use
Aircraft hydraulic fluid (mineral based) or damage to the brake system
will result.
2.3 CLEANING
Keeping the aircraft clean is important. Besides maintaining the appearance of the aircraft,
cleaning makes inspection and maintenance easier.
2.3.1
Windshield and Windows
These should be cleaned carefully with plenty of fresh water and a mild detergent, using the
palm of the hand to feel and dislodge any caked dirt or mud. A sponge, soft cloth or
chamois may be used but only as a means of carrying water to the plastic. Rinse thoroughly,
then dry with a clean, moist chamois. DO NOT rub the plastic with a dry cloth as this builds
up an electrostatic charge which attracts dirt. Oil and grease may be removed by using a soft
cloth moistened with mineral turpentine.
CAUTION
DO NOT use gasoline, alcohol, buzene,
acetone, carbon tetrachloride, fire
extinguisher fluid, de-icer fluid, lacquer
thinner or glass window cleaning spray.
These solvents will soften and craze the
Plastic.
DO NOT use a canvas cover on the windshield
Page: 2/8
Issue: 3
Date: 130302
or windows as the cover may scratch the
plastic.
2.3.2
Interior Surfaces
Interior surfaces should be cleaned with a soft cloth, fresh water and a mild detergent.
Volatile substances such as those mentioned in the previous section must never be used.
2.3.3
Exterior Surfaces
The exterior surfaces, under normal conditions, require a minimum of polishing and buffing.
CAUTION
DO NOT polish or buff the aircraft within the
first 2 weeks after delivery from the factory
as surface treatments take up to 14 days to
properly cure.
Generally, the exterior surfaces can be kept bright by washing with water and a mild soap or
detergent, followed by a rinse with water and drying with a cloth or a chamois.
Remove stubborn oil and grease with a cloth moistened with mineral turpentine, then wash
with water and a mild soap, rinse and dry as stated before.
After the curing period the aircraft may be waxed with a good quality automobile wax. A
heavier coating of wax on the leading edges of the wing, tail and on the engine nose cap will
help reduce abrasion encountered in these areas.
CAUTION
DO NOT use Silicon based cleaning materials as
Silicon is absorbed into the composite
materials and may affect repairability.
2.3.4
Aluminium Surfaces
The aluminium surfaces require a minimum of care, but should not be neglected. Wash and
clean as detailed in paragraph 2.3.3 above.
CAUTION
JABIRU aircraft are designed for minimum
maintenance. However, special attention
should be applied when the aircraft has been
used in extremely corrosive conditions, e.g.
beach landings with sand and salt. Always
ensure the aircraft is thoroughly hosed and
washed immediately after such use. Pay
particular attention to wheels and external
controls. Always hose down wheels and spats
after landings in mud or sand to ensure
brakes, wheels and spats are free of dirt
Page: 2/9
Issue: 3
Date: 130302
build-up.
2.3.5
Engine and Engine Compartment
The engine should be kept clean since dirty cooling fins and baffles can cause overheating of
the engine. Also, cleaning is essential to minimise any danger of fire and provide easy
inspection of components.
CAUTION
DO NOT hose engine. Electrical components may
be damaged by moisture. Ensure electrical
components are protected against moisture.
Caustic cleaning solutions should not be used.
Recommended cleaning procedure is lightly spray with degreasing fluid – after sealing coils
and starter motor. WIPE clean with brush and cloth.
2.3.6
Propeller
Wash with soap and water, rinse with clean water and dry with cloth or chamois. Lightly
wax using automotive wax.
2.3.7
Wheels
The wheels should be washed periodically and examined for corrosion, cracks or dents in the
wheel halves or in the flanges or hubs. If defects are found, remove and repair in accordance
with Section 5. Discard cracked wheel halves, flanges or hubs and install new parts.
2.4
LUBRICATION
There are no lubrication requirements for the JABIRU other than those detailed in Appendix
1.
2.4.1
Wheel Bearing – Mains and Nose
At each 100 hour inspection, jack the wheel, spin the wheel and check for free running and
any play on the shaft. Remove and replace if there is any sign of binding or wear.
Page: 2/10
Issue: 3
Date: 130302
2.5
INSPECTION
Inspection Charts
The chart at Paragraph 2.5.2 shows the recommended intervals at which items are to be
inspected.
As shown in the chart, there are items to be inspected each 50 hours, each 100 hours and
each 200 hours. There are also special inspection items which require inspection of
servicing at intervals other than 50, 100 and 200 hours.
The engine Instruction Manual also details engine inspection schedules and should be
consulted in addition to this chart.
2.5.1
•
When conducting an inspection at 50 hours, all items marked under EACH 50
HOURS would be inspected, serviced or otherwise completed as necessary to
ensure continuous airworthiness.
•
At each 100 hours, the 50 hours items would be completed in addition to the
items marked under EACH 100 HOURS as necessary to insure continuous
airworthiness.
•
An inspection conducted at 200 hours would likewise include the 50 hour items
and 100 hour items in addition to those at EACH 200 HOURS.
•
A complete aircraft inspection includes all 50, 100 and 200 hour items together
with those shown in the Engine Instruction Manual.
INSPECTION GUIDELINES
* MOVEABLE PARTS for:
lubrication, servicing, security of attachments, binding,
excessive wear, safetying, proper operation, proper
adjustment, correct travel, cracked fittings, security of
hinges, defective bearings, cleanliness, corrosion,
deformation, sealing and tension.
* FLUID LINES AND HOSES for: leaks, cracks, kinks, chafing, proper radius, security,
corrosion, deterioration, obstruction and foreign
matter.
* METAL PARTS for:
security of attachment, cracks, metal distortion, broken
welds, corrosion, and any other apparent damage.
* WIRING for:
security, chafing, burning, defective insulation, loose
or broken terminals, heat deterioration and corroded
terminals.
Page: 2/11
Issue: 3
Date: 130302
* BOLTS IN CRITICAL AREAS for: correct torque in accordance with torque values
given in the chart in Section 1, when installed or when
visual inspection indicates the need for a torque check.
NOTE:
Torque values listed in section 1 are derived from oilfree cadmium-plated threads, and are recommended for
all installation procedures contained in this manual
except where other values are stipulated. They are not
to be used for checking tightness of installed parts
during service.
* FILTERS, SCREENS and FLUIDS for: cleanliness, contamination and/or
replacement at specified intervals.
* AIRCRAFT FILE:
Various data, information and licenses are part of the
aircraft file. Check that the following documents are
up-to-date and in accordance with current Civil
Aviation Authority Regulations. Most of the items
listed are required by the Australian Civil Aviation
Authority Regulations. Since the regulations of other
nations may require other documents and data, owners
of exported aircraft should check with their own
aviation officials to determine their individual
requirements.
To be displayed in the aircraft at all times:
# Placards as detailed in Flight Manual Paragraph 2.9.
To be carried in the aircraft at all times:
# Flight Manual
To be made available on request:
# Aircraft Registration
# Radio Station License
# Pilot License/Certificate including Medical Certificate (if appropriate).
* ENGINE RUN-UP:
Before beginning the step-by-step inspection,
start, run-up and shut-down the engine in accordance
with instructions in the Flight Manual and Appendix 1
of this manual. During the run-up, observe the
following, making note of any discrepancies or
abnormalities:
1. Engine temperatures and pressures.
2. Static RPM. (Also refer to Engine
Instruction Manual).
3. Magnito drop. (Also refer to Engine
Instruction Manual).
4. Engine response to changes in power.
5. Any unusual engine noises.
Page: 2/12
Issue: 3
Date: 130302
6. Fuel shut-off valve; operate engine in ON position
and in OFF position long enough to ensure shut-off
functions properly.
7. Idling speed.
After the inspection has been completed, an engine
run-up should again be performed to determine that
any discrepancies or abnormalities have been
corrected.
Page: 2/13
Issue: 3
Date: 130302
2.5.2
INSPECTION CHART
IMPORTANT
READ ALL INSPECTION RQUIREMENTS
PARAGRAPHS PRIOR TO USING THESE
CHARTS.
Annual Inspection
Each 200 Hours
PROPELLER
Each 100 Hours
Each 50 Hours
1.
2.
3.
4.
5.
6.
Spinner…………………………………………………
Spinner flange…………………………………………
Spinner screws…………………………………………
Propeller……………………………………………….
Propeller bolts/nuts…………………………………….
Leading Edge Tape (if fitted)………………………….
*
*
*
*
*
*
*
*
*
*
*
*
ENGINE COMPARTMENT
Check for evidence of oil and fuel leaks, then clean
entire engine and compartment, if needed, prior to
inspection. (See notes in Paragraph 2.3.5 re engine
cleaning).
1.
2.
3.
4.
5.
6.
7.
8.
9.
10.
11.
12.
13.
14.
15.
16.
17.
18.
19.
20.
21.
Carburettor air filter……………………………………
Engine baffles and air ducts……………………………
Cylinders……………………………………………….
Crankcase and front crankcase seal………………………
Hoses, lines and fittings………………………………….
Intake and exhaust systems………………………………
Ignition harness…………………………………………
Spark plugs……………………………………………..
Compression check…………………………………….
Electrical wiring………………………………………..
Fuel pump………………………………………………
Engine controls and linkages…………………………….
Engine mounts, mount structure……………………….
Starter, solenoid and electrical connections……………..
Coils and electrical connections…………………………
Carburettor heat system………………………………..
Throttle and linkage……………………………………..
Carburettor……………………………………………..
Oil system tubes and hoses………………………………
Firewall…………………………………………………
Engine cowlings and clips……………………………….
Page: 2/14
Issue: 3
*
*
*
*
*
*
*
*
*
*
*
*
*
*
*
*
*
*
*
*
*
*
*
*
*
*
*
*
*
*
*
Date: 130302
*
*
*
*
*
*
*
*
*
*
Annual Inspection
Each 200 Hours
Each 100 Hours
Each 50 Hours
FUEL SYSTEM
1.
2.
3.
4.
5.
6.
7.
8.
Fuel filter, drain valve, bowl.…………………………
Fuel tank vent, cap and placards..………………………
Fuel tank………………………………………………
Check tank attachments……………………………….
Fuel shut-off valve and placards..……………………….
Electronic fuel boost pump and fittings………………….
Fuel lines and connectors……….……………………….
Fire sleeves………………………….………………….
*
*
*
*
*
*
*
*
*
*
*
*
*
*
*
*
LANDING GEAR
1.
2.
3.
4.
5.
6.
7.
8.
9.
Main gear wheels and fairings..…………………………
Nose gear wheel, steering links, tension links and
fairings….…………..…………………………
Wheel bearings…………..…………………………….
Nose gear strut…………………………………………
Nose gear housing and bushes..………………………….
Main gear struts, clamps and bolts/nuts…………………
Tyres and tubes.…………………………………………
Brake fluid, hoses, linings, discs, brake assemblies and
master cylinder…………………………………
Brake operational check….…………………………….
*
*
*
*
*
*
*
*
*
*
*
*
*
*
*
*
*
*
*
*
*
*
*
*
*
*
*
*
*
*
*
*
*
*
*
*
*
*
*
*
AIRFRAME
1.
2.
3.
4.
5.
6.
7.
8.
9.
10.
11.
12.
13.
14.
15.
16.
Aircraft exterior……………….……………………….
Aircraft structure………………………..……………..
Windows, windshield, doors and seals.…………………
Seatbelts and shoulder harnesses………………………..
Seat structure…………………………………………..
Instruments and markings………………………………..
Instrument plumbing and wiring….……………………..
Instrument panel, shockmounts, decals and labels..……..
Ventilation system……………………………………..
Cabin upholstery, trim…………………………………
Switches, fuses…………………………………………
Pitot and static systemslips……………………………….
Radio, intercom and headsets……………………………
Antenna and cable………………………………………
Battery, battery cradle and cables……………………….
Battery electrolyte……………………………………..
*
Page: 2/15
Issue: 3
*
*
*
*
*
*
*
*
*
Date: 130302
CONTROL SYSTEMS
In addition to the items listed below, always check for correct direction of movement
(particularly if controls have been disconnected) and correct travel.
Annual Inspection
Each 200 Hours
Each 100 Hours
Each 50 Hours
1.
2.
3.
4.
5.
6.
7.
8.
9.
10.
Cables and clamps…………….…………………………
Rod ends………………………..………………………
Trim control and cable..…………………………………
Travel stops….………..……………………………….
Decals and labels………..……………………………….
Flap controls and linkages……....……………………….
Elevator control and linkages…………………………….
Rudder pedals and linkages.…….……………………….
Exterior surfaces of control surfaces..………………….
Control horns, hinges and hinge lock tabs……………….
Page: 2/16
Issue: 3
*
*
*
*
*
*
*
*
*
*
*
*
*
*
*
*
*
*
*
*
Date: 130302
SECTION 3
FUSELAGE
Table of Contents
Paragraph
Fuselage .....................................................................................................................3.1
Windshield and Windows ..........................................................................................3.2
Description.......................................................................................................3.2.1
Cleaning ...........................................................................................................3.2.2
Waxing.............................................................................................................3.2.3
Repairs .............................................................................................................3.2.4
Scratches ..........................................................................................................3.2.5
Cracks ..............................................................................................................3.2.6
Removal ...........................................................................................................3.2.7
Installation .......................................................................................................3.2.8
Cabin Doors ...............................................................................................................3.3
Removal and installation .................................................................................3.3.1
Adjustment.......................................................................................................3.3.2
Door seals ........................................................................................................3.3.3
Cabin door latches ...........................................................................................3.3.4
Locks................................................................................................................3.3.5
Seats ...........................................................................................................................3.4
Repair...............................................................................................................3.4.1
Upholstery..................................................................................................................3.5
Soundproofing............................................................................................................3.6
Safety Provisions .......................................................................................................3.7
Seatbelts ...........................................................................................................3.7.1
Page: 3/1
Issue: 3
Date: 040401
3.1
FUSELAGE
The Fuselage is a composite monocoque (self-supporting) structure and includes both
the Horizontal Stabiliser and Vertical Fin.
All repairs must be referred to Jabiru Aircraft Pty Ltd.
3.2
WINDSHIELD and WINDOWS
3.2.1
Description
The windshield and windows are one-piece acrylic plastic panels set in sealing strips
with Sikaflex-291 or silicon and secured to the fuselage with screws/nuts.
IMPORTANT
The Windshield is a structural element
of the Fuselage and therefore must be
Maintained in excellent condition.
Cracks up to 25 mm in length should be
stop drilled; those longer than 25 mm
should NOT be repaired, and the
windshield should be replaced.
3.2.2
Cleaning
Refer to Section 2.
3.2.3
Waxing
Waxing will fill in minor scratches in clear plastic and help protect the surface from
further abrasion. Use a good grade of commercial wax (NOT SILICON BASED)
applied in a thin, even coat. Bring wax to a high polish by rubbing lightly with a clean,
dry flannel cloth.
IMPORTANT
Silicon based waxes and polish are not
recommended as silicon may be absorbed
into the glass fibre laminate and effect
the repairablity due to impairing bonding.
3.2.4
Repairs
Damaged window panels and windshield may be removed and replaced if damage is
substantial. However, certain minor repairs as prescribed in the following paragraphs
can be made successfully without removing the damaged part from the aircraft.
The procedure for repairing cracks is only recommended for low stress areas. No
repairs of any kind are recommended on highly stressed or compound curved areas or
where repair would be likely to affect the pilot’s field of vision.
Page: 3/2
Issue: 3
Date: 040401
3.2.5
Scratches
Scratches on clear plastic surfaces can be removed by hand buffing and polishing using
Plastic Polish available from JABIRU as Part No.: NOVUS#2.
NOTE:
3.2.6
Rubbing plastic surface with a dry cloth will
build up an electrostatic charge which will attract
dirt particles and may eventually cause scratching
of the surface. After applying polish, dissipate
this charge by rubbing surface with a slightly
damp chamois. This will also remove dust
particles which have collected while wax is
hardening.
Cracks
When a crack appears, drill a hole at the end of the crack to prevent further spreading.
Hole should be approximately 1/16 inch in diameter, depending on length of crack and
thickness of material. An unfluted drill should be used.
3.2.7
Removal
Unscrew and remove carefully with a small chisel.
3.2.8
Installation
1.
Ensure all old Silastic/Sikaflex-291 sealant has been removed from the fuselage
sealing strips and from a used windscreen which is being replaced.
2.
Check new windscreen for fit. File or grind away any excess material to ensure
a close fit.
3.
Squeeze a bead of Silastic/Sikaflex-219 around the outer edge of the
windscreen.
4.
Place windscreen accurately over the sealing strips and locate with one screw
top and bottom.
5.
Fit other screws.
6.
Take care not to crack windscreen when installing. DO NOT over tighten
screws – cracking will result.
3.3
CABIN DOORS
3.3.1
Removal and Installation
Removal of doors is achieved by removing the hinge pins or removing the screws
which attach the hinges.
Page: 3/3
Issue: 3
Date: 040401
3.3.2
Adjustment
Cabin doors should be adjusted so that the door skin fairs with the fuselage skin.
3.3.3
Door Seals
A weather strip is glued around all edges of the door. Apart from excluding wind and
water, the weather strip is important in minimising exhaust fume entry to the cabin. It
should be maintained in good condition and fit at all times. New weather strip may be
applied after mating surfaces of weather strip and door are clean, dry and free from oil
and grease.
3.3.4
Cabin Door Latches
There is one main latch on each door of a simple spring type. This is complemented
by two wedge catches at the top of each door.
Door latches or their component parts must be replaced if worn or damaged.
3.3.5
Locks
An optional cylinder and key lock is available. When fitted, the keyed barrel lock is
located in the fuselage at the rear of the Port side door. An internal toggle catch,
located in the fuselage at the rear of the Starboard door, locks the Starboard door.
Spare keys are available to JABIRU registered owners by quoting the aircraft Serial
Number.
3.4
SEATS
The JABIRU seats are an integral part of the structure of the aircraft; they are therefore
fixed in position. Forward and upward adjustment can be achieved by placing a
cushion behind and/or under the occupant. The seat pans incorporate crushable foam
which is essential in providing shock absorption in crash conditions.
WARNING
DO NO MODIFY SEATS.
3.4.1
Repair
As seats are integral to the aircraft structure, any repair must be referred to JABIRU
AIRCRAFT Pty Ltd.
3.5
UPHOLSTERY
Seat upholstery is provided through slip-on covers. These are easily removed for
cleaning and inspection of the seat structures.
Optional Hood and Cabin lining is available, together with Door Pockets.
Page: 3/4
Issue: 3
Date: 040401
3.6
SOUNDPROOFING
Soundproofing material is included in the Firewall.
In addition, a curtain of soundproofing material is provided at the rear of the
cockpit/baggage area. This curtain is attached to composite struts in the fuselage with
velcro straps. Its purpose is to minimise drumming of the fuselage as well as
restricting material falling aft of the curtain and resulting in a severe aft centre of
gravity condition. The curtain should be in place for all flights.
3.7
SAFETY PROVISIONS
3.7.1
Seatbelts
Aircraft grade Seatbelts, bolted to the fuselage structure, are provided for both seats.
Belts should be replaced if frayed or cut, latches are defective of stitching is broken.
Attaching parts should be replaced with equivalent grade parts if excessively worn or
defective.
Page: 3/5
Issue: 3
Date: 040401
Door Latch Assembly
Figure: 3-3-4
Page: 3/6
Issue: 3
Date: 040401
SECTION 4
WINGS and EMPENNAGE
Table of Contents
Paragraph
Wings and Empennage ..............................................................................................4.1
Wings .........................................................................................................................4.2
Removal ...........................................................................................................4.2.1
Repair...............................................................................................................4.2.2
Installation .......................................................................................................4.2.3
Wing Struts ................................................................................................................4.3
Removal and Installation .................................................................................4.3.1
Repair...............................................................................................................4.3.2
Fin ............................................................................................................................4.4
Removal, Installation and Repair.....................................................................4.4.1
Horizontal Stabiliser ..................................................................................................4.5
Removal, Installation and Repair.....................................................................4.5.1
Page: 4/1
Issue: 3
Date: 040401
4.1
WINGS and EMPENNAGE
4.2
Wings
Refer to Figure 4.2.
Each composite wing is a semi-cantilever, monocoque type with a main spar. The
wing is a moulded structure of rigid cellular polystyrene which is bonded through a
moulding process to a fibreglass skin and to the spars.
The forward wing attachment is an extension of the forward sub-spar. The rear
attachment is a composite block heavily bonded to the reinforced wing skin and
attaching the main spar through the Wing End Plug. Both attachments are through
stainless steel threaded bushes bonded into the attachment blocks.
4.2.1
Removal
The JABIRU aircraft is designed with wings which are removable for storage or
transport.
Wing removal is most easily achieved if two persons are available to handle the wing.
1.
2.
3.
4.
5.
6.
12.
13.
14.
Remove wing root fairings.
Remove wing strut fairings – top and bottom.
Disconnect Pitot tube – RH wing only.
Unbolt flap control rods – 1 each wing.
Unbolt aileron control cables (2) from rear of control stick horn inside cabin.
Remove pin and clamp block from aileron control cable clamps at rear of seat –
1 each seat.
With one person supporting wing tip, unbolt top wing strut bolt and lower wind
strut to the ground.
Lower wing tip to ground.
Unbolt and remove front wing attachment bolt.
Unbolt and remove rear wing attachment bolt.
Note: It may be necessary to rock the wing slightly while pulling attaching
bolt, or carefully use a long drift punch to drive out attaching bolt.
Carefully remove wing by moving it out to clear the aileron cable from the
fuselage.
Place wing on cushioned structure to avoid damage to wing strut attachment.
Unbolt lower wing strut bolt and remove wing strut.
Repeat Steps 6 – 12 to remove other wing.
4.2.2
Repair
7.
8.
9.
10.
11.
The wing is a composite monocoque structure. All repairs must be referred to JABIRU
AIRCRAFT Pty Ltd.
4.2.3
Installation
1.
Fit wing and its lower attaching bolt, leaving the top end of the strut on the
ground.
Page: 4/2
Issue: 3
Date: 040401
WARNING
Do Not Tighten nut or metal fatigue may result
washer must be free to rotate.
2.
3.
4.
5.
Fit wing to fuselage, leaving wing tip on the ground and routing aileron cable
through hole in fuselage wing root.
Install front and rear wing attaching bolts/nuts.
Put top wing strut attaching bolt in your pocket.
Lift wing tip and install wing strut to wing strut attachment with bolt from
pocket. Install nut.
WARNING
Do Not Tighten nut or metal fatigue may result
washer must be free to rotate.
6.
7.
8.
9.
10.
11.
Install bolt/nut in flap control rod.
Install bolt/nut in aileron control cable on main control stick horn.
Install clamp block and pin in aileron control cable clamp at rear of seat.
On RH wing, reconnect pitot tube.
Replace wing strut fairings – top and bottom.
Replace wing root fairings.
4.3
WING STRUTS
Each wing strut is a single lift strut which transmits a part of the wing load to the lower
portion of the fuselage. The strut consists of a streamlined tube riveted to two end
fittings which attach to the fuselage and wing.
WARNING
Do Not Tighten Strut Attachment Bolts.
Metal fatigue may result
Bolt must be free to rotate.
4.3.1
Removal and Installation
See Wing Removal (Paragraph 4.2.1) and Wing Installation (Paragraph 4.2.3).
4.3.2
REPAIR
Wing struts are structural components and therefore all repairs must be referred to
JABIRU AIRCRAFT Pty Ltd.
A dented, cracked or deformed wing strut should be replaced prior to next flight.
4.4
FIN
The Fin is a moulded composite structure supported by a rib and a rear spar. Hinges
attached to the rear spar attach the rudder.
4.4.1
Removal, Installation, Inspection and Repair
The fin is an integral part of the fuselage structure and cannot be removed.
All repairs must be referred to JABIRU AIRCRAFT Pty Ltd.
Page: 4/3
Issue: 3
Date: 040401
4.5
HORIZONTAL STABILISER
The horizontal stabiliser is a moulded monocoque structure of rigid cellular
polystyrene bonded to a fibreglass skin and rear spar.
4.5.1
Removal and Installation
The horizontal stabiliser is an integral part of the fuselage to which it is bonded. It
cannot be removed.
All repairs must be referred to JABIRU AIRCRAFT Pty Ltd.
Page: 4/4
Issue: 3
Date: 040401
SECTION 5
LANDING GEAR and BRAKES
Table of Contents
Paragraph
Landing Gear .............................................................................................................5.1
Trouble Shooting .......................................................................................................5.2
Main Gear ..................................................................................................................5.3
Removal ...........................................................................................................5.3.1
Installation .......................................................................................................5.3.2
Inspection and Repair ......................................................................................5.3.3
Main Wheel Fairing Removal and Installation................................................5.3.4
Main Gear Top Fairing Removal and Installation ...........................................5.3.5
Main Wheel................................................................................................................5.4
Removal ...........................................................................................................5.4.1
Disassembly .....................................................................................................5.4.2
Inspection, Assembly and Repair ....................................................................5.4.3
Installation .......................................................................................................5.4.4
Stub Axle Removal..........................................................................................5.4.5
Wheel Installation ............................................................................................5.4.6
Alignment ........................................................................................................5.4.7
Balancing .........................................................................................................5.4.8
Nose Gear...................................................................................................................5.5
Trouble Shooting .............................................................................................5.5.1
Removal and Installation .................................................................................5.5.2
Inspection and Repair ......................................................................................5.5.3
Nose Wheel Fairing Removal and Installation ................................................5.5.4
Nose Wheel................................................................................................................5.6
Removal and Installation .................................................................................5.6.1
Disassembly .....................................................................................................5.6.2
Inspection and Repair ......................................................................................5.6.3
Reassembly ......................................................................................................5.6.4
Balancing .........................................................................................................5.6.5
Nose Wheel Steering System.....................................................................................5.7
Steering Cable Assembly.................................................................................5.7.1
Nose Wheel Steering Assembly.......................................................................5.7.2
Brake System .............................................................................................................5.8
Trouble Shooting .............................................................................................5.8.1
Master Cylinder ...............................................................................................5.8.2
Removal and Installation
Repair
Hydraulic Brake Lines .....................................................................................5.8.3
Wheel Brake Assemblies .................................................................................5.8.4
Removal
Inspection and Repair
Installation
Brake Lining Installation
Brake System Bleeding....................................................................................5.8.5
Brake Pad Adjustment .....................................................................................5.8.6
Parking Brake ..................................................................................................5.8.7
Page: 5/1
Issue: 3
Date: 040401
5.1
LANDING GEAR
Main gear comprises two separate composite beams which are bolted to the fuselage at
the top and centre and to the wheel stub at the bottom.
The nose gear is a welded steel, trailing arm assembly with a rubber spring system.
The nose wheel is steerable with the rudder pedals.
Nose Wheel and Main Wheel Speed Fairings are optional equipment.
5.2
TROUBLE SHOOTING
Trouble
Probable Cause
Remedy
Aircraft leans to
one side
Incorrect tyre
inflation
Inflate to pressure
shown at Fig 1-1
Landing gear
attaching parts
not tight
Tighten loose parts.
Replace defective
parts.
Bent axle stubs
Install new part(s)
Incorrect tyre
inflation
Inflate to pressure
shown in Figure 1-1
Main wheels out
of alignment
Align as specified
in Figure 1-1
Bent axle stubs
Install new part (s)
Dragging Brakes
Refer to Para. 5.8
Tyres wear
excessively
5.3
MAIN GEAR
Figure 5-3 illustrates the main landing gear. The illustrations should be used in
conjunction with the following procedures during removal and installation of
component parts.
The wheels comprise two wheel halves which are attached to the wheel hub by
through-bolts and nuts as shown in Figure 5-3-1. During assembly of the main wheels
the through-bolts/nuts should be tightened to the value specified in Figure 1-2.
NOTE:
The Main Undercarriage Legs are Left and Right handed as denoted by Part Nos.
6003093 and 602409N respectively. They are NOT interchangeable.
WARNING: Check looseness of main u/c beams by lifting each wing and trying to move beam
back and forth. If movement, tighten clamp bolts (2) evenly to take beam movement out. Do not over
tighten or exceed 3 threads clear on the nuts (use extra washers). Models with wide 65lt tanks must
have tank attachments and hoses loosened and rocked to obtain clearance on rear main saddle bolt.
Over tightening can cause bolt fracture and failure to tighten both can also cause bolt failure.
Page: 5/2
Issue: 3
Date: 040401
5.3.1
Removal
The following procedural steps remove one side of the landing gear as a complete
assembly. Refer to applicable paragraphs for removal of the individual components.
1.
2.
3.
4.
5.
6.
Jack the aircraft in accordance with Paragraph 2.1.2.
Unbolt wheel end of flexible brake hose – catching brake fluid in a container.
Remove bolt/nut from top inboard end of undercarriage beam. Remove rubber
bushes (2).
Remove bolts/nuts (2) from the clamp at bend in undercarriage beam.
Remove clamp.
Remove Undercarriage Leg Assembly.
5.3.2
Installation
The following procedural steps install the landing gear as a complete assembly. Refer
to applicable paragraphs for installation of the individual components.
With aircraft jacked:
1.
6.
Offer the beam to the fuselage and install clamp and bolts/nuts (2) – Do not
tighten at this stage.
Locate top end bolt, install and tighten nut (See Torque Value Figure 1-2).
Tighten clamp bolts/nuts (2) (See Torque Value Figure 1-2).
Connect flexible brake line.
Top-up brake master cylinder with fresh brake fluid and bleed brakes – see
Paragraph 5.8.5.
Lower aircraft
5.3.3
Inspection and Repair
1.
Inspect composite beam for damage indicated by cracks or delamination. Pay
particular attention to the area around the centre bend and to areas around
drilled holes.
Inspect bolts and nuts for signs of stress or bending – replace if in any doubt.
Inspect clamp for damage.
Inspect bolt seats in fuselage for signs of damage, wear or perishing.
2.
3.
4.
5.
2.
3.
4.
Repairs to the composite undercarriage beams must be referred to JABIRU
AIRCRAFT Pty Ltd.
4.3.4
Main Wheel Fairing Removal and Installation
1.
Remove the machine screws around the join of the forward and rear sections of
the fairing.
Remove the bolt on the outside of the rear section of the fairing.
Remove the machine screws (2) in the leg attachment fitting.
Remove the machine screws (3) in the inside of the rear section of the fairing.
Reverse the preceding steps for installation.
2.
3.
4.
5.
Page: 5/3
Issue: 3
Date: 040401
5.3.5
Main Gear Top Fairing Removal and Installation
The fairing at the top of the main undercarriage leg is removed by removing the
securing screws.
To install, reverse this procedure.
5.4
MAIN WHEEL
5.4.1
Main Wheel Removal
1.
2.
3.
4.
5.
6.
Jack aircraft as outlined in Paragraph 2.1.2.
Remove speed fairing, if installed, in accordance with paragraph 5.3.4.
Remove outboard brake pad plate.
Remove lock bolt/nut through centre of axle and spacer.
Remove lock spacer.
Pull wheel from axle.
5.4.2
Main Wheel Disassembly
1,
Deflate tyre and break tyre beads loose from tyre rims.
WARNING
Injury can result from attempting to
separate wheel halves with the tyre
inflated. Avoid damaging wheel flanges
when breaking beads loose as a scratch,
nick or gouge may cause wheel failure.
2.
3.
4.
Remove through-bolts/nuts and separate wheel halves, removing tyre and tube
and wheel hub.
Remove brake disc.
Remove bearings from hub.
NOTE:
The bearing are “press-fit” in the wheel
hub and should not be removed unless a
new part is to be installed.
5.4.3
Main Wheel Inspection, Assembly and Repair
1.
2.
Clean all metal parts in solvent and dry thoroughly.
Inspect wheel halves for cracks. Cracked wheel halves should be discarded and
new parts used. Sand out nicks, gouges and corroded areas. Clean thoroughly
and paint with silver paint.
If excessively warped or scored or worn to a thickness of 2 mm, brake discs
should be replaced with a new part. Sand smooth small nicks and scratches.
Carefully inspect bearings for damage and discolouration.
NOTE:
Bearings are pre-packed. DO NOT
clean with solvents as it will removed the
packing.
3.
4.
5.
Replace bearings.
Page: 5/4
Issue: 3
Date: 040401
6.
Position tyre and tube between wheel halves with tube inflation valve through
hole in outside wheel half.
Mate with wheel hub.
While maintaining a light force, assemble a washer and nut on one through-bolt
and tighten snugly. Assemble the remaining washers and nuts on the throughbolts and torque to the value specified in Figure 1-2.
7.
CAUTION
Ensure tube is not pinched between
wheel halves during assembly. Uneven
or improper torque of through-bolt
nuts can cause failure of bolts with
resultant wheel failure.
8.
Insert through-bolts through brake disc and position disc on the inner wheel
hub flange.
Inflate tyre to seat tyre beads, then adjust to correct tyre pressure – Refer Figure
1-1.
9.
5.4.4
1.
2.
3.
4.
5.
6.
7.
8.
Lightly coat axle with “Anti Sieze” or a Water Proof grease.
Place wheel assembly on axle.
Install spacer and lock bolt/nut through centre of axle.
Place outboard brake pad plate and springs in position and secure with
bolts/nuts/washers.
Reconnect flexible brake line.
Refill brake master cylinder with fresh brake fluid.
Bleed brakes – Refer to Section 5.8.5.
Install speed fairing (if used) as outlined in Paragraph 5.3.4.
5.4.5
1.
2.
3.
4.
Main Wheel Installation
Main Wheel Stub Axle Removal
Remove speed fairing (if installed) in accordance with Paragraph 5.3.4.
Remove wheel in accordance with Paragraph 5.4.1.
Disconnect flexible brake hose and drain brake fluid.
Remove 4 bolts/nuts/washers securing axle to leg.
NOTE: When removing axle from leg, note number and position
of the wheel alignment shims (if any) between the axle
flange and composite leg. Mark these shims or tape them
together carefully so that they can be installed in exactly
the same position, to ensure that wheel alignment is not
disturbed.
5. Remove inboard brake plate.
Page: 5/5
Issue: 3
Date: 040401
5.4.6
Main Wheel Stub Axle Installation
1. Secure axle and inboard brake plate to composite leg, making sure that any wheel
alignment shims are installed in their original position.
2. Install wheel assembly on axle in accordance with Paragraph 5.4.4.
5.4.7
Main Wheel Alignment
Refer to Figure 5-4-7.
5.4.8
Wheel Balancing
Since uneven tyre wear is usually the cause of tyre imbalance, replacing the tyre will
probably correct this condition. If a wheel shows evidence of imbalance during
service, it may be statically balanced.
5.5
NOSE GEAR
The nose gear comprises a steerable nose wheel mounted on a welded steel assembly
with aluminium trailing arms and a rubber spring system.
The steel tube is constrained within two lubron bushes mounted in the fuselage main
horizontal beam.
Nose wheel steering is achieved by connecting the rudder pedal assembly to the nose
wheel steering link by a push rod. The nosewheel is centred by a sprung steel cable.
A nose wheel speed fairing is optional equipment.
Disassembly, inspection, repair and reassembly of the nose wheel assembly are
described in separate paragraphs.
The wheel is in two halves which are joined by through-bolts to the wheel hub as
shown in Figure 5-5. During assembly of the nose wheel, the through-bolts must be
tightened evenly and torqued to the value specified in Figure 1-2.
5.5.1
Trouble Shooting
Trouble
Nose wheel shimmy
Probable Cause
Nose strut bolts loose
Loose or worn steering link
Nose wheel out of balance
Wheel bearings loose
Page: 5/6
Issue: 3
Remedy
Tighten bolts
Tighten, replace defective
parts
Refer Paragraph 5.6.5
Replace
Date: 040401
5.5.2
Nose Gear Removal and Installation
See Figure 5-5.
1. Weight or tie-down tail of aircraft to raise nose wheel off floor.
2. Disconnect nose wheel steering cables and centring cable from steering cross
beam.
3. Unbolt steering cross beam.
4. Slide steering cross beam from position in top of front aluminium beam.
5. Pull the nose wheel strut assembly down from the bushes in the fuselage.
To install the nose gear, reverse the preceding steps.
5.5.3
Nose Gear Inspection and Repair
1. Inspect steel tube and attachments for dents and straightness.
2. Inspect rubber spring assembly for damage or perishing of the rubber, or
delamination of the rubber from the aluminium spacers between the rubber blocks.
3. Inspect aluminium trailing arms for damage or bending.
4. Inspect bolts/nuts for torque – see torque values Figure 1-2.
Repairs to the welded nose leg assembly beam must be referred to JABIRU
AIRCRAFT Pty Ltd.
5.5.4
Nose Wheel Speed Fairing Removal and Installation
1. Remove the machine screws around the forward and rear sections of the fairing and
remove the front section.
2. Loosen the axle nuts and remove the rear section.
3. Reverse the preceding steps for installation.
5.6
NOSE WHEEL
5.6.1
Nose Wheel Removal and Installation
1. Weight or tie-down tail of aircraft to raise the nose wheel off the floor.
2. Remove nose wheel axle bolt.
3. Pull nose wheel assembly from yolk.
Reverse the preceding steps to install nose wheel. Tighten axle bolt.
5.6.2
Nose Wheel Disassembly
1. Completely deflate tyre and break tyre beads loose at wheel rim.
ç
Page: 5/7
WARNING
Injury can result from attempting to
separate wheel halves with the tyre
inflated. Avoid damaging wheel flanges
when breaking beads loose as a scratch,
nick or gouge may cause wheel failure.
Issue: 3
Date: 040401
2.
3.
4.
5.
Remove through-bolts and separate wheel halves.
Remove wheel hub.
Remove tyre and tube from wheel halves.
Remove bearings.
NOTE: The bearings are “press-fit” in the wheel hub and should
not be removed unless a new part is to be installed.
5.6.3
Nose Wheel Inspection and Repair
1. Clean metal parts in solvent and dry thoroughly.
2. Inspect wheel halves for cracks. Cracked wheel halves should be discarded and
new parts used. Sand out nicks, gouges and corroded areas. Clean thoroughly and
paint with silver paint.
3. Carefully inspect bearings for damage and discolouration.
NOTE: Bearings are pre-packed. DO NOT clean with solvents
as it will remove the packing.
4. Refit bearings.
5.6.4
Nose Wheel Reassembly
1. Replace bearings in wheel hub.
2. Position tyre and tube between wheel halves with tube inflation valve through hole
in outside wheel half.
3. Mate with wheel hub.
While maintaining a light force, assemble a washer and nut on one through-bolt
and tighten snugly. Assemble the remaining washers and nuts on the through-bolts
and torque to the value specified in Figure 1-2.
Ô
CAUTION
Ensure tube is not pinched between wheel
halves during assembly. Uneven or
improper torque of through-bolt nuts can
cause failure of bolts with resultant wheel
failure.
4. Insert through-bolts through brake disc and position disc on the inner wheel hub
flange.
5. Inflate tyre to seat the tyre beads, then adjust to correct tyre pressure – Refer Figure
1-1.
5.6.5
Wheel Balancing
Refer to Paragraph 5.4.8 for wheel balancing information.
Page: 5/8
Issue: 3
Date: 040401
5.7
NOSE WHEEL STEERING SYSTEM
5.7.1
Steering Centring Cable Assembly
The Nosewheel Centring Cable Assembly consists of a manufactured cable assembly
and a spring.
Repair is limited to replacement of both or either part.
5.7.2
Nose Wheel Steering Assembly
Refer to Figure 5-7-2.
The Nosewheel Steering Assembly comprises a Steering Bellcrank Assembly which is
bolted to the Main Beam and push rods attaching the Rudder Pedals and the Steering
Link.
Repair is limited to the replacement of serviced parts.
5.8
BRAKE SYSTEM
The hydraulic brake system consists of one master cylinder located between the seats
in the main longitudinal beam, flexible hoses connecting the master cylinder to each
wheel brake cylinder and the single disc, floating-cylinder type brake assembly,
located at each main landing gear wheel.
5.8.1
Trouble Shooting
Trouble
Dragging brakes
Probable Cause
Brake handle binding
Worn or broken piston
return spring
Restriction in hydraulic
lines or in master cylinder
Brakes fail to operate
Leak in system
Air in system
Lack of fluid in master
cylinder
Master cylinder defective
Brake pads worn
5.8.2
Remedy
Check and adjust
Repair or install new
master cylinder
Drain brake line, clear with
compressed air. If
cleaning lines fails, the
master cylinder may be
faulty and should be
repaired or replaced.
If master cylinder or wheel
cylinders are leaking,
repair or install new parts.
Bleed system
Fill and bleed system
Repair or install new parts
Replace with new parts
Brake Master Cylinder
The brake master cylinder, located between the seats in the main longitudinal beam, is
actuated by applying rearward pressure to the brake handle. A small reservoir is
incorporated into the master cylinder for the fluid supply.
Page: 5/9
Issue: 3
Date: 040401
Brake Master Cylinder Removal and Installations
1. Remove the flexible hose from one wheel brake assembly and drain the hydraulic
fluid from the brake system.
2. Remove cover over main longitudinal beam between seats.
3. Unbolt pushrod at brake handle and remove pushrod.
4. Disconnect flexible hose at master cylinder.
5. Unbolt master cylinder retaining bolts (2).
6. Plug or cap hydraulic fittings and hoses to prevent the entry of foreign material.
Reverse the preceding steps to install brake master cylinder, then fill and bleed brake
system in accordance with Paragraph 5.8.5.
Brake Master Cylinder Repair
Figure 5-8-2 may be used as a guide during disassembly, repair and reassembly of the
brake master cylinder.
Repair is limited to installation of new parts, cleaning and adjustment. Use only
automotive brake fluid. DO NOT use aircraft grade hydraulic fluid or damage will
result.
5.8.3
Hydraulic Brake Lines
These lines are flexible hoses connected through a tee-piece.
Repair is limited to replacement.
5.8.4
Wheel Brake Assemblies
The Wheel Brake Assemblies use a disc which is attached to the main wheel hub with
through-bolts and a floating brake assembly (Refer to Figure 5-3-1).
Removal
The Wheel brake assemblies can be removed by disconnecting the brake hose and
unbolting the brake cylinder from the backing plate. The brake disc is removed after
the wheel is removed and disassembled. Refer to Figure 5-3-1 for disassembly of
either wheel brake assembly.
Wheel Brake Inspection and Repair
1. Clean all parts except brake linings and cylinder buckets in dry cleaning solvent
and dry thoroughly.
2. New cylinder buckets should be installed each time they are removed.
If reuse is necessary, they should be wiped with a clean cloth saturated in
automotive brake fluid and inspected for damage.
NOTE: Thorough cleaning is important. Dirt
and chips are the greatest single cause of
malfunctions and leaks in hydraulic brake
systems.
Page: 5/10
Issue: 3
Date: 040401
3. Check brake linings for deterioration or excessive wear.
4. Inspect brake cylinder bore for scoring. A scored cylinder will leak or cause rapid
bucket wear. If wear is evident, install a new brake cylinder.
5. If the anchor bolts on the brake assembly are nicked or gouged, replace with new
bolts.
6. Inspect wheel brake disc for a minimum thickness of 2mm. If brake disc is below
minimum thickness, install a new part.
Wheel Brake Installation
1.
2.
3.
4.
5.
Place brake cylinder assembly in position on backing plate.
Install bolts, springs, outboard pad and nuts/washers.
Reconnect flexible hose.
Fill master cylinder reservoir with brake fluid.
Bleed brakes – Refer to Paragraph 5.8.5.
Brake Lining Installation
New brake linings should be installed when the existing linings are worn to expose the
rivet heads.
To replace outboard lining:
1. Remove bolts securing outboard brake pad and brake cylinder to backing plate.
2. Remove outboard brake pad.
3. Place brake pad on a table with lining side down flat. Centre a 1/8” (or slightly
smaller) punch on the rolled rivet and hit the punch sharply with a hammer. Punch
out all rivets securing the lining to the pad plate.
4.
5.
6.
7.
8.
NOTE: A replacement kit for brake pads and
rivets is available from JABIRU as Part
No. 6000994.
Clamp the flat side of an anvil in a vice.
Align the new lining on the pad plate and place the brake rivet in the hole with the
rivet head in the lining. Place the head against the anvil.
Centre the rivet setting punch on the lips of the rivet. While holding the pad plate
down firmly against the lining, hit punch with hammer to set the rivet. Repeat
blows on the punch until the lining is firmly against the pad plate.
Realign the lining of the pad plate and install and set rivets in the remaining holes.
Replace the brake pad and refix with through-bolts and springs.
To replace inboard lining it is necessary to:
1.
2.
3.
4.
5.
6.
Remove wheel assembly – see Paragraph 5.4.1.
Remove stub axle – see Paragraph 5.4.5.
Remove brake cylinder backing plate.
Replace lining in accordance with steps 3-7 above.
Install axle and wheel assembly – see Paragraph 5.4.6.
Install outboard brake pad and refix with through-bolts and springs.
Page: 5/11
Issue: 3
Date: 040401
5.8.5
Brake System Bleeding
1. Fill the brake master cylinder with automotive brake fluid.
2. Loosen the flexible hose fitting at the brake cylinder.
3. Pump the handbrake until air is expelled from lines.
NOTE: Ensure brake master cylinder remains full above
the outlet hose.
4. When air is fully expelled, tighten flexible hose fitting.
5. Repeat steps 1-4 for other side brake.
Ô
5.8.6
CAUTION
Use only automotive brake fluid. DO
NOT use aircraft hydraulic fluid or
damage will result.
Brake Pad Adjustment
Brake Pads may be adjusted by remove the Main Wheel Spats and tightening the brake
pad attaching bolts and nuts until the wheel just rotates freely.
5.8.7
Parking Brake
The Parking Brake consists of an over centre cam on the brake handle. Should the cam
have insufficient travel for the brakes to hold the aircraft with a propeller thrust of
2500rpm, adjust by one or all of the following:
1. Adjust brakes as described in Paragraph 5.8.6.
2. Bleed air from brake system as described in Paragraph 5.8.5.
3. Adjust length of Master Cylinder Drive Rod at the Rod End attaching to the Brake
Handle.
NOTE: Items 1 and 2 above should correct the
adjustment.
Item 3 should only be necessary with replacement
of Master Cylinder.
Page: 5/12
Issue: 3
Date: 040401
Figure: 5-3
Page: 5/13
Issue: 3
Date: 040401
Page: 5/14
Issue: 3
Date: 040401
Page: 5/15
Issue: 3
Date: 040401
Figure: 5-3-1
Page: 5/16
Issue: 3
Date: 040401
Figure: 5-4-7
Page: 5/17
Issue: 3
Date: 040401
Figure: 5-5
Page: 5/18
Issue: 3
Date: 040401
Page: 5/19
Issue: 3
Date: 040401
Page: 5/20
Issue: 3
Date: 040401
Figure: 5-7-2
Page: 5/21
Issue: 3
Date: 040401
Figure: 5-8-2
Page: 5/22
Issue: 3
Date: 040401
SECTION 6
AILERON CONTROL SYSTEM
Table of Contents
Paragraph
Aileron Control System .............................................................................................6.1
Control Column .........................................................................................................6.2
Removal and Installation....................................................................................6.2.1
Control Cables ...........................................................................................................6.3
Removal and Installation....................................................................................6.3.1
Ailerons......................................................................................................................6.4
Removal and Installation....................................................................................6.4.1
Inspection & Repair ...........................................................................................6.4.2
Rigging.......................................................................................................................6.5
6.1
AILERON CONTROL SYSTEM
Refer to Figure 6-5.
The aileron control system is comprised of a control column and two enclosed pushpull cables fitted with spherical bearings.
ç
6.2
WARNING
All spherical bearings must be fitted with
a large washer on the outside of the
through-bolt to prevent the bearing case
and cable releasing in the event of a
bearing failure. See Figure 6-5.
CONTROL COLUMN
Refer to Figure 6-2.
6.2.1
Removal and Installation
The Control Column is a Primary Control and may not be removed or repaired without
reference to JABIRU AIRCRAFT Pty Ltd.
6.3
CONTROL CABLES
Control Cables are of the enclosed push-pull type, fitted with spherical bearings at both
ends.
To operate, the outer cover of the cable must be clamped firmly at each end.
6.3.1
Removal and Installation
Control Cables are Primary Control and may not be removed or repaired without
reference to JABIRU AIRCRAFT Pty Ltd.
Page: 6/1
Issue:
Date: 040401
6.4
AILERONS
Ailerons comprise a moulded and bonded monocoque structure embodying a
composite control horn at the outboard end.
6.4.1
Removal and Installation
1. Unbolt cable from aileron control arm.
2. Loosen screws in hinge pin retainers and lift hinge pin retainer away from the
hinge pin. It is not necessary to completely remove these parts.
3. Remove hinge pins.
4. Remove aileron.
Reverse the preceding steps for installation.
6.4.2
Inspection and Repair
Inspect ailerons for any signs of delamination or cracking. Pay particular attention to
the Control Horn and hinges and their surrounding areas.
Repairs must be referred to JABIRU AIRCRAFT Pty Ltd.
6.5
RIGGING
With the control stick in the neutral position, use a straight-edge not less than 1 metre
long. Hold the straight-edge flush on the underside of the wing aerofoil and adjust
aileron to sit on the straight-edge. Make this adjustment with the cable rod-ends,
ensuring that on completion the locknut is tight on the rod-ends and that cable is visible
through the inspection hole in the rod-end.
Then check UP travel on both ailerons using the Aileron Rigging Template (see
Appendix 3) as shown in Figure 6-5.
Use the Aileron Control Stop adjustment (see Figure 6-5-1) to adjust the total aileron
movement (ie. UP travel) and use cable adjustment as previously described to
proportion UP and DOWN travel. The Aileron Control Stop should engage before the
Aileron Arm hits the UP travel stop at the Wing Tip.
DO NOT move the Cable Anchors – these positions are factory set.
ç
Page: 6/2
WARNING
The control cable must be connected to
the same side of the control column
bellcrank as the wing to which the aileron
is fitted, otherwise control surface reversal
will result.
DO NOT CROSS CABLES
Issue: 3
Date: 040401
Figure: 6-2
Page: 6/3
Issue: 3
Date: 040401
Figure: 6-5
Figure: 6-5-1
Page: 6/5
Issue: 3
Date: 040401