1
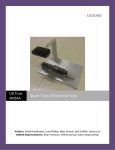
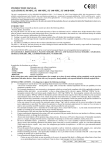
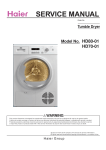
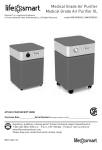
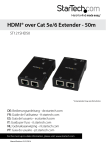
USER MANUAL 81,28cm/32” LCD TV Thank you very much for your purchase of this product. To enjoy your set to the full from the very beginning, read this manual carefully and keep it handy for ready reference. ENG CONTENTS CONTENTS 2 INSTALLATION 3 COMMENTS 3 ELECTRICAL SAFETY 4 PHYSICAL SAFETY 4 SAFETY INFORMATIONS 5 CAUTION 6 QUICK SET-UP GUIDE 8 FIRST START 9 REAR OF THE TV SET – CONNECTORS 10 REMOTE CONTROLLER 11 MENU 13 1. Initial Setup 2. Input Source Menu 3. Video Menu 4. Audio Menu 5. Miscallenous Menu 6. TV Menu 7. Geometric Menu USB MULTIMEDIA PLAYER 21 SPECIFICATION 25 -2- INSTALLATION Do not place the device in the room so that the light shine directly on the screen. Viewing in total darkness or watching the highlights on the screen can cause eyestrain. It is advised to use weak, indirect light for a pleasant watching TV. Make sure that the device does not adhere to the wall to ensure adequate heat dissipation. Insufficient heat dissipation can damage the device. Do not place near other heat sources (eg radiators). Make sure the ventilation holes are not obstructed during the operation. TV is powered by mains voltage. Acceptable voltage can be found on a label on the back of the TV. COMMENTS Never attempt to insert any objects inside the unit! The LCD panel is made of glass, so it can be physically destroyed. In case of damage to the panel, please note the risk of injury to the glass panel. Before cleaning, always unplug the TV power cord. For cleaning, to avoid scratching the screen, use only a soft cloth. Cleaning liquids could damage the device. During the storm, unplug both the power cord and antenna cable to avoid the risk of damage to the unit after being hit by lightning. All TVs work under high voltage. For this reason, all repairs and other operations carried out on open device must be performed by qualified service personnel. -3- ELECTRICAL SAFETY The TV set should only be connected to a mains supply which matches that stated onthe label on the mains adaptor To prevent overload, don't share the same mains supply socket with too many otheritems of equipment. Do not place any connecting wires where they may b e stepped on or tripped over. Do not place heavy items, which may damage the lea ds, on them. Hold the Mains plug, not the wires, when removing from a socket. During a thunderstorm or while leaving the TV for long periods, disconnect the aerial (if outdoor) and mains adaptor from the supply. Do not allow water or moisture to enter the TV or mains adaptor. Do NOT use in wet or moist areas such as Bathrooms, steamy kitchens or near swimming pools. Pull the plug out immediately, and seek profession al help if: - the mains plug or cable is damaged - liquid is spilt onto the set, or if it is accidentally exposed to water or moisture - anything accidentally penetrates the ventilation slots - the set doesn't work normally. Do NOT remove the safety covers. There are no user serviceable parts inside You may invalidate the warranty. Qualified personnel must only service this apparatus. To avoid battery leakage, remove exhausted batteri es from the remote controlhandset, or when not using for a long period. Do NOT break open or throw exhausted batteries on a fire. Do NOT block ventilation slots in the back cover. You may place the TV in a cabinet,but ensure at least 5cm (2") clearance all around. Do NOT tap or shake the TV screen, you may damage the internal circuits. Takegood care of the remote control, do not drop. To clean the TV use a soft dry cloth. Do NOT use s olvents or petrol based fluids. For stubborn stains, you may use a damp soft cloth with dilute detergent. PHYSICAL SAFETY To avoid leakage, remove batteries from theremote control when they are exhausted orwhen not in use for a long period. Do not break open the batteries or dispose of them in a fire. Do not block the ventilation slots in the back cover. You may place the TV in a cabinet, but ensure at least 5cm (2”) of clearance allround. Do not tap or shake the TV screen. Do not drop the remote control. To clean, use a soft dry cloth. Do not use solvents or petrol based fluids. For stubborn stains, use a damp cloth with dilute detergent. -4- SAFETY INFORMATIONS CAUTION! RISK OF ELECTRIC SHOCK! DO NOT OPEN! WARNING IN ORDER TO PREVENT FROM ELECTRIC SHOCK, DO NOT OPEN THE DEVICE. THERE ARE NO SPARE PARTS INSIDE THE DEVICE. IN CASE OF TROUBLE, CALL QUALIFIED SERVICE PERSONELL. The lightening flash with arrowhead symbol, within an equilateral triangle is intended to alert the user to the presence of un-insulated “dangerous voltage” within the products enclosure that may be of sufficient magnitude to constitute a risk of electric shock to the persons. The exclamation point within an equilateral triangle is intend to alert the user to the presence of important operating and maintenance (servicing) instructions in the literature accompanying the appliance. Produced after 13 August 2005. Waste electrical should not be disposed of with household waste. Please recycle where facilities exist. Check with your local authority or retailer for recycling advice. Batteries should not be disposed of with household waste. Please recycle where facilities exist. Check with your local authority or retailer for recycling advice. This product complies with European safety and electrical interference directives. -5- CAUTION Warning TV works under high voltage. Do not remove the casing. Service repairs can be performed only by qualified service personnel. Warning To reduce the risk of fire or electric shock do not use the unit in humid or exposed to water. Warning The device may not fall, do not also insert any objects through ventilation holes. Do not let the ever spill liquid on the television. Warning Ventilation is necessary in order to allow proper functioning of the device. Warning Do not place the TV on the power cord. -6- CAUTION Do not put anything on the TV or try to hit. Should be paid special attention when children are present in the vicinity. Not following these rules may lead to the downfall of the TV. Do not place the TV on an unstable surface, box, cabinet or shelf. TV can be damaged if it is overturned. When TV is not used for a long time, it is recommended to unplug the power cord from the outlet. TV should not be exposed to direct sunlight and should not be in the immediate vicinity of other heat sources. TV should not be in close proximity to other heat generating devices, such as video or audio amplifier. Do not use it near open flame. When mounting the TV to provide a minimum distance to the device. Lack of adequate ventilation causes the shortening of life of the TV and it is dangerous. -7- QUICK SET-UP GUIDE In the Box TV-Set Remote Controller Batteries User Manual Power Cable Insert the batteries 1. Remove the battery cover. 2. Insert the two 1,5V (AAA size) batteries making sure the polarity (+ or -) of the batteries matches the polarity marks inside the unit. 3. Replace the battery cover until you hear a click sound. Precautions when using batteries Do not use old and new batteries together. Do not use different types of batteries (for example, Manganese and Alkaline batteries) together. Note that there are chargeable and non-chargeable batteries. Remove the batteries from the remote control unit if you do not intend to use the TV for a long time. Precautions when using the remote control unit Do not drop the remote control unit. Do not subject the remote control unit to physical shocks. Keep the remote control unit dry. Wetting it may cause the unit to malfunction. Replace the batteries with new ones when operation of the unit deteriorates. -8- FIRST START Front View Turning TV on Place the TV set in an appropriate place and connect the power cable to the power socket. Turn the power switch at the back of the TV set in the “1” position. After few seconds the device will be in a Standby Mode. Press POWER button to turn the TV Set on and after a short while you will see the picture. Turning TV off. Press POWER button. The screen will fade. Turn the power switch at the back of the TV set in the “0” position WARNING: If you keep projected one picture on display for over 2 hours time, it would be possible to see burn-in effect on the panel. The same will be caused by logos, video games, computer pictures and teletext. Black bars on screen (for example 4:3 format) is not a malfunction of the TV set and is not covered by warranty. The Packing material should be kept away from children for security reasons. Plstic foil or bag can asphyxiate children. -9- REAR OF THE TV SET - CONNECTORS 1. USB Slot 9. Pr signal IN 2. HDMI 1 10. PC Audio IN 3. HDMI 2 11. Headphones 4. VGA IN 12. TV signal IN (RF Antenna) 5. SCART 13. AV Audio IN (L) 6. S-Video 14. AV Audio IN (R) 7. Y signal IN 15. AV Video IN 8. Pb signal IN 16. Power Socket Precautions when connecting to other equipment When using external equipment with this TV set, please read the instruction manual of the external equipment. Switch off all power supplies to the equipment and TV set before connection. Always ensure that the input and output terminals are correctly connected. - 10 - REMOTE CONTROLLER POWER: Press to enter or exit standby mode. S.MODE: Press this button to change the audio mode: User, Standard, Music, Moviecr Sport. P. MODE: Press to select the picture mode: choose from User, Dynamic, Standard cr Mid. MUTE: Press to mute sound. Press again to restore sound. AUTO: Press to auto adjust picture in PC Mode. DISPLAY: Press this button to display on the screen information about the current channel and mode. NICAM: Press to select the NICAM modes. 0-9 buttons: Press any number of 0-9 buttons to select a TV channel. -/-- button: Press this button to enter a program number with different digits, eg. - for 1,-- for 11,--- for 111 : Press to return to the last viewed channel. ASPECT: Press to select the picture aspect ratio. SOURCE: Press enter the source selecting menu, use ▲ and ▼ direction button. Press the SOURCE button repeatedly to select desired mode and press ENTER button to enter selected mode. EXIT: Press to exit all the OSD on the screen. TV MENU: Press to enter or exit the setup menu. Direction Buttons: Press the direction buttons to navigate through menus or settings. ENTER: Press to confirm selection in the setup Menu. CH+/- : In TV mode, press to select Analog or digital channel. VOL+/-: Press to increase or decrease volume. SLEEP: Let you select amount of time before your TV turn it self off automatically (30, 60, 90, 120min or Off). FAV: Mark or unmark your favourite channel FAV+/FAV-: Browse through your favourite channels up and down MEDIA: Enter the USB Media Player - 11 - REMOTE CONTROLLER TELETEXT MODE TEXT: Enter teletext mode, enter transparent backgroung and exit teletext mode 0-9 buttons: Choose teletext page number HOLD: Hold on or off for current page display INDEX: Request the index page (teletext mode) SIZE: Change page display size in teletext mode MIX: TV and TXT pictures are mixed together in split screen or with transparent background SUBPAGE: Sub coded page access REVEAL: Reveal or hide the hidden words Color Buttons: Use as shortcuts to specific pages shown at the bottom of the screen in text mode ▲ and ▼ buttons: Browse through active teletext pages EXIT: Exit teletext mode MULTIMEDIA PLAYER MODE : Press to play or pause playback. : Press to stop playback : Press to fast rewind/fast backward : Press to fast forward : Press to skip backward : Press to skip forward A-B: Press to set starting (A) and again to set ending (B) point of playback to loop. Press again to disable. GOTO: Press to go to the specific file by entering its number on the file list REPEAT: Press to choose repeat mode: Single, Repeat One, Repeat Folder, Folder, Shuffle, Random, ROOT: Press to go back to the root menu or file list Direction Buttons: Press to navigate through file list ENTER: Play the file or enter a folder For detailed information go to USB Multimedia Player section later in the manual. - 12 - MENU NAVIGATING THROUGH MENU 1. 2. 3. 4. 5. 6. Press MENU button to display the main menu. Press ▼ and ▲ buttons to select correct menu category. Press ► button or ENTER button to enter. Press ▼ and ▲ buttons to select the option that you want to adjust. Press ◄ and ► buttons to adjust. After finishing your adjustment, press MENU button to save and return back to the previous menu. 1. INITIAL SETUP OSD Language Press ▼ / ▲ buttons to select OSD Language, then press ◄ / ► button to choose. Region Selection Press ▼ / ▲ buttons to select Region Selection, then press ◄ / ► button to select. Auto Search Press ▼ / ▲ buttons to select Auto Search, then press ENTER button to start auto search. 2. INPUT SOURCE MENU Press SOURCE buttons to display the input source list; Press ▼ / ▲ buttons to select the input source you want to watch; Press ENTER buttons to enter the input source; - 13 - 3. VIDEO MENU Picture mode Use ◄ / ► buttons to choose correct picture mode: User, Cinema, Sports, Vivid, Hi-Bright. o HINT: You can press P.MODE button on the remote controller to change Picture Mode directly. Contrast, Brightness, Saturation, Hue, Sharpness Use ◄ / ► buttons to adjust the function. Color temperature Use ◄ / ► buttons to choose correct color temperature: User, Cool, Normal, Warm. Advanced Picture Adjust: DNR Use ◄ / ► buttons to choose correct DNR mode: Normal, Strong, Off, Low. Adaptive Luma Control Use ◄ / ► buttons to turn the function on or off. - 14 - 4. AUDIO MENU Sound Mode Use ◄ / ► buttons to choose correct Sound Mode: Off, Rock, Pop, Live, Dance, Techno, Classic, Soft. o HINT: You can press S.MODE button on the remote controller to change Sound Mode directly. Bass, Treble, Balance Use ◄ / ► buttons to adjust the function. Surround Use ◄ / ► buttons to turn the function on or off. 5. MISCALLENOUS MENU OSD Language Use ◄ / ► buttons to choose correct OSD Language Region Language Use ◄ / ► buttons to choose correct Region Language. Teletext Language Use ◄ / ► buttons to choose correct Teletext Language. - 15 - Blue Mute Use ◄ / ► buttons to turn the function on or off. Picture Size Use ◄ / ► buttons to choose correct Picture Size: Full, Zoom, 4:3, 16:9 SCART Use ◄ / ► buttons to choose correct SCART mode: Auto, RGB, CVBS/RGB Timer Press ENTER to open Timer submenu: Time To set current time, press ENTER to open Time submenu: Hour Use ◄ / ► buttons to set the current hour. Minute Use ◄ / ► buttons to set the current minute. Second Use ◄ / ► buttons to set the current second. Start Time To set start time, press ENTER to open Time submenu and set the time just as show above. Start Activate Use ◄ / ► buttons to choose: Off, On, Once. Stop Time To set shut down time, press ENTER to open Time submenu and set the time just as show above. Stop Activate Use ◄ / ► buttons to choose: Off, On, Once. Parental Press ENTER to open Parental submenu: You will be asked the password to enter the Parental Submenu. Default password is: 0000 It is strongly advisable to quickly change it to one known only for you! - 16 - Use Digits Buttons to enter Password If the Password is correct, Parental submenu will be shown Channel Lock Use ◄ / ► buttons to choose channel and press ENTER to lock it. Video Lock Use ◄ / ► buttons to choose input source and press ENTER to lock it Change Password Choose Password and use Digits Buttons to enter your new password Choose Confirm and enter your new password again Clear All Press Enter to clear all settings. If successful, message will be shown. Default Press ENTER to set all settings to default. 6. TV MENU - 17 - Region Selection Use ◄ / ► buttons to choose region of TV use. Auto Search Press ENTER to start Automatic Channel Search o Press EXIT to exit scan or press MENU to come back to menu Manual Search Press ENTER to enter Manual Search submenu PR Start Use ◄ / ► buttons to set tv channel Start From Use ◄ / ► buttons to set starting frequency point Start Search Press Enter to begin scan Update Search Press ENTER to update search Program Edit Press ENTER to open submenu - 18 - Single Channel Edit Use ▼ / ▲ buttons to choose channel you want to edit and press ENTER PR Name Press ENTER to open Channel Name Input Box Use ◄ / ► buttons to select slot and use ▼ / ▲ buttons to select character. Press ENTER to accept Sound System Use ◄ / ► buttons to set the correct sound system (Available sound systems: DK ,D/K1 A2,D/K2 A2,D/K3 A2, I,B/G,B/G A2,L,L') Frequency Use ◄ / ► buttons to adjust the channel frequency Skip Use ◄ / ► buttons to set function On or Off. If the function is On, the channel will be skipped while changing channels with CH+/CH- buttons. Decoder Use ◄ / ► buttons to set function On or Off. Channel List Edit Use color buttons to enable edit channel list functions: o SWAP: Press RED button to choose channel to swap, then use ▼ / ▲ buttons to choose another channel. Press ENTER to swap those two channels. o INSERT: Press GREEN button to choose channel to insert, then use ▼ / ▲ buttons to choose the destination place. Press ENTER to confirm. o COPY: Press YELLOW button to choose channel to copy, then use ▼ / ▲ buttons to choose the destination place. Press ENTER to confirm. o DELETE: Press BLUE button to delete channel from the list. - 19 - 7. GEOMETRIC MENU (ONLY IN PC-MODE) Auto Setting Press ENTER to Auto Adjust PC RGB picture. Phase, Manual Clock, H Position, V Position Use ◄ / ► buttons to adjust the function. - 20 - USB MULTIMEDIA PLAYER Plug USB Media Storage Device into the USB Slot at the back of the TV Set Press SOURCE button and use ▼ / ▲ to choose Multimedia, then choose your device and press ENTER OR press Media button on the Remote Controller, then choose your device and press ENTER MULTIMEDIA PLAYER MAIN WINDOW: 1. 2. 3. 4. 5. 6. 7. Files and folders list Current path Current playback status Serial number of current file or folder Total number of files and folders Current folder Name of current file - 21 - 8. Playback time elapsed 9. Playback time remaining 10. Bitrate of current file 11. Playback mode 12. File title 13. File preview 14. USB Device name MP3 PLAYER MODE: Use ▼ / ▲ buttons to choose file to play, then press ENTER or . Functions on the remote controller: - play or pause song / - go to the next / previous song on the list - go to the next / previous page of current folder while there is no music played / - set the fast forward / backward speed (x2/x4/x8/x16/x32) GOTO + 0-9 – press once to jump to the specific file/folder by entering its number - press twice to jump to the specific time of played song REPEAT - Set the repeat mode: - Folder: The player will stop after playing all files in the current list. - Shuffle: The player will stop after playing all files in the current list, but shuffled. - Random: The player will play files in the current list randomly. - Single: The player will stop after the current music file is finished. - Repeat One: The player will repeat current music file. - Repeat Folder: The player will repeat current folder A-B – Press once to set the beginning point (A) and press second time to set ending point (B) of fragment to be repeated in a loop. Press once again to turn looping off. LRC File Support The USB Multimedia Player supports lyrics LRC files. In order to display lyrics of your favourite song, prepare LRC file, name it exactly the same as MP3 song file (e.i song1.lrc for song1.mp3) and place it in the same directory. After starting playback, player will automatically display lyrics in bottom left corner of the screen. How to prepare LRC file? LRC File is an ordinary TXT file. It has specific structure of content allowing the player to display it. The structure is as in following: [mm:ss.ms] This is a single lyrics line Example: [00:05.23]I'm a big big girl [00:07.79]in a big big world In square brackets there is an exact time of displaying the line. (mm – minute, ss – second, ms – milisecond) - 22 - JPEG VIEWER MODE: Hint: You can play MP3 files in a background while viewing image files. Use ▼ / ▲ buttons to choose file to view, then press ENTER or correct image file and press ENTER or to enter Thumbnail Mode. Choose to enter Fullscreen Slideshow Mode. Functions on the remote controller: - play or pause slideshow / - view next / previous image file from the list / - change picture swich interval (5s./10s./20s.) ▼ / ▲ – flip the image file horizontally / vertically ► / ◄ - rotate image clockwise (right) / counterclockwise (left) - stop slideshow and go back to Thumbnail Mode REPEAT - Set the repeat mode (as in MP3 player) - Change the image transition effect DISPLAY – shows current slideshow status, MP3 playback status and buttons functions hints on status bar ROOT – return to the folder browser mode - 23 - TXT VIEWER MODE: Hint: You can play MP3 files in a background while viewing txt files. Use ▼ / ▲ buttons to choose file to view, then press ENTER or to open TXT-reading Mode. Functions on the remote controller: ▼ / ▲ – go to the next / previous line of the file ► / ◄ - go to the next / previous page of the file / - switch to the next / previous txt file 0-9 – jump to the specific page by entering its number / ROOT – return to the folder browser mode Hint: In TXT-reading Mode OSD functions are inactive. In order to use OSD functions, exit TXT-reading Mode - 24 - SPECIFICATION Screen Diagonal Resolution Aspect Ratio Power Supply Power Consumption System Frequency Channel Memory Storage Natural Colors Contrast Brightness Response Time 32” / 81,28 cm 1366x768 (HD Ready) 16:9 AC 100V-240V <120W / <0,7W (standby mode) PAL – B/G, D/K, I, SECAM – B/G, D/ K, L, L’ ; NTSC, NTSC 4.43 47 - 870MHz 200 channels 16.7M 4.000:1 450 cd/m2 8ms Aerial Input 75 ohm coaxial Audio Output 8W×2 @ 4ohm Dimensions Weight 50/60Hz 782/232/552mm (with foot) 14,3 kg USB Multimedia Player file formats MP3 (+LRC), TXT, JPEG Maufacturer: ATS S.A. ul. Oławska 12, Wierzbice 55-040 Kobierzyce POLAND - 25 -