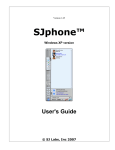
1
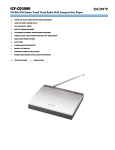
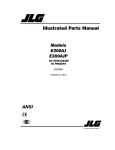
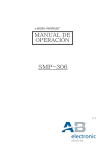
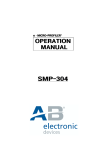
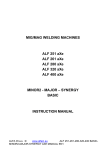
LAB-EL Laboratory Electronics 68B, Bodycha Str., 02-495 Warsaw tel: +48 22 667 71 18, +48 601 209656 fax: +48 22 867 53 32 e-mail: [email protected] Home page: http://www.label.pl/ Panel LB-706 user manual document version 1.16, October 2004 Manual concerns panels with firmware: 1.1...1.7, 1.10...1.33, 2.0...2.14 Constant development of our products creates the need for introducing changes that may not be included in this manual. Panel LB-706 user manual 2 Contents 1 Device description 3 1.1 Panel elements . . . . . . . . . . . . . . . . . . . . . . . . . . . . . . . . . . . . . . . . . . 3 1.2 Panel equipment . . . . . . . . . . . . . . . . . . . . . . . . . . . . . . . . . . . . . . . . . 4 2 Working with a device 4 2.1 Work preparation . . . . . . . . . . . . . . . . . . . . . . . . . . . . . . . . . . . . . . . . 4 2.2 Switching on/off . . . . . . . . . . . . . . . . . . . . . . . . . . . . . . . . . . . . . . . . . 5 2.2.1 Complete switch off . . . . . . . . . . . . . . . . . . . . . . . . . . . . . . . . . . . 5 2.3 Panel work modes . . . . . . . . . . . . . . . . . . . . . . . . . . . . . . . . . . . . . . . . 6 2.4 Displaying measurement results . . . . . . . . . . . . . . . . . . . . . . . . . . . . . . . . 7 2.4.1 Displaying in a standard format . . . . . . . . . . . . . . . . . . . . . . . . . . . . 7 2.4.2 Display in a nonstandard format . . . . . . . . . . . . . . . . . . . . . . . . . . . . 7 Menu system . . . . . . . . . . . . . . . . . . . . . . . . . . . . . . . . . . . . . . . . . . . 8 2.5.1 Menu Wylaczanie (Switch off) . . . . . . . . . . . . . . . . . . . . . . . . . . . . . . 8 2.5.2 Menu Informacje (Information) . . . . . . . . . . . . . . . . . . . . . . . . . . . . . 8 2.5.3 Menu Historia (History) . . . . . . . . . . . . . . . . . . . . . . . . . . . . . . . . . 9 2.5.4 Menu Ustawienia (Settings) 2.5 . . . . . . . . . . . . . . . . . . . . . . . . . . . . . . 10 2.6 Displaying additional information . . . . . . . . . . . . . . . . . . . . . . . . . . . . . . . 15 2.7 Measurement registry history . . . . . . . . . . . . . . . . . . . . . . . . . . . . . . . . . . 16 2.7.1 Registry to a memory . . . . . . . . . . . . . . . . . . . . . . . . . . . . . . . . . . 16 2.7.2 Outside recorder . . . . . . . . . . . . . . . . . . . . . . . . . . . . . . . . . . . . . 18 2.7.3 Printer registry . . . . . . . . . . . . . . . . . . . . . . . . . . . . . . . . . . . . . 18 2.7.4 Printout of registry memory content . . . . . . . . . . . . . . . . . . . . . . . . . . 18 2.7.5 Registry and alarming using IP modem . . . . . . . . . . . . . . . . . . . . . . . . 18 2.8 Pressure measurement options . . . . . . . . . . . . . . . . . . . . . . . . . . . . . . . . . 19 2.9 Exceed signaling . . . . . . . . . . . . . . . . . . . . . . . . . . . . . . . . . . . . . . . . . 20 2.10 Exploitation comments . . . . . . . . . . . . . . . . . . . . . . . . . . . . . . . . . . . . . . 20 3 Technical data 21 3.1 Meteorological parameters . . . . . . . . . . . . . . . . . . . . . . . . . . . . . . . . . . . 21 3.2 Technical parameters . . . . . . . . . . . . . . . . . . . . . . . . . . . . . . . . . . . . . . . 21 3.3 Measurement data characteristics 22 . . . . . . . . . . . . . . . . . . . . . . . . . . . . . . . 4 Software 22 4.1 Instrument program . . . . . . . . . . . . . . . . . . . . . . . . . . . . . . . . . . . . . . . 22 4.2 Other software . . . . . . . . . . . . . . . . . . . . . . . . . . . . . . . . . . . . . . . . . . 23 A Panel LB-706 menu structure – firmware 1.32 LAB-EL Laboratory Electronics 24 2 Panel LB-706 user manual 1 3 Device description Panel LB-706 is a device designed for processing, registry and visualization of measurement results. Small size and an option of being battery powered allow on using it in the field conditions. In stationary conditions a feeder of small voltage can power the device. The device cooperates with the following measurement probes: ⇒ LB-701 – hytherograph ⇒ LB-754T – double thermometer ⇒ LB-754J – single thermometer ⇒ LB-754P – psychrometer ⇒ LB-706B – barometric module (built-in a panel) Processed measurement data is presented on a built-in panel liquid crystal display (LCD). There is also a possibility of data registry to an internal measurement result history as well as sending it to an outside device using a communication interface. Panel is equipped with a real time clock that provides a base for time registry and sets automatic time of switching the device on and off. LB-706 can cooperate with an additional outside recorder: a thermal printer, or IP modem. Additional recorder is attached using a panel series port. Panel LB-706 is produced in few functional versions: LB-706T panel equipped with a thermometric module (2 temperature measurement channels) cooperates with a single thermometer LB-754J, a double thermometer LB-754, a psychrometer LB-754P and a hytherograph LB-701. LB-706B panel equipped with a barometric module - cooperates with a hytherograph LB-701. LB-706G panel equipped with a simplified keyboard (service) there are 2 key buttons on a keyboard: switch on and switch off. The simplified keyboard makes the device resistant to changes introduced by unauthorized persons. However, it makes it necessary to operate the panel through a computer. LB-706P panel equipped with an extended registry of the measurement history memory. It is possible to join few of the mentioned above functions (i.e. LB-706GBP) except for: it is not possible to join options T and B. 1.1 Panel elements Placement of panel elements that a user has access to is introduced in a figure no. 1 ⇒ A – LCD (display) ⇒ B – keyboard ⇒ C – LB-701 and LB-754 probe socket ⇒ D – feeder socket ⇒ E – communication port socket ⇒ F – optional pressure measurement input (if a panel is equipped with a barometric module LB-706B) From the devices bottom it is possible to access battery accumulator. LAB-EL Laboratory Electronics 3 Panel LB-706 user manual 4 C F A B D E Figure 1: LB-706 view from the top 1.2 Panel equipment Additional standard device equipment includes: ⇒ feeder 12V DC, ⇒ communication cable (to be connected to a PC computer), ⇒ user manual, ⇒ battery set, ⇒ floppy disk with software destined for cooperation with a panel (instrument program). ⇒ LAB-EL calibration certificate for versions LB-706B / LB-706BG Nonstandard equipment (upon a special request) includes: ⇒ protective cover hand bag, ⇒ certificate from the Air Force Technical Institute in Warsaw (concerns a barometer), ⇒ thermal printer used for data registry on a paper and a communication cable to be used with a printer, ⇒ LB-430 IP modem for wireless communication in GPRS/IP network along with a cable and a feeder. 2 Working with a device 2.1 Work preparation Before starting work it is necessary to connect correctly all of the set elements. All connection procedures should be performed with the panels power supply switched off in the following order: ⇒ Connect measurement probe plug to a panels C socket (a plug should be screwed down using screws that are on its sides). LAB-EL Laboratory Electronics 4 Panel LB-706 user manual 5 ⇒ If a panel communication interface is going to be used make a connection using a communication cable between a panel E socket and an outside device series port socket (computer, printer). It is recommended that when making a connection with a computer or a printer the device is switch off from the power supply. ⇒ If a panel is going to be powered from an outside feeder it is necessary to connect its plug to a panels D socket. Connecting or disconnecting electric connections in time when a panel is switched on may result in logical (i.e. calibration data, clock settings) or even physical system damage: of a panel, probe or a computer. If a panel cooperates with a modem LB-430 before starting SMS or GPRS/IP transmission it is necessary to inscribe a correct SIM card PIN code to a panel. Introducing an incorrect PIN code (or not introducing any) results in card locking. It is necessary at that time to provide PUK code. The card can be unlocked by placing it in a mobile phone (there is no such possibility using a panel LB-706). 2.2 Switching on/off Panel LB-706 LAB-EL wer.1.0 Figure 2: Panel vignette A key button marked by a symbol is used for switching on a panel LB-706. After pressing it information appears on a display, which provides devices name and firmware version (internal software). When displaying such information preliminary testes are performed, probe identification and preliminary measurement cycles. The preliminary work phase ends with entering a standard mode and displaying value results or a comment about an error (if such has occurred). Switching off the device is done by choosing with F key button a first menu position (Wylaczanie) and confirming with tak key button. Depending on a situation it is possible that after performing the mentioned above sequence the device enters a registry mode or a reading mode using communication interface and does not switch off the power supply. In such case switching off the power supply gets delayed (description of the work modes later in the manual). Panel LB-706G is equipped with a simplified keyboard that has only Wlacz (Switch on) and Wylacz (Switch off) key buttons. According to the description the device is switched on after pressing Wlacz key button and switched off after pressing Wylacz key button. 2.2.1 Complete switch off Panels with firmware 2.6 and more advanced ones have an option of complete switch off. On the contrary to normal switch off, complete switch off blocks panel wake function without a need of redefining the settings (registry interval). Another panel switch on using a keyboard brings back the normal function wake / sleep. Choosing the position Wylacz (Switch off) from the device menu performs complete switch off. F key button should be pressed until display shows Calk.Wylaczenie (Complete switch off) and confirmed with tak key button. LAB-EL Laboratory Electronics 5 Panel LB-706 user manual 2.3 6 Panel work modes Basic mode In a basic mode a panel shows the current measurement result values. Entering the basic mode is performed after a user manually switches on the panel. The panel stays in this mode until a user decides to switch it off or a certain amount of time passes (automatic switch off time) after which the panel exits the basic mode. Automatic switch off Automatic switch off time is a parameter configured using an instrument program. This parameter value is chosen from the interval from 5 seconds to 20 minutes and 55 seconds with 5-second resolution. Setting the automatic switch off time to 0 blocks the function the panel does not exit automatically the basic mode. Time after which the automatic switch off function starts working is counted from the last time a key button was pressed on a panel keyboard. Basic mode exiting Exiting the basic mode (by a user or by an automatic switch off) should not be confused with panel power supply switch off. In a situation of approaching registry moment or when a communication port stays in use power supply switch off is delayed and the panel enters a different work mode (see below). Registry mode Panel has a built-in real time clock, which sets a record time for memory of measurement history. When working in a basic mode the registry moments are not noticeable records take place in the background and the display only signals the fact that the registry is active (blinking M). In a situation when a panel is switched off and a record time approaches the clock wakes the panel, which then enters the registry mode. On the display instead of measurement results information appears registry mode and a number of seconds left until the record moment. After the record the panel disconnects power supply. From the moment of switching on for record and switching off the device stays approximately 20 seconds in this mode. This time is provided for stabilizing the measurement results and calculating an average from few samples. If a user decided to switch off a panel (which stays in a basic mode) and there is less than 20 seconds until a record the panel is going to enter the registry mode and only after the record disconnects the power supply. Panels with firmware software starting with version 1.22 have a possibility of data registry to a printer and with firmware from 1.24 wireless registry using GPRS/internet network. It is possible to choose one of the following registry options in the panel settings: ⇒ registry to a memory only, ⇒ registry to an outside recorder, ⇒ simultaneous registry to an outside recorder and to a memory. Correct functioning of waking up and putting to sleep requires from a user to always switch off a panel using a keyboard. It is not recommended to pull out a feeders plug or take out the batteries when the panel is switched on. Power supply network failures can have negative influence on correct work of the devices automatic waking up function. In order to avoid it the panel should be equipped with batteries. Battery consumption is minimal and guarantees correct work. Reading mode using a port Panel communication port activity is controlled by an outside signal coming from a system, which provides other communication side (i.e. computer). If a port-activating signal appears in time when a panel is not active the panel wakes up and enters a reading mode using a port. Information appears on a display saying Aktywny port (Port active). After port activation signal abates the panel switches itself off. When working in the reading mode using a port registry to memory works normally but it is not signaled in any way. If a signal activating the reading mode using a port is fading and there are less than 20 seconds left till a registry record the panel does not switch itself off but enters a registry mode. LAB-EL Laboratory Electronics 6 Panel LB-706 user manual 2.4 2.4.1 7 Displaying measurement results Displaying in a standard format The device in a basic mode displays the current measurement results. Panel screen was (logically) divided to 4 sections and each one of them shows one parameter. Section 1 displays temperature. Section 2 relative humidity. 1 2 3 4 Figure 3: Display sections A user defines sections 3 and 4. Additionally there is a possibility of setting air temperature resolution display. A user can request displaying in resolution 0.1 or 0.01 or choose an automatic mode of matching resolution depending on the probe parameters. All display format settings can be made using instrument software or by using a device menu system (does not apply to panel LB-706G). Section 3 For section 3 the following display settings are possible: ⇒ dew point temperature ⇒ pressure Dew point temperature is a parameter calculated by a panel and will be displayed correctly if a panel has information about the current air humidity and temperature value. If pressure is a chosen parameter for section 3 then its value will be assessed basing on the measurement using internal barometric module. If a panel does not have a barometric module; section 3 will display temporary pressure value (see point 2.8). A user has an option of choosing a unit in which the pressure value is going to be displayed from among: hPa, mmHg. Section 3 can display an abbreviated symbol of a chosen pressure unit (h for hPa and m for mmHg). Whether this symbol is going to be displayed is decided by section 4 (see below). Section 4 For section 4 the following display settings are possible: ⇒ dew point temperature ⇒ steam content [ppmvol ] ⇒ time of the internal real time clock ⇒ pressure unit full symbol The current air temperate and humidity value are necessary for correct display of both dew point temperature as well as water steam content values. After choosing an option of full unit symbol in section 4 an abbreviated unit symbol is not going to be displayed in section 3. 2.4.2 Display in a nonstandard format Mentioned above display result format is not used in two cases: LAB-EL Laboratory Electronics 7 Panel LB-706 user manual 8 Barometer only If a device is equipped with a barometric module only and no outside probe is connected to it then its display shows: 1. upper line pressure in hPa and internal clock time 2. lower line pressure in mmHg and possible registry signaler status (blinking M) Thermometer only If a panel is connected with a probe LB-754 or LB-754J (but not LB-754P) then its display shows: 1. upper line first thermometer temperature and internal clock time 2. lower line second thermometer temperature (only LB-754) and possible registry signaler status (blinking M) 2.5 Menu system 1 Panel LB-706 has a 5 button keyboard which is used for servicing device menu functions. Those functions allow a user on setting work parameters, overview of the registered results and reading information about the device. Entering a menu after pressing F key button. System menu is built hierarchically and its highest level encloses 4 categories. 1. Wylaczanie (Switch off) – switching off panel power supply 2. Informacje (Information) – obtaining information about a panel, probe and device errors. 3. Historia (History) – overview and erasing of memory registry content 4. Ustawienia (Settings) – setting panel work parameter settings The key buttons ↑ and ↓ are used to navigate between the menu parameters at the same level. A submenu of a lower level is chosen after pressing F key button. Entering higher menu after pressing nie key button. 2.5.1 Menu Wylaczanie (Switch off) Directly from the main menu level after pressing tak key button the device gets switched off (exits the basic mode). 2.5.2 Menu Informacje (Information) Entering a submenu Informacje allows on displaying the following information about a device. 1. Panel – panel symbol and a fabric number 2. Sonda (Probe) – probe type, version, fabric number of an external measurement probe 3. Pamiec (Memory) – registry memory size formulated in a number of pages 4. Dodatki (Additions) – information about installed additional module: barometric or thermometric 5. Zegar (Clock) – allows on reading device clock time and in case of error information about its time. 6. Firmware – information about firmware version (panel internal software) 7. Producent (Producer) – information about a producer 1 Does not concern panel LB-706G – this panel does not service a menu LAB-EL Laboratory Electronics 8 Panel LB-706 user manual 2.5.3 9 Menu Historia (History) There are two positions in Historia submenu: 1. Przeglad (Look over) 2. Kasowanie (Erasing) 3. Ustawienia (Settings) 4. Wydruk (Printout) Przeglad (Look over) Panel allows on reviewing registered measurement records. Reviewing history from the end (from the last registered record) and also from the beginning (from the first record). The following measurement points are displayed after pressing ↑ (reviewing from the back) or ↓ key button (reviewing from the beginning). It is possible to go to the beginning of a review at any time after pressing jkeytak key button. The following data format display was used: upper line - provides date and record registry hour, lower line - displays parameters. For version 1.26 it is possible to display two out of three possible to be registered results at the same time: temperature and humidity or temperature and pressure or humidity and pressure. Pressing F key button allows on choosing a pair of displayed parameters. For version 1.28 parameters to be reviewed are chosen from the submenu Ustawienia. At the same time one parameter is displayed and is changed by F key button. Kasowanie (Erasing) Erasing has to be confirmed twice. First by pressing tak key button and next by pressing F key button. After erasing a memory content registry is continued and if it is blocked it is because the memory is full it will be continued. Ustawienia (Settings) In submenu Ustawienia it is possible to choose displayed in review parameter registry history. 1. Par.przegl (review parameters) – defines a way of choosing parameters for review wybrane (chosen) – parameters chosen by a user will be visible auto – parameters chosen for registry will be visible 2. Akt.RH (RH active) – defines whether humidity is chosen for review ukryty (hidden) – not visible in review widoczny (visible) – visible in review 3. Akt.TA (TA active) – as above for temperature 4. Akt.P (P active) – as above for pressure 5. Akt.TA2 (TA2 active) – as above for temperature 2 When setting Parametry przegl±du as auto the rest of the submenus are not available because a panel shows in review only those parameters that are chosen for registry. The submenu Ustawienia is available in panels from version 1.28. LAB-EL Laboratory Electronics 9 Panel LB-706 user manual 10 Wydruk (Printout) Menu position, allows on making a printout of a registered memory content directly on a printer connected to a panel. Such possibility is available in panels with version 1.32 and more advanced ones. A user can set time interval of an available printout in two ways. ⇒ by providing printout time limits (option od. . . do (from...to)) ⇒ by providing time interval length which proceeds immediately a current moment (option ostatnie (last)). The following submenus are available in this menu position: 1. Od. . . do (From .. to) ⇒ Wydr.od (From) – printout start time edition section ⇒ Wydr.do (To) – printout end time edition section ⇒ Wydruk! (Printout!) – printing process initiation 2. Ostatnie (Last) ⇒ Ostatnie (Last) – defining time length interval - edition section ⇒ Wydruk! (Printout!) – printing process initiation 3. Aktualne (Current) – raport printout with an actual measurement values In order to make a printout one should define time interval (one of two methods), choose Wydruk! position and next confirm by tak key button. When printing is finished an information koniec (end) shows on a display along with information about the printed measurement records. It is possible to cancel a printing process using nie key button. Printing end is usually signaled right before a printer is actually finished because it has a big data buffer. Canceling printing by a user does not result in an immediate printing end (optionally after printing cancellation using nie key button it is possible to switch off power supply immediately). Third submenu position Aktualne allows on printing a short report, which covers only the current measurement results. The printout format is similar to memory history content printout. Panels with firmware 2.6 and more advanced ones have a possibility of adding a heading (programmed by a user) to a printout. The heading can be specified using instrument software. Headings length is limited to 48 characters where each change in the printouts width and each additional line are treated as 1 character. 2.5.4 Menu Ustawienia (Settings) Submenu Ustawienia has an option which groups various work parameter settings functions: 1. Wyswietlacz (Display) 2. Auto-wylacz (Automatic switch off) 3. Rejestracja (Registry) 4. Zegar (Clock) 5. Drukarka (Printer) 6. Modem 7. Sygnalizacja (Signaling) LAB-EL Laboratory Electronics 10 Panel LB-706 user manual 11 Wyswietlacz (Display) Submenu Wyswietlacz encloses a set of 4 parameters to be edited by a user. Each parameter is edited basing on a choosing from th list rule (see below). The following positions are available: ⇒ Pole#3 (Section 3) – setting a parameter displayed in section 3, one from: DP – dew point temperature P – pressure ⇒ Pole#4 (Section 4) – setting a parameter displayed in section 4, one from: ppm – steam value content in .. DP – dew point temperature zeg – panel clock time P-Jed – pressure presentation unit symbol ⇒ Rozdz.TA (TA Resolution) – setting temperature display resolution, one from: auto – resolution chosen automatically by a panel basing on probe characteristics data 0.1 – resolution 0.1 0.01 – resolution 0.01 ⇒ Jedn.P (P unit) – setting a unit with which pressure is displayed, one form: hPa – pressure presented in . mmHg – pressure presented in . Auto-wylacz (Automatic switch off) It is a parameter edited basing on a principle of section edition (see below). A user can define time after which a device gets switched off automatically. Automatic switch off time is counted from the last time of pressing any key button. Minute and second sections can be edited. Time is set with 5 second resolution. Rejestracja (Registry) Submenu Rejestracja has a set of 7 registry parameters to be edited by a user. The following positions are available: ⇒ Interval – registry interval edited basing on a principle of section edition. Sections: days, hours and minutes can be edited. ⇒ Nadpisuj (Overwrite) – setting permission for registry continuation after a memory is full – choosing from the list. Possible settings: tak (yes) – registry with continuation after a memory is full nie (no) – registry with blocking after a memory is full ⇒ Zapis RH (RH record) – record humidity entries activation – choosing from the list. Possible settings: tak (yes) – humidity record switched on nie (no) – humidity record switched off ⇒ Zapis TA (TA record) – record temperature entries activation – choosing from the list. Possible settings: tak (yes) – temperature record switched on nie (no) – temperature record switched off LAB-EL Laboratory Electronics 11 Panel LB-706 user manual 12 ⇒ Zakres TA (TA range) – setting range of changes when recording temperature – choosing from the list. Possible settings: auto – range chosen automatically by a panel basing on probe data characteristics -40 – range of changes from 40 to +85 -200 – range of changes from -200 to +550 ⇒ Rozdz. TA (TA resolution) – setting resolution for temperature storing - choosing from the list. Possible settings: auto – resolution chosen automatically by a panel basing on probe data characteristics 0.1 – resolution 0.1 0.01 – resolution 0.01 ⇒ Zapis P (P record) – pressure entries activation - choosing from the list. Possible settings: tak (yes) – pressure record switched on nie (no) – pressure record switched off Zegar (Clock) Menu function allows on setting device clock manually. Editing is possible basing on a rule of section edition. The following sections can be edited: day number, month name, year, hour, minutes and seconds. Drukarka (Printer) Submenu Drukarka encloses registry printer work position settings: ⇒ Interlinia (Interlinie) – setting spaces between the following printout lines – choosing from the list. Possible settings: 1 – smallest distance 2 3 4 – biggest distance ⇒ Form.daty (Date format) – setting date format on a printout – choosing from the list. Possible settings: dmr – date in a format day-month-year (i.e.: 17-09-2002) rmd – date in a format year-month-day (i.e: 2002-09-17) dms – date in a format day-month-abbreviated year (i.e.: 17-09-02) smd – date in a format abbreviated year-month-day- (i.e.: 02-09-17) ⇒ Id.Sondy (Probe Id) – allows on switching on or off an option of adding to each printout line measurement probe identification data (probe type and serial number) – choosing from the list. Possible settings: tak (yes) – adding probe identification switched on nie (no) – adding probe identification switched off ⇒ Rejestr.do (Registry to) – defining registry device - choosing from the list. Possible settings: pam+druk (mem+print) – choosing simultaneous registry option to: a memory and to a printer pam (mem) – choosing registry option only to a memory dr (print) – choosing registry option only to a printer ⇒ Druk.teraz (Print now) – execution of one line printout with current measurement data. After choosing this option it is necessary to confirm the execution with tak key button. LAB-EL Laboratory Electronics 12 Panel LB-706 user manual 13 ⇒ Test druk. (Test print) – performing short test printout encloses information about measurement probes number and type. It can be used as a registry page heading printout execution is confirmed by pressing tak key button and next F key button. ⇒ Rodz.druk. (Printer type) – defines type of a printer used - choosing from the list. Possible settings: Kafka – for Kafka printer Kafka-R – for reverse printout Kafka-R printer Choosing printer type is only important when making test printouts. Submenu Drukarka positions are only available when a panel is factory accustomed for cooperation with a printer. Modem Submenu Modem has many settings that concern panel LB-706 and modem LB-430 cooperation: ⇒ Rejestr.do (Registry to) – defining registry channel – choosing from the list. Possible settings: pam+mod (mem+modem) – choosing simultaneous registry: to a memory and through a modem/network pam (mem) – choosing memory registry only mod (modem) – choosing registry through a modem/network ⇒ Prog.alram (Alarm thresholds) – setting alarm thresholds. For each of the measured values (two temperatures humidity and pressure) it is possible to set separate alarm parameters. It is described below on an example of temperature T1 – choosing from the list. Possible settings: → T1L.AK (T1L active) – switching on activity of lower alarm threshold for temperature T1 – choosing from the list. Possible settings: tak (yes) – alarm threshold active nie (no) – alarm threshold not-active ⇒ T1L.W (T1L value) – lower alarm threshold value for temperature T1 – edition section. ⇒ T1H.AK (T1H active) – switching on activity of upper alarm threshold for temperature T1 – choosing from the list. Possible settings: tak (yes) – alarm threshold active nie (no) – alarm threshold not-active ⇒ T1H.W (T1H value) – upper alarm threshold value for temperature T1 – edition section. ⇒ T1.HIS (T1 hysteresis) – alarm hysteresis for temperature T1. ⇒ Ust.SMS (SMS settings) – group of SMS communication parameter settings: → Sms.num (SMS numbers) – numbers in SMS communication * Centr. (Service center) – SMS service center number (a number should start with a country prefix for Poland 48...) – edition section. * Tel#1 (Number 1) – SMS message user number (a number should start with a country prefix for Poland 48...) – edition section. * Tel#2 (Number 2) – SMS message user second number (as above) * Tel#3 (Number 3) – SMS message user third number (as above) User number is read using a panel until it meets a first space character. If any section Tel#? is to be left not used then it should be filled with space characters (it is enough if a first section is a space character). LAB-EL Laboratory Electronics 13 Panel LB-706 user manual 14 ⇒ Sms.test – allows on sending a test SMS to a group of users mentioned in settings Sms.num. ⇒ Ust.IP (IP settings) – group of GPRS/IP connection parameter settings: → IP.adres – IP address for data collecting server – edition section. → IP.port – IP port for data collecting server – edition section. → Proto – protocol used for communication – choosing from the list. Possible settings: tcp – TCP protocol udp – UDP protocol → IP.test – allows on sending a test package using a network/modem. ⇒ Ust.Modemu (Modem settings) – group of parameter settings for communication with a modem → Ciag.ppp (PPP persist) – setting the type of PPP communication – choosing from the list. Possible settings: nie (no) – PPP connection is established only when it is necessary to send a package through a network after sending PPP it is disconnected tak (yes) – connection is established before sending a first package and is continued. ⇒ Sim.pin – introducing PIN card code for a SIM card – edition section. After introducing the code it is not possible to read it. Attention: Introducing incorrect PIN code results in blocking SIM card. In order to unblock it is necessary to use a telephone, which allows on introducing a PUK code. ⇒ GprsApn – introducing APN name – edition section. ⇒ PapLogin – introducing user name for PAP authorization – edition section. ⇒ PapHaslo (PAP password) – introducing PAP authorization password – edition section. After introducing the password it is not possible to read it. Sections GprsApn, PapLogin and PapHaslo have maximum length of 32 characters. However, it is not possible to enter more than 14 characters using a panel keyboard. If it is necessary to introduce longer identification it is recommended to use an instrument program. ⇒ Ust.Stacji (Station settings) – group of panel work parameter settings as a measurement station. → Nazwa (Name) – measurement station name – edition section. Station name is used for identification purposes in network communication. It also appears in SMS alarm messages. → Al.sygn (Alarm signaling) – way of alarm signaling - choosing from the list. Possible settings: brak (lack) – alarms will not be signaled ip – information about alarms will be transmitted to a server using IP network sms – information about alarms will be signaled by sending SMS messages oba (both) – information about alarms will be signaled using IP network and by sending SMS messages. → Al.powt (Alarm repeating) – setting alarm signaling repeat time – edition section. It allows on setting alarm communicates repeat period. Setting time to 0 blocks the repeat function (alarms will be signaled only once). The settings may be set with 10 minutes resolution in the range from 10 minutes to 24 hours and 50 minutes. Sygnalizacja (Signaling) Submenu Sygnalizacja encloses settings for exceed audio signaling function. ⇒ Odraczanie (Postponement) – setting time for signaling delay after pressing a key button – edition section. It is possible to set the time from 1 to 90 minutes. Setting value to 0 switches off a delay function. ⇒ Prog.sygn. (Signaling thresholds) – set of activity and value settings. Separate for each parameter. LAB-EL Laboratory Electronics 14 Panel LB-706 user manual 15 → Prog.T1 (T1 thresholds) – thresholds for temperature. * T1L.AK (T1L active) – lower threshold activity for temperature – choosing from the list. nie (no) – blocks signalization for a lower threshold tak (yes) – activates signalization for a lower threshold * T1L.W (T1L value) – lower threshold value for temperature – edition section. * T1H.AK (T1H active) – upper threshold activity for temperature – choosing from the list. nie (no) – blocks signalization for upper threshold tak (yes) – activates signalization for upper threshold → T1H.W (T1H value) – upper threshold value for temperature – edition section. ⇒ Prog.T2 (T2 thresholds) – thresholds for temperature2 (analogous as T1) ⇒ Prog.RH (RH thresholds) – thresholds for humidity (analogous as T1) ⇒ Prog.PR (PR thresholds) – thresholds for pressure (analogous as T1) choosing from the list means marking one of the possible options. After pressing F key button a list of options to be chosen from appears in the lower line. Upper line displays a marker showing which option is currently picked. Pressing F successively allows on marking any position from the list. Acceptation is done after pressing tak key button pressing nie key button results in cancellation of the whole procedure. edition section allows on editing few value sections. After pressing F key button sections with edited values appear in the lower line. On the other hand a marker showing, which one of the values is ↓ actually edited, appears in the upper line. Edition is based on changing the values using ↑ key buttons. Choosing next value to be edited is done after pressing F key button. Pressing F key button in a situation when a marker shows the last value causes for a question to appear asking for acceptance of the changes made. Acceptance is done after pressing tak key button. Pressing nie key button at any time results in exiting the edition procedure. If F key button is pressed to a question about acceptance the marker goes again to the first edited value. 2.6 Displaying additional information Except from measurement results other information can be signaled on a display: registry status, serial number and communicates about errors. Registry status When working in a basic mode blinking M letter in lower line signals that a panel is in the process of registering the measurement results to a memory. Starting with firmware 1.10 additionally a warning is signaled about ending memory registry space blinking symbol ! alternately with a letter M. A warning appears only in case of registry with blocking in a situation when a panels filling the last page of registry memory. Power supply status2 Starting with firmware 1.14 a warning is provided about low battery voltage. Blinking B letter in a lower display line signals it. If registry is in process at that time then the letter B is displayed alternately with other signaling symbols (see: Registry status). Low power supply voltage signaling does not influence panel work in any way it only informs about the moment of total battery run down and occurrence of power supply error. 2 Older panels LB-706 in which internal software was upgraded to version 1.14 or upper may not have this function. All panels that were equipped with firmware 1.14 or more advanced one have this function from the very beginning. LAB-EL Laboratory Electronics 15 Panel LB-706 user manual 16 Serial numbers Both a panel and the probes connected to it have serial numbers (fabric) stored in a configuration memory. Those numbers are available for a user to read using Informacje menu (panel LB-706) or after pressing a Switch off key button (panel LB-706G return to displaying measurement data is done after another pressing of the same key button). Signaling measurement errors In case of exceeding the range of measurement or any other situation in which it is not possible to calculate correctly the value of a measurement result the displayed value of an adequate parameter will be blinking. Comments about errors In a situation when a panel detects equipment or configuration errors during auto tests - information about error type is displayed: ⇒ Blad zasilania (Power supply error) – means that panel power supply voltage is too low it is necessary to replace the batteries. ⇒ Brak ustawien (Lack of settings) – means a reversible user settings error (**). ⇒ Brak sondy (Lack of probe) – panel signals lack of connected measurement probe. ⇒ Ustaw zegar (Adjust clock) – panel signals that a real time clock is not set (**). ⇒ Blad wewnetrzny (Internal error) – means not reversible panel configuration data fabric error (*) ⇒ Brak kalibracji (Lack of calibration) – means not reversible error of measurement probe calibration data (*) ⇒ Brak zegara (Lack of clock) – means that either a real time clock was not installed in a system or there was a communication error with it typically a clock is installed in a panel so the fact that an error has occurred can be treated as a defect (*) ⇒ Blad sprzetu (T) (Equipment error (T)) – means that a temperature measurement module for a probe LB-754 was not detected (*) ⇒ Blad sprzetu (B) (Equipment error (B)) – means that a pressure measurement module LB-706B was not detected (*) (*) If such error has occurred it usually means a damage, which needs to be serviced. It is recommended to switch off the panel from the power supply for some time and then again switching it on sometimes this type of error may be caused by outside factors (i.e. electromagnetic interferences caused by mobile phones, energetic device, atmospheric discharge). (**) If such error has occurred it usually means that a user has to intervene in panel settings. The settings can be made using an instrument program or a panel keyboard. 2.7 2.7.1 Measurement registry history Registry to a memory Panel LB-706 has a possibility of registry memory service. A user sets registry. Registry configuration is done by: ⇒ choosing record intervals from the range from 1 minute to 45 days with 1-minute resolution or choosing 0 interval what is equal with stopping registry, ⇒ choosing one of the mentioned recorder modes: LAB-EL Laboratory Electronics 16 Panel LB-706 user manual 17 1. recording with continuation the oldest records are deleted and new ones are recorded in their place, 2. recording with clocking registry is blocked after memory is full, ⇒ choosing data set for registry (record structure) any set chosen form the following parameters is possible: temperature, temperature2, humidity, pressure. The way in which temperature is recorded is additionally configured. A user influences temperature registry resolution and a range of stored data change. It is possible to force records with resolution 0.1 or 0.01 or accept assumed probe resolution (panel matches record resolution on its own depending on probe parameters analog option to temperature display resolution). Range of a registered temperature should be chosen in such was so it covers the whole range of measured temperature changes. It is possible to choose from the range of: -40. . . +85 or -200. . . +550 or accept assumed range for which a probe is assigned (one of the following). Panel LB-706 serves different types of registering memory and a maximum records number possible to be stored depends on the memory type. Information about memory type can be obtained using an instrument program. Internal panel memory capacity is determined by a number of available pages. In order to assess the total number of pages possible to be recorded in one should multiply the number of pages by a parameter provided in a table (number of records that fit one page). Table below concerns registry with temperature switch off or with one temperature. RH P RH+P no RH no P 1 x TA 0.1 -40..+85 -200..+550 82 61 61 61 49 41 123 123 1 x TA 0.01 -40..+85 -200..+550 61 61 61 49 41 41 123 82 bez TA 123 123 61 ∅ Table below concerns registry with both temperatures switched on. RH P RH+P no RH no P 2 x TA 0.1 -40..+85 -200..+550 49 41 49 41 35 30 61 61 2 x TA 0.01 -40..+85 -200..+550 41 41 41 35 30 30 61 49 Symbols have the following meanings: ⇒ 1 x TA 0.1 – one temperature is registered with 0.1 resolution ⇒ 1 x TA 0.01 – one temperature is registered with 0.01 resolution ⇒ 2 x TA 0.1 – two temperatures are registered with 0.1 resolution ⇒ 2 x TA 0.01 – two temperatures are registered with 0.01 resolution ⇒ RH – registered humidity ⇒ P – registered pressure Table below provides example panel registry memory capacity values with typical measurement set configuration. LAB-EL Laboratory Electronics 17 Panel LB-706 user manual Set configuration LB-706 + LB-701 LB-706B + LB-701 LB-706B LB-706T + LB-754P LB-706T + LB-754J LB-706T + LB-754T LB-706T + LB-701 2.7.2 18 Memory 32 pages 2624 1568 3936 2624 3936 1952 2624 Memory 128 pages 10496 6272 15744 10496 15744 7808 10496 Registered parameters TA+RH TA+RH+P P TA+RH TA 2 x TA TA+RH Outside recorder Device can be equipped (optionally upon request) with a possibility of cooperation with an outside decoder: a thermal printer or a wireless IP modem. Panel can have one of those two functions. 2.7.3 Printer registry Panels LB-706 with software firmware 1.22 (and more advanced ones) can serve a thermal printer as a registry device. Registry to a printer is done basing on similar principles as memory registry. The same settings are used that apply to: registry interval, record structure (determining what measurements are to be registered) and temperature registry format (resolution and range). Additionally a user can set date format and decide whether measurement probe identification will be added for each printout line. Each printer record has one printout line form, which looks like: 17-09-2002 13:15 TA=+25.33 RH=48.7% P=1005.7hPa LB-701/743 where the following were enclosed: measurement date and hour, temperature value, relative humidity and pressure as well as probe identification consisting of a symbol and a serial number. 2.7.4 Printout of registry memory content In panels with firmware software 1.32 and (more advanced ones) a function of memory content printout registry straight to a thermal printer was made available. A user has a possibility of setting time interval to which the printout applies. Printout format is similar to the one described in point 2.7.3. The content of each line depends on a content of a record registered. Date format can be received form the Drukarka menu settings. For the time of printing the registry memory content the registry process gets suspended (records that should be registered at that time will be left out). 2.7.5 Registry and alarming using IP modem LB-706 from version 1.24 has an option of cooperation with a wireless internet modem LB-430. A connection is established using GSM/GPRS network (service offered by a mobile phone provider). Any computer (server) that has access to internet can receive data. It is required to start software in order to receive data packages from the servers side. Panel except from a standard memory registry sends a package of data to server every set period of time (interval the same which applies during memory registry). This type of registry is especially comfortable in places where there is no possibility of placing a cable transmission line. LAB-EL company offers a possibility of making registry on its servers providing a user with access to them using standard internet browsers. A detailed package format description was introduced in an addition to the following manual. Panel LB-706 allows on defining alarm thresholds for each of the measured values (2*temperature, humidity, pressure). When taking measurements the results are compared to defined thresholds and in case LAB-EL Laboratory Electronics 18 Panel LB-706 user manual 19 temperature T1 of exceed of set threshold values an alarm is signaled. Alarm signaling means sending SMS messages to users (maximum 3) with information allowing on identifying a problem source and alarm cause. For each value lower and upper alarm threshold can be defined - each threshold can be activated or deactivated. When an alarm situation is over a user receives information about alarms end (also SMS). There is a possibility of setting time for repeating alarm communicates then a message will be sent cyclically until the moment of alarm cause end. For each of the measured value it is possible to set alarm hysteresis which is an interval level where an alarm is reported from the level at which information about alarm end is provided the example below illustrates it. T1.H T1.HIS T1.HIS T1.L time Al.powt signaled alarm state not signaled signaling repeating alarm end signaling alarm end Picture description: T1.L – lower alarm threshold, T1.H – upper alarm threshold, T1.HIS – alarm hysteresis, Al.powt – alarm repetition time. Setting non zero hysteresis is usually necessary in order to avoid massive alarm signaling / alarm end in a moment of going over a measurement value and existing fluctuation in measurement results. Except from alarms caused by exceeding threshold values there can be alarms that are caused errors of certain value measurements. Measurement error will be reported as an alarm if at least one of the alarm thresholds of a certain value is activated. 2.8 Pressure measurement options Panel LB-706 is adjusted for building in a barometric module (version LB-706B). This option is only possible in case when a hytherograph LB-701 serves an outside probe. In a situation when a panel cooperates with a probe LB-754 and a pressure value is necessary for internal calculations (i.e. calculating relative humidity in a psychometric LAB-EL Laboratory Electronics 19 Panel LB-706 user manual 20 measurement) a possibility of providing outside pressure value was anticipated through setting default pressure or temporary pressure. Both parameters mentioned are set using communication interface command with help of instrument software. Default pressure is a parameter stored in a device configuration memory (its value is stored even if panel gets switched off). After another switch on default pressure value is provided for relative humidity calculations. Temporary pressure is temporarily stored in a devices operational memory and after switch off it is deleted. Setting temporary pressure does not change in any way an assumed pressure value but it sets effective value used for humidity calculations. It is possible to create a measurement system in which a psychrometer built basing on LB-706 receives current data from an outside barometer and takes them for temporary pressure. In such situation (often setting of pressure parameter) it is recommended to use temporary pressure (not default) because it does not cause records in configuration memory, which is characterized, by a limited number of operations erasing/record. 2.9 Exceed signaling Panels in version 1.30 and newer ones can attend an internal exceed signaler. Signaling is realized using a piezo converter built-in a panel. A user has a possibility of setting activation conditions concerning signaling through programming thresholds. For each parameter (humidity, temperature, pressure, temeperature2) lower and upper signaling activation threshold can be defined. Each one of thresholds can be blocked individually. Additionally a situation of sensor failure is signaled or exceed of acceptable range of measurement in case when at least one of the threshold of a certain parameter was not blocked. A user has a possibility of delaying signaling by pressing any key button in time when signaling is activated. Always at least 3 signal impulses are going to be generated. A user sets a delay time in range from 1 to 90 minutes. Setting delay time to 0 switches off delay function. Delay is important for a certain time or until a moment of stopping exceed. If in time of lasting delay a new exceed appears then signaling is activated and delay annulled. Exceed signaling functions are independent form the alarm functions using IP modem. 2.10 Exploitation comments ⇒ In case of extended brakes in device exploitation it is recommended to take out the batteries from the panel in order to prevent electrolyte from liking. ⇒ It is recommended to use batteries of good quality (alkaline, lithium). ⇒ Only a feeder provided a set along with a panel should be used. ⇒ It is suggested to use company wiring system for communication connections optional accessories (extension cord, separators) can be ordered with the panel producer. ⇒ It is not advised to switch off the panel power supply when it is working. Taking out the batteries or pulling out a feeders plug should be proceeded by switching the panel off from a keyboard and waiting until a display is expired. After disconnecting power supply when the device is working one risks registry data loss and possible clock resynchronization. In systems where it is especially important to have registry data continuation even when using a network power supply it is recommended to equip a panel with batteries as a stand-by power supply in case of network failure. Battery consumption is in such case minimal and guarantees continuous work. ⇒ It is not acceptable to allow for the panel to get wet or allow on water out dropping in it. LAB-EL Laboratory Electronics 20 Panel LB-706 user manual 21 ⇒ Panel should be protected from being exposed to strong sunlight that may result in device overheating. ⇒ Panel does not require maintenance. 3 Technical data 3.1 Meteorological parameters pressure measurement – panel LB-706B uncertainty ±1 hPa ambient temperature condition 0. . . +50 range 700. . . 1100 hPa 3.2 Technical parameters Power supply The device can be powered form a network power supply or from a battery. In a situation when there are batteries in a panel and a feeder is connected at the same time the panel chooses the network power supply as a power supply source. ⇒ feeder 12V DC/100mA Attention. A feeder 12V DC/400mA is necessary for powering a panel LB-706T with a psychrometer LB-754P what is taken into account during set purchasing. In a situation when a user buys a psychrometer on his own it is recommended to buy a feeder with increased current capacity. ⇒ 4 element AA (4 * 1.5V) For network power supply only a feeder purchased in LAB-EL company should be used. Additional power supply source is provided by an internally installed lithium battery used for supporting inside real time clock functions in time when a panel is not powered from any other source. Work environment Parameters apply only to panel LB-706 specification for measurement probes are described in adequate documents. ⇒ range of temperatures: 0 ...+50 ⇒ rangeof humidity: 0...100% – water out dropping is jot acceptable Communication interface Communication interface works in a standard EIA-232C, with the following parameters: 9600 , 8 data bits + 1 stop bit, without synchronization (handshake). Communication language format is provided in a separate document available using company home page. 4 series port lines are used for communication: RxD TxD RTS GND DB9 pins 2 3 7 5 panel socket pins 6 4 5 1 1 6 RTS line is used as a signal activating a communication port. When the port is active energy consumption rises in few mA so it is recommended to power the panel from a network power supply during that time. Communication cable length should not exceed 15m. If it is necessary to communicate to longer distances it is recommended to use adequate signal amplifiers (they can be ordered with the LAB-EL company). LAB-EL Laboratory Electronics 21 Panel LB-706 user manual Overall dimensions 3.3 22 185 * 110 * 45 mm Measurement data characteristics Panel LB-706 is adapted for processing measurement signals from probes LB-701, LB-754 and a module LB-706B. Each one of those devices provides certain data coming directly from the measurement primary data. Basing on the primary data a panel calculates other values – secondary data. Primary data Tables provide range of parameter changes serviced by a panel and a resolution with which data is presented to a user. LB-701 probe parameter temperature F) relative humidity LB-754J/T probe parameter temperature F) range -40...+85 - std range -200...+550 - ext range 0...99.9 % resolution 0.1 or 0.01 range -40...+85 - std range -200...+550 - ext range resolution 0.1 or 0.01 0.1 % F) Thermometer range of measurement is additionally limited by a type of temperature sensor used and its connection cable, according to a range provided in added sensor technical data specification. LB-706B module - barometer parameter range pressure 700...1100 hPa resolution 0.1 hPa Secondary data The table provides range of changes, presentation resolution and a set of primary data necessary for determining a certain parameter. parameter range resolution dew point -40...+85 0.1 steam content 0...99999 ppmvol 1 ppmvol 0...99.9 % 0.1 % relative humidity chrometer) 4 4.1 (psy- primary data - relative humidity - temperature - relative humidity - temperature - wet termometer temperature - dry termometer temperature - pressure Software Instrument program As a set constituent element a user receives an instrument program used for making settings and reading data from the device. Before starting the program it is recommended to get accustomed with an activating manual that is provided on a distribution disk and after starting the device with the help text. The instrument panel is destined for a computer PC with Windows system. As a warranty service a user can download instrument program upgrades from the home page http://www.label.com.pl/ LAB-EL Laboratory Electronics 22 Panel LB-706 user manual 4.2 23 Other software A user can create software cooperating with a panel LB-706 on his own. Communication language specification in the scope of used comments is available on http://www.label.com.pl/. When using own software one should pay attention to not using different commands than those introduced in the specification since it can result in data damage stored during the production process and device regulation. LAB-EL Laboratory Electronics 23 Panel LB-706 user manual A 24 Panel LB-706 menu structure – firmware 1.32 Menu | +-- 1.Wylaczanie (Switch off) – Tak/Nie (Yes/No) switching off the device | +-- 2.Informacje (Information) | | | +-- 2.1 Panel – panel serial number | +-- 2.2 Sonda (Probe) – measurement probe type and serial number | +-- 2.3 Pamiec (Memory) – registering memory size | +-- 2.4 Dodatki (Additions) – information about additional modules | +-- 2.5 Zegar (Clock) – panel clock overview | +-- 2.6 Firmware – internal software version number | \-- 2.7 Producent (Producer) – information about the producer | +-- 3.Historia (History) | | | +-- 3.1 Przeglad (Overview) – registered records overview | +-- 3.2 Kasowanie (Erasing) – deleting memory history content | +-- 3.3 Ustawienia (Settings) | | | | | +-- 3.3.1 Par.Przegl – way of choosing parameter overview | | +-- 3.3.2 Akt.RH – defines whether humidity is visible in overview | | +-- 3.3.x Akt... – other parameters (analogous to 3.3.2) | | | \-- 3.4 Wydruk (Printout) -> ... | \-- 4.Ustawienia (Settings) -> ... | +-- 4.1 Wywietlacz (Display) | | | +-- 4.1.1 Pole #3 (Section #3) – display parameter settings section #3 | +-- 4.1.2 Pole #4 (Section #4) – display parameter settings section #4 | +-- 4.1.3 Rozdz.TA – setting temperature display resolution | \-- 4.1.4 Jedn.P – setting pressure presentation units | +-- 4.2 Auto-wylacz (Automatic switch off) – automatic switch off time setting +-- 4.3 Rejestracja (Registry) | | | +-- 4.3.1 Interwal (Interval) – registry interval | +-- 4.3.2 Nadpisuj (Over-writing) – registry mode after memory is full | +-- 4.3.3 Zapis RH (RH Recording) – humidity recording switch on | +-- 4.3.4 Zapis TA (TA Recording) – temperature recording switch on | +-- 4.3.5 Zakres TA (TA Range) – setting a range of temperature change | +-- 4.3.6 Rozdz.TA – setting temperature recording resolution | +-- 4.3.7 Zapis P (Record) – pressure recording switch on | \-- 4.3.8 Zapis TA2 (Record) – temperature 2 recording switch on | +-- 4.4 Zegar (Clock) clock settings | +-- 4.5 Drukarka (Printer) -> ... +-- 4.6 Modem -> ... \-- 4.7 Sygnalizacja (Signaling) -> ... LAB-EL Laboratory Electronics 24 Panel LB-706 user manual 25 Submenu 3.4 Wydruk (Printout): 3.4 | +-| | | | | +-| | | | \-- Wydruk (Printout) 3.4.1 Od..do – registry memory printout in option from .. till | +-- 3.4.1.1 Wydr.od (Printout from) – printout start time +-- 3.4.1.2 Wydr.do (Printout till) – printout end time \-- 3.4.1.3 Wydruk! (Printouts) – starting printing (from .. till) 3.4.2 Ostatnie (Last) – registry memory printout in option last days/hours | +-- 3.4.2.1 Ostatnie (Last) – number of last days/hours \-- 3.4.2.2 Wydruk! (Printouts) – starting printing (last days/hours) 3.4.3 Aktualne (Current) – report with current data Submenu 4.5 Drukarka (Printer): 4.5 | +-+-+-+-+-+-\-- Drukarka (Printer) 4.5.1 4.5.2 4.5.3 4.5.4 4.5.5 4.5.6 4.5.7 Interlinia (Interline) – setting vertical printout density Form.daty – setting date format on a printout Id.sondy – attaching identification to a printout Rejestr.do – choosing registry device Druk.teraz – forcing additional printout Test.druk – executing a test printout Rodz.druk – setting printer type Submenu 4.7 Sygnalizacja (Signaling): 4.7 Sygnalizacja (Signaling): | +-- 4.7.1 Odraczanie (Delay) – exceed signaling delay time \-- 4.7.2 Prog.sygn. – defining exceed thresholds | +-- 4.7.2.1 Prog.T1 – temperature exceed signaling thresholds | | | +-- 4.7.2.1.1 T1L.AK – lower signaling threshold activity | +-- 4.7.2.1.2 T1L.W – lower signaling threshold value | +-- 4.7.2.1.3 T1H.AK – upper signaling threshold activity | \-- 4.7.2.1.4 T1H.W – upper signaling threshold value | ... – (signaling thresholds analogous to T2, RH, PR) LAB-EL Laboratory Electronics 25 Panel LB-706 user manual 26 Submenu 4.6 Modem: 4.6 | +-+-| | | | | | | | | | | +-| | | | | | | | | | +-| | | | | | +-| | | | | | | \-- Modem 4.6.1 Rejestr.do – choosing registry channel 4.6.2 Prog.alarm. – alarm thresholds | +-- 4.6.2.1 Prog.T1 – temperature T1 alarm thresholds | | | +-- 4.6.2.1.1 T1L.AK – lower alarm threshold activity | +-- 4.6.2.1.2 T1L.W – lower alarm threshold value | +-- 4.6.2.1.3 T1H.AK – upper alarm threshold activity | +-- 4.6.2.1.4 T1H.W – upper alarm threshold value | \-- 4.6.2.1.5 T1.HIS – alarm hysteresis | ... – (alarm thresholds analogous to T2, RH, PR) 4.6.3 Ust.SMS (SMS settings) | +-- 4.6.3.1 Sms.num | | | +-- 4.6.3.1.1 Centr. – SMS service center number | +-- 4.6.3.1.2 Tel#1 – SMS alarming subscriber number | +-- 4.6.3.1.3 Tel#2 – SMS alarming subscriber number | \-- 4.6.3.1.4 Tel#3 – SMS alarming subscriber number | \-- 4.6.3.2 Sms.test – sending a test SMS 4.6.4 Ust.IP (IP settings) | +-- 4.6.4.1 IP.adres – data collecting IP server address +-- 4.6.4.2 IP.port – data collecting service IP port +-- 4.6.4.3 Proto – data transmission IP protocol +-- 4.6.4.4 IP.test – test message sending in IP network 4.6.5 Ust.Modemu (Modem settings) | +-- 4.6.5.1 Ciag.ppp – PPP connection mode +-- 4.6.5.2 Sim.pin – SIM card PIN +-- 4.6.5.3 GprsApn – GPRS network APN name +-- 4.6.5.4 PapLogin – user name in PAP authorization \-- 4.6.5.5 PapHaslo – user password in PAP authorization 4.6.6 Ust.Stacji (Station settings) | +-- 4.6.6.1 Nazwa (Name) – measurement station name +-- 4.6.6.2 Al.sygn – ways of alarm signaling \-- 4.6.6.3 Al.powt – alarm repeating interval LAB-EL Laboratory Electronics 26