1
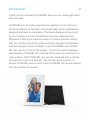
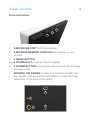
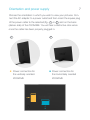
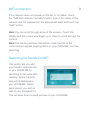
User
manual
choose version:
1
WIFI ZM7WIFI
2 3G ZM73G
User
manual
WIFI ZM7WIFI
Conteiment
Introduction
Packaging contents
Design elements
Orientation and power supply
Start-up
Choosing a language
WiFi connection
Searching for friends via WiFi
Searching for friends via email
Touch display - gestures
Using your ZOOM.ME display
ZOOM.ME screen orientation
Slideshow
Your friends list
Gallery
Quick menu
Settings
Exporting images to an SD card
Connecting ZOOM.ME to a computer
About your ZOOM.ME
Display messages
Frequently asked questions
Technical specifications
Cleaning and maintenance
Usage and repairs
Safety information
Wireless functionality
AC adapter
Proper disposal of electrical and electronic
equipment
Declaration of conformity
Warranty and servicing
Warranty card
2
3
4
7
8
8
8
9
10
10
12
12
13
13
15
16
18
20
21
21
21
23
24
25
25
25
26
27
27
28
29
34
Introduction
2
Thank you for purchasing ZOOM.ME. Now you can receive gifts each
and every day.
ZOOM.ME is an innovative approach to keeping in touch with your
friends and family. At the heart of its functionality, lies an aesthetically
designed and easy to use display. The device displays pictures sent
by your friends from their smartphones via a free dedicated app.
Whenever a friend or a loved one wants to share a special moment
with you, all they have to do is take a picture using their smartphone
and use the app to send it straight to your ZOOM.ME. As a ZOOM.
ME user, you don’t have to lift a finger - the picture will be displayed
automatically. ZOOM.ME will compose the pictures you receive into a
unique album. With ZOOM.ME, any moment captured with a camera
can become a one-of-a-kind gift. You can also send a picture to
several ZOOM.ME users at once. Each ZOOM.ME can receive images
from any number of sources.
Packaging contents
The set includes:
1. The ZOOM.ME display,
2. AC adapter with cable and pin plug,
3. Abridged user manual (Quick Start Guide),
4. User manual + warranty card,
If any of the above elements is missing, or has been damaged,
contact the seller.
Before plugging in, remove all protective covers and packaging
elements.
Please be sure to carefully read through the hereby user
manual.
3
4
Design elements
Ports and buttons
1
2
3
1.
A MICROUSB PORT for PC connectivity,
2.
A MICROSD MEMORY CARD SLOT for backing up your
pictures,
3. A RESET BUTTON,
4.,5.A POWER SLOT to connect the AC adapter,
6.
A POWER BUTTON for turning the device on and off. Activating
the sleep mode,
7.
OPENING THE CASING: In order to access the microSD card
slot, the SIM card slot and the microUSB port, press the designated point on the back of the casing.
7
4
6
5
5
Design elements
MicroSD card installation
The microSD card serves as storage for backup copies of pictures
stored on the device. The installation must be carried out with the
device turned on. Open the case, insert the card in the appropriate
slot 1 and close the case.
Acknowledge the message on your ZOOM.ME display.
1
Design elements
6
The RESET button
If the device is not working properly, or ceases to respond, you should
use the reset button located in the sliding part of the case, by carefully
pressing it with a thin object.
Activating the device
In order to activate the device, press and hold the power button
for ca. 5 seconds, until you see the start-up image show up on the
ZOOM.ME display, then release the button and wait for the device to
fully activate.
Deactivating the device
In order to deactivate the device, press and hold the power button for
ca. 5 seconds. A deactivated device cannot receive incoming pictures. They will be received once the device has been activated again
and once the ZOOM.ME has logged in to the network.
Sleep mode
In order to initiate the sleep mode, simply press the power button.
The display will deactivate, but the device will still receive incoming
pictures.
7
Orientation and power supply
Choose the orientation in which you wish to view your pictures. Connect the AC adapter to a power outlet and then insert the square plug
of the power cable to the selected (fig. 1 or 2 ) slot on the back
(darker side) of the ZOOM.ME. You will hear a distinctive click when
once the cable has been properly plugged in.
1
2
Power connection for
the vertically oriented
ZOOM.ME
Power connection for
the horizontally oriented
ZOOM.ME
Start-up
8
Once you’ve connected the device to a power source and turned it
on, follow the onscreen instructions.
Choosing a language
Choose the message
display language on your
device and touch the
“Next” button.
WiFi
connection
In order to receive messages from your friends
and family, ZOOM.ME
must be permanently connected to a WiFi network.
Choose a preferred
network from the list of
available networks and touch the “Next” button. If necessary, type
in the password using the onscreen touch keyboard that will appear
upon touching the input field. You can also tick the “Show password”
option to display characters while typing. Once you are finished, touch
the “Next” button.
WiFi connection
9
If the network does not appear on the list, or is hidden, touch
the “Add WiFi network manually” button. Type in the name of the
network and the password in the appropriate fields and touch the
“Add” button.
Hint: You can scroll through some of the screens. Touch the
display and then move your finger up or down to scroll through the
content.
Hint: The moving rainbow-colored bar under the title of the
current screen signals ongoing tasks on your ZOOM.ME, such as
searching.
Searching for friends via WiFi
This option lets you add
your friends’ smartphones
to your ZOOM.ME by
searching in the same WiFi
network. Active transmitters will be displayed in
your ZOOM.ME. Select
each person you wish to
add to your accepted list.
This will allow them to send pictures to your ZOOM.ME.
Searching for friends via email
10
This option lets you add
your friends’ smartphones to your ZOOM.
ME by searching their
email address. Type a
given person’s email address has been registred
in the ZOOM.ME mobile
app. Touch the „Verify”
button.
Your ZOOM.ME will verify
the registered email address and display the appropriate user. Touch
the “Confirm” button to add that person to your list, or “Cancel”. If
the email is not registered or invalid, your ZOOM.ME will display the
appropriate message.
Touch display - gestures
ZOOM.ME is equipped with a state of the art IPS touch display that is
operated by using gestures, which will allow you to use your ZOOM.
ME in an intuitive way.
After the initial configuration, a user guide covering the basics of
ZOOM.ME will appear. See how it works.
Touch display - gestures
11
SCROLL THE SCREEN TO THE LEFT to view the
next picture in the slideshow.
SCROLL THE SCREEN TO THE RIGHT to view the
previous picture in the slideshow.
TOUCH AND HOLD to view the quick menu.
SCROLL DOWN to view gallery.
TOUCH THE SCREEN during the slideshow to jump
to the latest picture.
Touch display - gestures
12
Having completed the guide, you are now ready to use your ZOOM.ME.
Note, you can always change your settings and manage your
pictures without using any additional buttons. ZOOM.ME was
optimized for maximum accessibility in order to ensure the most
satisfaction from sharing those special moments with the ones you
hold dear.
Using your ZOOM.ME display
ZOOM.ME screen orientation
By changing the positioning of the ZOOM.ME display, you can choose
how to view the received pictures. In order to help create a one of a
kind picture, the ZOOM.ME mobile app notifies your friends and family
members how you have positioned your ZOOM.ME display.
Position the ZOOM.ME
horizontally to view the
pictures in panoramic
format, or vertically to
enter portrait mode. You
can change the setting at
any time - the ZOOM.ME
display will automatically adjust the screen
orientation.
13
Slideshow
Your ZOOM.ME displays pictures on your device in the form of a slideshow. You can adjust the timing and number of pictures displayed, or
hold on a particular picture using the quick menu.
You can activate the “Block new picture” function in the settings to
pause the slideshow upon receiving a new picture. You can then
resume the slideshow by swiping the screen to the right.
Your friends list
This enables you to manage the ZOOM.ME apps of your friends and
family. You can accept or block individual users on the list. To go to
“Your friends list”, swipe the screen downwards 1 , to bring up the
Gallery and then select “Friends” 2 .
1
2
14
Your friends list
There are three tabs available:
YOUR FRIENDS – these are your friends’ ZOOM.ME apps that have
already been accepted and you can receive pictures and messages
from them,
PENDING – these are the ZOOM.ME apps pending acceptance. They
can also be blocked,
BLOCKED – these are the ZOOM.ME apps of people who cannot
send you pictures or messages.
You can manage your friends list at any time. You can also select
multiple entries at once and choose a specific action. Deleted friends
may no longer send messages or pictures to your ZOOM.ME, unless
you add them to the list again.
Adding friends to the list
In order to add friends to the list with your ZOOM.ME, choose one of
the following options:
SEARCH FRIENDS
VIA WIFI
SEARCH FRIENDS
VIA EMAIL
These functions have been covered in detail in the
Start-up -> Searching for friends... sections.
Gallery
15
Go to “Gallery”: Swipe the screen downwards to display a gallery of
pictures stored on the device. The pictures are organized on a timeline, from newest to oldest. Scrolling down through the gallery, you
can see markers informing you when a given picture was sent.
The gallery lets you manage your pictures, add or delete favorites.
Hold down a given picture to select it. You can select additional ones
by simply touching them.
In order to deselect a picture, touch it again or use the “OK” button,
which will deselect all previously selected pictures.
Favorites
You can mark pictures that hold a special signigicance for you by
adding them to favorites. Favorite pictures will always show up
during the slideshow, regardless of the set number of pictures to be
displayed (you can find information on picture display options in the
Settings section). This option will let you keep close to those special
cherished moments.
Deleting pictures
You can delete any unwanted pictures from your device at any time.
Simply select a given picture in the gallery and touch the “Delete”
button. Your ZOOM.ME will ask you to confirm your selection.
To go back to the slideshow, touch any picture.
Quick menu
16
During a slideshow, you can open the quick menu and gain access to
the following options:
SETTINGS – Go to settings,
FAVORITES – Mark picture as favorite,
HOLD – Enable the “Hold” function for a given picture,
DELETE – Delete the currently displayed picture,
CANCEL – Resume slideshow,
In order to access the quick menu, touch and hold a picture in your
ZOOM.ME display slideshow. Your ZOOM.ME number allows to
identify your ZOOM.ME. Give it to your friends and loved ones, so they
can send you their pictures.
The quick menu also contains information on the special email address your friends can use to send pictures to your ZOOM.ME.
Invite friends – Let your friends know about your ZOOM.ME and how
they can send you pictures.
Note: In order to receive pictures from a friend, you must first
add them to your list and accept them!
Quick menu
17
THE “HOLD” FUNCTION - lets you hold the slideshow on the
selected picture. Once you go left or right from that picture, the
slideshow will resume.
To close the quick menu, touch the “Cancel” button. Your ZOOM.ME
will resume from the last viewed photo.
To access the quick menu,
touch and hold picture
on your ZOOM.ME display
slideshow.
Your ZOOM.ME number
allows others to identify
your ZOOM.ME. Give it
to your friends and family
members. It will allow them
to send pictures to your
device.
Settings
18
This screen lets you manage settings of your ZOOM.ME. You can
choose from the following options.
WIFI NETWORKS – connect and manage WiFi networks,
SCREEN BRIGHTNESS – use the slider to adjust the screen brightness of your ZOOM.ME,
ZOOM.ME ACTIVITY – choose the hours in which you want the
device to be active. Outside of this period, your ZOOM.ME will enter
the sleep mode. Even in this mode, it will still be able to receive
messages,
NUMBER OF NEW PICTURES IN THE SLIDESHOW – set
the number of new pictures displayed in your default ZOOM.ME
slideshow,
Hint: Pictures marked as Favorites will show up in the slideshow,
regardless of this setting. This allows you to keep track of messages
and pictures that hold a special significance for you.
PICTURE DISPLAY TIME – set the default time a single picture will
be displayed during the slideshow,
Settings
19
WAKE ZOOM.ME ON NEW PICTURE – move the slider right to
make your ZOOM.ME activate the display on receiving a new picture
outside of its working hours.
ENTER ZOOM.ME SLEEP MODE AFTER – set the time in which
your ZOOM.ME will go back to sleep mode after receiving a new
picture outside of its working hours,
DISPLAY SENDER – move the slider to the right if you wish to
display the name of the sender of each picture,
BLOCK PICTURE – move the slider to the right if you wish to stop
the slideshow upon receiving a new picture,
CHOOSE SLIDESHOW ANIMATION - choose the animation for
picture transitions,
RANDOM ANIMATIONS - move the slider to the right if you want the
transition animations to be selected at random,
SOFTWARE - touch to see if your ZOOM.ME software is up to date,
RESTART DEVICE - touch to restart your device in case of it’s not
functioning properly,
Settings
20
FULL RESET - touch to fully reset your device in case of persisting
technical problems,
Note: Selecting this option will revert the device to its default
settings.
In order to save your settings and go back to the previous screen,
touch the “Save” button.
Exporting pictures to an SD card
This allows you to easily create a backup copy of your pictures. Make
sure there is enough space on your card and insert it into the device.
Your ZOOM.ME display will show the following message: “Do you
want to create a backup copy of your memory card?” Touch “Yes” to
start backing up your pictures.
If the memory card had been previously inserted into the device, you
must remove it and insert it again in order to enable the copy function.
Note: Your memory card must be compatible with the FAT32
file format in order to be recognized.
Connecting ZOOM.ME to a computer
21
In order to establish a connection with a computer, connect the device
to a USB port using the appropriate cable (not included in the set).
The computer should automatically detect your ZOOM.ME within
several seconds. You can then copy or delete pictures on the device.
About your ZOOM.ME
Go to the “About your ZOOM.ME” screen: swipe the screen downwards to bring up the Gallery. From there, select the “About ZOOM.
ME” option, where you will find important information that might prove
useful while using your device:
SERIAL NUMBER – here you can see the serial number of your
device.
SOFTWARE VERSION – here you can see the software version
currently installed on your device.
DEVICE VERSION – here you can see what version of the device
you are using.
TERMS OF USE – here you can find information on the terms of use
of the device.
PRIVACY POLICY – here you can find out about the privacy policy.
Display messages
While the device is active, it can display messages to inform you of
new activity or a technical problem. Notable messages include:
Display messages
22
YOUR ZOOM.ME IS NOT CONNECTED TO THE
INTERNET
Check your network connection. It is necessary if you
want to be able to receive pictures.
YOU HAVE A NEW PICTURE
This message means you have received a new picture
from someone you know. It will also display the picture
itself, along with a message from its sender.
... WANTS TO JOIN YOUR FRIENDS LIST
A new person wants to join your friends list. You can accept that person and allow them to send pictures to your
ZOOM.ME, or reject them. The “Hold” button will move
the person to a list of contacts pending your decision.
Manage your friends list to control the number of people
who can send you messages.
ZOOM.ME SOFTWARE UPDATE AVAILABLE
The device automatically scans for available updates.
If the latest version of the software is available, it will be
downloaded and installed automatically. Upon finishing
the update process, your ZOOM.ME will restart and
resume standard operation.
Frequently asked questions
23
My ZOOM.ME won’t turn on.
Connect the device to the included AC adapter, note whether you
can hear a distinctive clicking sound. If the device is out of power, let
it recharge for several minutes and try to turn it on again by pressing
and holding the power button for approximately 5 seconds. We
recommend keeping the ZOOM.ME display connected to the power
supply in order to ensure its continued activity.
The device does not respond to touch, it’s not working
properly.
Use the restart function in the settings or use the reset button on the
back of the device case, by carefully pressing the button with a thin
object.
Why aren’t some pictures displayed in full screen?
ZOOM.ME automatically scales pictures to achieve optimal image proportions. Turn your device horizontally or vertically to enable horizontal
scaling or portrait mode.
Why is the available memory different than specified?
FLASH memory is divided into two main parts, one of which – invisible
to the User – is meant for system files and the operating system. The
other part is used entirely for the User’s files.
Frequently asked questions
24
Why doesn’t my device connect with a Wi-Fi network?
Make sure your WiFi signal source is working properly. The distance
between the router and the receiver should not be more than 50
meters. Make sure there are no obstacles between the devices that
could weaken the signal.
Can I charge my device with a different charger than Goclever?
Remember that using a different charger than the one included with
the device might result in damaging your device and losing your
warranty.
If you have any further questions or issues, please contact our technical support department.
Technical specifications
Capacitive touch display: 7” LCD IPS, 1024 x 600 px
Internal memory: 4 GB (system software + user data)
Connectivity: WiFi: b/g/n
Ports: microUSB 2.0, microSD up to 32 GB
Power input: 5 V, DC 2.5 mm plug
Battery: 1000mAh
Dimensions: 195 x 126 x 18mm
Included with the device is an AC adapter. Its parameters are:
input: 100-240 V~, 50/60 Hz, 0,35 A;
output: 5,0 V 1,5 A
Cleaning and maintenance
25
Use a soft, dry cloth to clean the device and the AC adapter. Do not
use alcohol, paint thinner, gasoline or other or any other solvents to
clean the screen.
Usage and repairs
Repairs can only be performed by authorized and qualified personnel.
Any attempt to repair the device on your own, or using an unauthorized servicing center, shall render the warranty null and void. The user
cannot easily replace the battery in this product.
Safety information
GOCLEVER does not assume liability for any interference occurring
during the use of the device. Taking off the casing or dismantling
the device, or any of its accessories, for any reason, might result in
damage not covered by the warranty.
In order to avoid electrocution, you must refrain from taking off the
device case by yourself. Any repair operations can only be performed
by qualified personnel.
The device and its AC adapter are not waterproof. Please do not
use them in the bathroom, or other humid areas. Avoid exposure to
rainfall.
The device should not be stored or used in places where it would be
exposed to heat sources, such as heaters or air vents; direct sunlight;
excessive amounts of dust; humidity and rain; mechanical vibrations
or tremors; strong magnets or speakers with no magnetic shielding;
excessively high or low temperatures or humidity.
Safety information
26
Turning off the device using the power button does not fully disconnect it from the power source. In order to fully deactivate the device,
disconnect the AC adapter from the power source. Make sure to use
a power outlet that is easily accessible and located near the device.
Wireless functionality
In certain conditions and environments, wireless functionality can be
limited by the real estate owners or local authorities, e.g. on board of a
plane, in the hospital, or any other location where the risk of electronic
interference is deemed harmful.
If you have reasonable doubt whether or not wireless functionality is
restricted in your current location, consult a member of the authorized
personnel before turning it on.
If you are using any personal medical devices (cardiac pacemaker,
hearing aid, etc.), consult your doctor or device manufacturer on the
safety of using wireless devices.
If the device generates TV/radio signal interference that stops once
the device has been turned off, we recommend doing one of the
following: change the setting or positioning of the receiving antenna,
increase the distance between the receiver and the transmitter,
consult the seller or an experienced technician qualified in dealing with
audio/video devices. GOCLEVER shall not assume liability for any TV/
radio signal interference, or any other undesirable effects.
AC adapter
27
We recommend using the original GOCLEVER AC adapter included
with the product. This adapter is intended to be used exclusively with
the ZOOM.ME display.
Please, do not use the AC adapter if the power cable is damaged.
This might result in a short circuit, a fire, or serious damage to the
device.
Unplugging the AC adapter from the power outlet will result in
disconnecting the adapter from the power source. The outlet should
be easily accessible. While unplugging the AC adapter, do not pull the
cable - use the main adapter case for grip.
Proper disposal of electrical and
electronic equipment
Disposing of unused electrical and electronic equipment (used in
the European Union and other European countries using their own
collection systems)
If you see this symbol on the product or its packaging,
it means the product can be treated as municipal waste.
Thus, it should be delivered to an authorized center for
collecting electrical and electronic equipment for recycling. Proper
disposal of the product prevents potentially harmful effects on the
environment and human health, which may occur due to improper
waste disposal. Recycling is beneficial for the environment.
Proper disposal of electrical and
electronic equipment
28
For more information on the recycling of this product, consult your local governing authority, waste disposal services, or the store in which
you have bought the product.
Declaration of conformity
GOCLEVER Sp. z o.o. hereby declares that the ZOOM.
ME device (model ZM73G / ZM7WIFI) conforms to the
basic requirements and other appropriate provisions of
the following directives: EMC 2004/108/EC, LVD 2006/95/EC, R&TTE
1999/5/EC, RoHS 2011/65/EC, ErP 2009/125/EC. The full documentation, including detailed information on the product, is available on
the product’s website: www.zoom.me.
Any other trademarks, not belonging to GOCLEVER, that were depicted in this manual are the property of their respective owners.
Warranty and servicing
29
GOCLEVER’S GENERAL TERMS AND CONDITIONS OF WARRANTY
Thank you for buying a Goclever product and we hope you will enjoy
it. The product has been manufactured according to the strict quality
standards of Goclever, however if you experience any problems during
the warranty period, please contact us as follows
www.digitest.de/goclever
Hotline: 0800-1004332
Many end-user problems can easily be solved using the support
service referred to above, so please contact us first before contacting
the place of purchase.
Before contacting the hotline please have the following ready:
- model number and serial number of the device (will be able to find it
on the warranty card, on the device itself or on the unit box)
- detailed fault description
- Proof of purchase from retailer
Should the problem not be solved, in order for the device to undergo
warranty evaluation you will be requested to send it to the repair
centre. In order to do so, you will be given a unique RMA number
which needs to be stated clearly on the box. Please note that the
item should be sent in the original box, as otherwise the BUYER will
be responsible for damage in transit. Please also note that packages
with illegible RMA number or without any RMA numbers will NOT be
accepted by the repair centre.
Warranty and servicing
30
1.Goclever Sp. z o.o. with registered office in Przeżmierowo (62081) at Skórzewska Street 35, Wysogotowo, Poland hereinafter
referred to as Guarantor, guarantees that Goclever branded
product is free from any design or material defects that could
compromise its functionality provided that user manual supplied
at conclusion of the agreement has been adhered to.
2.This warranty is applicable only on the territory of UK and Ireland.
3.Goclever shall remove any possible defect of the device, in accordance with the provision of this warranty, provided that a proof of
purchase is presented to the repair center.
4.The duration of warranty for Goclever devices shall be 12 months
starting on the date the device was purchased. Goclever shall not
cover the costs of repair after this period elapses.
5.This warranty is non-transferable.
6.The user should call the technical support number in accordance
with the RMA procedure and obtain a RMA number if a fault is
found.
7.Warranty for LCDs and batteries mounted in Goclever products is
limited to 12 months from the date of purchase, TFT LCD screens
with sizes from 3,5” to 10,1” may have up to 5 faulty pixels
(white, black or the so-called sub-pixels).
8.Warranty for accessories added to the device (cables, power
supply) is limited to 6 months from the date of sale and excludes
physical damage.
9.DOA (dead on arrival) must be reported within 14 days of purchase.
Warranty and servicing
31
10.Defects detected within the warranty period shall be removed
free of charge within the possibly shortest time not exceeding
21 working days from the date on which the devices have been
received by the repair center.
11.Fault must be reported to the repair center not later than within 10
days from its occurrence.
12.The buyer is obliged to supply the product in original packaging
complete with all accessories. The Buyer shall be responsible for
the damage resulting from use of different packaging.
13.Ownership of the devices that have not be collected from the
repair center within 3 months from completion of the repair shall
pass on to the repair center.
14.In case of unjustified claim (incorrect information provided, claim
relating to fault-free device or user damage) The Claimant shall be
charged with testing fees and costs of transport.
15.Warranty does not cover:
Any use of the equipment going beyond the scope of its intended
use;
Claims relating to specification of the device if they are consistent
with the ones given by the manufacturer in the user manual or
other normative documents;
Defects caused by external forces, e.g. mechanical damage, effects of weather conditions, pollution, water damage, overvoltage,
etc.
Defective functioning of unauthorized software installed in the
device;
Capacitive stylus damage to screen;
Warranty and servicing
32
Normal wear and tear or improper storage;
Improper use or installation of third party products (e.g. Memory
cards).
16.If a warranty repair requires parts to be changed, the replaced
element remains the property of the Goclever. Replaced parts
may be of a different brand provided that technical parameters
are at least equal.
17.The Buyer loses the warranty right if warranty seals are broken,
the tag with serial number if removed, or should repair centre
detect unauthorised repair or systemic or construction changes of
the device.
18.Goclever may waive the deadlines for warranty service should
unexpected circumstances of force majeure arise e.g. natural
disaster, social unrest, etc.
19.Goclever is not responsible for damages and losses incurred as a
result of being unable to use the device while it was serviced.
20.Warranty rights does not include the buyer’s right to damage to
loss of profits, due to defects of the device.
21.Goclever shall not be responsible for damage resulting from loss
of data on magnetic drives, please note that maps are restored
back to the factory condition.
22.The legal relations between the buyer and the device and the Goclever is governed exclusively by the provisions of this warranty.
Claims for compensation going further than that are excluded
unless they result from mandatory provisions of law.
Warranty and servicing
33
23.This warranty has a supplementary character in relations to buyer’s rights towards the seller. Warranty does not exclude, nor limit,
nor suspend buyer’s rights resulting from nonconformity of goods
with the contract.
24.This warranty does not affect your statutory rights.
Warranty and post-warranty servicing:
www.zoom.me
Manufacturer:
GOCLEVER Sp. z o.o.
ul. Skórzewska 35
Wysogotowo (Poznań)
62-081 Przeźmierowo, Poland, EU.
ZOOM.ME Sp. z o.o.
ul. Grunwaldzka 472
80-309 Gdańsk Poland, EU
34
Warranty card
DATE OF SALE
PRODUCTION DATE
DEVICE MODEL
SERIAL NUMBER
SELLER NAME / STAMP:
SIGNATURE:
Date and buyer signature
Repair history
Date
Found
defect
Repairs
carried out
Servicing center
stamp and signature
© Copyrights 2014 All rights reserved
Visit www.zoom.me
Send gifts
every day!
User
manual
3G ZM73G
Conteiment
Introduction
Packaging contents
Design elements
Orientation and power supply
Start-up
Choosing a language
WiFi connection
Searching for friends via WiFi
Searching for friends via email
Touch display - gestures
Using your ZOOM.ME display
ZOOM.ME screen orientation
Slideshow
Your friends list
Gallery
Quick menu
Settings
Exporting images to an SD card
Connecting ZOOM.ME to a computer
About your ZOOM.ME
Display messages
Frequently asked questions
Technical specifications
Cleaning and maintenance
Usage and repairs
Safety information
Wireless functionality
AC adapter
Proper disposal of electrical and electronic
equipment
Declaration of conformity
Warranty and servicing
Warranty card
2
3
5
10
11
11
11
12
13
13
15
15
16
16
18
19
21
23
24
24
24
26
27
28
28
28
29
30
31
31
32
37
Introduction
2
Thank you for purchasing ZOOM.ME. Now you can receive gifts each
and every day.
ZOOM.ME is an innovative approach to keeping in touch with your
friends and family. At the heart of its functionality, lies an aesthetically
designed and easy to use display. The device displays pictures sent
by your friends from their smartphones via a free dedicated app.
Whenever a friend or a loved one wants to share a special moment
with you, all they have to do is take a picture using their smartphone
and use the app to send it straight to your ZOOM.ME. As a ZOOM.
ME user, you don’t have to lift a finger - the picture will be displayed
automatically. ZOOM.ME will compose the pictures you receive into a
unique album. With ZOOM.ME, any moment captured with a camera
can become a one-of-a-kind gift. You can also send a picture to
several ZOOM.ME users at once. Each ZOOM.ME can receive images
from any number of sources.
Packaging contents
The set includes:
1. The ZOOM.ME display,
2. AC adapter with cable and pin plug,
3. Abridged user manual (Quick Start Guide),
4. User manual + warranty card,
optional:
5. SIM card form a telephone service provider.
If any of the above elements is missing, or has been damaged,
contact the seller.
Before plugging in, remove all protective covers and packaging
elements.
Please be sure to carefully read through the hereby user
manual.
3
ZOOM.ME as a 3G router
4
Your ZOOM.ME can act as a local Internet HotSpot. The HotSpot or
WiFi router option can be enabled in two ways:
-either bring up the “Quick Menu” by touching and holding the
screen, or swiping the screen upwards. Once in the Quick Menu,
select the HotSpot option. Touching it toggles the WiFi router
option,
-or go to the Settings screen, where you will find the “Enable
WiFi router”, with the description: “grant Internet access in this
location using your ZOOM.ME”. Touching it will enable the WiFi
router option and a default network will appear, called ZOOM.ME
HOTSPOT, secured with a default password: 12345678.
The password can be changed in the Settings screen, by
touching the “Input HotSpot password” button and changing the
value from 12345678 to any other password consisting of at least
8 characters.
-
The router functionality allows to connect up to 5 devices.
5
Design elements
Ports and buttons
1
2
3
4
1. A MICROUSB PORT for PC connectivity,
2. A SIM CARD (MINI SIM) SLOT for 3G connectivity,
3. A MICROSD MEMORY CARD SLOT for backing up your
pictures,
4. A RESET BUTTON,
5.,6.A POWER SLOT to connect the AC adapter,
7.
A POWER BUTTON for turning the device on and off. Activating
the sleep mode,
8.
OPENING THE CASING: In order to access the microSD card
slot, the SIM card slot and the microUSB port, press the designated point on the back of the casing.
8
5
7
6
6
Design elements
MicroSD card installation
The microSD card serves as storage for backup copies of pictures
stored on the device. The installation must be carried out with the
device turned on. Open the case, insert the card in the appropriate
slot 1 and close the case.
Acknowledge the message on your ZOOM.ME display.
1
7
Design elements
SIM card installation
Turn off the device and open the case. Insert the card in the appropriate slot 2 and close the case. Restart the device.
2
Design elements
8
3G functionality
-
once you’ve inserted the SIM card and activated the device, it
will automatically register to a GSM network,
- having registered to a GSM network, the device will automatically connect to the Internet via 3G,
-
if the user does not wish to use a 3G connection, they can
go to Settings -> WiFi networks and connect the device to a local
WiFi network (the device will no longer use a 3G connection).
The RESET button
If the device is not working properly, or ceases to respond, you should
use the reset button located in the sliding part of the case, by carefully
pressing it with a thin object.
Activating the device
In order to activate the device, press and hold the power button
for ca. 5 seconds, until you see the start-up image show up on the
ZOOM.ME display, then release the button and wait for the device to
fully activate.
Design elements
9
Deactivating the device
In order to deactivate the device, press and hold the power button
for ca. 5 seconds. A deactivated device cannot receive incoming pictures. They will be received once the device has been activated again
and once the ZOOM.ME has logged in to the network.
Sleep mode
In order to initiate the sleep mode, simply press the power button.
The display will deactivate, but the device will still receive incoming
pictures.
10
Orientation and power supply
Choose the orientation in which you wish to view your pictures. Connect the AC adapter to a power outlet and then insert the square plug
of the power cable to the selected (fig. 1 or 2 ) slot on the back
(darker side) of the ZOOM.ME. You will hear a distinctive click when
once the cable has been properly plugged in.
1
2
Power connection for
the vertically oriented
ZOOM.ME
Power connection for
the horizontally oriented
ZOOM.ME
Start-up
11
Once you’ve connected the device to a power source and turned it
on, follow the onscreen instructions.
Choosing a language
Choose the message
display language on your
device and touch the
“Next” button.
WiFi
connection
In order to receive messages from your friends
and family, ZOOM.ME
must be permanently connected to a WiFi network.
Choose a preferred
network from the list of
available networks and touch the “Next” button. If necessary, type
in the password using the onscreen touch keyboard that will appear
upon touching the input field. You can also tick the “Show password”
option to display characters while typing. Once you are finished, touch
the “Next” button.
WiFi connection
12
If the network does not appear on the list, or is hidden, touch
the “Add WiFi network manually” button. Type in the name of the
network and the password in the appropriate fields and touch the
“Add” button.
Hint: You can scroll through some of the screens. Touch the
display and then move your finger up or down to scroll through the
content.
Hint: The moving rainbow-colored bar under the title of the
current screen signals ongoing tasks on your ZOOM.ME, such as
searching.
Searching for friends via WiFi
This option lets you add
your friends’ smartphones
to your ZOOM.ME by
searching in the same WiFi
network. Active transmitters will be displayed in
your ZOOM.ME. Select
each person you wish to
add to your accepted list.
This will allow them to send pictures to your ZOOM.ME.
Searching for friends via email
13
This option lets you add
your friends’ smartphones to your ZOOM.
ME by searching their
email address. Type a
given person’s email address has been registred
in the ZOOM.ME mobile
app. Touch the „Verify”
button.
Your ZOOM.ME will verify
the registered email address and display the appropriate user. Touch
the “Confirm” button to add that person to your list, or “Cancel”. If
the email is not registered or invalid, your ZOOM.ME will display the
appropriate message.
Touch display - gestures
ZOOM.ME is equipped with a state of the art IPS touch display that is
operated by using gestures, which will allow you to use your ZOOM.
ME in an intuitive way.
After the initial configuration, a user guide covering the basics of
ZOOM.ME will appear. See how it works.
Touch display - gestures
14
SCROLL THE SCREEN TO THE LEFT to view the
next picture in the slideshow.
SCROLL THE SCREEN TO THE RIGHT to view the
previous picture in the slideshow.
TOUCH AND HOLD to view the quick menu.
SCROLL DOWN to view gallery.
TOUCH THE SCREEN during the slideshow to jump
to the latest picture.
Touch display - gestures
15
Having completed the guide, you are now ready to use your ZOOM.ME.
Note, you can always change your settings and manage your
pictures without using any additional buttons. ZOOM.ME was
optimized for maximum accessibility in order to ensure the most
satisfaction from sharing those special moments with the ones you
hold dear.
Using your ZOOM.ME display
ZOOM.ME screen orientation
By changing the positioning of the ZOOM.ME display, you can choose
how to view the received pictures. In order to help create a one of a
kind picture, the ZOOM.ME mobile app notifies your friends and family
members how you have positioned your ZOOM.ME display.
Position the ZOOM.ME
horizontally to view the
pictures in panoramic
format, or vertically to
enter portrait mode. You
can change the setting at
any time - the ZOOM.ME
display will automatically adjust the screen
orientation.
16
Slideshow
Your ZOOM.ME displays pictures on your device in the form of a slideshow. You can adjust the timing and number of pictures displayed, or
hold on a particular picture using the quick menu.
You can activate the “Block new picture” function in the settings to
pause the slideshow upon receiving a new picture. You can then
resume the slideshow by swiping the screen to the right.
Your friends list
This enables you to manage the ZOOM.ME apps of your friends and
family. You can accept or block individual users on the list. To go to
“Your friends list”, swipe the screen downwards 1 , to bring up the
Gallery and then select “Friends” 2 .
1
2
17
Your friends list
There are three tabs available:
YOUR FRIENDS – these are your friends’ ZOOM.ME apps that have
already been accepted and you can receive pictures and messages
from them,
PENDING – these are the ZOOM.ME apps pending acceptance. They
can also be blocked,
BLOCKED – these are the ZOOM.ME apps of people who cannot
send you pictures or messages.
You can manage your friends list at any time. You can also select
multiple entries at once and choose a specific action. Deleted friends
may no longer send messages or pictures to your ZOOM.ME, unless
you add them to the list again.
Adding friends to the list
In order to add friends to the list with your ZOOM.ME, choose one of
the following options:
SEARCH FRIENDS
VIA WIFI
SEARCH FRIENDS
VIA EMAIL
These functions have been covered in detail in the
Start-up -> Searching for friends... sections.
Gallery
18
Go to “Gallery”: Swipe the screen downwards to display a gallery of
pictures stored on the device. The pictures are organized on a timeline, from newest to oldest. Scrolling down through the gallery, you
can see markers informing you when a given picture was sent.
The gallery lets you manage your pictures, add or delete favorites.
Hold down a given picture to select it. You can select additional ones
by simply touching them.
In order to deselect a picture, touch it again or use the “OK” button,
which will deselect all previously selected pictures.
Favorites
You can mark pictures that hold a special signigicance for you by
adding them to favorites. Favorite pictures will always show up
during the slideshow, regardless of the set number of pictures to be
displayed (you can find information on picture display options in the
Settings section). This option will let you keep close to those special
cherished moments.
Deleting pictures
You can delete any unwanted pictures from your device at any time.
Simply select a given picture in the gallery and touch the “Delete”
button. Your ZOOM.ME will ask you to confirm your selection.
To go back to the slideshow, touch any picture.
Quick menu
19
During a slideshow, you can open the quick menu and gain access to
the following options:
SETTINGS – Go to settings,
FAVORITES – Mark picture as favorite,
HOLD – Enable the “Hold” function for a given picture,
DELETE – Delete the currently displayed picture,
CANCEL – Resume slideshow,
ROUTER – Use your ZOOM.ME as an Internet router. Touch to toggle
the router function.
In order to access the quick menu, touch and hold a picture in your
ZOOM.ME display slideshow. Your ZOOM.ME number allows to
identify your ZOOM.ME. Give it to your friends and loved ones, so they
can send you their pictures.
The quick menu also contains information on the special email address your friends can use to send pictures to your ZOOM.ME.
Invite friends – Let your friends know about your ZOOM.ME and how
they can send you pictures.
Note: In order to receive pictures from a friend, you must first
add them to your list and accept them!
Quick menu
20
THE “HOLD” FUNCTION - lets you hold the slideshow on the
selected picture. Once you go left or right from that picture, the
slideshow will resume.
To close the quick menu, touch the “Cancel” button. Your ZOOM.ME
will resume from the last viewed photo.
To access the quick menu,
touch and hold picture
on your ZOOM.ME display
slideshow.
Your ZOOM.ME number
allows others to identify
your ZOOM.ME. Give it
to your friends and family
members. It will allow them
to send pictures to your
device.
Settings
21
This screen lets you manage settings of your ZOOM.ME. You can
choose from the following options.
WIFI NETWORKS – connect and manage WiFi networks,
SCREEN BRIGHTNESS – use the slider to adjust the screen brightness of your ZOOM.ME,
ZOOM.ME ACTIVITY – choose the hours in which you want the
device to be active. Outside of this period, your ZOOM.ME will enter
the sleep mode. Even in this mode, it will still be able to receive
messages,
NUMBER OF NEW PICTURES IN THE SLIDESHOW – set
the number of new pictures displayed in your default ZOOM.ME
slideshow,
Hint: Pictures marked as Favorites will show up in the slideshow,
regardless of this setting. This allows you to keep track of messages
and pictures that hold a special significance for you.
PICTURE DISPLAY TIME – set the default time a single picture will
be displayed during the slideshow,
Settings
22
WAKE ZOOM.ME ON NEW PICTURE – move the slider right to
make your ZOOM.ME activate the display on receiving a new picture
outside of its working hours.
ENTER ZOOM.ME SLEEP MODE AFTER – set the time in which
your ZOOM.ME will go back to sleep mode after receiving a new
picture outside of its working hours,
DISPLAY SENDER – move the slider to the right if you wish to
display the name of the sender of each picture,
BLOCK PICTURE – move the slider to the right if you wish to stop
the slideshow upon receiving a new picture,
CHOOSE SLIDESHOW ANIMATION - choose the animation for
picture transitions,
RANDOM ANIMATIONS - move the slider to the right if you want the
transition animations to be selected at random,
ENABLE WIFI ROUTER - broadcast Internet using your ZOOM.ME.
Touch to enable the router function and set a password for your WiFi
network broadcasted from your ZOOM.ME,
SOFTWARE - touch to see if your ZOOM.ME software is up to date,
RESTART DEVICE - touch to restart your device in case of it’s not
functioning properly,
Settings
23
FULL RESET - touch to fully reset your device in case of persisting
technical problems,
Note: Selecting this option will revert the device to its default
settings.
ADD FUNDS OR ACTIVATE A SERVICE - this option allows you to
use codes from your operator to add funds or to activate a service.
In order to save your settings and go back to the previous screen,
touch the “Save” button.
Exporting pictures to an SD card
This allows you to easily create a backup copy of your pictures. Make
sure there is enough space on your card and insert it into the device.
Your ZOOM.ME display will show the following message: “Do you
want to create a backup copy of your memory card?” Touch “Yes” to
start backing up your pictures.
If the memory card had been previously inserted into the device, you
must remove it and insert it again in order to enable the copy function.
Note: Your memory card must be compatible with the FAT32
file format in order to be recognized.
Connecting ZOOM.ME to a computer
24
In order to establish a connection with a computer, connect the device
to a USB port using the appropriate cable (not included in the set).
The computer should automatically detect your ZOOM.ME within
several seconds. You can then copy or delete pictures on the device.
About your ZOOM.ME
Go to the “About your ZOOM.ME” screen: swipe the screen downwards to bring up the Gallery. From there, select the “About ZOOM.
ME” option, where you will find important information that might prove
useful while using your device:
SERIAL NUMBER – here you can see the serial number of your
device.
SOFTWARE VERSION – here you can see the software version
currently installed on your device.
DEVICE VERSION – here you can see what version of the device
you are using.
TERMS OF USE – here you can find information on the terms of use
of the device.
PRIVACY POLICY – here you can find out about the privacy policy.
Display messages
While the device is active, it can display messages to inform you of
new activity or a technical problem. Notable messages include:
Display messages
25
YOUR ZOOM.ME IS NOT CONNECTED TO THE
INTERNET
Check your network connection. It is necessary if you
want to be able to receive pictures.
YOU HAVE A NEW PICTURE
This message means you have received a new picture
from someone you know. It will also display the picture
itself, along with a message from its sender.
... WANTS TO JOIN YOUR FRIENDS LIST
A new person wants to join your friends list. You can accept that person and allow them to send pictures to your
ZOOM.ME, or reject them. The “Hold” button will move
the person to a list of contacts pending your decision.
Manage your friends list to control the number of people
who can send you messages.
ZOOM.ME SOFTWARE UPDATE AVAILABLE
The device automatically scans for available updates.
If the latest version of the software is available, it will be
downloaded and installed automatically. Upon finishing
the update process, your ZOOM.ME will restart and
resume standard operation.
Frequently asked questions
26
My ZOOM.ME won’t turn on.
Connect the device to the included AC adapter, note whether you
can hear a distinctive clicking sound. If the device is out of power, let
it recharge for several minutes and try to turn it on again by pressing
and holding the power button for approximately 5 seconds. We
recommend keeping the ZOOM.ME display connected to the power
supply in order to ensure its continued activity.
The device does not respond to touch, it’s not working
properly.
Use the restart function in the settings or use the reset button on the
back of the device case, by carefully pressing the button with a thin
object.
Why aren’t some pictures displayed in full screen?
ZOOM.ME automatically scales pictures to achieve optimal image proportions. Turn your device horizontally or vertically to enable horizontal
scaling or portrait mode.
Why is the available memory different than specified?
FLASH memory is divided into two main parts, one of which – invisible
to the User – is meant for system files and the operating system. The
other part is used entirely for the User’s files.
Frequently asked questions
27
Why doesn’t my device connect with a Wi-Fi network?
Make sure your WiFi signal source is working properly. The distance
between the router and the receiver should not be more than 50
meters. Make sure there are no obstacles between the devices that
could weaken the signal.
Can I charge my device with a different charger than Goclever?
Remember that using a different charger than the one included with
the device might result in damaging your device and losing your
warranty.
If you have any further questions or issues, please contact our technical support department.
Technical specifications
Capacitive touch display: 7” LCD IPS, 1024 x 600 px
Internal memory: 4 GB (system software + user data)
Connectivity: WiFi: b/g/n, 2G/3G,
WiFi router functionality - tether up to 5 devices
Ports: microUSB 2.0, microSD up to 32 GB, SIM (Mini SIM)
Power input: 5 V, DC 2.5 mm plug
Battery: 1000mAh
Dimensions: 195 x 126 x 18mm
Technical specifications
28
The ZOOM.ME 3G device is optimized for GSM networks at 2G frequencies: 850MHZ/900MHZ/1800MHZ/1900MHZ, and 3G frequencies:
900MHZ/2100MHZ.
Included with the device is an AC adapter. Its parameters are:
input: 100-240 V~, 50/60 Hz, 0,35 A; output: 5,0 V 1,5 A
Cleaning and maintenance
Use a soft, dry cloth to clean the device and the AC adapter. Do not
use alcohol, paint thinner, gasoline or other or any other solvents to
clean the screen.
Usage and repairs
Repairs can only be performed by authorized and qualified personnel.
Any attempt to repair the device on your own, or using an unauthorized servicing center, shall render the warranty null and void. The user
cannot easily replace the battery in this product.
Safety information
GOCLEVER does not assume liability for any interference occurring
during the use of the device. Taking off the casing or dismantling
the device, or any of its accessories, for any reason, might result in
damage not covered by the warranty.
Safety information
29
In order to avoid electrocution, you must refrain from taking off the
device case by yourself. Any repair operations can only be performed
by qualified personnel.
The device and its AC adapter are not waterproof. Please do not
use them in the bathroom, or other humid areas. Avoid exposure to
rainfall.
The device should not be stored or used in places where it would be
exposed to heat sources, such as heaters or air vents; direct sunlight;
excessive amounts of dust; humidity and rain; mechanical vibrations
or tremors; strong magnets or speakers with no magnetic shielding;
excessively high or low temperatures or humidity.
Turning off the device using the power button does not fully disconnect it from the power source. In order to fully deactivate the device,
disconnect the AC adapter from the power source. Make sure to use
a power outlet that is easily accessible and located near the device.
Wireless functionality
In certain conditions and environments, wireless functionality can be
limited by the real estate owners or local authorities, e.g. on board of a
plane, in the hospital, or any other location where the risk of electronic
interference is deemed harmful.
If you have reasonable doubt whether or not wireless functionality is
restricted in your current location, consult a member of the authorized
personnel before turning it on.
Wireless functionality
30
If you are using any personal medical devices (cardiac pacemaker,
hearing aid, etc.), consult your doctor or device manufacturer on the
safety of using wireless devices.
If the device generates TV/radio signal interference that stops once
the device has been turned off, we recommend doing one of the
following: change the setting or positioning of the receiving antenna,
increase the distance between the receiver and the transmitter,
consult the seller or an experienced technician qualified in dealing with
audio/video devices. GOCLEVER shall not assume liability for any TV/
radio signal interference, or any other undesirable effects.
AC adapter
We recommend using the original GOCLEVER AC adapter included
with the product. This adapter is intended to be used exclusively with
the ZOOM.ME display.
Please, do not use the AC adapter if the power cable is damaged.
This might result in a short circuit, a fire, or serious damage to the
device.
Unplugging the AC adapter from the power outlet will result in
disconnecting the adapter from the power source. The outlet should
be easily accessible. While unplugging the AC adapter, do not pull the
cable - use the main adapter case for grip.
Proper disposal of electrical and
electronic equipment
31
Disposing of unused electrical and electronic equipment (used in
the European Union and other European countries using their own
collection systems)
If you see this symbol on the product or its packaging,
it means the product can be treated as municipal waste.
Thus, it should be delivered to an authorized center for
collecting electrical and electronic equipment for recycling. Proper
disposal of the product prevents potentially harmful effects on the
environment and human health, which may occur due to improper
waste disposal. Recycling is beneficial for the environment. For more
information on the recycling of this product, consult your local governing authority, waste disposal services, or the store in which you have
bought the product.
Declaration of conformity
GOCLEVER Sp. z o.o. hereby declares that the ZOOM.
ME device (model ZM73G / ZM7WIFI) conforms to the
basic requirements and other appropriate provisions of
the following directives: EMC 2004/108/EC, LVD 2006/95/EC, R&TTE
1999/5/EC, RoHS 2011/65/EC, ErP 2009/125/EC. The full documentation, including detailed information on the product, is available on
the product’s website: www.zoom.me.
Any other trademarks, not belonging to GOCLEVER, that were depicted in this manual are the property of their respective owners.
Warranty and servicing
32
GOCLEVER’S GENERAL TERMS AND CONDITIONS OF WARRANTY
Thank you for buying a Goclever product and we hope you will enjoy
it. The product has been manufactured according to the strict quality
standards of Goclever, however if you experience any problems during
the warranty period, please contact us as follows
www.digitest.de/goclever
Hotline: 0800-1004332
Many end-user problems can easily be solved using the support
service referred to above, so please contact us first before contacting
the place of purchase.
Before contacting the hotline please have the following ready:
- model number and serial number of the device (will be able to find it
on the warranty card, on the device itself or on the unit box)
- detailed fault description
- Proof of purchase from retailer
Should the problem not be solved, in order for the device to undergo
warranty evaluation you will be requested to send it to the repair
centre. In order to do so, you will be given a unique RMA number
which needs to be stated clearly on the box. Please note that the
item should be sent in the original box, as otherwise the BUYER will
be responsible for damage in transit. Please also note that packages
with illegible RMA number or without any RMA numbers will NOT be
accepted by the repair centre.
Warranty and servicing
33
1.Goclever Sp. z o.o. with registered office in Przeżmierowo (62081) at Skórzewska Street 35, Wysogotowo, Poland hereinafter
referred to as Guarantor, guarantees that Goclever branded
product is free from any design or material defects that could
compromise its functionality provided that user manual supplied
at conclusion of the agreement has been adhered to.
2.This warranty is applicable only on the territory of UK and Ireland.
3.Goclever shall remove any possible defect of the device, in accordance with the provision of this warranty, provided that a proof of
purchase is presented to the repair center.
4.The duration of warranty for Goclever devices shall be 12 months
starting on the date the device was purchased. Goclever shall not
cover the costs of repair after this period elapses.
5.This warranty is non-transferable.
6.The user should call the technical support number in accordance
with the RMA procedure and obtain a RMA number if a fault is
found.
7.Warranty for LCDs and batteries mounted in Goclever products is
limited to 12 months from the date of purchase, TFT LCD screens
with sizes from 3,5” to 10,1” may have up to 5 faulty pixels
(white, black or the so-called sub-pixels).
8.Warranty for accessories added to the device (cables, power
supply) is limited to 6 months from the date of sale and excludes
physical damage.
9.DOA (dead on arrival) must be reported within 14 days of purchase.
Warranty and servicing
34
10.Defects detected within the warranty period shall be removed
free of charge within the possibly shortest time not exceeding
21 working days from the date on which the devices have been
received by the repair center.
11.Fault must be reported to the repair center not later than within 10
days from its occurrence.
12.The buyer is obliged to supply the product in original packaging
complete with all accessories. The Buyer shall be responsible for
the damage resulting from use of different packaging.
13.Ownership of the devices that have not be collected from the
repair center within 3 months from completion of the repair shall
pass on to the repair center.
14.In case of unjustified claim (incorrect information provided, claim
relating to fault-free device or user damage) The Claimant shall be
charged with testing fees and costs of transport.
15.Warranty does not cover:
Any use of the equipment going beyond the scope of its intended
use;
Claims relating to specification of the device if they are consistent
with the ones given by the manufacturer in the user manual or
other normative documents;
Defects caused by external forces, e.g. mechanical damage, effects of weather conditions, pollution, water damage, overvoltage,
etc.
Defective functioning of unauthorized software installed in the
device;
Capacitive stylus damage to screen;
Warranty and servicing
35
Normal wear and tear or improper storage;
Improper use or installation of third party products (e.g. Memory
cards).
16.If a warranty repair requires parts to be changed, the replaced
element remains the property of the Goclever. Replaced parts
may be of a different brand provided that technical parameters
are at least equal.
17.The Buyer loses the warranty right if warranty seals are broken,
the tag with serial number if removed, or should repair centre
detect unauthorised repair or systemic or construction changes of
the device.
18.Goclever may waive the deadlines for warranty service should
unexpected circumstances of force majeure arise e.g. natural
disaster, social unrest, etc.
19.Goclever is not responsible for damages and losses incurred as a
result of being unable to use the device while it was serviced.
20.Warranty rights does not include the buyer’s right to damage to
loss of profits, due to defects of the device.
21.Goclever shall not be responsible for damage resulting from loss
of data on magnetic drives, please note that maps are restored
back to the factory condition.
22.The legal relations between the buyer and the device and the Goclever is governed exclusively by the provisions of this warranty.
Claims for compensation going further than that are excluded
unless they result from mandatory provisions of law.
Warranty and servicing
36
23.This warranty has a supplementary character in relations to buyer’s rights towards the seller. Warranty does not exclude, nor limit,
nor suspend buyer’s rights resulting from nonconformity of goods
with the contract.
24.This warranty does not affect your statutory rights.
Warranty and post-warranty servicing:
www.zoom.me
Manufacturer:
GOCLEVER Sp. z o.o.
ul. Skórzewska 35
Wysogotowo (Poznań)
62-081 Przeźmierowo, Poland, EU.
ZOOM.ME Sp. z o.o.
ul. Grunwaldzka 472
80-309 Gdańsk Poland, EU
37
Warranty card
DATE OF SALE
PRODUCTION DATE
DEVICE MODEL
SERIAL NUMBER
SELLER NAME / STAMP:
SIGNATURE:
Date and buyer signature
Repair history
Date
Found
defect
Repairs
carried out
Servicing center
stamp and signature
© Copyrights 2014 All rights reserved
Visit www.zoom.me
Send gifts
every day!