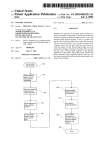
1
USER MANUAL
WEB USER PANEL FOR
GOCLEVER BIG-I
TRACKING SYSTEM
Dear Customer,
We present advanced web based software dedicated to track GOCLEVER BIG-I tracking devices.
Please read carefully this user manual!
Getting started
First step after purchase of product is registration in WEB system, to get access to on-line tracking software.
In order to register your device you have to prepare UNU Number which is written on warranty card:
REGISTRATION ACCOUNT AND DEVICE.
To register device and create user account, please go to website: http://manager.bigi.goclever.com
and press the link REGISTER
REGISTRATION.
You should be redirected to registration forms with user and device details:
After selecting "Do you want Invoices" option - additional form "Invoice" will appear:
After registering users and device, you will be able to LOG IN using registered data.
After successful login you will be redirected to Tracker Manager (Account). In this section user can:
- manage his account details,
- add devices,
- browse invoices and actual status of selected plans,
- initiate payments,
- purchase extras
Welcome screen of Tracker Manager (Account) looks like on picture:
DEVICES:
You can register another device to your profile (In section Add Device). After adding second devices you will be able to
track them on the same map.
CURRENT USAGE
Get information about your actual tariff, date of experience, purchase services for every device in your portfolio.
Check information on website about product and tariff differences.
INVOICES
Browse history of issued invoices, get copies in pdf or xls format.
GO TO MAP
After you are done with all the settings - you can go to map screen to start tracking your devices.
After confirm your login parameters, you will see the screen:
WARNING!!!:
After successful registered an account, we need some time to activate a SIM card inside. Maximum period
for this operation is 7 days.
We will send you e-mail message with confirm of activation SIM card.
Next you can Go To Map and track active device on the map.
If you have registered only one device you will see its actual position on map. Click on device icon on map or on the left
side bar to get more detailed information:
- Object's name
- actual status
- time from last measurement
To see recorded route of your object, just press Show the route, and then select period of time (for BASIC tariff - system
stores last 7 days of tracking history, for ADVANCED tariff - last 30 days)
You can use also "Track Object" function, which will center map always on current position.
Note: Route drawing does not refresh to actual position automatically in Track object function enabled.
System shows recorded route with a line connecting measured points:
Road view:
Aerial view:
You can operate on the map using map menu:
•
•
•
•
move map using
zoom in / zoom out
Road / Aerial / Birds Eye - changes map view from typical cartographic to satelite photos or realistic photos.
2D/3D - changes map view from typical cartographic into 3D View (need to install add component)
User can also search places by clicking right mouse button directly on the map:
Reports
After you press Reports tab on top of the window, you will see such screen:
You can prepare two reports for selected object:
1. History of movements and stops in selected period of time (depends on selected plan maximum 7 or 30 days of
history)
2. Report of alerts in selected period of time (depends on selected plan maximum 7 or 30 days of history)
Options
Click options tab to see such screen:
Objects
Edit display setting of your object:
User can select :
1. Icon representing tracked object
2. route drawing color,
3. object name shown in the system.
AREAS (GEOFENCE)
BIG-I gives user opportunity to draw areas. Such areas can be used to set up GEOFENCE. It is virtual border, which can
be used to control tracked objects. With set areas you can setup alerts, which will be activated if tracked object leaves or
enters selected area in specified period of time.
For example we can set geofence in radius of 200 meters around the school building:
ALARMS
Now let's setup an alert if our child leaves the school area in period of time from week schedule:
Now set up the way how to communicate the alert to mail or send SMS:
now set up time periods when area alert is active:
Now chose alert name the and set up as active.
For example Alert can be also initiated by speed:
If you have any question please send us information from our contact form, please click button
on the top.