1
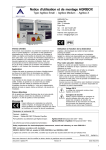
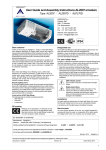
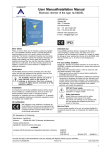
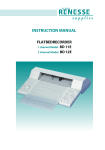
User Guide and Assembly Instructions Agriled® armature
Type: AGRILED® RED 250W/400W MH/HPS
AGRILIGHT b.v.
Vlotlaan 560,
2681 TX Monster
The Netherlands
Tel: +31 (0)174.287.287
Fax: +31 (0)174.287.292
Internet: www.agrilight.com
E-mail: [email protected]
IP64
Dear Client
Intended use
Firstly, we wish to thank you for choosing a product by Agrilight
B.V. The AGRILED® RED armature constitutes part of the Agrilight
range of products for the livestock industry and is designed for
optimum lighting in livestock pens. The product is in full compliance
with applicable regulations. The AGRILED® RED armature provides a
high degree of resistance to intrusion of dirt, dust particles and
water and also produces unparalleled light distribution and has a
sustained life-cycle. These instructions provide the necessary
information for handling and installing your AGRILED® RED armature
safely and correctly. We therefore recommend that you read the
instructions carefully and keep them is a safe place. In the event of
doubt, please do not hesitate to contact your service technician or
Agrilight B.V. for additional information.
The AGRILED® RED armature is intended for the optimum lighting
of livestock pens. Any other use is not in compliance with the
intended use. Agrilight B.V. accepts no liability for damage or
injury resulting from any use of the AGRILED® RED other than its
intended use, i.e. for which it was developed and designed.
Installation
It is important to note that the AGRILED® RED armature should be
installed by a certified technician. Failure to do so invalidates the
product warranty. In compliance with the instructions for installation
laid down by Agrilight BV, all generally and locally applicable building
and construction regulations should be respected and complied
with.
For your own personal safety: Caution!
Agrilight B.V. attaches the greatest importance to the fact that the
AGRILED® RED armature is operated and maintained in a manner
that ensures the safety of the user. Please follow the instructions
below in order to ensure the safe and reliable operation of the
product:
1. Please read this manual before installing the armature.
2. Ensure that the persons responsible for installing and
mounting/connecting the armatures of the AGRILED® RED are
familiar with the instructions and all other relevant information
contained in the manuals before commencing with the
installation. Please ensure before installing that all instructions
are fully understood. This is the responsibility of the certified
technician who installs the equipment.
230V AC Power supply
AGRILED® RED components are connected to a
230V power supply.
Service Parts
To ensure proper operation of the unit, only original Agrilight B.V.
components should be used, or components of the same quality.
The trigger-switch does not comprise any serviceable parts.
Safety instructions
Always follow and comply with the safety
instructions of this manual.
If the safety instructions and warnings are not
complied with, this may damage the installation
and/or lead to severe or fatal injury.
CE certification
With reference to the certificate of conformity for
the AGRILED® RED, the CE mark on the type label
of the AGRILED® RED indicates that the product is
in full compliance with EU consumer safety, health
and environmental requirements.
EU declaration of Conformity:
Manufacturer: Agrilight b.v.
Address: Vlotlaan 560, 2681 TX Monster, The Netherlands
Hereby certifies that the Agrilight B.V. armatures with type designation:
AGRILED® RED 250W/400W MH/HPS
comply with the provisions and regulations laid down in directive: “Low voltage”, 73/23/EEG
And comply with the standards: EN60598-1 and EN60598-2-1
Monster, 2010
Agrilight b.v.
We retain the right to make amendments to the text, drawings and diagrams without any prior notification.
Document : AGRILED® RED EN
Version: 00
Date: january 2010
1
Unpacking and Inspecting
1. Unpack the AGRILED® RED armature with due care.
2. Inspect the contents of the packaging for any damage that may have occurred during transport.
3. In the event of damage, contact Agrilight B.V. immediately, with reference to the packaging documents. You are advised to discontinue
the installation of the damaged AGRILED® RED armature, even if the damage in question appears to be superficial or only minor. In the
event of damage, please consult Agrilight B.V. first, before you consider installing and operating the armatures.
Scope of delivery and introduction
No.
Description
[1]
[2]
[3]
[4]
[5]
[6]
[7]
Armature
Light 250W/400W MH/HPS
Feed-through gland (pre-mounted)
Blind end (pre-mounted in feed-through gland)
T-shaped bracket (for chain mounting)
Fixture bracket
(a) support 950 mm (for bracket mounting), or
(b) support 450 mm (for bracket mounting), or
(c) support 200 mm (for bracket mounting)
Manual
[8]
Quantity
1x
1x
1x
1x
2x
1x
2x
2x
2x
1x
Any other fittings and fixtures (if these have been ordered).
The armature is supplied without power lead and without 0-10V control cable, unless agreed otherwise.
[2]
[6]
[7a]
[7b]
[5]
[7c]
[1]
[3]
[4]
Description of AGRILED® RED
The AGRILED® RED armature is specially designed for illuminating
livestock pens and, apart from the HPS or MH primary lighting, also
provides LED lighting. Depending on your requirements and the
lighting plan, the primary light source of the armature has a:
• High-pressure Sodium lamp (that emits yellow light), or
• Metal Halide lamp (that emits white light).
The AGRILED® RED armature can be controlled by the Agribox
control cabinet. The LED lighting produces a bright red
monochromatic light of a lower intensity than the primary light
source and operates as night lighting. Red light does not disturb
livestock during the night which means that inspection rounds can
be performed during the hours of the night without disturbing the
animals. The integration of this night lighting no longer necessitates
the installation of two separate armatures.
The AGRILED® RED armature consists of an aluminium housing
comprising two separate compartments:
• The electronics compartment, and:
• he light compartment.
Both compartments are provided at both ends with a
detachable plastic cover.
The light compartment is also covered with an armature glass
that may never be removed/detached.
The armature is of the density class IP64. The assembly of
reflectors ensures the optimum distribution of lighting.
Primary lighting
Secondary LED lighting
(B)
(A)
The primary light source of the armature is a High-pressure
Sodium lamp (A) emitting a yellow light or a white Metal Halide
lamp (B) emitting a white light.
2
The LED lighting is fully integrated in the armature and can be
switched on 10 minutes after switching off the primary light
source.
Technical data
Specifications
AGRILED® RED
Model
AL 250 W
AL 400 W
480x370x240
13,5 Kg
--
480x370x240
14,6 Kg
--
Type of light:
Power PL Voltage**
Frequency
Power supply
Power factor (indicative)
HPS of MH
250 W
230V / 50Hz
1,3 A
> 0,85
HPS of MH
400 W
230V / 50Hz
2,3 A
> 0,85
Secondary LED lighting Type of light:
LED Power Voltage**
Frequency
Power supply
Power factor (indicative)
LED red
6 x 3 watt **
230V / 50Hz
< 0,2 A **
0,52 **
LED red
6 x 3 watt **
230V / 50Hz
< 0,2 A **
0,52 **
Dimensions in mm.
Weight (complete)
Additional remarks
Primary PL lighting
Remarks
*
Other voltages on request.
** for the power connecting values of the
armature, these LED light parameters
do not need to be taken into account as
these are determined by the primary
light source: the LED lighting and the
primary light source should be
connected up in such a manner that
they can never be switched on at the
same time. This means that the power
connecting values are determined by
the primary light source.
Installation
General directives
If the following instructions and safety
warnings are not complied with, this may
result in death or serious personal injury and
damage to the equipment.
•
•
•
•
•
•
•
•
Only a certified technician is permitted to install the AGRILED®.
Some caution is required when handling the armature, also to
prevent damage being caused to the components due to
mechanical stress. Avoid shocks and other kinds of stresses
or loads during transport, when assembling and mounting, and
when using the armature.
Always block off any traffic in the vicinity where the AGRILED®
is being installed before commencing with any work on the
installation.
Always disconnect the armature from the power source
before carrying out any work on the installation. Ensure that
the power supply is not turned on accidentally.
Keep the direct vicinity free from animals and any internal
transport whilst carrying out installation activities.
Only use insulated tools!
Please be aware that both the armature glass and the light can
be very hot and cause severe burns. After switching off the
armature, allow the light to cool down for at least 30 minutes
before handling.
Place and secure the light in the armature before mounting the
armature.
Opening and closing the electronics compartment
•
The armature glass must never be detached or removed as this
will cause damage to the sealing. The warranty becomes invalid
if the armature glass is detached or removed. A lamp may only
be removed or inserted through the opening in the side of the
light compartment. This opening can be accessed only when the
plastic cover is detached.
•
In order to prevent thermal damage to the LED lighting,
the LED lighting (secondary light source) may never be
switched on at the same time as the primary light
source. The LED lighting must be connected in such a
manner that it cannot be switched on at the same time
as the primary light source.
•
Ensure that the power supply and voltage corresponds
to the power supply and voltage required by the
armature. These are clearly indicated on the armature
sticker.
•
When connecting up, consult the circuit diagram in this
manual and always ensure that you comply with the
legally applicable connecting requirements (e.g. NEN
1010 for the Netherlands).
The lighting plan shows the conditions that must be taken into
account when installing. These instructions must be fully complied
with in order to ensure uniformity and a proper illumination level.
Agrilight B.V. cannot be held liable for damage
and/or injury resulting from improper mounting
and installation.
Electrical feed-throughs
1. Remove the two Torx
screws from the plastic
cover of the light compartment using a Torx (T20)
screwdriver.
2. Use the two tabs [A] on the
cover in order to remove the
cover.
[D]
[A]
3. After completing installation: clean the contact surfaces of the
cover gasket and sealing and the cover of the armature using
a mild detergent on a damp cloth. Inspect the rubber sealing
and gasket and replace if necessary.
4. Rub some mild soap or acid-free vaseline onto the rubber
sealing and gasket so that the cover can be fitted more easily.
5. Close the armature by replacing the cover and by screwing
the two Torx screws tightly into position. To prevent damage
to the cover or to the sealing do not use a battery-powered
device to do this, nor apply excessive force. When closed, the
cover should fit just inside the rim of the aluminium armature
housing.
[B]
[E]
[C]
In order to feed the power lead into the armature, the armature is
provided with the feed-through gland [B] in the plastic cover on
the electronics side of the armature.
For feeding an additional cable/lead, the armature is provided
with a blind end stop in feed-through gland [C].
Remove this blind end stop [D] in order to feed the cable/lead
through the opening. On the cover of the electronics
compartment there are two positions indicated for an additional
feed-through gland: a centerline for drilling [E] is indicated for this
purpose just above the two tabs on the cover. Insert an
appropriate feed-through gland of the correct IP class after
drilling the hole.
No other holes or openings may be made in any
other place in the cover as this will affect the
operation and safety of the armature.
3
Removal of the electronics mounting plate
The mounting plate can be detached if replacement (or repair) of the triggering device is needed.
Never remove the glass armature cover. This is to ensure that the sealing in the cover always remains
properly closed. Removal of the cover invalidates the warranty. Disassembly should only be by means of
removing the plastic cover-ends of the armature.
1. Remove both Torx screws using a screwdriver with a socalled Torx bit (T20).
2. The components and wiring can be accessed after detaching
the mounting plate.
3. Attach the mounting plate and secure it again to the aluminium
armature housing using both Torx screws.
Ensure that the wiring is not connected to
the power supply and that it does not
loosen or get entangled between parts.
Mounting the armature
Bracket fixture
Use the bracket fixture to attach and secure the armature to
the building structure, such as the ceiling, separate suspended
construction or a support beam.
1. Mount the light in the armature; consult the section entitled
“Mounting and/or replacing the light”.
2. Ensure that the building structure (the ceiling or a suspended
construction or a support beam) is able to carry the weight of
the armature.
3. Secure the fixture bracket properly to the building structure, at
the position according to the lighting plan.
4. Attach the long sides of the
L-shaped brackets to the
fixture bracket.
Chain fixture
Use the chain fixture to suspend the armature with chains.
1. Mount the light in the armature; consult the section entitled
“Mounting and/or replacing the light”.
2. Ensure that the building structure (the ceiling or a suspended
construction or a support beam) is able to carry the weight of
the armature.
3. Press the 2 T-shaped
brackets into the slots
on the upper side of the
armature until each
bracket and hole is
secured over the
securing ridges. This
securing mechanism is
no longer detachable.
4. Mount the chains properly and securely to the building
structure (the ceiling or a suspended construction or a
support beam).
5. Suspend the armature
by hooking the chains
to the openings [A] of
the brackets.
5. Press the shorter sides of
the L-shaped brackets into
the slots on the upper side
of the armature until each
bracket and hole is secured
over securing ridges. This
securing mechanism is no
longer detachable.
6. The armature is provided
with a level indicator so
that the armature can be
mounted and secured in
the correct horizontal
position. This level
indicator is located in the
top of the plastic cover of
the electronics
compartment.
4
6. The armature is
provided with a level
indicator so that the
armature can be
mounted and secured in
the correct horizontal
position. This level
indicator is located in
the top of the plastic
cover of the electronics
compartment.
[A]
Maintenance
Inspection and Cleaning
Disconnect the AGRILED® RED from the
power supply before conducting
maintenance on the armature!
Agrilight B.V. recommends that you have your AGRILED® light
system serviced once a year by a certified technician to test its
operation and to check all fixtures and connections.
Cleaning set
A special cleaning set is available for cleaning the AGRILED® RED
armature. This consists of a rounded brush, telescopic rod, a
bucket to size and a special cleaning agent. For more information
or to order the cleaning set, please contact your service technician
or Agrilight B.V. directly.
Contamination of the armature has an adverse effect on the
distribution of lighting and luminance.
In order to retain the desired amount of lighting (luminance or light
intensity) it is recommended that the armatures are inspected at
least twice a year and cleaned using mild soap, or more
frequently if the livestock shed climate and contamination make
this necessary.
Placing and replacing the light sources
LED lighting
Fitting and replacing is NOT described in this section.
LED lighting may only be fitted, replaced or repaired by
specialized personnel.
Removing a 250W/400W MH/HPS light
Please be aware that both the armature glass and the
light can be very hot and cause severe burns. Leave
the light to cool down for at least 30 minutes before
removing.
To ensure safety, before removing and plastic cover,
please ensure that the armature is disconnected from
the power mains.
1. Remove the two Torx screws from the plastic cover of the
light compartment using a Torx (T20) screwdriver.
2. Use the two tabs to release and remove the cover. In the
resulting opening there is a reflector with a rectangular
window which provides manual access to the light.
3. Unscrew the light carefully by turning it in an anti-clockwise
direction.
Fitting a 250W/400W MH/HPS light
The correct light must always be used in the armature.
This is to prevent damage to the lights. For the correct
light, please refer to the type sticker on the armature.
Never touch the light with your bare hands. Use clean
gloves. Contamination of the light gas can decrease
the life-cycle of the light.
1. Place the light by carefully
screwing it into the fitting
until it is tight. Ensure that
the reflector plates are
deformed during
replacement of the light.
After screwing the light into
position it is recommended
that this is then centred
manually in relation to the
reflector/light axis. The slight
lateral tolerance of the light in
the fitting can be used to do
this. Pressing a light slightly
against the light glass will
suffice.
2. After completing installation: clean the contact surfaces of the
cover gasket and sealing and the cover of the armature using
a mild detergent on a damp cloth. Inspect the rubber sealing
and gasket and replace if necessary.
3. Rub some mild soap or acid-free vaseline onto the rubber
sealing and gasket so that the cover can be fitted more easily.
4. Close the armature by replacing the cover and by screwing
the two Torx screws tightly into position. To prevent damage
to the cover or to the sealing do not use a battery-powered
device to do this, nor apply excessive force. When closed,
the cover should fit just inside the rim of the aluminium
armature housing.
To ensure safety, before removing and plastic cover,
please ensure that the armature is disconnected from
the power mains.
Malfunctions
When checking malfunctions, be aware of the risk of electrically live components. Although the armatures are designed
with safety in mind and are earthed, hazards due to malfunctions can never be ruled out. Only certified technicians are
permitted to handle the electrical installation or to perform measurements on the unit.
Always disconnect the armature before opening the plastic cover (turn off the main switch and secure it, e.g. with the use
of a padlock).
Be aware of and prevent any accidental activation by others or by an automated control and/or dimmer switch. In the
event of a malfunction, never touch the armature whilst the power supply is still connected or if the casing of the armature
is damaged or wet.
5
Malfunction of the primary PL lighting
Malfunctions in the secondary LED lighting
If the PL lamp does not operate properly (no sign of illumination)
check:
• the electrical power supply;
• whether the armature is switched on (check switch);
• whether the power supply unit is intact (correct voltage);
• whether the fuses are intact;
• whether the control unit is properly configured (if present,
check: timer, PLC and the operation of the dimmer switch);
• the light and replace it if necessary.
In essence, the LED lighting consists of a number of LEDs that are
mounted in arrays to both of the wing reflectors.
If the light does illuminate but abnormally:
• Check whether the light is at the end of its life-cycle, indicated
by:
- If the light flickers, does not start smoothly or if it clearly
produces less light than usual: disconnect the armature to
prevent any damage to the light-ignition circuit;
- If the end of the tube in the light (the burner) has turned
brown or black;
- If the inside of the light has turned brown.
In these cases, always replace the light.
If the armature still doesn’t operate properly after replacing the
light:
• Contact a technician to take the following action:
- Replace the starter unit
- Replace capacitor
- Replace triggering unit
In order to prevent thermal damage to the LED lighting,
the LED lighting may never be switched on at the
same time as the primary PL light source. The LED
lighting must be connected in this way so as to
prevent it from illuminating whilst the primary light
source is switched on.
If none of the LED lights illuminate (no sign of illumination) check:
• the electrical power supply;
• Determine whether the primary lighting has been switched off
for more than 10 minutes;
• whether the LED lighting is switched on (check switch);
• whether the power supply unit is intact (correct voltage);
• Inspect the fuses to determine whether these are still intact;
• whether the control unit is properly configured (if present,
check: timer, PLC and the operation of the dimmer switch);
• There is probably a defect in the LED light configuration that can
only be repaired by specialized and/or certified personnel.
Consult Agrilight B.V. for the necessary action to be taken.
If not all LED lights illuminate:
• The AGRILED® system is designed in such a manner that
there will generally be a suitable light intensity in the event
that one or more LEDs become defective. Please refer to the
terms of warranty. If and as soon as any repair or
replacement of defective LEDs is needed: The replacement
of defective LEDs may only be performed by certified
personnel. Consult Agrilight B.V. for the necessary action to
be taken.
Electrical circuit diagram AGRILED® 250W/400W MH/HPS
6
User Guide and Assembly Instructions Agriled® armature
Type: AGRILED® RED 250W/400W MH/HPS
CONDITIONS OF WARRANTY
General
1. If it appears that your product does not function well, even though you have used it in the correct manner and in accordance
with the user manual and assembly instructions, the product will be replaced free of charge within a period of one year after
purchase. In order to claim this warranty the customer must submit the product invoice to Agrilight B.V. with the 1 year
warranty period.
2. The product must be returned to Agrilight B.V. within 30 days following the occurrence of the defect or malfunction for the
purpose of verification.
3. The product must be provided with a project name and sent to the following address:
Agrilight b.v.
Attn.: Service Dept.
Vlotlaan 412
2681 TV Monster, The Netherlands
4. When Agrilight B.V. sends the replacement parts you will receive an invoice that will be credited to your account when and if it
can be verified that the malfunction of defect is covered by the warranty.
5. If Agrilight B.V. has not received the defective product by return mail within 30 days of the invoice date, the warranty invoice
will be treated as a sales invoice, after which period the invoiced amount must be paid to Agrilight B.V. within 30 days.
6. The warranty does not cover the following situations for which the customer will be invoiced during the warranty period:
a. Defects or damage resulting from fire, earthquakes, floods, lightning strikes, other natural disasters, as well as
environmental pollution and problems related to power supply.
b. Defects resulting from sand, mud, dirt etc. entering the cabinet of the product.
c. Defects resulting from transport, accidents, shock and vibrations etc. following the purchase from and delivery of the
product by Agrilight B.V..
d. Defects resulting from carelessness or incorrect storage, improper maintenance etc.
e. Defects resulting from improper use (such as the use of the unit for purposes not listed in the user manual and/or
assembly instructions etc.).
f . Defects resulting from (uncertified) repairs and modifications.
g. If the invoice cannot be submitted together with the product when warranty claims are made.
h. If changes have been made to the original purchase invoice or to the customer name on the invoice.
7. The liability on the part of Agrilight B.V. is limited to the scope of this warranty and only includes the replacement and/or repair
of the product. Agrilight B.V. accepts no liability for damages incurred directly or indirectly as a result of any defects in the
product. Agrilight B.V. is not liable for expenses incurred as a result of disassembly and assembly/mounting, or expenses
incurred as a result of travel and accommodation.
8. Any damage resulting from transport or incomplete delivery must be reported to Agrilight B.V. within 5 working days. Any
notifications received by Agrilight B.V. beyond this period do not fall within the scope of the warranty or warranty period.
Warranty on the lights
1.
2.
3.
4.
A warranty period of 1 year applies to the lights and LEDs of armatures supplied by Agrilight B.V.
This warranty applies only to normal use and normal operating conditions with regard to power/voltage and frequency.
In the case of all lights supplied by Agrilight B.V. account must taken of approx. 1% failure per 1000 lighting hours.
With regard to the AGRILED®, a defect or damage to fewer than 2 LEDs per LED-strip is considered as an esthetic defect
which does not affect the normal operation of the armature.
5. Lights that fail prematurely during the course of the warranty period will be replaced by Agrilight B.V. Lights that fail as a result
of abnormal external effects, due to breakage of the exterior bulb following thermo-shock or due to theft, do not fall under the
replacement warranty.
6. The warranty does not apply to failure of the lights applied to systems in which those light types were used if such a system
is not in compliance with IEC standards and requirements.
Aging and tolerances in the intensity of the lights applied
The light will age during use and will eventually emit less light as the number of total life-cycle lighting hours increases.
The drop in light intensity is increased by a voltage that exceeds the prescribed rated power.
LIABILITY
Agrilight B.V. states emphatically that it cannot be held liable for damages of any kind or magnitude, caused by non-compliance with
the instructions in this manual or as a result of non-compliance with the connecting and installing requirements according to NEN
1010. We also refer to our terms and conditions of delivery according to the conditions and requirements laid down by the
Netherlands Metal Association and any additional warranty provisions of Agrilight B.V.
We reserve the right to make amendments without further notification.