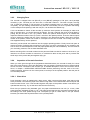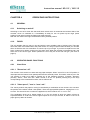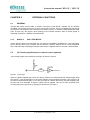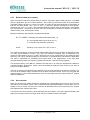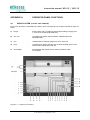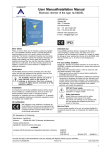
1
INSTRUCTION MANUAL
FLATBEDRECORDER
1 channel Model BD 11E
2 channel Model BD 12E
Instruction manual B D 1 1E / BD 1 2E
IMPORTANT USER INFORMATION
Reading this entire manual is recommended for a full understanding of this product.
The exclamation mark within an equilateral triangle is intended to alert the user to the presence of
important operating and maintenance instructions in the literature accompanying the instrument.
Should you have any comments on this manual, we will be pleased to receive them.
The producer reserves the right to make changes in the specifications without prior notice.
WARRANTY AND LIABILITY
The producer guarantees that the product delivered has been thoroughly tested to ensure that it meets
its published specifications. The warranty included in the conditions of delivery is valid only if the
product has been installed and used according to the instructions supplied by the producer.
Modifications made by the customer or on customers request can affect the validity of the CE
declaration.
The producer shall in no event be liable for incidental or consequential damages, including without
limitation, lost profits, loss of income, loss of business opportunities, loss of use and other related
exposures, however caused, arising from the faulty and incorrect use of the product.
COPYRIGHT 2004
All rights reserved. No part of this publication may be reproduced, stored in a retrieval system or
transmitted in any form or by any means, without permission in written form from the producer.
Van Renesse Supplies B.V.
1
Instruction manual B D 1 1E / BD 1 2E
Konformitätsbescheinigung
According to EC guideline 89/336/EEC 73/23/EEC
Producer:
Van Renesse Supplies B.V.
Vlotlaan 350
2681 TV Monster
Productname:
Flatbedrecorder
Type:
BD11E and BD12E
Conformity with the following standards:
Imissions:
EN 50082-1
IEC 1000-4-2
IEC 1000-4-3
IEC 1000-4-4
Groupstandard
IEC 801-2
8 kV
IEC 801-3
3 V/m
IEC 801-4
1 kV
Emissions:
EN 50081-1
EN 55022
Groupstandard
Safety standard:
IEC 1010-1
2
Van Renesse Supplies B.V.
Instruction manual B D 1 1E / BD 1 2E
CONTENTS
CHAPTER 1
1.1.
1.2.
1.3.
1.4.
1.5.
CHAPTER 2
2.1
2.2
2.3
2.3.1
2.3.2
2.3.3
2.3.4
CHAPTER 3
3.1
3.2
3.2.1
3.2.2
3.2.3
3.2.4
3.2.4.1
3.2.4.2
3.2.5
KAPITEL 4
4.1
4.1.1
4.1.2
4.2
4.2.1
4.2.1.1
4.2.1.2
4.2.1.3
4.2.1.4
4.2.1.5
4.2.1.6
4.2.2
4.2.2.1
4.2.2.2
4.2.2.3
4.2.2.4
SAFETY
5
INTRODUCTION
SAFETY PRECAUTIONS
CAUTION AND WARNING STATEMENTS
SYMBOLS
IMPAIRED SAFETY-PROTECTION
5
5
5
5
5
GENERAL INFORMATION
7
INTRODUCTION
PRINCIPLE OF OPERATION
SPECIFICATIONS
General specifications
Servo system
Chart drive system
External available I/O
7
7
8
8
8
9
9
PREPARATIONS FOR USE
11
UNPACKING
INSTALLATION
Safety instructions for power connection
Changing paper
Changing pens
Inspection of the main functions
Chart drive
Servo system
Polarity selection
11
11
11
13
14
14
14
15
15
OPERATING INSTRUCTIONS
17
GENERAL
Switching on and off
Fuses
OPERATOR PANEL FUNCTIONS
Chart drive
"Record on / off"
"Chart speed", "mm / s // mm / min"
"Int / ext"
Paper transport
"Home" and "set"
"Grid"
Servo system
"Span"
"Cal / var"
"Zero” and "Zero adjust"
Electrical pen up / down
17
17
17
17
17
17
17
18
18
18
18
18
19
19
19
19
Van Renesse Supplies B.V.
3
Instruction manual B D 1 1E / BD 1 2E
CHAPTER 5
5.1
5.1.1
5.2
5.3
5.3.1
5.3.2
EXTERNAL FUNCTIONS
21
GENERAL
RS232-C ONLY FOR BD 11E
I/O CIRCUITRY SPECIFICATIONS
SIGNAL EXPLANATION
External chart drive control
Servo marker
21
21
21
22
23
23
APPENDIXES
APPENDIX A
25
OPERATOR PANEL FUNCTIONS
25
SERVO SYSTEM
CHART DRIVE
25
26
APPENDIX B
THERMO MODULES
27
APPENDIX C
ATTENUATOR AND SHUNTS
29
APPENDIX D
ACCESSORIES AND SPARES
31
A.1
A.2
4
Van Renesse Supplies B.V.
Instruction manual B D 1 1E / BD 1 2E
CHAPTER 1
SAFETY
Read this page carefully before installation and use of the instrument.
1.1
INTRODUCTION
The instrument described in this manual is designed to be used by properly trained personnel only.
Adjustment, maintenance and repair of the exposed equipment shall be carried out only by qualified
personnel, that is aware of the hazards involved.
1.2
SAFETY PRECAUTIONS
For the correct and safe use of the instrument it is essential that both operating and servicing
personnel follow generally accepted safety procedures in addition to the safety precautions specified
in this manual.
Specific warning and caution statements, where they apply, will be found throughout the manual.
Where necessary, the warning and caution statements and/or symbols are marked on the apparatus.
1.3
1.4
CAUTION AND WARNING STATEMENTS
CAUTION:
Is used to indicate correct operating or maintenance procedures in order to
prevent damage to or destruction of the equipment or other property.
WARNING:
Calls attention to a potential danger that requires correct procedures or
practices in order to prevent personal injury.
SYMBOLS
Meaning:
1.5
To preserve the protection afforded by the
instrument from damage the operator must
refer to an explanation in the instruction
manual.
IMPAIRED SAFETY-PROTECTION
Whenever it is likely that safe operation is impaired, the instrument must be made inoperative and
secured against unintended operation. The appropriate servicing authority must then be informed.
Equipment connected to this unit must comply with the relevant IEC, UL and CSA standards.
To comply with the UL and CSA safety standards only fuses of the same type and rating may be used.
Such as Wickmann type 19195 according to IEC 127, UL recognised 250 mA for 115V and 125 mA for
230 V
Van Renesse Supplies B.V.
5
Instruction manual B D 1 1E / BD 1 2E
6
Van Renesse Supplies B.V.
Instruction manual B D 1 1E / BD 1 2E
CHAPTER 2
2.1
GENERAL INFORMATION
INTRODUCTION
The flatbed recorder is available in four different versions, with one or two channels and with or
without electrical penlift and remote control.
BD11E
BD12E
single channel recorder with electrical penlift and remote control
dual channel recorder with electrical penlift and remote control
The BD11E and BD12E recorder is a compact recorder meeting today’s technology. The recorder
uses a null balancing potentiometric system. The two-channel recorder offers two completely
independent and isolated servo systems. Both pens use the full-scale width (200 mm). Disposable
fibre pens are used, avoiding the inconvenience of a bleeding ink system. Many combinations of
measuring ranges and additional options are possible (see appendix C - E).
2.2
PRINCIPLE OF OPERATION
The recorder transports the chart paper at a constant velocity, which may be as slow as 0.1 mm per
minute or as fast as 20 mm per second. The positions of two independent pens represent the levels of
the two corresponding inputs of which the time functions are drawn. The full scale input sensitivity
range from 1 mV to 20 VDC. The recorder is equipped with one chart drive control panel and with two
independent servo system control panels, one for each channel.
A number of functions can be controlled by means of the operator panel, as well as by external
signals. They comprehend chart drive control and for both channels pen up and down and servo
markers. A complete description of these functions and the interface can be found in chapter 4.
Due to the nature of the two-channel recorder, the pen of channel 1 is always 2.5 mm behind the pen
of channel 2.
Van Renesse Supplies B.V.
7
Instruction manual B D 1 1E / BD 1 2E
2.3
SPECIFICATIONS
2.3.1
General specifications
Recording system
Recording paper
Pen
Power Supply
:
:
:
:
Safety
Imission
:
:
Emission
:
Earth leakage current
Ambient temperarture range
Storage temperature
Relative humidity (operating)
Relative humidity (storage)
Housing material
:
:
:
:
:
:
Colour
Weight
Dimensions
:
:
:
2.3.2
Servo system
Span settings
:
Pen travel
Number of pens
Pen response time
Span accuray
Non linearity
Dead zone
Input terminals
Input impedance
:
:
:
:
:
:
:
:
Input current
Input configuration
Maximum input voltage
Zero adjustment
Zero
:
:
:
:
:
Zero drift
Common mode rejection
Mains frequency
:
:
:
Variable range setting
:
8
potentiometric servo balance system
roll chart (25 m)
disposable fiber tip cartridges
93.5 - 132 V / 187 - 264 V, 50/60 Hz
(voltage selector)
max. consumption 30 VA (1 ch), 40 VA (2 ch)
Certified in accordance with cUL 3101-1 and IEC 1010-1
EN 50082-1 Groupstandard
IEC 1000-4-2 IEC 801-2
8 kV
IEC 1000-4-3 IEC 801-3
3 V/m
IEC 1000-4-4 IEC 801-4
1 kV
EN 50081-1 Groupstandard
EN 55022
< 0.5 mA in accordance with IEC 601-1, class B
-10 to +40 0C.
-40 to +75 0C.
20 - 85%, non condensing
5 - 95%
Bay Blend no. FR 110-00005
flammability rating according to UL 94 V-O
white
3.5 kg, including roll of chart
380 x 290 x 90 mm (W x D x H)
1-2-5-10-20-50-100-200-500 mV
1-2-5-10-20 V
200 mm
1 or 2, factory installed
< 0.2 s for 5 - 95% fsd (full scale deflection)
< 0.3% full scale deflection
< 0.3% full scale deflection
< 0.2% full scale deflection
2 safety terminals according to VDE 0110 class A
1 MOhm for DC,
10 kOhm in series with 1.5 µF for AC
less than 5 nA
floating
42 VDC / 30 VAC (personal safety limits)
-50 to +150% full scale
selectable left-hand or right-hand side of the paper (default
left-hand side)
< 1 µV / °C
130 dB (DC and 50 Hz AC
permissible peak to peak max. 5 times interference (not
visible)
40 - 100% of selected span
Van Renesse Supplies B.V.
Instruction manual B D 1 1E / BD 1 2E
Pen lift
2.3.3
electrical pen lift, channel 1 and 2 independent, plus remote
control connection
:
:
:
:
:
:
:
:
:
:
0.1-0.2-0.5-1-2-5-10-20 mm / min. or mm / sek.
0.05 mm
better than +/- 50 ppm
> 1 µs
TTL pulse input maximum frequency 8 kHz (option)
1 - 12000 selectable by chart speed setting
chart roll according to DIN 16230
25 m
20 minutes at highest chart speed
4100 hours at lowest chart speed
Chart drive system
Speed setting
Step size
Inaccuracy time base
Pulse width
External drive
External division factor
Recording paper
Paper length
Paper life
2.3.4
:
External available I/O funktions BD11E / BD12E (remote control is optional)
The following functions are available at the15 pin sub D connector, which is located at the rear side of
the recorder:
Pen lift channel 1
Pen lift channel 2
Start of plot / major gridmark
Go to major gridmark
Servomarker channel 1
Servomarker channel 2
"home"
Chart stop
External chartdrive pulse input
Ground
Chapter 5 EXTERNAL FUNCTIONS gives more information on these functions and the effect of
installing options.
Van Renesse Supplies B.V.
9
Instruction manual B D 1 1E / BD 1 2E
10
Van Renesse Supplies B.V.
Instruction manual B D 1 1E / BD 1 2E
CHAPTER 3
3.1
PREPARATIONS FOR USE
UNPACKING
The recorder is packed in a specially developed shipping carton. If damage to this carton is evident,
ask the carrier’s agent to be present when the instrument is unpacked. Inspect the instrument for
mechanical damage, and if there is damage, contact your local supplier. Verify the presence of all
standard accessories and check the carton before throwing it away, to see if nothing is left inside.
Standard accessories for recorder model BD11E:
1 instruction manual
1 fibre pen blue (short)
1 paper chart roll
1 mains supply cord
2 sets of 2 fuses
Standard accessories for recorder model BD12E:
1 instruction manual
1 fibre pen blue (short) for channel 1
1 fibre pen red (long) for channel 2
1 paper chart roll
1 mains supply cord
2 sets of 2 fuses
For ordering accessories and spare parts see appendix E.
3.2
INSTALLATION
3.2.1
Safety instructions for power connection
Before connecting the equipment to the mains, ensure that the protective mains earth is functioning
correctly. Before any other connection is made, the instrument shall be connected to a protective earth
conductor via the three-core mains cable. The mains plug should be inserted only into a socket outlet
provided with a protective earth contact. The protective action should not be negated by use of an
extension cord without protective conductor.
WARNING :
Any interruption of the protective conductor inside or outside the instrument,
or disconnection of the protective earth terminal, is likely to make the
instrument dangerous. Intentional interruption is prohibited.
Adjust the recorder according to the available mains supply. As the voltage selector suggests, the
recorder may be operated at 230 V or 115 V.
The switch involved is located at the rear side of the recorder, but can only be seen in the absence of
the paper roll. Taking away the paper roll reveals a small square hole through which both the selected
voltage and the switch itself can be seen. With the use of a pointed object this switch can be moved to
the left or to the right, whatever position is desired. The location of this switch is shown in figure 1.
Van Renesse Supplies B.V.
11
Instruction manual B D 1 1E / BD 1 2E
Before switching on the recorder, make sure that the required fuses are installed. Operating the
recorder at 115 V requires 250 mA fuses, while an operation voltage of 230 V requires 125 mA fuses.
The mains on / off switch is located on the left-hand side of the recorder. Make sure that only fuses of
the required current rating and type are used for renewal. The use of repaired fuses, and/or the shortcircuiting of fuse holders, is prohibited. Fuses should only be renewed by a qualified person, who is
aware of the hazards involved.
NOTE:
If the mains plug has to be adapted to the local situation, it should only be
done by a qualified person.
WARNING :
The instrument shall be disconnected from all sources when a fuse is to be
renewed, or when the instrument is to be adapted to a different mains voltage.
Figure 1 Rear side of the recorder
12
Van Renesse Supplies B.V.
Instruction manual B D 1 1E / BD 1 2E
3.2.2
Changing Paper
First lift the plastic transparent ruler off the paper (see fig. 2), turn it all the way to the top of the
recorder and leave it in that position. In order to do so easily, place the fingers of both hands on top of
the recorder housing and with both thumbs apply a gentle force to the respective ends of the ruler
pointing upward and a little backward, for which purpose the ruler is equipped with small ridges.
Figure 2 shows the lifting of the ruler.
Figure 2 Lifting of the ruler
Then push the edge of the paper (with a fingernail for example) in order to loosen it from the sprocket
wheels. After that, the remains of the paper roll together with the plastic shaft can be taken out of the
back of the recorder. The paper roll can be lifted easily through a hole in the bottom of the recorder
housing.
Unpack a new roll of paper, insert the shaft in the roll and put the two in place. Make sure that the
orientation of the paper roll is such as to have the printed grid on top during normal operation. Then
take the edge of the paper and slide it through the horizontal slit. (The transparent ruler still remains in
the upright position.) Pull the paper towards you far enough to judge whether it is parallel to the
recorder housing or not. Of course it should be. Then, with your fingertips make the holes in the edge
of the paper fit the sprocket wheels, first at the left side and then at the right side.
This is because the holes in the left side guarantee exact paper positioning, while the oval holes at the
right side only support vertical transport. When the paper is in the correct position, fitting both sprocket
wheels, with one hand hold the paper in position and with the other hand lower the ruler. Then with
both hands simultaneously apply a gentle force both at the left and right side of the ruler. A double
click indicates the proper lowering of the ruler.
Van Renesse Supplies B.V.
13
Instruction manual B D 1 1E / BD 1 2E
3.2.3
Changing Pens
The recorder is shipped with one (BD11E) or two (BD12E) packages of felt pens, each package
containing 1 pen. The blue pen, the short one, is used with channel 1. The other red pen, the long
one, is used with channel 2. The best thing to do before changing pens is to switch off the recorder
completely. The pen holding mechanisms may then be moved freely into such a position that taking
out the used pen and replacing it with the new pen, can be done the easiest way.
If it is not desirable to switch off the recorder (to retain the home position for example) in order to be
able to change pens, you should proceed as follows. For both channels the pens must be lifted by
putting the pen lift lever in the “up” position. When the optional electrical pen lift is installed the
respective switches marked “Pen Up / Down” must be in the upward position. Then the channel inputs
must be zeroed by putting both the "Zero" switches in the downward position. Both pens will then
remain at the position, which was chosen to correspond to the zero of scale. The moving of the pens
has stopped and they can be replaced.
After that, put back both zero switches into the upright operating position. Finally lower both pens to
resume recording. Following this procedure, the only thing you get is a small gap in your recording, the
size of which of course depends on both the paper speed and your manual dexterity. The time scale of
your recording, however, has not been disturbed at all.
Before switching off the recorder make sure the pens are lifted to avoid ink stains on the chart. If you
intend not to use the recorder for some time, it is advised to take out the pens and to put back the
small caps, which protect the pens against drying up.
3.2.4
Inspection of the main functions
When you have gone through all the preparations described above, the recorder is ready for a short
test of the main functions, which are described in the next sections. Remember that no external signal
source has been connected to the recorder yet. A detailed description of all of the functions can be
found, in chapter 4 OPERATING INSTRUCTIONS. Before performing the test, each of the twoposition switches, which are on the control panel, must be put in the upward position. Also the pen lift
is in the lifted position.
3.2.4.1 Chart drive
Push the button, which is marked with a down arrow. After 0.5 second the paper must start moving
slowly and after 2 seconds the paper must start moving faster. Then release this button and push the
button marked “home” once. This should bring back the paper to the position where it was before you
operated the arrow key. Try out the same with the other arrow key.
Each time you press the key indicated “grid”; the paper should advance one unit (i.e. 10 mm). Now
press the button indicated “record on / off”. The paper should start moving at a speed corresponding to
the setting of the chart speed turning knob. The speed you get of course still is in mm per second,
because you started with all push buttons in the upward position.
14
Van Renesse Supplies B.V.
Instruction manual B D 1 1E / BD 1 2E
3.2.4.2 Servo system
The testing described below can be performed separately for each of the two channels. The position
of the "range" switch is of no importance, while performing these tests.
By operating the knob named zero-“adjust”, the pen can be positioned anywhere on the paper.
Normally when there is no input, the pen is on the left-hand side edge of the paper.
The pens can be moved up and down by operating the pen lift lever, which is located on the right-hand
side just next to the extreme right position of the pens.
When the optional electric pen lift is installed, pen 1 and 2 can be set up and down independently.
When this testing has been performed successfully, this means that the basic functions of your
recorder are working properly.
NOTE:
3.2.5
Die oben gegebene Beschreibung basiert auf der Annahme, dass sich der
Polaritätsschalter in Stellung "links" befindet.
Polarity selection
If desired, the polarity of each of the channel inputs can be inverted independently. The selection is
performed by setting the involved switches, which are located at the rear side of the recorder. The
location of these switches is indicated in figure 1 in chapter 3 PREPARATIONS FOR USE. They can
only be accessed after the paper roll has been taken out, as described in section 3.2.2 Changing
paper.
The factory default setting of these switches is “left”. If one of these switches is set to “right”, the
corresponding channel will have it zero position at the right hand side.
NOTE :
Inverting the input polarity does not result in a displacement of the zero
position but in a mirrored channel performance.
Van Renesse Supplies B.V.
15
Instruction manual B D 1 1E / BD 1 2E
16
Van Renesse Supplies B.V.
Instruction manual B D 1 1E / BD 1 2E
CHAPTER 4
OPERATING INSTRUCTIONS
4.1
GENERAL
4.1.1
Switching on and off
Switching on and off is done with the small black switch which is located at the left-hand side of the
recorder. Once it is switched on, it immediately is ready for use. On power up the origin (home
position) is set at the location the paper was at that moment.
With the "set" button the origin can be defined at any desired position.
4.1.2
FUSES
The only problem that you may run into and which is user solvable is that of a blown fuse. There are
two fuses, which are located next to the power switch. It is easy to replace them because you can take
them out with the aid of a screwdriver or even the tip of your finger. If you have to replace one of the
fuses, make sure to replace it with one of the same type. When the recorder is operated at 230 V the
fuses are of the 125 mA type. When operated at 115 V they are of the 250 mA type. (see note on
page 6).
4.2
OPERATOR PANEL FUNCTIONS
4.2.1
Chart Drive
4.2.1.1 "Record on / off"
The function of this switch is to start and stop paper transport. When "record" is in the "off" position, it
interrupts both the internal chart speed pulses and the external pulses. This switch must be put in the
"off" position in order to be able to operate any of the following functions: “Forward / Reverse”
(Arrows), “Home”, “Grid” and “Set”. When “record” is in the “on” position pressing any of the keys
corresponding to the mentioned functions, has no effect at all.
4.2.1.2 "Chart speed", "mm / s // mm / min"
The velocity at which the paper is moving is controlled by a combination of two choices. One concerns
the position of the switch named "chart speed". There are eight possible positions, ranging from 0.1 to
20 units. The second choice concerns the applied unit, which is either mm / s or mm / min.
This combination gives you a lowest speed of 0.1 mm per minute at which the paper roll has an
expected lifetime of 4100 hours and a highest speed of 20 mm per second, at which a new roll of
paper gives up after 20 minutes.
Van Renesse Supplies B.V.
17
Instruction manual B D 1 1E / BD 1 2E
4.2.1.3 "Int / ext"
The position of this switch determines the source of the pulses which make the paper move. When it is
in the “Internal” position an internal clock, which can be adjusted as described in the previous section,
is in effect. When the switch is in the "ext" position the chart drive must be fed with pulses from an
external source. This is explained in more detail in chapter 5.
4.2.1.4 Paper transport
The buttons associated with this function are marked with two small black triangles (arrows). With
these buttons the paper can be positioned very precisely underneath the pens. Each time that one of
these buttons is pressed shorter than one second, the paper is moved over a distance of 0.05 mm in
the corresponding direction. If the key is held down, however, after one second the paper will start
moving at a speed of 2 mm / s. It will do so for the next five seconds. So it moves over a distance of
10 mm.
If the button is still being held at the end of the sixth second, the paper will start moving at a speed of
20 mm / s. Using proper timing while operating, these paper transport keys make it possible to put the
pens at any desired position very quickly. The paper can only be transported in this manner when the
“Record” switch is in the “off” position.
4.2.1.5 "Home" and "set"
These buttons can only be operated when the “record” switch is in the “off” position. Pressing the
“Home” button will bring back the paper to the position where the origin is located. Origin is either the
position during powering up or the position where the “set” button was last pressed. "set" is used for
defining a new origin for "Home" and at the same time for the "Major grid mark" position. Be careful
not to operate the "home"-button, if you are not certain about the location of the origin. If the origin lies
within an area of the paper, which already has been torn off the recorder, the recorder of course will
loose control of the paper. Seeking home takes place at a velocity of 20 mm / s.
4.2.1.6 "Grid"
This function is activated by pressing “grid”, also in the record off mode. Each time it is pressed, the
paper advances to the next major grid mark. The major grid mark lines are lines parallel to the paperruler with 1 cm intervals. When the origin has been set precisely on top of a grid mark, pressing the
"grid" button will always bring the pen on top of the next grid mark. Paper transport takes place at a
velocity of 20 mm / s for this function.
4.2.2
Servo system
The BD12E is equipped with two fully independent servo systems. Each servo system has an operator
panel for controlling its functions. The following explanation of these functions holds equally well for
both channels.
The signals that are to be recorded must be connected to the corresponding input terminals at the rear
side of the recorder. The black terminals are the negative ones and the red terminals the positive
ones.
The maximum input voltage, which is allowed across the terminals for each of the channels, is 30 VAC
or 42 VDC for personal safety. If a higher input voltage is used, this will not damage your recorder, but
18
Van Renesse Supplies B.V.
Instruction manual B D 1 1E / BD 1 2E
the input terminals cannot be touched safely any more. The maximum allowable voltage difference
across any two terminals of different channels is 500 V.
4.2.2.1 "Span"
The input span of each channel is selected with the rotating switch named "range". This switch has 14
positions. Turned counter-clockwise all the way, a span of 20 V is chosen. This means that an input
voltage of 20 V will move the pen all the way from the left- hand edge to the right-hand edge of the
paper. (Supposed, of course, that the zero-position was at the left side of the paper)
When the range switch is turned fully clockwise, the span is 1 mV full scale. The whole range in
between these spans is covered in 14 steps according to the sequence 1, 2, 5, and 10. The input
spans have these calibrated values only when the "cal / var" switch is in the "cal" position.
4.2.2.2 "Cal / var"
When this switch is in the "cal" position an input signal equal to the selected range will result in a fullscale deflection. It may, however, sometimes be desirable to have an input span, which lies in
between the values that can be chosen with the range switch. In such a case, the "cal / var" switch
must be put in the "var" position, after which the variable span can be set by turning a potentiometer
(indicated with "var") with the aid of a small screwdriver.
Example:
Suppose a signal varying between 0 and 25 mV has to be recorded and one wants to use the fullscale width.
1.
2.
3.
Select the 50 mV range.
Put the “cal / var” switch in the “var” position.
And adjust the potentiometer until the amplitude reaches 100 % of scale.
Da der variable Messbereich Justierungen von 40% bis 100% des geeichten Messbereichs zuläßt,
kann jeder gewünschte (nicht geeichte) Messbereich zwischen 0.4 mV und 20 V erreicht werden.
4.2.2.3 "Zero" and "Zero adjust"
When the "Zero" switch is in the down position, the pen will remain at its zero location. This is the
location of the pen in the absence of an input voltage. The location of this point can be shifted to the
left or to the right by turning the small knob zero "adjust". This function allows relocation of the zero
point anywhere between the left and right edge of the paper. After the zero location has been chosen,
the recorder must be put back into operation again by pressing the "zero" once again, which brings the
switch back in the upward position.
If desired, the signal axis together with the location of its zero point can be mirrored with respect to the
centre of the recorder. Please refer to section 3.2.5 polarity selection for more information.
4.2.2.4 Electrical pen up / down
BD11E / BD12E
When the optional electrical pen lift is built in the pens can be lifted independent.
If the pen remains too long at the same position, ink-stains will form on the paper. To avoid this, the
recorder automatically lifts the pen when there has been no paper movement for more than 30
seconds. This time interval is equal to the time between two chart speed pulses when the recorder is
Van Renesse Supplies B.V.
19
Instruction manual B D 1 1E / BD 1 2E
operating at the lowest possible speed (i.e. 0,1 mm per minute). This time-out is being accomplished
by checking both the internal and external chart speed pulses. This includes checking the operation of
the arrow keys on the operator panel.
20
Van Renesse Supplies B.V.
Instruction manual B D 1 1E / BD 1 2E
CHAPTER 5
5.1
EXTERNAL FUNCTIONS
GENERAL
Through the remote control cable, a number of functions of the BD11E / BD12E can be remotely
controlled. The remote control uses a 15 pin sub D type connector, which is located at the rear side of
the recorder. The location of this connector is as shown in figure 1 in chapter 3 PREPARATIONS FOR
USE. Its pins carry the signals, which belong to the involved functions. Each of these signals is
described in section 5.4 SIGNAL EXPLANATION.
5.1.1
RS232-C
ONLY FOR BD11E
Via the remote cable input information for one channel is available in digitised form. This information
can be directly read by any computer with an RS232-C interface. Data is sent in a time-multiplexed
form. After each step of the paper transport mechanism, a digitised value for channel 1 is transmitted.
5.2
I/O Circuitry specifications for remote control (optional)
All incoming signals are received by input logic as shown in figure 3.
Figure 3 Input Logic
When no signal is applied (open input), the pull-up resistor of 10 kOhm keeps the Schmitt-trigger input
at a logical 1. This corresponds to a non-active situation for the respective function. This is true for all
functions in the default situation (i.e. the way your BD11E / BD12E was factory set and shipped) If the
function has to be activated, a logical 0 (zero) must be applied. This can be done by either short
circuiting the input to ground or by applying an active zero (TTL spec.).
Van Renesse Supplies B.V.
21
Instruction manual B D 1 1E / BD 1 2E
5.3
SIGNAL EXPLANATION
BD11E / BD12E
Figure 4 shows the connector lay out of the 15-pin sub D connector. Below a list is given with the
functions that are available when these options are installed.
Figure 4 15-pin sub D connector lay out
1
2
3
4
6
7
8
10
12
14
15
-
pen lift channel 1
pen lift channel 2
start of plot / major gridmark
go to major gridmark
servomarker channel 1
servomarker channel 2
"home"
ground
chart on / off
external chartdrive pulse input
ground
x=
o=
+=
x
x
x
x
x
x
x
o
o
o
o
o
o
o
+
+
o
only available in record on mode
"0" active or contact closure
only available when internal penlift is not active
In order to suppress unwanted interference from external origin, all signal inputs, except ECP
(External Chartdrive Pulse) and servomarker, are being filtered. Any pulse that is shorter than 40 ms is
rejected. As a consequence these signals are always delayed for 40 ms.
22
Van Renesse Supplies B.V.
Instruction manual B D 1 1E / BD 1 2E
5.3.1
External chart drive control
When an external chart drive Pulse (ECP) is used for moving the paper under the pens, a so-called
divisor is applicable. This is a number between 1 and 12.000, by which the number of received pulses
is divided, before one step (i.e. 0.05 mm) is made. The value of this divisor depends on the position of
both the two-state button “mm / min” or “mm / s” and the 8 position turning knob "chart speed".
Switching from "mm / s" to "mm / min" increases the divisor with a factor 60 and turning "chart speed"
from 20 towards 0.1 accounts for a factor 200. The combination of these two results in a maximum
dividend of 60 x 200, which equals 12.000.
Method to determine the externally controlled chart speed:
S x F x 0.0025 = Externally Controlled Chart Speed (mm / s)
S = Chart Speed Setting (must be in mm / s)
F = External Pulse Generator Frequency
NOTE
:
Divide by 60 to convert mm / min. to mm / s
The maximum frequency at which External Chart Pulses may be sent to the BD11E / BD12E recorder
is 8 kHz. (Pulse duration at least 1 µs). Since the maximum stepping rate, corresponding to a
maximum chart speed of 20 mm / s and a step size of 0.05 mm, equals 400 Hz, this maximum ECP
frequency can only be handled properly by the recorder, if a dividend value of at least 25 is applicable.
The user is responsible for maintaining this lowest value. If the steppermotor of the chart drive
receives stepping pulses at a frequency greater than 400 Hz, it will stop turning regularly.
This special property of the BD11E / BD12E has been built in to meet the requirements needed for
unusual laboratory applications. Under normal circumstances External Chart Pulses do not need to
have such a high frequency.
There is no maximum for the ECP pulse duration, but it is recommended to use pulses of at least 1 µs.
As soon as the positive edge is received, the chart drive will make one step. This is only true when the
dividend equals 1. When the dividend has a value of N, that step will not be made until the Nth positive
edge has appeared.
5.3.2
Servo marker
When one of the servo marker functions is activated, the corresponding pen moves 10 mm to the left,
with respect to the position it had. It then continues drawing the applied signal, only the drawn curve is
shifted 10 mm to the left. As soon as the function is deactivated, the pen moves back to the position
that represents the channel input value.
This is true if the "zero" position is at the left-hand side of the paper. If it is at the right-hand side of the
paper, then the pen moves to the right, when the servo marker function is activated.
Van Renesse Supplies B.V.
23
Instruction manual B D 1 1E / BD 1 2E
24
Van Renesse Supplies B.V.
Instruction manual B D 1 1E / BD 1 2E
APPENDIX A
A.1
OPERATOR PANEL FUNCTIONS
SERVO SYSTEM (one for each channel)
Each of the functions is indicated with a letter, which corresponds to a location indicated in figure A.1
below.
a) "range"
:
Rotary switch with 14 positions selects span settings, ranging from
1 mV to 20 V fsd (full-scale deflection).
b) "cal / var"
:
2-position push button selects between calibrated and user
adjustable span.
c) "var"
:
Potentiometer to set span range from 40 to 100% fsd.
d) "zero"
:
2-position push button switches one channel amplifier input to zero,
used for zero adjustment of the pen.
e) "zero adjust"
:
Potentiometer with thumb wheel, used to position the pen
on the paper.
Figure A.1 Locations of functions
Van Renesse Supplies B.V.
25
Instruction manual B D 1 1E / BD 1 2E
f)
"pen up / down"
h) "POC on / off"
A.2
:
2-position push button, used to activate the optional electrical pen lift
(pen 1 and pen 2 independent).
:
2-position push button selects between Pen Offset Compensation
on and off.
*** This 2-position push button is without function as POC
module is no longer available. ***
CHART DRIVE (left hand side of recorder)
i) "record on / off"
:
2-position push button switches between:
- "Record on"-mode: internal chart speed settings or external pulse
input and remote control functions.
- "Record off"-mode: keyboard control of chart drive; forward, reverse,
home, zero set and go to major gridmark.
j) "chart speed"
:
8-position rotary switch for fixed chart speed settings.
k) "mm / sec" or
"mm / min"
:
2-position push button switches selected chart speed unit from
mm / sec. to mm / min.
l) "int / ext"
:
2-position push button, switches between keyboard selected
chart speed and external chart pulse input (optional).
m) forward
:
Push button, transports the paper forward with increasing speed.
n) backward
:
Push button, transports the paper backward with increasing speed.
o) "set"
:
Push button, sets start of plot and major grid mark position.
p) "home"
:
Push button, moves paper to start of plot position (with pen up).
q) "grid"
:
Push button, moves the paper (always forward) to the next major
grid mark (lines with 10 mm distance). When on grid mark the
paper moves one grid mark further.
r) "power"
:
Green LED to indicate power on.
NOTE
26
:
Functions l, m, n, o and p are only available in record off mode.
Van Renesse Supplies B.V.
Instruction manual B D 1 1E / BD 1 2E
APPENDIX B
THERMO MODULES
For the BD11E and BD12E three different temperature modules are available:
-
thermocouple, type J, with linearisation,
temperature range from –50°C to +1200°C
-
thermoelement, Typ K, with linearisation,
temperature range from –50°C to +600°C
-
Pt100 module, with linearisation,
temperature range from –100°C to +850°C
See appendix E for type numbers.
Both J and K thermocouple modules are active temperature measuring units, providing linearisation
and automatic cold junction compensation. Linearisation is according to IPST 68. The output voltage is
1 mV / ºC.
So a selected range of 100 mV gives a full scale deflection of exactly 100ºC
and a selected range of 500 mV gives a full scale deflection of exactly 500ºC.
The Pt100 module is an active measuring unit, suitable for measurement with the use of an external
Pt100 element based on DIN 43760.
The linearisation is based on DIN 43760. The output voltage is 1 mV / ºC.
All temperature modules are powered from a separate power supply (3...12 VDC adapter).
Van Renesse Supplies B.V.
27
Instruction manual B D 1 1E / BD 1 2E
28
Van Renesse Supplies B.V.
Instruction manual B D 1 1E / BD 1 2E
APPENDIX C
ATTENUATOR AND SHUNTS
For measuring higher voltages and currents five different attenuators and shunts are available:
Attenuators:
100x, maximum voltage 500 V
10x, maximum voltage 500V
See appendix E for type numbers.
These attenuators have completely shielded banana inputs and outputs, to guarantee maximum
safety.
Shunts:
-
0 – 20 mA shunt (100 Ω) giving full scale (20 mA) with input range on 2 V.
-
4 – 20 mA shunt (125 Ω) giving full scale (20 mA) with input range on 2 V (zero shifted).
0 – 16 A shunt (10 m Ω) giving full scale (10 A) with input range on 0.1 V.
The shunts also have completely shielded banana inputs, to allow currents with a high voltage related
respect to ground.
Van Renesse Supplies B.V.
29
Instruction manual B D 1 1E / BD 1 2E
30
Van Renesse Supplies B.V.
Instruction manual B D 1 1E / BD 1 2E
APPENDIX D
ACCESSORIES AND SPARES
Mains cord USA
Mains cord Europa
Mains cord UK
2570-042
2570-041
3444-293
1 Set of 10 fuses 125 mA for 230 V
1 Set of 10 fuses 250 mA for 115 V
2655-154
2655-196
Instruction manual german
Instruction manual english
Service manual english
0350-301
0350-300
0350-350
Standard packing with 10 chart rolls
linear graduation (zero left)
2643-918
Standard packing with 10 chart rolls
linear graduation (zero right)
2643-962
Fibre pens (short) for the BD11E recorder and channel 1 of the BD12E recorder:
5 Fibre pens, blue
5 Fibre pen, black
5 Fibre pens, red
5 Fibre pens, green
2643-852
2643-908
2643-909
2643-910
Fibre pens (long) for channel 2 of BD12E recorder:
5 Fibre pens, red
5 Fibre pens, black
5 Fibre pens, blue
2643-853
2643-858
2643-854
1 safety banana plug, red
1 safety banana plug, black
1 remote control cable (1.5 m)
1 carrying case
2523-597
2523-598
2570-167
2067-033
Attenuator 100x, 1.500 V max.
Attenuator 10x, 1.500V max.
0328-322
0328-324
Current shunt 0 – 20 mA
Current shunt 4 – 20 mA
Current shunt 0 – 16 A
0328-320
0328-321
3300-001
Temperature module, type J
Temperature module, type K
Temperature module, Pt100
0350-732
0350-731
0336-704
Van Renesse Supplies B.V.
31
Instruction manual B D 1 1E / BD 1 2E
32
Van Renesse Supplies B.V.
Customer Support
Our customer support
remains at your disposal
for any maintenance or
repair, calibration,
supplies and spares.
The address is as follows:
Germany
and
Austria
Für Servicearbeiten und
Kalibrierung, Verbrauchsmaterial und Ersatzteile
steht Ihnen unsere
Customer Support
Abteilung unter folgender
Adresse zur Verfügung:
Notre service 'Support Clientèle'
reste à votre entière disposition
pour tout problème de
maintenance, réparation ou
d'étalonnage ainsi que pour les
accessoires et pièces de rechange.
Leur adresse est la suivante :
Gengenbach Messtechnik e.K.
Heinrich-Otto-Strasse 3
D-73262 Reichenbach / Fils
T +49 7153 9258 0
F +49 7153 9258 160
E [email protected]
WWW.FLACHBETTRECORDER.DE