1
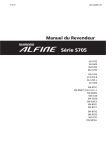
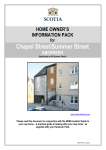
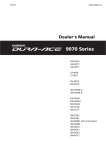
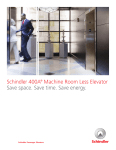
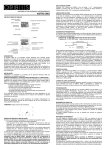
Rako Controls Ltd.
RAH-Smart MULTI ROOM HANDHELD CONTROLLER - USER AND SETUP GUIDE
The RAH-Smart controller is a stylish handset with a colour display screen allowing use in multiple rooms,
selectable from the menu, and offers Scene control of lighting and overall control of curtain/blinds as well as
individual circuit control for lighting and individual control of blinds or curtains within a room. Rooms,
Scenes, and Channels can be named for ease of use.
Room 4
Display
Select Scenes
All
The controller is shipped with factory default settings. It will need to be programmed to operate correctly
with the installed system. The RAH-Smart can be configured manually following these instructions or more
normally, the handset will be configured by the system installer using the USB interface and programming
software. For information on how to program this way refer to the software Help file.
▲
▼
Sel
Shortcut Key
▲
For clarity, where this manual refers to blind control only, all aspects are equally applicable to curtain control.
When the manual refers to channels this is normally the same as lighting circuits although it is possible to
assign separate circuits to the same channel.
Power up – To power up the RAH-Smart press any key. A Splash screen will be displayed followed by the
startup menu screen. The unit will automatically start up in either the last room that was used, or in a user
selected “Default” room.
The unit will turn itself off, if inactive, after 20 seconds to preserve battery life (not when in Set-Up mode).
◄
Enter
Menu
Context keys
►
▼
General Operation – Lighting (Scene Mode) – This section should be read in conjunction with page 5 of
this manual ‘Basic Operation For Dimmable Lighting Control’.
On power up the handset will display the Scene Select screen (A2) with either the last room or default room,
displayed, depending on configuration. Use the right/left keys to select the desired scene and press Enter or
use the up/down keys to have overall fade up/down control. To return to the Select Room screen (A1) press
Room. To control individual channels, from Screen A2 press Chan (Channels), in Screen A3 use the
left/right keys to scroll through the available channels and use the up/down keys to fade that channel
up/down. To exit press Quit.
USB Connector
RAH Smart Multi room Handheld Controller: User guide Page 1 of 9
Rako Controls Ltd.
General Operation – Lighting (Switch Mode) – This section should be read in conjunction with page 6 of this manual ‘Basic Operation for Switched
Lighting Control.
If a Room is configured as one with Switched control only a menu of more appropriate screens will be displayed. The navigation is the same as Scene Mode
(see above) other than in Channel Control Screen B3 the up/down keys scroll through the channels and left/right keys execute the On/Off functions.
General Operation – Curtain and Blind Mode – This section should be read in conjunction with page 7 of this manual ‘Basic Operation For Curtain &
Blind Control’.
If a Room is configured for controlling blinds a menu of more appropriate screens will be displayed.
On switch on the handset will display either the last room or default room, depending on configuration (Screen C1). To open/close all blinds in that room
press the left/right keys, to stop the blinds at an intermediate point press the Enter key.
If the blinds are of the Venetian type the motor control module may have been set with ‘momentary’ action. In momentary mode the open/close keys will
allow short presses to change the louvre tilt and releasing the key after a short time will stop the change in tilt. To fully open/close the blind keep the
appropriate key held until the control module ‘latches’ (default setting for this is 1.5 seconds) and then release, the blind will now travel to fully
opened/closed without any further input.
To access individual blind control press the up/down keys to scroll between blinds, or press ‘All’ to return to the Overall control screen.
To change rooms press the ‘Room’ key (to access Screen C2) and then use the up/down keys to scroll between rooms, use the Enter key to select.
Grouped Rooms – It may be desirable to have rooms that have a logical association ‘grouped’ with the shortcut key giving quick navigation between these
rooms. Examples might be a room that has both lighting and blinds addressed as separate rooms (to give more logical control) or possibly an open plan
Kitchen/Dining/Lounge area where each section has its own room address to give separate scene control. In these instances the user might want to access
both rooms quickly. Once a room in a group is selected the shortcut key will scroll through all the rooms in the group, if there are only two rooms this action
will appear as a ‘toggle’.
Configuring the RAH-Smart manually – Before configuring the RAH-Smart the Rako system to be controlled needs to be programmed, once this is
complete the RAH-Smart can be set-up to control the desired rooms with any required channel and scene information.
Entering setup mode – From the power up screen (A2), press Room to access the Change Room screen (A1). Press the left right and shortcut keys
simultaneously. Set-Up mode cannot be accessed from all screens. To exit setup mode press quit twice
RAH Smart Multi room Handheld Controller: User guide Page 2 of 9
Rako Controls Ltd.
The following notes should be read whilst referring to the Main Setup Menus pages of this manual. The notes assume that the handset is in setup
mode (see above).
To assign House Address and Enable Rooms the user must know the numbers assigned to the receivers to be controlled. This will be available either
from the installer or by examining the Address Switch settings on a Rako wallplate and referring to the wallplate manual.
Setting the House Address – To Enter the House address use the down key to navigate to Screen D2 (Choose House), press Enter to display the current
house (Screen D21) and then scroll up or down to the desired house number and press Enter.
Note: The following functions are the most commonly accessed functions of the handset
Enabling Rooms – A system can comprise of room numbers ranging from 1-255 (Room 0 is House Master), to avoid the problem of scrolling through many
unused rooms in normal mode, active Rooms need to be enabled. From Screen D1 press Enter to access Screen D12, use the left and right keys to scroll to a
room that needs to be enabled, press up to ’disabled’ (Screen D13), toggle between ‘enabled/disabled’ using the Enter key and press save to store any
changes.
Enabling Channels – Each room in a system can have up to 15 channels, to avoid scrolling through many unused channels in normal mode active channels
need to be enabled. In Screen D12 select the desired Room and press the up key to navigate to Screen D14 and press Enter to access Screen D141. Use the
right/left keys to change a channel between On/Off and press save after each change. Use the up/down keys to change channels.
Room Naming – For ease of use it is desirable to name rooms. To name a room select the desired room in Screen D12 and use the down key to move the
cursor to the existing name (default is New, Screen D11) and press Enter. Use the left/right and up/down keys to edit the name, once edited press Enter and
then save.
Channel Naming – For ease of use it may be desirable to name channels. Select the desired room in Screen D12 and use the up keys to navigate to Screen
D14, press Enter and use the up/down keys to select the desired channel and press Enter to access the name. Use the up/down and right/left keys to edit the
name, once edited press Enter and then save.
Scene Naming – For ease of use it may be desirable to name scenes. Select the desired room in Screen D12 and use the up keys to navigate to Screen D15,
press Enter and use the up/down keys to select the desired scene and press Enter to access the name. Use the up/down and right/left keys to edit the name,
once edited press Enter and then save.
RAH Smart Multi room Handheld Controller: User guide Page 3 of 9
Rako Controls Ltd.
Set Default – The default screen allows the selection of a default room. Note: setting a room as default does not automatically imply that this is the room
selected on Power Up as that is definable in the Start Mode Screen (D3). To set a room as the default room, select the desired room in Screen D12 and use
the up key to navigate to Screen D16 and press Enter and then save.
Room Mode – A room can be defined as one with control for scene lighting (default), switched lighting control (Switch) or curtain and blind control (C&B).
To define a room mode select the desired room in Screen D12 and use the up key to navigate to Screen D17. Use the Enter key to switch between modes and
press Enter.
Delete – It may be desirable to restore a room to the default settings, if for example, considerable editing had been done that needed to be undone. To delete a
room select the desired room in Screen D12 and use the up key to navigate to screen D18. Pressing Enter will prompt an ‘Are You Sure’ message and then
either select Yes or No. A deleted room can always be re-enabled but all information will be restored to default settings.
Start Mode – The room selected on power up is user definable and can be set as either the default room or the last room selected before the unit powered
down. To define a default room see the ‘Set Default’ section above. From Screen D1 use the down key to navigate to Screen D3 and use the Enter key to
toggle the power up mode between Last Room and Default Rm, once selected press Quit.
Factory Reset – It is possible to restore the handset to the factory settings. ALL USER DEFINED INFORMATION WILL BE LOST. From Screen D1
navigate use the down key to navigate to Screen D5 and press Enter. A warning message ‘Are You Sure?’ will be displayed, select either yes or no.
Group Setup (see Grouped Room notes in General Operation) – From Screen D1 use the down key to navigate to Screen D6 and press Enter to reach
Screen D61. Use the left/right keys to choose a Group Number (there can be multiple groups) and press the down key to highlight ‘Disabled’ and use the
Enter key to toggle between Disabled/Enabled. Use the down key to highlight the room and use the right/left keys to scroll through the active rooms until the
first room to be ‘grouped’ is reached and press Enter to add this room to the group. Once added the display will show En (enabled) to indicate that this room
is grouped. Follow the same procedure to add other rooms to the group and press Save to store changes. Note: the shortcut key will only scroll between
grouped rooms in normal mode when one of the grouped rooms has been selected.
RAH Smart Multi room Handheld Controller: User guide Page 4 of 9
Rako Controls Ltd.
BASIC OPERATION FOR
Dimmable LIGHTING
CONTROL
A1
Change Room
Use this menu to choose
which room you want to
control
Use ▲ or ▼ Choose the room that you want to
control.
Then press Enter key to go to that room
Room 4
SWITCH ON
▲
▼
Room
Enter
Room Select Screen
Start Up
Splash screen
Use ◄ or ► keys to choose
different channels within the
room
Hold down ▲or ▼ to Fade
chosen lights up and down.
A3
A2
Channel Fade
Chan
All
Quit ◄►
Room 4
▲
▼
1 2 3 4 OFF
Quit
Channel Control Screen.
To control individual lights
RAH Smart Multi room Handheld Controller: User guide Page 5 of 9
Chan◄►
▲
▼ Room
Use ◄ or ► keys then Enter to choose
different scenes.
Use ▲or ▼ to Fade lights up and down.
Scene Control Screen.
To recall preset light levels
Rako Controls Ltd.
BASIC OPERATION FOR
Switched LIGHTING
CONTROL
B2
Room Select Screen
Change Room
Press ▲or ▼
to change room
Room 4
▲
▼
Then Enter key to go to
that room
Enter
Room
SWITCH ON
B1
Room 4
Start Up
Splash screen
Press ◄ to turn lights off
Press ► to turn lights on
Press ▲or ▼ keys to select
individual channels within
the room.
◄Off
All
On►
▲
▼ Room
Room
▲or▼
All
B3
Room 4
◄Off
On►
Channel 1
▲
All
▼ Room
Press All Key to quickly
restore control to entire room
RAH Smart Multi room Handheld Controller: User guide Page 6 of 9
Switch Lights On/Off
Rako Controls Ltd.
BASIC OPERATION FOR
CURTAIN & BLIND
CONTROL
C2
Room Select Screen
Change Room
Press ▲or ▼
to change room
Room 4
▲
▼
Then Enter key to go to
that room
Enter
Room
SWITCH ON
C1
Room 4
Start Up
Splash screen
Press ◄ to close blinds
Press ► to open blinds
Press Enter to stop the blinds
Press ▲or ▼ keys to control
individual channels within
the room.
◄Close Open►
All
▲
▼ Room
Room
▲or▼
All
C3
Room 4
◄Close Open►
Channel 1
▲
All
▼ Room
Press All Key to quickly
restore control to entire room
RAH Smart Multi room Handheld Controller: User guide Page 7 of 9
Open & Close Blinds
Rako Controls Ltd.
To put the RAH Smart into SETUP
mode: First go to the Change Room
screen.
Hold down ◄ ► and then press the
shortcut key simultaneously.
MAIN SETUP MENUS
D1
Setup
Room Setup
Enter
See Next page for further detail of Room Setup
Menus
▲
▼ Quit
▲or ▼
D2
Setup
Choose House
D21
▲or ▼
The controller must be set to the same
House Address as the rest of the Rako
system. Failure to do this will prevent
the controller from communicating with
the lights.
House 002
Enter
▲
▲
▼
▲
▼ Quit
Note: Do not leave the RAH Smart in
setup mode, as in this mode it does not
automatically switch itself off - the
batteries will be drained.
D22
House 001
▲
▼
Press Quit Twice to exit setup mode
D3
Setup
Start Mode
Last Room
▲
▼ Quit
▲or ▼
D31
Enter
Choose which room the controller is set
to when it is switched on – either the
Default Room (as defined in Room
Setup) or the Last Room that was used
before the remote was switched off
Setup
Start Mode
Default Room
▲
▼ Quit
D4
Setup
Firmware
V 1.1.0
Firmware version
number
▲
▼ Quit
▲or ▼
D5
D51
Setup
Factory Reset
Enter
▲
▼ Quit
▲or ▼
Choosing this option will return the
controller to it’s factory settings. Only
do this if you are prepared to reprogram
the controller to operate with your Rako
system.
Group Commands – Useful for quick selection
of different rooms using Shortcut key. Can be
used for quick navigation between (eg)
lighting and blind control (as these should
normally be set to different room addresses)
Are You Sure?
Yes
No
D6
D61
Setup
Group Setup
▲
▼ Quit
Enter
D62
Group 0
Disabled
Room 4
Save
▲
▼ Quit
▼
D63
Group 0
Disabled
Room 4
Save
Enter
▲
▼ Quit
Group 0
Enabled
Room 4
Save
▲
▼ Quit
D64
▼
Group 0
Enabled
Room 4
Save
Quit
Group 0
Enabled
Room 5
Save En
RAH Smart Multi room Handheld Controller: User guide Page 8 of 9
Save
▲
▼ Quit
Enter
▲
▼ Quit
▲
Save En ▼ Quit
► D66
D67
D68
▲or ▼
D65
Group 0
Enabled
Room 4
Group 0
Enabled
Room 5
Save En
Enter
▲
▼ Quit
Group 0
Enabled
Room 5
Save
▲
▼ Quit
The sequence of menu key
presses shown here will add
Room 4 and Room 5 to a
group 0. Other groups can be
added as required, with
whichever rooms are required
“En” indicates that the room
is now within the group
D18
Rako Controls Ltd.
ROOM SETUP MENUS
▼
▲
D181
Enter
Delete
Room 004
Room 4
▲
Save En ▼ Quit
Are You Sure?
Press Enter to set current room for Lighting control, switch
control or for Curtains and Blinds control
Lights
Room 004
Room 4
▲
Save En ▼ Quit
Press Enter to set the current
displayed room to be the “Default”
Room (in this case Room 004).
▼
▲
D16
D152
Set Default
Room 004
Room 4
▲
Save En ▼ Quit
▼
No
Yes
D17
Ins
▲
Scenes
Room 004
Room 4
▲
Save En ▼ Quit
▲
D1
Setup
Room Setup
▲
▼ Quit
▼
Quit
▲
▲
Enabled
Room 004
Room 4
▲
Save En ▼ Quit
Del
Save
Press ▲▼ to select different scene, then press
Enter if you want to give it a new name
Quit
Press Save button to store Scene Name
D141
Enter
Quit
Room 4
Channel 1 On
Channel 1
Save
Use ◄ or ► to turn Channel ON/OFF
Store selection with Save button
Quit
Use ▲or ▼ choose a different Channel, then then
press Enter if you want to give it a new name
D13
D142
Enter
Room 4
Channel 1 On
Channel 1
Save
Press Save button to store Channel Name
Descriptive Channel Name. eg “Downlights”. Edit
using ▲►▼◄ and Enter
Quit
D12
Enabled
Room 004
Room 4
▲
Save En ▼ Quit
▼
Room 4
Scene 1
New
D14
Enabled
Room 004
Room 4
▲
Save En ▼ Quit
▼
Enter
▲
Descriptive Scene Name. eg “Party”. Edit using
▲►▼◄ and Enter
D151
Enter
Channels
Room 004
Room 4
▲
Save En ▼ Quit
Use Enter to Enable
or Disable this Room
Press Save button to
store your selection
Room 4
Scene 1
New
Enter
D15
▼
Deleting a room will disable it and restores default values
and names to that room. User settings will be lost.
Use ◄ or ► to change
room number
D11
D111
Enter
Enter
Enabled
Room 004
Room 4
▲
Save En ▼ Quit
RAH Smart Multi room Handheld Controller: User guide Page 9 of 9
Descriptive Room Name. eg “Lounge”.
Edit using ▲►▼◄ and Enter