1
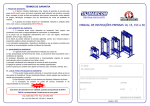
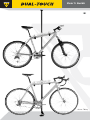
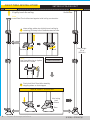
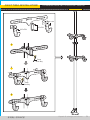
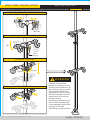
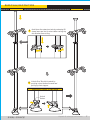
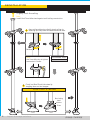
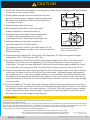
User's Guide
B
I
K
E
S
T
A
N
D
GB
Art no. TW004
1
TABLE OF CONTENTS
DETAILED PARTS DESCRIPTION ...............
FIRST TIME INSTALLATION ....................
REMOVAL/MOVEMENT ...........................
REINSTALLATION ....................................
2
P. 2
P. 3~5
P. 6
P. 7
3-1
3-2
4
10-3
10-1
10-2
5-1
10-5
10-5
10-4
5-2
DETAILED PARTS DESCRIPTION
NO.
6
1.
2.
3.
4.
5.
7
8
9
2
6.
7.
8.
9.
10.
NAME
Q'TY
Ceiling Rubber Top
Extension Tube
Hook Unit Adaptor (ø38.1 mm)
3-1 Hook Unit Mounting Device
3-2 Adjusting Knob
QR Clamp Lever
Hook Unit Adaptor (ø44.0 mm)
5-1 Hook Unit Mounting Device
5-2 Adjusting Knob
Main Tube
Unlock Button
Lock/Unlock Foot Stepper
Ground Rubber Button
Hook Unit
10-1 Hook
10-2 Hook Locking Nut
10-3 Balance Adjusting Unit
10-4 M6 x 1.0mm x 20L Bolt
10-5 M6 x 1.0mm x 20L Bolt
1
1
1
1
1
1
1
1
1
4
4
2
4
4
Repair & storage solutions
B
I
K
E
S
T
A
N
D
WARNING
1. Failure to completely follow any of these instructions or to heed any of the warnings in this
User’s guide may cause the stand and bicycles to fall and may result in serious physical injury,
death and/or property damage.
2. The product as installed must be vertically straight up and down at all times.
3. Install product against a ceiling joist or beam. Failure to do so may cause damage to your ceiling
and the stand to fall.
4. Install only against smooth and level surface. Failure to do so may cause the stand and bicycles
to fall.
5. Never use for any other purpose than the storage of bicycles.
6. Up to two additional Third Hook bicycle holders may be added to the Dual-Touch bike stand.
Additional Third Hooks are sold separately. Read the manufacturer's instructions prior to
installation. No more than two additional Third Hook bicycle holders may be added for a total
of no more than four hooks per stand. No more than one bicycle may be hung on each hook.
The additional hooks must be installed on the opposite side of the original hooks.
7. Do not install in any area to which children have access.
8. Never install in an area where it may be accidentally kicked, bumped or otherwise mishandled.
9. Bumping into the stand may cause it to fall. If the stand is accidentally bumped, check the
stability of the stand in accordance with these instructions to ensure that it is secure.
10. Check the stand frequently in accordance with this user's guide to ensure that it is secure.
LIMITATION OF LIABILITY
Neither the manufacturer, distributor nor retailer shall be held liable for any claim of personal injury
or property damage as a result of user crash, abuse, improper installation, overloading, unintended
use, product modification or poor quality of mounting surfaces.
Repair & storage solutions
B
I
K
E
S
T
A
N
D
3
FIRST TIME INSTALLATION
SETING UP MAIN UNIT
Slightly touch the ceiling
Solid Area
Note:
Install Dual-Touch bike stand against solid ceiling construction.
1
Have ceiling rubber top slightly touch ceiling by
releasing QR clamp lever to extend extension tube.
Release
Note:
Use 5mm Allen key to tighten
tension bolt if loose.
2
Max. Height
3.2 m
(10ft-6in)
Lock
Recommended Torque
3 Nm or 26.5 in-lbs
Firmly lock Dual-Touch bike stand by
stepping down on foot stepper.
LOCK FOOT STEPPER
Max. locking
travel
distance
12mm
4
Repair & storage solutions
B
I
K
E
S
T
A
N
D
FIRST TIME INSTALLATION
ASSEMBLING HOOK UNIT TO HOOK UNIT ADAPTOR
M6 x 20L
M6 x 20L
M6 x 20L
1
5mm
Allen Key
2
5mm
Allen Key
3
B
I
K
E
S
T
A
N
D
Repair & storage solutions
5
FIRST TIME INSTALLATION
ADJUSTING HOOK UNIT
TO ADJUST HOOK POSITION
5mm
Allen key
TO ADJUST HOOK ANGLE
30˚
5mm
Allen key
TO ADJUST HEIGHT
Tighten
Loosen
WARNING
360˚ ROTATION
6
Repair & storage solutions
Please read installation
instructions carefully prior to
installing stand. Before using
the stand, thoroughly test the
fully-weighted stand (with
equipment in place) to ensure
the stand has been installed
securely and is functioning
properly. Neither
manufacturer, distributor, nor
retailer shall be responsible
for any damage resulting from
improper installation,
overloading or product failure.
B
I
K
E
S
T
A
N
D
REMOVAL/REPOSITION
1
Hold down the extension tube by releasing QR
clamp lever and lock it when rubber ceiling top
dis-attaches from ceiling.
2
Unlock Dual-Touch bike stand by
pushing unlock button forward and
pulling up foot stepper.
UNLOCK FOOT STEPPER
Unlock
Button
B
I
K
E
S
T
A
N
D
Repair & storage solutions
7
REINSTALLATION
Slightly touch the ceiling
Note:
Install Dual-Touch bike stand against solid ceiling construction.
1
Have ceiling rubber top slightly touch ceiling by
releasing QR clamp lever to extend extension tube.
Release
Lock
Note:
Use 5mm Allen key to tighten
tension bolt if loose.
2
Recommended Torque
3 Nm or 26.5 in-lbs
Firmly lock Dual-Touch bike stand by
stepping down on foot stepper.
LOCK FOOT STEPPER
Max. locking
travel
distance
12mm
8
Repair & storage solutions
B
I
K
E
S
T
A
N
D
CAUTION
1. Install Dual-Touch bike stand against a ceiling joist or beam. Never install against a fragile ceiling
or on a non-solid or rough surface.
2. Always make sure main tube and extension tube are
securely locked in place. Improper fastening may cause
QR clamp lever and tension bolts to loosen resulting
in collapse of stand.
3. Always balance bike on its hook.
4. When breaking down Dual-Touch bike stand
always remember to remove the bike(s)!
Tension
Bolt
Use 5mm Allen key to tighten
tension bolt if loose.
5. The adjusting knob should not be overtightened.
If unable to loosen adjusting knob, loosen
mounting bolts first, then loosen adjusting knob.
6. Hold main tube securely when removing or
repositioning Dual-Touch bike stand.
7. The maximum height of Dual-Touch bike stand is 3.2m
(10ft-6in) Please measure height of your ceiling from floor
before installing.
Mounting
Bolts
Use 5mm Allen key to loosen
mounting bolts if adjusting
knob is overtightened.
8. Maximum weight capacity per Third Hook is 18 Kilograms (39.7 lbs) and maximum weight
capacity per Pole is 72 Kilograms (158.7 lbs).
9. Up to two additional Third Hook bicycle holders may be added to the Dual-Touch bike stand.
Additional Third Hooks are sold separately. Read the manufacturer's instructions prior to
installation. No more than two additional Third Hook bicycle holders may be added for a total
of no more than four hooks per stand. No more than one bicycle may be hung on each hook.
10. Caution should be taken when mounting the Dual-Touch bike stand in areas with high vibration
either near the base or the top of the Dual-Touch bike stand. Automatic garage door openers,
air compressors, etc., may cause enough vibration to cause the Dual-Touch bike stand to move.
The additional hooks must be installed on the opposite side of the original hooks. Periodically
check the stability of the Dual-Touch bike stand if near a vibration source to insure safe storage
of your bicycles.
11. Check the stability of the Dual-Touch bike stand by lightly pulling and pushing the vertical bar.
Remove any bicycles on the Dual-Touch bike stand before testing stability. The foot or top should
not be able to move when in the locked position. If the Dual-Touch bike stand is loose, readjust
height, remount Dual-Touch, and test again. Periodically check the stability of the Dual-Touch
bike stand to insure safe storage of your bicycles.
WARRANTY
2-year Warranty: All mechanical components against manufacturer defects only.
Warranty Claim Requirements
To obtain warranty service, you must have your original sales receipt. Items returned without a sales receipt will assume that the
warranty begins on the date of manufacture. All warranties will be void if Dual-Touch bike stand is damaged due to user crash,
abuse, system alteration, modification, or used in any way not intended as described in this operating manual.
* The specifications and design are subject to change without notice.
Topeak products are available only from professional bicycle shops.
Please contact your nearest Topeak authorized bicycle dealer for any questions.
For customers in the USA, call: 1-800-250-3068 Website: www.topeak.com
B
I
K
E
S
T
A
N
D
Copyright © Topeak, Inc. 2009
M-TW004-GB 7/09
Repair & storage solutions
9


![Installation Manual [PDF 2.7 MB]](http://vs1.manualzilla.com/store/data/006021203_2-b809fadeadfb6e2f18452db3ed531a3e-150x150.png)