1
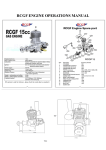
RCGF Engines
OPERATING INSTRUCTIONS
This engine is designed for use in radio controlled model airplanes. With its high
power output and lightweight, it's ideal for your TOC airplane. Read and follow all of
the Operating Instructions before you use it.
WARNING!!!
The engine is not a toy. Serious injury and even death may result from improper use. You
alone are responsible for its safe and proper operation. RCGF is not responsible for any
injury, damage or other loss resulting from its use. If you do not agree, you must not use
the engine.
SAFETY INSTRUCTIONS
1 If you are unfamiliar with this type of engine, seek the help of an experienced
user. Never operate it alone or without proper knowledge and experience on hand.
Always have your club Safety Officer inspect your engine installation, plane and
radio set up before attempting to use them. Verify proper ignition, receiver and
transmitter battery voltages, and perform a range check before every flight. NEVER
attempt to start the engine or fly with radio "glitches" of any kind.
2 Gasoline is highly flammable and hazardous; always have a fully charged fire
extinguisher at the ready when using it; always use it with extreme caution and with
approved containers and fueling equipment. Never operate your engine indoors or in a
closed area.
3 Before every use, check the engine assembly, propeller and airframe carefully for
any damage or loose screws, nuts, and bolts. Normal gas engine vibration has a
tendency to loosen things up when you least expect it. Never attempt to operate the
engine or aircraft if you suspect there might be a problem.
4 Always stand clear of and behind the propeller; never allow anyone including
yourself, to be in front of or to the sides of the propeller when starting or running the
engine. Anyone near the engine should wear protective eyewear and clothing.
5 Always use a correctly mounted (correct length bolts, no spacers behind it, not
touching the spinner cone, etc.), and properly sized propeller. Never use a propeller
that has been damaged, modified or repaired or that has not been properly balanced.
How to properly balance a prop is available online at www.dodvideos.com/don3.wmv
.
6 Always use a heavy-duty starter stick or heavy leather work glove to flip the prop.
Always have the airframe in a starting stand and have someone else hold the plane
when starting or running the engine. Never operate the engine where anything (dirt,
gravel, clothing, any loose items) might be drawn into the propeller. Keep spectators
at least 50ft. away from your aircraft when operating the engine.
7. Unless you are starting it, never turn the engine over without first making sure the
ignition is off. Always use an ignition kill switch and have the throttle setup such that
it can be used to stop the engine when necessary.
8. Never mount the engine in anything other than an airframe for which it's designed
for use in. Overpowering an airframe is dangerous and unsafe. Do not use an engine
stand to run the engine. A stand may not allow engine vibration energy to be properly
dissipated and may cause failure of the engine mounting parts, propeller, propeller
mounting bolts or stand.
9. Always fly in accordance with the safety rules, regulations and recommendations
of the AMA. Read and understand all of the safety material on their website
www.modelaircraft.org before using this engine.
ENGINE INSTALLATION
If using the mounting brackets, they should be installed with the closed end to the
firewall and the open end to the engine. If using the mounting stand-offs, the cut ends
should be mounted to the engine. If additional mounting height is needed, it should be
placed between the mounting hardware (brackets / stand-offs) and the firewall. Make
sure that all spacing is flat and of the same size and surface plane so as not to induce
any twisting force into the mounting hardware or damage to the engine or mounting
hardware failure may result. Spacing should never be used between the mounting
hardware and the engine. In all cases, the firewall / airframe mounting surface must be
absolutely flat or potentially damaging forces can be exerted to the engine or
mounting hardware which can cause failure.
Check to see that the carburettor has adequate clearance (at least 1in.) to anything for
proper breathing. If it doesn't, make appropriate adjustments. Make sure that your
airplanes fuel tank and lines are made for gasoline use, that the tank is adequately
vented and that the feed line clunk can move freely in all directions and not get hung
up anywhere. We recommend using a filter between your gas supply and airplane fuel
tank. If you use a fuel filter between the airplane tank and the carburettor, make sure it
is of adequate size to supply an unobstructed flow of fuel to the carburettor or the
engine may not run correctly.
Make sure that the cowl openings on your plane provide enough airflow for proper
cooling. Ideally, all of the cooling fins of the cylinder should be exposed directly to
unobstructed flow of cooling air and there should be 3 times as much air exit area as
intake area. Many planes have cowl openings that actually inhibit proper cooling of
single cylinder engines. Their openings were made to give a scale appearance of the
full size planes they are patterned after. Along with the openings described above,
blocking the scale openings either partially or wholly can significantly help promote
cooling airflow over the cylinder fins.
Many types of fueling devices (fuel dots, filler valves, etc.) are available for your use.
Our experience has shown that often the simplest is the best. Regardless of which
device you decide to use, be very wary of air leaks, as they can be detrimental to the
proper operation of your engine.
NOTE: Always use Loctite on engine mounting hardware and make sure your
models firewall and engine box are adequately reinforced (pinned, soaked in thin CA,
etc.).
IGNITION SYSTEM
The RCGF ignition system is designed for input voltage ranging from 4.8 to 6.0 volts,
no more and no less. A battery pack of 1200mah or greater may be sufficient for a day
of flying for most users. Check your battery voltage with a voltage meter before every
flight and do not fly if the voltage is not between 5.2 and 6.0 volts; the voltage at the
start of a flight may not remain for the duration of the flight. Disconnect the battery
from the ignition system while charging the battery. The ignition module should be
connected to the battery through a heavy-duty switch, mounted where it can be
reached easily when starting the engine.
NOTE: A 6 volt or larger battery pack must be regulated to between 5.2 and 6.0
volts or it will supply too high a voltage to the ignition module.
The ignition module and its battery should both be "soft" mounted with 1/2in foam on
all sides to avoid damage from vibration. All parts in the ignition system should be
mounted no less than 12in. away from any part of the airplanes radio equipment to
avoid possible interference. The shielded plug wire is wrapped in a plastic spiral
covering to help protect it from damage and wear. Even so it must be inspected
frequently as damage to the shielding may cause radio interference.
The spark plug that comes with engine should be gapped at 0.018in. to 0.020in.
Torque should be 7 to 8 ft-lbs. Be very careful not to over tighten it or damage to the
cylinder threads may result. The plug cap comes with an internal grounding spring
and a split retainer ring around its base; they both must be used at all times. The plug
cap fits very tightly to the spark plug; you should feel a release of pressure when the
cap seats properly to the plug. It will also be difficult to remove the plug cap from the
plug; be sure you pull straight out on the cap and not on the plug wire. If the plug is
not properly connected to the cap, damage to the module may result.
ENGINE BREAK IN
Break in running should be done with regular gas mixed with a high quality petroleum
based 2 cycle oil at a ratio of 30:1. The engine should be run installed in the airframe
with wings attached, on the ground for 2hrs at 2500rpm. Ground running should be
done with a slightly smaller prop and with the cowl off to promote good cooling. The
engine should never be run in a test stand, as they do not allow vibration energy to be
properly dissipated.
When the 2hrs of ground running is complete, the carburettor should be adjusted and
the engine should be flown at light load and varying speed for enough time to have 3
gallons of gas mixed with high quality petroleum based 2 cycle oil run through it. The
prop you use should allow the engine to run at between 6700 and 7200rpm.
The oil should be switched to full synthetic 2 cycle mixed at a ratio of 45:1after that.
Note that when you switch to synthetic 2-cycle oil, it is likely that the carburettor
mixture and idle speed will need to be adjusted.
CARBURETOR ADJUSTMENT
Every engine has been adjusted to average mixture settings, which will most likely
allow the engine to start and run in most locations. However, as altitudes and
barometric pressures vary by location and even by day, it is very likely that the
carburettor mixture settings will need to be adjusted to obtain optimum performance.
NOTE: Never make adjustments to the carburettor while it is running. Always use a
tachometer to aid in making adjustments to your carburettor.
1 Choke Lever
2 Throttle Lever
3 Idle Speed Adjustment Screw
4 Low Speed Mixture Adjustment Screw
5 High Speed Mixture Adjustment Screw
6 Ignition Sensor
The average mixture settings are 1&1/2 turns out for the low speed circuit (See No.
4), and 1&3/4 turns out for the high-speed circuit (See No. 5). Carburettor mixture
adjustment starts with the low speed circuit. The low speed should be set such that the
transition from idle to full throttle is smooth, even if the throttle is snapped to full.
This will likely result in a slightly rich idle mixture but you're better off with that than
a rough transition. If the engine dies when the throttle is advanced, the mixture is
likely too lean. If the engine stumbles when the throttle is advanced, the mixture is
likely too rich. Since the low speed mixture has some effect on high-speed mixture,
always adjust the high speed after adjusting the low.
The high-speed circuit is properly adjusted when the engine can reach maximum rpm
while in the air, which is usually slightly richer than when it’s on the ground. A
general rule of thumb is to richen from the maximum on the ground rpm by about
200rpm. If ever the engine slows or dies while at full throttle, the high-speed mixture
is likely too lean and you should adjust it as soon as possible or damage can result.
NOTE: Be careful not to run the mixture screws in too far as damage to the screw
and / or carburettor body may result. Also, don't be tempted to run an overly rich
mixture. Gas engine lubrication comes from the oil concentration in the gas, not from
a rich fuel / air mixture. If you want more lubrication, you can vary the oil mix ratio.
A too rich mixture will only result in poor engine performance and a fouled plug and
combustion chamber.
STARTING THE ENGINE
COLD Step 1: Close the choke, advance the throttle to very slightly above the idle
position, turn on the ignition and briskly flip the prop through compression until the
engine fires and then dies. If the gas line is dry, this may take 20 or more flips.
Step 2: Open the choke and briskly flip the prop through compression. The engine
should start in just a few flips. If it acts like it wants to start but doesn't, you may need
to advance the throttle slightly.
WARM Open the choke, advance the throttle to very slightly above the idle
position, turn on the ignition and briskly flip the prop through compression. The
engine should start in just a few flips. If it acts like it wants to start but doesn't, you
may need to advance the throttle slightly.
NOTE: It is possible to flood the engine by over choking. In this case, the spark
plug must be removed and dried of excess fuel. Make sure to have the ignition off
when removing the spark plug.
ENGINE MAINTENANCE
Fuel tubing throughout the fuel system should be changed periodically and should
never allow any air to enter the system. If your gas line starts to get hard, soft or
changes colour, there's a good chance it needs to be replaced. Keep in mind that the
tubing inside your tank deteriorates more quickly that anywhere else in the system.
The exterior of the engine should be kept clean and inspected regularly. Tucked away
inside the cowl, it would be easy to miss loose nuts and bolts without frequent
inspections. Dirt inside the cowl area can easily find its way into the carburettor. It
should be kept clean and free of dirt build up.
The carburettor fuel screen should be cleaned periodically also. Carefully remove the
pump cover (inlet side of the carburettor), gasket and pump membrane. The screen
will be visible and can be cleaned after careful removal. If ever the carburettor seems
to need frequent mixture adjustment or acts like it's starving for fuel, a dirty screen is
a likely candidate for a cause. The carburettor should be inspected, cleaned or
reconditioned with every flying season or after being stored for a long period of time.
The spark plug should be inspected, cleaned and gapped periodically and replaced if it
is fouled or worn. A new plug with every new season is a worthwhile maintenance
step.