1
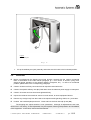
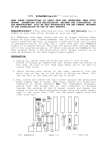
TR6 CONTROL LOGIC X1 R2 R1 R5 R3 R4 Q2 R8 Q5 R21 R20 R9 LD6 Q8 LD7 Q10 R19 Q3 EMI2 X6 Q7 Q9 X7 D3 EMI5 EMI6 Q11 R34 R37 R36 R35R12 LD2 D2 R16 R14 EMI8 R13 R15 EMI1 X5 PL1 AS1026R2 board EMI3 Q1 R27 R28EMI4 EMI7 R11 R26 R29 R10R30R31 R32 R33 LD1 X2 R18 LD3 5:21 IC2 R22 R17 R23R24 R25 Q4 LD5 LD4 Q6 C6 SW1 1 C1C3 IC3 IC1 5:20 R7 R6 C4 C5 X4 C2 AS 1026R2 PL2 5:6 5:3 5:5 5:16 5:17 5:7 5:8 5:9 AS1025R2 5:18 5:1 5:10 5:11 5:19 5:12 5:4 5:2 5:14 5:15 5:13 AS1025 board 1. 230V main power supply connector 2. Fuse 1: T500mAL 250V (230V power supply) 3. 60VA multivoltage transformer 4. AS1025 board 5. Fuse 2: T2AL 250V (24VDC voltage) 6. I2C expansion connector 7. Parameter programming DIP switches 8. DIP switches for selecting operation mode and programming parameters 9. "AS-LINK" connector for programming console 10. Programming push button and LED 11. RS232 line TTL 5V level 12. Customer input/output connector 13. Signal relay 14. Direction A and B limit switches connector 15. Direction A and B electromagnets connector 16. Application microcontroller 17. Microcontroller reset button 18. Direction A and B simulation buttons 19. 230V power supply filter AS1026 board 6. I2C expansion connector 20. Dropping arm test button 21. Dropping arm connector Fig. 5 Automatic Systems TR491-TR6-GB-a YD-JMW 20/01/00 Installation TR491 2-1106GB Rev.: C p. 10/12