1
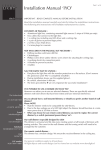
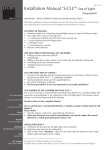
Part 1 of 4
Installation Manual ‘ULTIMO’(Suspended)
IMPORTANT : READ COMPLETE MANUAL BEFORE INSTALLATION
Read the installation manual carefully and strictly follow the installation instructions.
Not following the instructions will invalidate warranty/service claims.
CONTENTS OF PACKAGE :
• Aluminium light line, containing mounted LED light sources (LED’s of 2.1 watt each).
• Two rods that connect the ceiling cap to the light line.
• 1 x ceiling tray including one LED driver.
• 1 x allen wrench, plus 4 allen screws (2 spare).
• 1 x pair of gloves to prevent finger prints.
• 2 x Phillips screws.
• 2 x 8 mm plugs for concrete.
NOT INCLUDED IN THE PACKAGE, BUT NECESSARY :
-- Drilling machine with 8 mm drill bit.
-- Phillips screw driver and/or electric screw driver (for attaching the ceiling clip).
-- 2 wrenches of 7mm.
-- A working electricity connection point.
-- A blanket to prevent scratches.
-- A ladder.
N.B.! THE SAFEST WAY TO UNPACK :
• First place the light line with the wooden protection on a flat surface. (Don’t remove
this protection until the ‘Ultimo®‘ is completely installed!).
• During installation always use the supplied gloves!.
• Be careful, aluminium is delicate. In case of finger prints, clean directly with refined
petrol.
• Never touch the light sources with your fingers!
• The items preceded by t are very important for successful installation!!
The Netherlands
+31 (0)78 6817005
Fax
+31 (0)78 6819213
E-mail
[email protected]
Website
www.ferrolight.nl
Rabobank
NL58RABO0133271676
CoC
24296720
VAT number
NL817894718B01
IT IS POSSIBLE TO USE A DIMMER ON YOUR ‘ULTIMO’
However we advise you to use our selected dimmers. These are specifically selected
dimmers with LED drivers that have been tested and have minimal interference.
Do you already have a wall mounted dimmer, or should you prefer another brand of wall
dimmer?
Please NOTE!
• That the dimmer needs to be compatible for LED drivers.
• Due to the low wattage use of a LED light object the dimmer should function at a minimum power that is 20 watts or lower.
• When you choose for our remote control dimmer, you need to replace the current
dimmer by a switch (permanent power/always ‘on’).
Our wall dimmer (especially designed for LED)
This dimmer is universal and fits into every existing system of all brands of dimmers with
turning switches. The cover for the wall dimmer and the turning switch will need to be
arranged by the customer.
Our remote control dimmer :
This dimmer has a modern design. We mount the receiver/dimmer in the ceiling tray.
Our general conditions apply to all purchases
All light objects and recent designs can be viewed on our website www.ferrolight.nl
Part 2 of 4
Installation Manual ‘ULTIMO’(Suspended)
IMPORTANT : READ COMPLETE MANUAL BEFORE INSTALLATION
Read the installation manual carefully and strictly follow the installation instructions.
Not following the instructions will invalidate warranty/service claims.
We can send your dimmer together with the light object to your reseller/light advisor. For
prices please contact your light advisor.
INSTALLATION STEP 1 :
a) Determine the best spot for the light object to be mounted.
b) Mark the screw holes for the ceiling hub.
c) Drill Ø 8mm holes. Attention! : make sure you don’t drill into electrical wires / pipes
hidden under the plaster of the ceiling!
Ring tong
(red or bleu)
The Netherlands
+31 (0)78 6817005
Fax
+31 (0)78 6819213
E-mail
[email protected]
Website
www.ferrolight.nl
Rabobank
NL58RABO0133271676
nut
sleek washer
corrugated washer
nut
plastic washer (wt)
INSTALLATION STEP 2 : Connecting the rods to the ceiling tray
a) Start with installation of the rods.
b) Remove the nuts and washers from the rods.
c) Put the rods, screw thread side first, through the holes in the ceiling hub.
d) Mount the nuts and washers on the rod (see illustration above) in the right order. Fasten
the first nut manually, but not too tight.
e) Connect the LED driver cables to the rods.
f) Attention!: connect the red cable to the rods with the red dot. Blue cable to rods with
the blue dot.
g) The O-rings of the cables must be put between the flat and the corrugated washers.
h) Tighten the second (= final) nut a bit more for good electrical contact (= tighten by hand
+ a quarter turn using the little wrench).
INSTALLATION STEP 3 : Attaching the ceiling tray & rods to the ceiling
a) Shut down the electricity for the installation point.
b) Connect the 220 Volt cable (marked with black ribbon) to the electrical connection
point.
c) Attach the ceiling tray to the ceiling.
d) Mount the ceiling tray (not too tight, so you don’t deform the ceiling tray).
INSTALLATION STEP 4 : Attaching the light line to the cables
a) Be careful to insert the screws straight, using the supplied allen wrench and don’t over
tighten to prevent damaging the small screws.
b) Insert the rods completely into the light line.
Be careful not to scratch/damage the aluminium light line and light sources
CoC
24296720
VAT number
NL817894718B01
Our general conditions apply to all purchases
All light objects and recent designs can be viewed on our website www.ferrolight.nl
Part 3 of 4
Installation Manual ‘ULTIMO’(Suspended)
IMPORTANT : READ COMPLETE MANUAL BEFORE INSTALLATION
Read the installation manual carefully and strictly follow the installation instructions.
Not following the instructions will invalidate warranty/service claims.
In case of the ‘ULTIMO’ not functioning optimally, possible causes could be :
-- The color codes (red to red, blue to blue) are interchanged.
-- The electronic LED driver has been cut off as it is short-circuit proof.
-- One or more contacts are untight, resulting in flickering of the light sources.
Possible solutions :
a) Tighten the nuts on the upper side of the rods.
b) Tighten the allen screws connecting the light line to the rods, a little bit.
WHEN IN DOUBT, DON’T HESITATE TO ASK FOR OUR ADVICE OR CONTACT
YOUR RESELLER. YOU CAN ALWAYS CONTACT US DURING INSTALLATION!
(office hours only)
REMOTE DIMMER instructions:
Your wireless Eaton (Moeller) dimmer, is preprogrammed by us via the left arrow keys
: LIGHT is ON
--
Briefly press the upper arrow button
--
Briefly press and hold the upper arrow button: LIGHT is DIMMED
--
Briefly press the lower arrow button
--
Briefly press and hold the lower arrow button: DIMMING THE LIGHT
--
Press and hold the upper arrow button
--
Press and hold briefly the upper arrow button: THE LAST SELECTED MODE
: LIGHT is OFF
: THE LIGHT BRIGHTENS
GENERAL & IMPORTANT INFORMATION ABOUT ‘ULTIMO‘
The Netherlands
+31 (0)78 6817005
Fax
+31 (0)78 6819213
E-mail
[email protected]
Website
www.ferrolight.nl
Rabobank
NL58RABO0133271676
INSTALLATING ‘ULTIMO‘ YOURSELF
-- Read the installation manual carefully and strictly follow the installation instructions.
-- Not following the instructions will invalidate warranty/service claims.
-- Spare parts are available at extra costs.
Ferrolight is not liable for any damage due to neglect, incompetence or not following
instructions or advice given by Ferrolight.
WARRANTY :
1) There is a 24 month warranty on all parts, LED’s included.
2) When defects are due to Ferrolight, replacement parts are sent free of charge.
3) Ferrolight never repairs on site.
4) In case of defects, send the malfunctioning part(s) directly to Ferrolight, but always
consult your reseller first. Ferrolight will return the repaired/new part(s) without any
charge.
CoC
24296720
VAT number
NL817894718B01
Our general conditions apply to all purchases
All light objects and recent designs can be viewed on our website www.ferrolight.nl
Part 4 of 4
Installation Manual ‘ULTIMO’(Suspended)
IMPORTANT : READ COMPLETE MANUAL BEFORE INSTALLATION
Read the installation manual carefully and strictly follow the installation instructions.
Not following the instructions will invalidate warranty/service claims.
MAINTENANCE OF THE ‘ULTIMO‘
Unless clearly stated otherwise in writing by Ferrolight, your ‘ULTIMO’ should not be used
in wet, moist or damp rooms. Finger prints or dirt must be removed immediately, using
refined petrol. If stains are not removable with refined petrol a special polishing cloth can
be obtained via Ferrolight.
REPLACING LED’s
Normally you never have to replace LED’s, because they have a life span of more than
50.000 hours. In the very rare case of a possible defect, the complete light line must be sent
to Ferrolight , via your reseller / light advisor. Always consult you reseller / light advisor first.
TRANSPORT
-- All light objects are carefully packed by Ferrolight and sent with the utmost care to the
selling points.
-- Ferrolight can’t be held responsible for damage of any kind caused during transport
-- Immediately check the package for possible damages and the right content.
-- In case of missing or damaged parts, notify your reseller within 48 hours, due to possible transport insurance claims.
Enjoy your handmade ’ ULTIMO’ light object, designed and created by
Ferdinand Verbeek!
Our light objects are designed and made with the utmost care and positive energy.
Questions? E-mail us at [email protected].
For more information about our designs visit www.ferrolight.nl
The Netherlands
All light objects and recent designs can be viewed on our website www.ferrolight.nl
+31 (0)78 6817005
Fax
+31 (0)78 6819213
E-mail
[email protected]
Website
www.ferrolight.nl
Rabobank
NL58RABO0133271676
CoC
24296720
VAT number
NL817894718B01
Our general conditions apply to all purchases
All light objects and recent designs can be viewed on our website www.ferrolight.nl