1
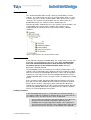
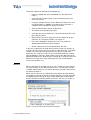
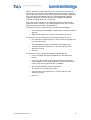
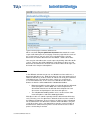
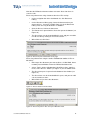
Document
User Manual IDportal
Date
August 2005
Status
Final; version 3.0
Information for:
All
User Manual IDPortal
How to use the IDPortal
environment
Table of Contents
Introduction ................................................................................................. 3
The user manual............................................................................... 3
What is the IDPortal environment ............................................................... 4
Accessing IDPortal...................................................................................... 5
Client tools ........................................................................................ 5
Location of IDPortal .......................................................................... 5
My Network places ........................................................................... 5
Creating a network place/webfolder ....................................... 6
Views on IDPortal ............................................................................. 7
Document structure within IDPortal ............................................................ 8
Faculty Dossier ................................................................................. 8
Student Portfolio ............................................................................... 9
Portfolio Documents ............................................................... 9
Evidence............................................................................... 10
Student Dossier .................................................................... 11
Templates ....................................................................................... 11
Working with documents in IDPortal......................................................... 14
Document Profiles .......................................................................... 14
Standard folders ............................................................................. 16
Enhanced folders............................................................................ 16
Versioning ............................................................................ 16
Check-out ............................................................................. 16
Check-in ............................................................................... 17
Publish.................................................................................. 18
Approve ................................................................................ 19
Security ..................................................................................................... 21
Reader ............................................................................................ 21
Author ............................................................................................. 21
Approver ......................................................................................... 21
Extra Functionality within the IDPortal environment ................................. 22
Categories ...................................................................................... 22
Search ............................................................................................ 22
Web Discussions ............................................................................ 23
Subscriptions .................................................................................. 25
Appendix A: Folder overview Faculty Dossier .......................................... 27
Appendix B: Folder Overview Student Portfolio ....................................... 28
User Manual IDPortal 2005.doc
2
Introduction
During their education at the faculty of Industrial Design, the students work
in teams on projects. Besides the projects, the students also work
individually on assignments. The tracking of a student’s progress isn’t
exclusively based on the results, but also on how he or she tackles the
problem, the knowledge and skills gained and on the accomplished
activities.
To be able to audit the progress of the students, different kinds of
feedback forms are used, next to two portfolio documents, written by the
student. The feedback forms give detailed information on a whole team or
on an individual student’s work, from the point of view of an expert, client,
assignor or unit team member that had something to do with the student.
The portfolio documents provide a way to the student to indicate what they
have done and to indicate what they have learned during a period.
Because all these documents should be easily accessed and centrally
stored, the IDPortal was created. In this secure and user-friendly
document management system, all the above-mentioned feedback forms
and portfolio forms can be stored, retrieved and searched.
The user manual
This user manual is a guide for all users of the IDPortal, the portal and
document management system of Industrial Design. It introduces the
basics of the IDPortal environment, how you can reach it, how it is
structured and especially how you can use it to store and retrieve the
feedback and the portfolio documents.
This manual does not describe the procedures and workflow of the before
mentioned documents, nor does it describe how to manage the IDPortal
environment. It is specifically meant for the users of the IDPortal.
Note that the manual might describe features you as a user have no
access to due to security, but in most cases this will be mentioned in the
description.
User Manual IDPortal 2005.doc
3
What is the IDPortal environment
The IDPortal is a portal environment for the faculty Industrial Design at the
Technische Universiteit Eindhoven. It is used as a document management
system for portfolio documents of the students and all the feedback forms
that are written during the projects and assignments and which are used
during the assessments. The IDPortal also provides the ability to easily
find specific documents, based on predefined properties or on categories.
Besides that, the environment can also be seen as a starting portal for all
members of the faculty of Industrial Design, both staff and students.
The IDPortal is based on a Microsoft product called Sharepoint Portal
Server. It is easy to use, integrates with Microsoft Office and can be
accessed from the local intranet domain as well as from the Internet.
Figure 1: Global view of the SharePoint Portal Server
environment
User Manual IDPortal 2005.doc
4
Accessing IDPortal
Before learning how to use the IDPortal environment, you will first want to
have a look and feel of the system. To do this, you need to know how to
access the IDPortal. This chapter explains how you set-up the client tools
that are required to access the IDPortal, how you can access it and which
views you can use to access the portal.
To be able to use the IDPortal environment, the following steps have to be
taken:
1. Install Client tools ( only for Office 2000)
2. Create network places
3. Install templates
Client tools
To be able to work with the IDPortal environment, except for viewing the
portal dashboard, you need to install the Microsoft Sharepoint Portal
Server Client tools. You can find the set-up program in the public folders in
your MS Outlook. The program is placed in the post ‘SharePointclient’ in
the folder ‘All Public Folders/Software/Faculteit Industrial Design/’.
Note: The Client tools of the SharePoint Portal Server only run on
Microsoft Windows 98, Microsoft Windows NT 4.0 and Microsoft Windows
2000 operating systems.
After installing the Client tools, you can use the IDPortal system without
any problem. The Client tools integrate the IDPortal environment into MS
Office, so that you can easily work with the environment even from within
the well-known environment of MS Office. The Client tools also integrate
the system into your windows Explorer, making it possible to connect to
the IDPortal system by using the windows explorer and be able to call
IDPortal specific functions from within this familiar environment.
Location of IDPortal
The IDPortal can be accessed from within the TU Eindhoven and from all
other places with access to the Internet. If you are at the TU Eindhoven,
the best way to access the IDPortal is by connecting to its so-called
internal domain name, which is http://idportal/education. If instead you
want to enter the portal from outside the TU Eindhoven domain with a web
browser, the address will be http://idportal.tue.nl/education. When using
the latter option, you will be asked for authentication. Your normal login
name and password should give you the required access.
My Network places
A network place, also called a webfolder, is a shortcut to a Web server.
You can use network places to store documents and to publish documents
in the IDPortal environment. It is best used when you are working with the
documents and know where to find or place the documents in the folder
structure of IDPortal.
User Manual IDPortal 2005.doc
5
The root for the network place or webfolder is http://idportal/education (or
http://idportal.tue.nl/education from outside the TUE domain using a web
browser). Starting from this root directory you can browse the IDPortal
environment and create additional network places to commonly used
folders.
If you have a computer running Windows 98 or Windows NT 4.0, use Web
folders to access SharePoint Portal Server. If you have a computer
running Windows 2000, use My Network Places to access SharePoint
Portal Server. My Network Places and Web folders are equivalent.
Students
Besides creating a network place/webfolder to the root of the IDPortal
environment, it’s advisable for all students to also make a network
place/webfolder to both the faculty dossier
(http://idportal/Education/Documents/Faculty Dossier) and their own
personal folder (http://idportal/Education/Documents/Student
Portfolio/<studentnumber>).
If the network places/webfolders are created, it’s also recommended to
create shortcuts to the network places/webfolders and place the shortcuts
on the desktop.
Staff
If you are a staff member, creating two extra network places/webfolders,
one to the faculty dossier (http://idportal/Education/Documents/Faculty
Dossier) and one to the students folder
(http://idportal/Education/Documents/Student Portfolio) is advised. This
shoiuld be done to access the IDportal environment a lot quicker and
easier.
If the network places/webfolders are created, it’s also recommended to
create shortcuts to the network places/webfolders and place the shortcuts
on the desktop.
Creating a network place/webfolder
To create a network place on a MS Windows 2000 system, follow these
steps:
•
In My Network Places, double-click Add Network Place.
•
Follow the instructions in the Add Network Place Wizard.
•
To save files to the Web server, drag them and any supporting
folders to the newly created Network Place.
To create a webfolder on a MS Windows 98 or NT system, follow these
steps:
•
In My Computer, double-click Web Folders.
•
Double-click Add Web Folder.
•
Follow the instructions in the Add Web Folder Wizard.
•
To save files to the Web server, drag the files and any supporting
folders to the newly created Web folder.
User Manual IDPortal 2005.doc
6
Views on IDPortal
There are two ways to view the IDPortal, either by using the windows
explorer and ‘my network places’, or by using your favourite web browser
(though Internet Explorer 5.5 or higher is recommended). The two views
each have their different strengths and should be used for different ways
of using the IDPortal environment. ‘My network places’ should be used
when working with documents, while the browser view, also known as
viewing the dashboard site, is best when you’re searching for particular
documents. For more information on ‘My network places’, also known as
webfolders, see the paragraph, ‘My Network places’. In both ways you
connect to the address http://idportal/education or VPN connection to the
TU/e network (or http://idportal.tue.nl/education from outside the TUE
domain).
For more information about VPN connections http://www.tue.nl/dienstict/
select “producten en diensten-Virtual Private Networking service”
Using a VPN connection from outside the TUE you can use the address
http://idportal/education
User Manual IDPortal 2005.doc
7
Document structure within IDPortal
Now that you are able to view the IDPortal environment, either by browser
or by windows explorer, you might notice that all the documents are stored
in a folder named ‘Documents’. This folder contains the three main folders,
‘Faculty Dossier’, ‘Templates’ and ‘Student Portfolio’. In the ‘Faculty
Dossier’ the team related feedbacks are stored, in the ‘Templates’ folder
the templates of all the forms can be found, while in the ‘Student Portfolio’
folder the student’s portfolio documents and individual feedback forms are
stored.
Figure 2: The contents of the 'Documents' folder
This chapter provides information on the document structure that is used
in IDPortal and what kinds of documents are stored in which folders.
Faculty Dossier
The ‘Faculty Dossier’ folder is used to store the information that is the
responsibility of the faculty. This includes all the team feedback forms and
the project and assignment descriptions forms. The individual feedback
forms, though they are a responsibility of the faculty too, are stored in the
student’s personal folder.
Figure 3: The contents of the 'Faculty Dossier' folder
User Manual IDPortal 2005.doc
8
Student Portfolio
The ‘Student Portfolio’ folder contains all the personal folders of all ID
students. As a student you can only see your own folder, while as a staff
member, you will see all the students folders (More on this in the chapter
‘Security’). The student’s personal folder consists of three parts, the
portfolio documents, the evidence and the Student Dossier.
Note that the folder ‘Student Dossier’ in the student’s personal folder is the
responsibility of the faculty, not the student. The student is only
responsible for the root of his/her personal folder and the subfolder
‘Evidence’.
Figure 4: The contents of the 'Student Portfolio' folder
Portfolio Documents
In the root of the Student’s Portfolio folder, the student stores his/her ‘Self
Evaluation’ and ‘Portfolio Work Document’ form. This ‘Self Evaluation’
form and ‘Portfolio Work Document’ form should be the only two
documents present in the ‘Student Portfolio’ folder. All legacy
documents should be deleted.
The portfolio documents are written by the students and therefore are the
student’s own responsibility. At the beginning of every period, the student
will have to remove the old portfolio documents, if this is not already done,
and place a single copy of each of the two portfolio documents in his/her
‘Student Portfolio’ folder. These new copies will be used during the coming
period.
At the end of the period, department Education will announce the exact
date and time, the two portfolio documents will be moved to the Student
Dossier by the student’s competency coach. Note that the documents
shouldn’t be removed directly after the set date and time though, but only
after the two portfolio documents are published in the student’s Student
Dossier, or at the beginning of next period.
Linking to evidence
In the two portfolio documents, a student will link to evidence location (
see evidence folder) or feedback in “Student dossier” or “Faculty dossier”.
The following steps describe how this is done in MS Word:
•
User Manual IDPortal 2005.doc
Get the URL of the document you want to link to. The URL of the
document can be found by selecting the document in the
webfolder then using the right mouse button select <properties>
and cut and paste the URL link. Or the ‘Show Actions’ page of the
document you want to link to on the dashboard site of IDPortal.
9
•
Select Insert | Hyperlink from the menu.
•
Enter the file or webpage name.
•
Click OK.
•
Please be aware that when using hyperlinks to other files in the
IDportal environment, as you do in the Portfolio Work and Self
Evaluation documents, the portal default uses relative links after
you saved the file in the portal for example: ../../Student
Portfolio/s123485/Evidence/test. If you copy the Portfolio Work or
Self Evaluation document to your local disk and you place the file
back in the portal again the link will not function anymore. Reason
for this behavior is that as long as the document is in the portal
environment the Sharepoint software manage/controls the
hyperlinks to files in the portal. Replacing the file with a copy from
outside the portal causes the portal handle the link as a fault URL.
If you edit your document outside the portal and make a hyperlink
to a document in the portal use the notation :
http://idportal.tue.nl/education/Student
Portfolio/s123485/Evidence/test or
http://idportal/education/Student Portfolio/s123485/Evidence/test .
Disadvantage is that the portal will ask you to authenticate before
you can read the information.
Evidence
The evidence folder is used to store a student’s so called ‘Evidence of
learning’, files that can be used as a proof of the work a student has done
or what he/she has learned. Only files that are referred to in the in the ‘Self
Evaluation’ form should be placed in this folder.
There are two extra network drive’s available after you login.
G:\ drive for file storage, and the w:\ drive for your student web page.
Evidence is a subfolder of your w:\ drive to be used as evidence folder.
URL for this location is: http://www.student.tue.nl/ initials and lastname.
The location to use for inserting hyperlinks within the ‘Self Evaluation’ and
‘Portfolio Work Document’ should be:
http://www.student.tue.nl/[letter]/ initials and
lastname/evidence/<filename>
Attention: [letter] is important to use within the URL! You can find out
which letter you need to use by going to your student web page. Then
you will get information on the drive concerned, and the letter to use (this
letter varies for each student generation)
Example:
http://www.student.tue.nl/H/i.d.student/evidence/test.doc
What we noticed is, that some of the students after they finished their
Portfolio Work Document and Self Evaluation reorganize the evidence
folder.
The change of the file location also changes the URL of the file.
User Manual IDPortal 2005.doc
10
As a result of this action the hyperlinks in the Portfolio Work Document and
Self Evaluation Forms do not work anymore. So structure the files in your
Evidence Folder first, and then insert hyperlinks in your SE or PWD.
•
Please be aware not to use the w: notation when linking an URL
Student Dossier
In the Student Dossier the student’s individual feedback forms are stored,
including the assessments and the portfolio documents of the previous
periods. The Student Dossier is therefore the responsibility of the faculty,
not the student. The student can include links to his/her individual
feedback forms in this folder in the portfolio documents.
Templates
All the MS Word documents that are used in the IDPortal environment are
based on MS Word templates. These templates can be found in
‘S:\Templates’. This folder is provided so that you can create new
documents for the IDPortal environment.
Note: Templates should not be copied to your local machine for
permanent use, because if a document is created from these templates,
documents features like ‘Click to save document to IDPortal’ and ‘Click to
refresh data above’ will not work properly.
How to create a document:
To always use the correct and up-to-date template, set MS Word to
automatically find the templates on the ‘S:\Templates’. To do this, follow
these steps:
•
Select the ‘options’ item in the ‘tools’ menu within MS Word
•
Select the ‘File Locations’ tab and modify the ‘Workgroup
templates’ value.
•
Set the ‘Workgroup templates’ property to ‘S:\Templates’.
By following the above steps, you can easily create a new form, by
selecting ‘File | New’ in MS Word and then selecting the correct template
on the ‘General’ tab.
If you’re on the local TUE domain, you can use the ‘Click to save
document to IDPortal’ button to automatically store the document initially
on the correct folder and with the correct name in the IDPortal
environment. It cannot be used outside the TUE domain. In that case, you
will need to select the path yourself. (Note: this thus not work if the
document already exists in the IDPortal environment)
If you’re on the local TUE domain, you can also use the ‘Click to refresh
data above’ button to automatically fill header data.
Troubleshooting:
Question:
User Manual IDPortal 2005.doc
11
I’m on the local TUE domain but the ‘Click to save document to IDPortal’
and ‘Click to refresh data above’ buttons will not work.
Possible reasons:
•
Your document was created from a template not located in
‘S:\Templates’
•
Antivirus software has deleted your document macros, Mail
providers have such functionality
Solution:
To correct the problem you have to attach/restore the right template to
your document. To do this, follow these steps:
•
Check you’re on the local TUE domain
•
Select the ‘unprotect document’ item in the ‘tools’ menu within MS
Word
•
Select the ‘Templates and add-Ins...’ item in the ‘tools’ menu
within MS Word
•
Set the ‘Document templates’ property to the right template in
‘S:\Templates’. For example (‘S:\Templates\Assessment.dot’)
•
Don’t forget to protect the document.
•
Select the ‘protect document’ item in the ‘tools’ menu within MS
Word.
•
Select the option ‘Forms’ and click ‘Ok’.
User Manual IDPortal 2005.doc
12
User Manual IDPortal 2005.doc
13
Working with documents in IDPortal
The document management system is the core functionality of the
IDPortal environment. It allows the users to store their documents in its
environment much like on a normal hard drive or file share. There are two
major differences though.
The first major difference is that all documents are assigned a document
profile. Such a profile contains certain document properties, also known
as meta-data, which are used to provide extra information about the
document.
The second major difference is that, next to the standard folder, you also
have a so-called ‘enhanced folder’. An enhanced folder allows for extra
document management features like check-in, check-out, publish, version
history and approval routes. Note that students only use standard
folders.
Icon for Standard folders
Icon for Enhanced folders
This chapter provides information on these features and on how to use
them. The placing and managing of the documents in ‘normal’ folders will
be explained first. After which the placing, managing and publishing of
documents in an enhanced folder will be explained.
Document Profiles
Every document in an Enhanced folder in the IDPortal environment has an
associated document profile that contains a collection of document
properties. The IDPortal uses the information in the document profile to
direct searches once the document is published (or just placed in a
standard folder). In the IDPortal environment, every type of form has its
own specific profile.
When you place a new document in the IDPortal environment, using a
network place/webfolder, you can edit its profile by selecting ‘Edit profile’
from the menu that shows when you right click on the document. This will
open the ‘Edit profile’ form (see Figure 5).
When you place a document when using the Dashboard site, the
‘Document Profile’ page (see Figure 6) will be shown when you check-in
or publish the document (or just place it in a standard folder). In both ways
you can enter the document profile specific properties, which will be saved
with the document.
When you edit a profile for the first time, most of the properties will already
be copied from the form. Validate if these are correct and enter the
properties that aren’t copied from the MS Word form. The document
properties that are marked with a red ‘*’ are compulsory and are required
to be filled in. The others can be left out if needed.
Note that you cannot select another profile than the pre-selected profile.
The pre-selected profile is the default (and only possible) profile for the
folder you have placed the document in. If the profile isn’t the profile you
want, you’ve probably misplaced the document.
User Manual IDPortal 2005.doc
14
Figure 5: Edit profile form
Figure 6: Document Profile page
User Manual IDPortal 2005.doc
15
Standard folders
Though most of the folders used in the IDPortal environment are of the
‘enhanced’ type, some are still of the ‘standard’ type. Standard folders
within the IDPortal behave almost exactly as a folder does on your local
hard drive or on a file share. You can easily copy documents into it,
rename documents and delete documents. The only difference is that
every document has a profile assigned to it, providing a way for additional
information on the document (See ‘Document Profiles’).
Enhanced folders
An enhanced folder is a folder within IDPortal that offers document
management through check-in, check-out and publishing functionality, a
version history and approval routing. Most of the folders within the IDPortal
environment are of the type ‘enhanced’.
Versioning
One of the features of an enhanced folder is the automatic versioning of all
documents. When you create or copy a new document into an enhanced
folder, the version will be set to 0.0. After the first check-in this will be set
to version 0.1 and every check-out thereafter will increase the minor
version number, the number behind the dot, with one. When you publish a
document, the main version number, the number before the dot, will be
increased with one and the minor version number will be reset to 0. So,
the first publish will create a 1.0 document.
The main advantage of the versioning feature of the IDPortal environment
is that you can jump back to previous versions. This way you can view
what you have changed and retrieve lost parts. To view all the previous
version of a document, right click the document in a network
place/webfolder and select the ‘Versions’ tab page. On this tab page you
can select a previous version and view the document or its properties at
that version.
Check-out
In an enhanced folder you can reserve the right to edit a document by
checking it out. No other user can edit a document that is checked out by
you. Until you check a document back in, other users in the folder cannot
view your changes. This way you can work on a form together with other
users, without risking the chance to overwrite each other’s changes. Just
check the document out, make your changes and check it back in. After
you’ve checked it in again, others can check it out and make their
changes.
There are three ways to check-out a document, either by using a network
place/webfolder, by using the IDPortal dashboard site or from within an
MS Office application.
Check-out a document from the workspace:
•
Locate the document that you want to check-out.
•
Ensure that the document is checked-in.
•
Right-click the document, and then click check-out.
Check-out a document using a Microsoft Office application:
•
User Manual IDPortal 2005.doc
From the File menu, click check-out.
16
Check-out a document through the dashboard site:
•
On the navigation bar of the dashboard site, click Document
Library.
•
On the Document Library page, locate the document that you
want to check-out.
•
It may be available from a list in the Document Library view, or it
may be located in a subfolder. If the document is located in a
subfolder, open that folder to display its contents.
•
Click the Show Actions link for the document.
•
The Document Inspection page opens.
•
Verify that the correct document is selected and checked in, and
then click Check-out
•
Right-click the link on the page and save the document to your
computer, by selecting the option ‘save target as’.
•
In the Save dialog box, complete the necessary actions to
download the document to your computer.
•
After the document has been downloaded, click OK.
If you have a document checked-out, but haven’t made any changes, or
want to cancel the check-out, you can do an ‘undo check-out’. This option
removes the ‘checked-out’ flag and keeps the current version of the
document. The ‘undo check-out’ can be selected from both the network
place/webfolder as from the ‘Show actions’ page of the document on the
IDPortal dashboard site. Note that you can only do an ‘undo check-out’ on
documents that you have checked-out yourself. You cannot undo the
check-out of another user.
Check-in
When a document is checked out, other users cannot view your changes,
nor make changes to the document themselves. To make your changes
readable and/or let other users edit the document, you will need to check
the document back in.
When you do a check-in, the ‘Edit Profile’ form will be opened, allowing
you to fill-in or change the document profile properties. It will also provide
an additional part at the top to enter version information and to indicate
that the document should be published after the check-in (see Figure 7).
Figure 7: Top of the 'Edit Profile' form when checking in
User Manual IDPortal 2005.doc
17
There are three ways to check-in a document, either by using a network
place/webfolder, by using the IDPortal dashboard site or from within an
MS Office application.
Check-in a document from the workspace:
•
Locate the document that you want to check-in.
•
Ensure that the document is checked-out to you.
•
Right-click the document, and then click check-in.
•
Add comments and make any necessary changes to the profile
form.
•
Click OK.
Check-in a document using a Microsoft Office application:
•
From the File menu, click check-in.
•
Add comments and make any necessary changes to the profile
form.
•
Click OK.
Check-in a document through the dashboard site:
•
On the navigation bar of the dashboard site, click Document
Library.
•
On the Document Library page, locate the document that you
want to check-in.
•
It may be available from a list in the Document Library view, or it
may be located in a subfolder. If the document is located in a
subfolder, open that folder to display its contents.
•
Click the Show Actions link for the document.
•
The Document Inspection page opens.
•
Verify that the correct document is selected and checked out by
you, and then click Check In.
•
Enter the path to the new version of the document or click Browse,
find and select the document and click Open.
•
Click continue.
•
Add comments and make any necessary changes to the
documprofile properties.
•
Click Save.
Publish
If you publish a document from an enhanced folder, the document is then
available to all users with read access (or more) to the folder the
document is placed in. After the document is published it’s also added to
the search index, meaning it can be found using the search function on the
IDPortal dashboard site.
There are three ways to publish a document, either by using a network
place/webfolder, by using the IDPortal dashboard site or from within an
MS Office application.
User Manual IDPortal 2005.doc
18
Publish a document from the workspace:
•
Locate the document that you want to publish.
•
Ensure that the document is checked in.
•
Right-click the document, and then click Publish.
Publish a document using a Microsoft Office application:
•
From the File menu, click Check In.
•
In the check-in section of the form, select the Publish this
document after check in check box.
•
Add check-in comments and make any necessary changes to the
profile form.
•
Click OK.
Publish a document through the dashboard site:
•
On the navigation bar of the dashboard site, click Document
Library.
•
On the Document Library page, locate the document that you
want to publish.
•
It may be available from a list in the Document Library view, or it
may be located in a subfolder. If the document is located in a
subfolder, open that folder to display its contents.
•
Click the Show Actions link for the document.
•
The Document Inspection page opens.
•
Verify that the correct document is selected and checked in, and
then click Publish.
•
Click OK.
Approve
There is one enhanced folder that’s a bit different from the others as it has
an approval route on it, namely the folder ‘Assessments’ in every student’s
portfolio folder. This approval route means that when an author publishes
a document in this folder, the document first has to be approved by a
member of the education department.
As soon as a document in this folder is published, the document will be
marked as ‘pending for approval’ and the approvers in the department of
education will be notified by e-mail. The approvers can approve or reject
the document, by using the appropriate commands in the network
place/webfolder or on the dashboard site.
Figure 8: Approval of a document
User Manual IDPortal 2005.doc
19
While a document is under approval, users cannot check out or edit it. If
you want to send comments or feedback to the author or other approvers,
you can do so by sending e-mail or by using Web discussions, depending
on the approval and feedback process in your organization. Whether
approvers approve or reject the document, the IDPortal environment
maintains any Web discussions associated.
After a document is approved, the IDPortal environment publishes the
approved version. That way, users with appropriate roles can search for
and view the document on the dashboard site.
To approve or reject a document from a network place/webfolder:
•
In the network place/webfolder, find the document that you want to
approve.
•
Right-click the document, and then click Approve or Reject.
To approve or reject a document from the approval request e-mail:
•
In the document approval request, select Click here to approve or
reject this document.
•
The dashboard site opens the Document Inspection page.
•
Verify that the correct document is selected, and then click
Approve or Reject.
•
Click OK.
To approve or reject a document through the dashboard site:
•
On the navigation bar of the dashboard site, click Document
Library.
•
On the Document Library page, locate the document that you
want to approve. It may be available from a list in the Document
Library view, or it may be located in a subfolder.
•
Click the Show Actions link for the document.
•
The Document Inspection page opens.
•
Verify that the correct document is selected, and then click
Approve or Reject.
•
Click OK.
User Manual IDPortal 2005.doc
20
Security
The IDPortal environment uses roles to group users who have the same
permissions under a unique name, similar to a local Windows 2000 group.
Each folder can contain a different set of users and groups for each role.
When you are assigned a certain role, that role gives you permission to
perform specific tasks, such as creating or editing documents.
In the IDPortal environment you can have different roles for different
folders. For example, in one folder you may be assigned to the role of
reader, while in another folder, you may be assigned as an author.
This chapter introduces the role-based security that is used in the IDPortal
environment, including information about the two roles: reader and author
as well as the additional user function, approver.
Reader
A reader is a user who can search for and read documents but cannot add
them to the workspace. All folder users are assigned to the role of reader
by default.
Readers can perform the following tasks:
•
In a standard folder, readers can view all documents.
•
In an enhanced folder, readers can view only folders and
published documents. A reader cannot check out, edit, or delete
documents and cannot view draft versions of documents.
Author
An author is a user who can add documents to specific folders and read,
edit, or delete any documents in the folder.
Authors can perform the following tasks:
•
In a standard folder, authors can create, read, edit, and delete all
documents in the folder. Authors can also create, rename, and
delete their folders. When an author creates a new folder, the new
folder inherits the security settings, including role information, from
the parent folder. Authors cannot change the roles or the approval
policy on folders that they create.
•
In an enhanced folder, authors can create, read, edit, and delete
all documents, including other users' draft documents, and can
submit any document for publication. Authors can also create,
rename, and delete their own folders. When an author creates a
new folder, the new folder inherits the security settings, including
role information, from the parent folder. However, authors cannot
change the roles or the approval policy on folders that they create.
Approver
Approvers are folder users who review and approve documents for
publication on the dashboard site. This function may supplement their
other tasks as a reader or author. Approval routes can only be set-up by
the portal coordinators.
User Manual IDPortal 2005.doc
21
Extra Functionality within the IDPortal environment
The IDPortal environment offers far more besides the document
management system as described in the previous chapters. Next to the
storing and viewing of the documents, the documents can also be
discussed, searched, viewed in categores or subscribed to. This chapter
will give more detail on these four features.
Categories
Categories allow the IDPortal environment to organize documents and sort
them into a hierarchy of topics and subtopics. When a user views a
category, all documents assigned to that category will be shown, unless
the user does not have read access to the document. In that case, the
document will not be shown at all.
The IDPortal environment is currently set-up with four categories, dividing
all the documents into four groups:
•
Project Team Feedback Forms
•
Individual Feedback Forms
•
Task Descriptions
•
Portfolio Documents
When you publish a document, you should assign it one of the above
categories, depending on the type of document. It provides an easy way to
find documents based on the type.
Staff
Because staff members have got read access to all documents, the
categories show too many documents to be of much use to them. They
might be interested in the category Task Description though, which gives a
good overview of all available tasks.
Students
Due to the fact that students only have read access to their own files and
the faculty dossier, the categories can give a good overview of the
student’s documents. The Individual Feedback category only shows a
student’s personal feedbacks, making this category a good overview and a
good starting point for all students.
Search
The possibility to search all the documents within the IDPortal is one of the
major advantages of the IDPortal. Users with appropriate roles, atleast
reader role, can search for and view all the published documents on the
dashboard site.
The Search function can only be accessed from the dashboard site, at
http://idportal/Education/Portal/Search (or
http://idportal.tue.nl/Education/Portal/Search when you’re accessing it from
outside the TUE domain). On this page (See Figure 9) you can enter a
word or text part to search for and/or search for documents of a certain
profile or with specified values for the properties. Besides that, you can
also provide a creation or modification date.
User Manual IDPortal 2005.doc
22
Figure 9: Search page on IDPortal dashboard site
When searched, only the published documents that match the search
request will show up on the result page. From the page with the results of
the search request, you can easily access the documents, view the
documents or sort the documents on ‘Best Match’, author, title or date.
You can also subscribe to the search request by clicking ‘Subscribe to this
search’. That way you will be notified by e-mail whenever there are new
documents that match the selected search criteria. More on this topic can
be found in the chapter ‘Subscriptions’.
Web Discussions
In the IDPortal environment you can use Web discussions to discuss a
document with other users. Web discussions let you enter comments in or
about the document, so other readers or authors can view your comments
and add their own. The web discussions can be very useful for the
assessment documents. Users can access Web discussions from a
browser or from the Office 2000 Online Collaboration toolbar.
•
Browser-based discussions allow users who do not have Microsoft
Internet Explorer 5, Office 2000, or the client components of
SharePoint Portal Server installed on their computers to read
discussions and participate in the discussion process.
•
The collaboration toolbar provides access to discussions from
Internet Explorer 5 and Office 2000 applications.
Web discussions are stored separately from the document to which they
refer. That way, even if a document is deleted, the discussions remain in
the IDPortal environment. There is but one set of discussions maintained
for each document. For documents stored in enhanced folders, only one
set of discussions exists, even though there may be several versions of
that document. A document may have several versions because of the
process of checking in and out.
User Manual IDPortal 2005.doc
23
Note that the IDPortal environment does not return discussion items in
search results.
Discussing a document using a browser other then IE 5 and up:
•
On the navigation bar of the dashboard site, click Document
Library.
•
On the Document Library page, locate the document that you
want to discuss. It may be available from a list in the Document
Library view, or it may be located in a subfolder.
•
Click the Discuss link for the document.
•
The Document is opened with a discussion part at the bottom (see
Figure 10).
•
The discussions can be viewed within this part, and you can add a
new discussion by clicking on ‘Insert Discussion…’.
•
When finished, click Close.
Figure 10: Discussion part at the bottom of the page.
Discussing a document using the Online Collaboration toolbar in IE 5 or
MS Office:
•
Either open the document you want to discuss in MS Word, from a
network place/webfolder or from the IDPortal dashboard site.
•
Select ‘Tools | Online Collaboration | Web Discussions’ from the
menu, or the ‘Discuss’ button (see Figure 11) on the toolbar of IE.
•
The discussion pane is opened at the bottom of the window (see
Figure 12).
•
The discussions can be viewed within this pane, and you can add
a insert new discussions
•
When finished, just close the document.
Figure 11: Discuss button in the IE toolbar
Figure 12: Discussion pane in IE 5 and up and MS Office 2000
User Manual IDPortal 2005.doc
24
Subscriptions
If you find a document, a folder, a category or a specific collection of
search results useful, you may want the IDPortal to notify you of changes
to these items in the future. You can view notifications on the
Subscriptions Summary Web Part on the dashboard site home page or on
the Subscriptions page on the dashboard site. You can also choose to be
notified of subscriptions updates by e-mail.
Figure 13: You can subscribe to Folders, Files, Search Queries and Categories
Every user can create his/her own subscription, though no user can have
more than 20 subscriptions at a time. If a user attempts to create a
subscription after reaching the subscription quota, IDPortal informs the
user that it cannot create the subscription because the quota has been
reached.
By default, the setting for notifications per subscription is 20. The
maximum value for this setting is 100. When a notification arrives for a
subscription that has reached its quota, IDPortal selects which notification
to delete according to the following order of precedence:
•
For a document, folder or category subscription, the IDPortal
deletes the oldest notification.
•
For a search subscription, what the IDPortal deletes depends on
whether the notification is sent by e-mail. If the subscription sends
an e-mail notification, IDPortal deletes the lowest-ranked
notification that was already sent. If no notifications were sent,
IDPortal deletes the lowest-ranked notification that was not sent. If
the subscription does not send e-mail notifications, IDPortal
deletes the lowest-ranked notification.
Students
Students should subscribe to the Student Dossier folder in their own
personal portfolio folder. This will let them be automatically notified when
new feedback forms regarding the student are published. They might also
consider subscribing to the Task Description folder in the Faculty Dossier,
in case they want to be informed when new project or assignment
descriptions are published.
Staff
Staff members can subscribe themselves to the faculty dossier or to the
student dossiers of the students in their unit. Especially members from
Education might be interested in subscribing to the Task Description folder
in the Faculty Dossier.
User Manual IDPortal 2005.doc
25
How to create a new subscription to a document or folder:
•
On the navigation bar of the dashboard site, click Document
Library.
•
On the Document Library page, locate the document or folder that
you want to subscribe to. It may be available from a list in the
Document Library view, or it may be located in a subfolder.
•
Click the Subscribe link for the document or the folder.
•
Complete the new subscription information. When you provide an
e-mail address, you will be notified by e-mail when documents
have been added or changed.
•
Click OK.
How to create a new subscription on a category
•
On the navigation bar of the dashboard site, click Categories.
•
On the Categories page, locate the category you want to
subscribe to and open it.
•
Click the ‘Subscribe to this category’ link.
•
Complete the new subscription information. When you provide an
e-mail address, you will be notified by e-mail when documents
have been added or changed within this category.
•
Click OK.
How to create a new subscription on a search request:
•
On the navigation bar of the dashboard site, click Search.
•
On the Search page, enter your search criteria and click Go.
•
Click the ‘Subscribe to this search’ link.
•
Complete the new subscription information. When you provide an
e-mail address, you will be notified by e-mail when documents
have been added or changed within this search.
•
Click OK.
How to remove a subscription:
•
On the navigation bar of the dashboard site, click Subscriptions.
•
On the Subscriptions page locate the subscription you want to
remove.
•
Click the ‘Delete subscription’ link.
•
Click OK to verify the removal.
User Manual IDPortal 2005.doc
26
Appendix A: Folder overview Faculty Dossier
Folder
Profile
Category
Faculty Dossier*
Base Document
Expert Feedback*
Expert Feedback
Project Team
Feedback
Client Feedback*
Client Feedback
Project Team
Feedback
Project Coach Feedback*
Project Coach
Feedback
Project Team
Feedback
TaskDescription*
Base Document
Project Description*
Project Description
Task Description
Assignment Description*
Assignment Description
Task Description
Folder
IDEducation
IDUnitManagers
IDUnitTeams
IDAssessors
IDStudents
Table 1: Folder Overview of the Faculty Dossier (*=Enhanced Folder)
Faculty Dossier
A
A
A
R
R
Expert Feedback
A
A
A
R
R
Client Feedback
A
A
A
R
R
Project Coach Feedback
A
A
A
R
R
Task Description
A
R
R
R
R
Project Description
A
R
R
R
R
Assignment Description
A
R
R
R
R
Table 2: Authorization table of Faculty Dossier folder (A=Author, R=Reader)
User Manual IDPortal 2005.doc
27
Appendix B: Folder Overview Student Portfolio
Folder
Profile
Student Portfolio
Base Document
Student number
Student Dossier*
Category
Base Document
Base Document
Individual Expert
Feedback*
Individual Expert
Feedback
Individual Feedback
Assignment Feedback*
Assignment Feedback
Individual Feedback
Self Evaluation*
Self Evaluation
Portfolio
Project work
Document*
Project Work Document
Portfolio
Assessment*
Assessment
Individual Feedback
Evidence
Base Document
Folder
IDEducation
IDUnitManagers
IDUnitTeams
IDAssessors
IDStudents
<Student>
Table 3: Folder Overview of the Student Portfolio (*=Enhanced Folder)
Student Portfolio
R
R
R
R
R
-
A
A
A
R
-
A
A
A
A
R
-
R
Expert Feedback
A
A
A
R
-
R
Assignment Feedback
A
A
A
R
-
R
Self Evaluation
A
A
A
R
-
R
Project work Document
A
A
A
R
-
R
Assessment*
A
A
A
R
-
R
R
R
R
R
-
A
Student number
Student Dossier
Evidence
Table 4: Authorization table of the Student Portfolio folder (A=Author, R=Reader, *=Approval by
Education)
User Manual IDPortal 2005.doc
28