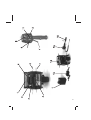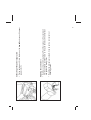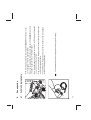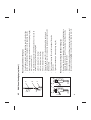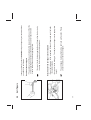
1
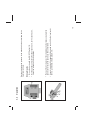
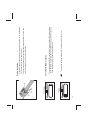
R Ulrich Alber GmbH + Co. KG Sigmaringer Str. 100 D-72458 Albstadt Tel.: ++ / 7431 - 9096 - 0 Fax: ++ / 7431 - 9096 - 35 21.0001.4.02.03 User's manual viamobil R R The viamobil complies to the guidelines for medical products of the European Community 93/42/EWF With the viamobil you have purchased a reliable and high-quality product from alber. After mounting to your wheelchair the viamobil will things make much easier for you, for example driving long distances with your wheelchair. It assists you in driving up slopes and slows the wheelchair down while going downhill. To get to know all advantages of the viamobil please read this user's manual carefully and pay attention to the safety instructions. If you have further questions, please call your dealer (see point 8). Congratulations ! 1. Brief Survey viamobil...............................................................................................................................................1 1.1 Technical Data.................................................................................................................................................1 1.2 Essential Parts.................................................................................................................................................3 2. Before Operating.....................................................................................................................................................4 2.1 Attaching to the Wheelchair..............................................................................................................................4 2.2 Charging the Batteries......................................................................................................................................7 3. Operation................................................................................................................................................................8 3.1 Safety Instructions...........................................................................................................................................8 3.2 Driving...........................................................................................................................................................10 3.3 Obstacles.......................................................................................................................................................12 3.4 Dangerous Situations.....................................................................................................................................12 4. Accessories...........................................................................................................................................................13 4.1 Vehicle Charging Cable..................................................................................................................................13 4.2 Extra Battery pack..........................................................................................................................................14 4.3 Extra Handles................................................................................................................................................15 4.4 Anti Tippers....................................................................................................................................................17 5. Care and Maintenance..........................................................................................................................................18 5.1 Changing the Electrical Fuses........................................................................................................................18 5.2 General Information about the Batteries.........................................................................................................19 5.3 Charging the Batteries....................................................................................................................................20 5.4 Cleaning........................................................................................................................................................21 5.5 Maintenance..................................................................................................................................................21 6. Problems and Solutions / Troubleshooting.............................................................................................................22 7. Warranty and Liability ............................................................................................................................................23 7.1 Warranty........................................................................................................................................................23 7.2 Liability...........................................................................................................................................................23 8. alber - Dealers.......................................................................................................................................................24 Table of Contents Sealed lead acid battery, 2 x 12 V, 12 Ah 24 V 151 x 99 x 95 mm 25A Akku-Recycling Pb max. 50°C After expiry of the service life, return the battery to alber or the alber specialist dealers who will dispose of it correctly. Operating voltage: Battery dimensions: Maximum current: Battery Battery: Nominal Capacity: Maximum Capacity: Speed: Climbing and Braking Capacity: Range: : Weight Control Unit: Batteries: Drive Unit: Battery Charger: Total Weight: Temperature of operation: BC2403 A 100-240 V 24 V 3A IU0U -10oC / +40oC 0,9 kg (1,9 pounds) 9,0 kg (19,8 pounds) 14,0 kg (30,8 pounds) 0,9 kg (1,9 pounds) 24,8 kg (54,6 pounds) Charger Designation: Input voltage: Nominal output voltage: Charging current: Charging process: 1 150 W 300 W variable, up to 5,0 km/h [3,1 mph] (forward) and up to 2,5 km/h [1,5 mph] (backward) up to a slope of 18% (at a total weight of 130 kg / 286 pounds) up to 20 km (12,5 miles) depending on the surface topography and weight of the person Brief Survey viamobil 1.1 Technical Data 1. 2 3 1.2 10. Driving Lever 11. Direction Switch 12. ON/OFF Switch 13. Battery Charger 14. Driving Unit 15. Control Unit 16. Extra Handles 3. Charging Plug 4. Carrying Grip 5. Power supply Cord 6. Upper Bolt 7. Lower Bolt 8. Charge Indicator 9. Speed Control 2. Clamp 1. Battery Pack Essential Parts Attaching to the Wheelchair 2.1 4 the pin's center with your thumb and simultaneously pulling it with your index and middle finger. • Take out the locking pins from the holding device by pressing the button in Taking out the locking pins Always attach or detach the viamobil without the batteries. The wheelchair must be equipped with the necessary brackets for the viamobil. If you are already using a scalamobil (a stair climber for wheelchairs, manufactured by alber) the same bracket-system may be used for the viamobil attachment. Attaching the brackets and adjusting the viamobil must be done by Ulrich Alber GmbH or authorized personnel only. Before Operation 2. 5 the brackets. Secure the upper bolts by reinserting the two locking pins into their respective holes in the brackets. • Push the upper part of the device forward until the upper bolts (6) catch Insert the viamobil into the brackets Push the upper part of the device forward until the upper bolts (6) catch the brackets. Secure the upper bolts by reinserting the two locking pins into their respective holes in the brackets. Use the same procedure as described to take out the locking pins. • Insert the lower bolt (7) of the viamobil in the lower hooks of the brackets. Insert the viamobil into the lower hooks hindering position. • By pulling the locking lever outward, it can be put in a convenient, not into its specifically provided fixture on the push handles of the wheelchair and tighten the locking lever. • Next the control unit (15) is attached. Push the receiver of the control unit Attaching the control unit supply cord (5). 6 • Put the battery pack (1) into its place on the viamobil and connect the power Connecting of the power supply cord 7 2.2 + _ first time. Please see chapter 5.3 • To ensure the batteries' durability, charge them before using them for the Charging the Battery Pack In case that the extra handle (16) has not been attached to the other side of the wheelchair, proceed as described for attaching the control unit. Make sure that the helix cable does not touch the back wheel of the wheelchair while driving. Plugging in the helix cable • Finally, plug the helix cable of the control unit into the designated socket of the drive unit. Make sure that the nose of the plug fits into the groove of the socket. Do not use any force when you plug it in. Safety Instructions 3.1 In order to use the viamobil safely, please follow these instructions strictly: Otherwise it is necessary to mount anti tippers. 8 • Before you start, turn the speed control (9) to the position of the lowest speed. • The attendant must be physically capable to catch the wheelchair plus its driver if it tips over backwards. because of the danger of tipping over backwards particularly when driving on slopes. • Only the attendant may operate the viamobil. The wheelchair driver cannot use the viamobil by himself weight is reduced by the weight of the viamobil (approximately 25 kg / 55 pounds). • When you use the viamobil, you also need to consider the wheelchair's user's manual; e.g. its maximum attendant of the viamobil may easily reach them. • The wheelchair to which the viamobil is attached must have its locking brakes in such a position that the parking brakes that are independent of the wheels' air pressure. • Attaching the viamobil to a wheelchair, make sure that the wheelchair is equipped with locking brakes / standards of technology. • The viamobil may be attached only to approved standard wheelchairs, that coincide with the authorized ! Operation 3. The viamobil must be checked and approved annually by your dealer. If you drive parallel to obstacles that are narrower than the wheelchair's track, make sure that they do not exceed 3 cm (1,18 inches). Do not use the viamobil on slopes that exceed 18%. In no case may the slope exceed the maximum inclination permitted by the wheelchair manufacturer. Cross the edges of sidewalks carefully; if they exceed 8 cm (3,15 inches) in height, you need to switch off the viamobil. Avoid using the viamobil in the sand, do not use it crossing puddles. Before using the viamobil on slopes, you should practice on even ground and learn how to handle the device safely. Do not drive closely to precipitous edges, abysses, and stairs when the viamobil is in operation. When you use the viamobil on slopes, you need to secure it additionally with the locking brakes of the wheelchair every time you stop or turn it off. • • • • • • • • 9 The efficiency of the additional drive may be affected by electromagnetic fields, generated for example, by mobile telephones. The additional drive therefore, should be switched off if mobile telephones are being used in the close vicinity of the wheelchair. The additional drive can also affect other equipment such as theft-proof cabinets in departmental stores. The mounting and changing of holding devices for the viamobil may only be done by alber or authorized personnel. • 3.2 Operation tions, e.g. obstacles, slopes, people, etc.. 10 • As you drive, adjust the speed with the speed control (9) to the local condi- speed control (9) to the speed you find comfortable. • Then pull the driving lever (10) completely and simultaneously adjust the unlock the wheelchair's locking brakes. • Turn on the device with the ON/OFF Switch (12). • Turn the speed control (9) to the lowest speed, and, as the case may be, Driving forwards First check whether the pressure of the wheelchair's tires coincide with the manufacturer's data. 11 0 0 _ + _ Empty + Full charge 1 1 To spare the batteries, always turn the device off after each use. • The charging indicator (8) continually informs you about the charge status of the batteries. If it starts to flash, the batteries' energy is almost used up. If you continue driving, the device may stop soon. Checking the Battery capacity • Then turn the speed control (9) to the lowest speed before you start, and select the speed you find most comfortable. • If you want to drive backwards, put the direction switch (11) to "backwards" (in this position the arrow points at you). Driving backwards You have to switch off the viamobil when crossing obstacles exceeding a height of 8 cm (3,15 inches), such as sidewalks. Dangerous Situations • Afterwards turn on the viamobil again and continue the trip. • Then push the wheelchair on or across the obstacle. downward at the same time. • Lift the front wheels of the wheelchair a bit by pushing its push handles slightly backward and • In that case, drive forward to the obstacle. ! Obstacles • closed, fenced-in, enclosed spaces or areas • snow-covered or icy surfaces • narrow and/or steep winding pathways next to major roads or in the proximity of steep edges or abysses • crossing of major roads, intersections, railway crossings • narrow walkways, bridges, slopes such as ramps, narrow pathways on slopes such as dikes, mountains • quay walls, landing-places, docks, paths and places close to water • airports, train stations, harbors and construction sites You may not use the viamobil in dangerous places and situations. The viamobil must be turned off in places such as: 3.4 3.3 12 13 2 3 3 5 Vehicle Charging Cable 4.1 The batteries will only be charged when the engine is running. • The batteries are charged by means of the car battery. They are equipped with an overcharge protection. • Plug the end of the vehicle charging cable into the socket (2), and the other end into the cigarette lighter. • Now the battery pack can be taken out easily. First lift it, then pull it towards you, and put it on the cars floor. • Open the spring-loaded latch (2) on the plug (3) of the viamobil and pull out the power supply cord (5) of the battery pack. • With this charging cable you can charge the viamobil while driving in your car by plugging it into the cigarette lighter. Accessories 4. 4.2 Extra Battery Pack which doubles the viamobil's original range. • • • 14 out of the battery pack. Take out the discharged battery pack at the grip. Put in the extra battery pack and connect it with the power supply cord (5). Lock it with the clamp (2). • Simply open the clamp (2) on the plug (3) and pull the power supply cord (5) • If you want to make longer trips, it is advisable to buy a second battery pack, 15 (II) d B 4.3 d a b c C (III) d B C B A C • When attaching, push the additional handgrips into the guide mount (A) again and clamp lightly in position using the clamping lever (d). • By pressing the lever (d) upwards (see picture I) the handgrips are released and can be removed. The adjusting ring (B) secures the already selected position. Removing and attaching the additional handgrips • Tighten the threaded pin in the adjusting ring (B). • Push the adjusting ring (B) onto the top edge of the guide mount (C). • Clamp the guide mount (C) in the desired position as shown in drawing (ll). The lever (d) only requires pressing down slightly until fixed inposition. c=90 cm distance from the floor b=93 cm distance from the floor a=96 cm distance from the floor • The tube (A) has 3 grooves in which the guide mount (C) can be slotted for setting at the following heights: • Push the tube (A) together with the screwed-on adjusting ring (B) into the guide mount (C). • If not already mounted, push the adjusting ring (B) onto the tube (A). Do not yet tighten the threaded pin in the adjusting ring (B). Mounting the additional handgrips Additional handgrips (optional) • To remove the extra handles, pull out the indexing bolt and turn it a quarter rotation. Take the handles out by simply pulling upwards. acle at the back of the viamobil and turn the indexing bolt a quarter rotation so that it locks into the indexing hole. Make sure that the handles are securely fastened by pulling them two times up and down. • To attach the extra handles, slide them into the designated recept- 16 17 4.4 Anti Tippers The anti tippers must be attached in a right and a left position. Please check the marks on the two anti tippers. • Secure it with the locking pin. Then adjust the anti tippers to the appropriate height. • Open the locking pin at the receptacle of the anti tippers and push the latter into said receptacle. Attachment of the anti tippers to the viamobil If you want to climb steps, separate the anti tippers from the device by removing the locking pins at the holding devices. • The position at which the push spring button snaps in has to be such that the entire supporting wheel stands out behind the wheelchair's back wheel in order to achieve the sufficient supporting effect. Position of the anti tippers In case you intend to use the viamobil on slopes frequently, we recommend that you attach the anti tippers. Changing the Electrical Fuses 5.1 fuses. To exchange it, simply remove the old fuse with a screw driver and screw in the new one. • The 2A fuse is located in a screwed connection on the right of the two 25A the fuses more easily. After removing their transparent plastic covers, the two 25A fuses can be easily taken out and replaced by new ones. 18 • Open the clamp (2) and pull out the power supply cord (5), so you can reach Due to a short circuit or overstress the fuses may be destroyed. However, they can be easily exchanged. Care and Maintenance 5. General Information about the Battery Pack 19 Taking care of your batteries means charging them regularly. After expiry of the service life, return the battery to alber or the alber specialist dealers who will dispose of it correctly. Do not short circuit the battery. A short circuit causes extremely high currents which may damage the battery or the device. Do not expose the battery to fire or burn. This may cause the battery to explode. Should skin or eyes come into contact with the electrolytic liquid, rinse immediately with clear water and consult a doctor. Incorrect handling of the battery may result in the leakage of electrolytic liquid. This may cause injuries to the skin or damage clothing. batteries and certified for airline transportation by DOT and IATA. • The lead batteries can be recharged or discharged in any possition. They are considered as safe as dry reduction of capacity. However, after several recharging / discharging cycles, they recover their original capacity. • If you store dry gel-cell batteries over a longer period of time (without regularly recharging them) they suffer a possible, always be connected to the alber automatic charger. After charging the batteries the alber automatic charger switches from the charging mode to the preservation of the charge, which makes it impossible to overcharge the batteries. • Dry gel-cell batteries are subject to a so-called self discharge. Therefore the batteries should, whenever pack of your viamobil should be recharged after each partial discharge, i.e. after each use. • Avoid a total discharge of your batteries. Always turn off your viamobil when you are not driving. The battery The batteries of your viamobil are rechargeable, maintenace-free, high quality dry gel-cell batteries. The durability of dry gel-cell batteries depends considerably on the charging / discharging cycles. If you avoid totally discharging your lead batteries, you can expect more than 200 times of the full capacity, and far more than 1000 partial dischargings. If you totally discharge your batteries, you reduce their capacity as well as their lifetime. 5.2 5.3 bottom of the charger. As soon as the batteries are fully charged, the charger switches to retaining the charge. Overcharging is, therefore, impossible. • Please handle the charger according to the user's manual located at the • Plug the main plug into the wall outlet. with the spring-loaded latch (2). • Connect the charger with the socket on the batteries, and lock the charger • Take the batteries out by lifting them and pulling them toward you. supply cord (5). • Open the spring-loaded latch (2) on the plug (3) and pull out the power To charge the batteries, use the alber Automatic Charger or the vehicle charging cable exclusively. If the batteries are not used, they should - in order to retain the charge - always be connected to the charger. This increases the lifetime of dry gel-cell batteries. 2 alber viamobil 35 Charging the Batteries 20 21 5.5 5.4 Your viamobil is a low-maintenance device. However, in the interest of your safety, have the viamobil thoroughly checked every two years, even if there aren’t any outward signs of damage or malfunction. For any maintenance work please contact your dealer or any alber-distributor. Maintenance The driving wheel should also be cleaned carefully, either by compressed air or with a dry brush. The control unit may only be cleaned with a damp (not wet) cloth. Cleaning Problems and Solutions / Troubleshooting 22 No traction on the driving wheel, the driving wheel spins free: Check the distance between the wheel and the ground when the wheel is in its upper position. The distance should be 1,5 cm (0,6 inches). Possibly the spring is broken. Contact your dealer. The driving wheel does not go up after switching off the viamobil: You can still use the viamobil; however, contact your dealer right away The viamobil stops for no apparent reason: The device may have been overstressed. Check the fuses and exchange them, if necessary The batteries are empty. Check the charge indicator (8). Should either one or both of the display's left segments flash alternatingly, the batteries are empty. In such case, charge the batteries. The viamobil stops when used on steep slopes: The slope is too steep. The device is overstressed. Support it by manual pushing or pulling, as the case may be. The viamobil does not work after you switch it on: The batteries are almost empty-the viamobil turns itself off to protect the batteries from total discharge. In such case, please charge the batteries. 6. Warranty and Liability 23 • outside parts were mounted on or connected to the viamobil • Assembly and repairs were carried out by unauthorized persons • Parts from the viamobil were removed • Parts or accessories other than those recommended by the manufacturer of the viamobil were substituted • the viamobil was operated with less than sufficient battery charge or on batteries that are not regularly and properly charged • the viamobil was used other than in accordance with all instructions and precautions contained in the operator's manual and on the product labeling • the viamobil was not checked and serviced annually • the operation was carried out by untrained operators • the viamobil was not handled properly Neither Ulrich Alber GmbH nor its agents or authorized dealers and sales representatives will be liable for safety, reliability or performance of the viamobil or for any claims for personal injury or property damage which may arise from the following: 7.2 Liability Ulrich Alber GmbH grants a warranty of 12 months (6 months for the batteries) for the viamobil, which is valid from the date of purchase. 7.1 Warranty 7. 21.0001.4.02.05 R Vor dem Weissen Stein 21 D-72461 Albstadt www.ulrich-alber.de Ulrich Alber GmbH