1
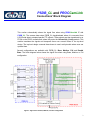
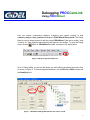
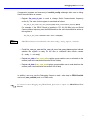
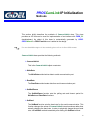
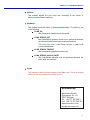
PROCCamLink IP User Guide February 2008 GiDEL products and their generated products are not designed, intended, authorized, or warranted to be suitable for use in life-support applications, devices or systems or other critical applications © 1993 - 2008 by GiDEL Ltd. All rights reserved. GiDEL, PROCStar II™, PROCSpark II™, PROC_DSP™, PSDB_CL™, PROCWizard™, PROCCamLink™, PROCMultiPort™ and other product names are trademarks of GiDEL Ltd., which may be registered in some jurisdictions. This information is believed to be accurate and reliable, but GiDEL Ltd. assumes no responsibility for any errors that may appear in this document. GiDEL reserves the right to make changes in the product specifications without prior notice. Windows NT, Windows XP, Windows 2000, Stratix II, EP2S60, DDRII, CameraLink and other brands and product names are trademarks or registered trademarks of their respective holders. USA 1600 Wyatt Drive Suite 1 Santa Clara, CA 95054, USA Tel: 1 - 408 - 969 - 0389 Fax: 1 - 866 - 615 - 6810 Worldwide 2 Ha'ilan Street, P.O. Box 281 Or Akiva, 30600 Israel Tel: +972 - 4 - 610 - 2500 Fax: +972 - 4 - 610 - 2501 [email protected] [email protected] Web: www.GiDEL.com [email protected] Contents Introduction ..............................................................................1 PROCCamLink IP Key Features..............................................2 PROCCamLink Connections' Block Diagram........................3 Setting Up PROCCamLink Using PROCWizard ....................5 Debugging PROCCamLink Using PROCWizard....................8 PROCCamLink IP Initialization Methods..............................10 Figures Figure 1: Signa flow for Base, Medium, and Full configuration .................... 3 Figure 2: Signal flow for Double Base configuration ...................................... 4 Figure 3: Configuration Mode Icon ................................................................... 5 Figure 4: PROCCamLink Configuration Dialog ............................................... 6 Figure 5: PROCWizard Configuration Mode Window with Camera Link IP... 7 Figure 6: Debug Configuration Mode Icon ....................................................... 8 Figure 7: PROCWizard Debug Mode Window with Camera Link IP .............. 8 Introduction PROCCamLink™ IP is a GiDEL Intellectual Property that provides a simple and convenient way to connect an external CameraLink camera to GiDEL PROC boards. This connection is achieved via PSDB_CL™ or PSDB_CL2™ daughterboards. A block diagram in the next section, Figure 1 and Figure 2, schematically shows the signal flow when using PSDB_CL and PROCCamLink IP. The camera signals are processed in two stages: first by the PSDB_CL daughterboard and then by the CameraLink_Config module on the PROC board. The translated ready-to-use signals enter the user's module where they can immediately be operated by user's logic. This system concept provides an easy way to connect to an external camera, while freeing the designer from having to deal with hardware connections and board constrains. Once the PROCCamLink IP has been set up, PROCWizard automatically connects the required signals to the designer's module. The signals entering the user's module are ready for immediate use and are arranged in the format the user has requested. No further data translation is needed. For more information, please refer to PSDB_CL Data Book. 1 PROCCamLink IP Key Features GiDEL PROCCamLink™ IP was designed to provide a simple and convenient way to connect an external camera to GiDEL PROC boards using PSDB_CL™ or PSDB_CL2™ daughter boards. CameraLink IP key features include: 9 Full support of all standard CameraLink modes (base, medium, full and double base modes) 9 Automatic and complete connection of CameraLink to user's HDL module 9 Serial Communication with camera 9 Optional synchronization of all Camera Link inputs with the Base channel input clock 9 Simple interface 9 Optimization for easy control by hardware and software 2 PSDB_CL and PROCCamLink Connections' Block Diagram This section schematically shows the signal flow when using PROCCamLink IP with PSDB_CL. The camera data enters PSDB_CL daughterboard where it is converted from LVDS serial data to standard parallel TTL signals. These signals are then transferred to an FPGA on the PROC motherboard, where they enter the CameraLink_Config module. This module translates the signals and transports them over several buses to the top-level design. The top-level design connects these buses to user's entity/module where user can operate them. Several configurations are available with PSDB_CL: Base, Medium, Full and Double Base. The block diagram below shows the signal flow when using Base, Medium or Full configuration. Figure 1: Signa flow for Base, Medium, and Full configuration 3 PROCCamLink IP Connections The block diagram below shows the signal flow when using Double Base configuration. f_CameraLink_config (first CL Module) GiDEL’s IP f_rx_base f_rxclk_base Camera Transmitter Control Serial 2 Comm. Transciever 4 Control Serial f_rxcc (CL-in Control) 2 Comm. f_rxSer From/To Camera (CL-in Serial Comm.) Data Second Base Data 4 LVDS Receiver X[4..0] CLKX 28 X[28..0] s_rx_base [28..0] CLKX s_rxclk_base Connector 4 Camera Control Serial Comm. 2 Camera Transmitter Transciever Control Serial Comm. PSDB_CL 4 s_rxcc (CL-in Control) 2 s_rxSer (CL-in Serial Comm.) f_rxSerTC (1st camera serial comm.) Camera f_rxSerTFG (1st camera serial comm.) 4 f_FVAL, f_LVAL, f_DVAL, f_spare (1st camera frame/line/data valid) f_cc (user 1st camera camera control) optional host controls s_tap / s_rgb* (second image data channels) s_strb_base (second camera clock) s_FVAL, s_LVAL, s_DVAL, s_spare (2nd cameraframe/line/data valid) s_cc (user 2nd cameracamera control) (optional) CLKX Connector f_strb_base (first camera clock) 2nd cam. host ctrl [28..0] (optional) 28 X[28..0] 1st cam. host ctrl CLKX (first image data channels) s_rxSerTFG (2nd camera serial comm.) LVDS Receiver X[4..0] First Base Data s_rxSerTC (2nd camera serial comm.) 4 _if Module (PCI Interface for Camera Control) optional host controls s_user_CameraLink (User’s Acquisition Module) f_tap / f_rgb* Data f_user_CameraLink (User’s Acquisition Module) s_CameraLink_config (second CL Module) GiDEL’s IP PROC Board From/To PCI * Data channels may be tap8 / tap10 / tap12 / tap14 / tap16 / RGB24 / RGB30 / RGB36 in Base / Medium / Full modes, or tap8 / tap10 / tap12 / tap14 / tap16 / RGB24 in Double Base mode ** In Medium and Full modes, all the data transfers may be synchronized to the base channel. In this case, a single strobe signal and a single validation signal will enter the user's design, instead of separate signals for each channel as shown in the block diagram. To activate this option, select Registered inputs in PROCWizard while configuring the CameraLink IP. Figure 2: Signal flow for Double Base configuration GiDEL PROCWizard automatically generates all the units shown in the above block diagrams, as well as the top-level design. For more information, please refer to PROCWizard User Manual. 4 Setting Up PROCCamLink Using PROCWizard To set up the PROCCamLink IP, first enter the Configuration Screen in GiDEL PROCWizard. The Configuration Mode is used to build designs in PROCWizard. New items can be added to the design in this mode and existing items can be redesigned. To enter the Configuration mode, click the button in PROCWizard's toolbar, as shown in the figure below: Figure 3: Configuration Mode Icon Once in Configuration Mode, you will see the design you are building represented by a tree of items. To learn more about these items, please refer to PROCWizard User Manual. To add PROCCamLink to your design, choose the IC item that represents the FPGA device to which the PSDB_CL daughterboard is connected. Right-click on this IC and choose IP Core Æ Camera Link from the pop-up menu. This will open a dialog box shown in the Figure 4. This dialog box enables the user to configure the PROCCamLink IP. 5 Setting Up PROCCamLink IP Figure 4: PROCCamLink Configuration Dialog The following parameters are defined in this dialog box: h Mode: defines the Camera Link mode to be used: Base, Medium or Full Camera Link configuration; Base_1 or Base_2 for Double Base Camera Link configuration; h Serial Communication Frequency: sets the serial communication frequency with the camera (from 9600 to 921600 baud) h Mode assignment: defines output data width and the output standard: tap8bit, tap10bit, tap12bit, tap14bit, tap16bit or RGB24bit for Base mode tap8bit, tap10bit, tap12bit, RGB30bit or RGB36bit for Medium mode tap8bit for Full mode h Registered inputs: checking this checkbox synchronizes all Camera Link inputs with the Base channel input clock (not only sampling but full synchronization). In this case, a single strobe signal and a single validation signal will appear in the top-level design, instead of separate signals for each channel. For more details about Camera Link configuration, see Specifications of the Camera Link Interface Standard for Digital Cameras and Frame Grabbers. 6 Setting Up PROCCamLink IP Clicking Finish adds the PROCCamLink IP to the design. Note A Camera Link IP with all its elements can be cut and pasted or copied and pasted to another IC (provided that the target IC has Camera Link Interface). PROCCamLink design consists of camlink_config and user_camlink subdesigns. Camlink_config is the CameraLink interface unit that provides the mechanisms required to communicate with a camera. User cannot alter this unit or add functionality to it. In order to add functionality or user's logic, one must use the user_camlink subdesign. This unit is added especially for that purpose. All the CameraLink signals (data, clocks and control signals) enter this unit to allow maximum flexibility. The structure of Camera Link design is shown in the figure below. Figure 5: PROCWizard Configuration Mode Window with Camera Link IP Right-clicking on user_camlink allows the designer to add items to this subdesign. Here, the user can add clocks, registers, memories and register groups. In addition, the user can connect this subdesign with PROCMultiPort IP Ports. For more information on subdesigns, see paragraph Module (entity), chapter 4 in PROCWizard User Manual. For more information on PROCMultiPort IP, see paragraph IP Core – MultiPort, chapter 4 in PROCWizard User Manual. 7 Debugging PROCCamLink Using PROCWizard User can access components (registers, memories and register groups) of both camlink_config and user_camlink subdesigns in PROCWizard Debug mode. The Debug Mode is used to debug designs in real-time using PROCWizard. Data can be written / read on-the-fly to / from registers and memories that appear in the design. To enter the Debug mode, click the button in PROCWizard's toolbar, as shown in the figure below: Figure 6: Debug Configuration Mode Icon Once in Debug Mode, you will see the design you are building represented by an item tree, as shown in Figure 5. To access registers/memories, use the Read and Write buttons and the Data(Hex) field. Figure 7: PROCWizard Debug Mode Window with Camera Link IP 8 Debugging PROCCamLink IP Components (registers and memories) of camlink_config subdesign allow user to debug Serial Communication to camera: o Register Ser_com_ck_dev is used to change Serial Communication frequency on-the-fly. The value for this register is calculated as follows: Ser_com_ck_dev_value = PCI_clock_frequency (Hz) / Serial_communication_frequency (baud) For example: if the PROC Board is installed in PCI 64 (66 MHz) slot and Serial Communication frequency must be 9600 baud then the value that should be written to this register is: Ser_com_ck_dev_value = 66000000 / 9600 = 6875 = 1ADB (Hex) Note PROCWizard always uses hexadecimal values when reading / writing registers / memories. o Fields Ser_com_wr_ena and Ser_com_rd_ena of ser_com_status register indicate whether the register is ready for the user to read/write data from/to camera (0 – ready, 1 – not ready) o Register wr_data of ser_com_write register group enables user to write data to the camera (each write transaction transfers 8 bits of data) o Register rd_data of ser_com_read register group enables user to read data from the camera (each read transaction accesses 8 bits of data) In addition, user may use the Debugging Screen to read / write data to PROCCamLink user's unit (user_camlink) and / or to other units. To learn more about debugging using PROCWizard, please refer to chapter 6 in PROCWizard User Manual. 9 PROCCamLink IP Initialization Methods This section briefly describes the methods of CameraLinkInit class. This class provides an API that can be used for implementation of an interface with PSDB_CL daughterboard. An object of this class is automatically generated by GiDEL PROCWizard if a PROCCamLink core is added to the design. For more detailed description of these methods, please refer to the Proc API document. CameraLinkInit class provides the following methods: h CameraLinkInit This is the CameraLinkInit object constructor. h WriteData The WriteData method writes data to serial communication port. h ReadData The ReadData method reads data from serial communication port. h SetWaitParam The SetWaitParam function sets the polling rate and timeout period for WriteData and ReadData functions. h SetBaud The SetBaud function sets the baud rate for the serial communication. This function changes the values of CameraLinkInit internal members rather than actually changing the baud rate. In order to physically change the port baud rate, call Initialize method immediately after calling the SetBaud method. 10 PROCCamLink Initialization Methods Initialize This method adjusts the port baud rate according to the values of CameraLinkInit internal members. GetStatus This method returns the status of CameraLinkInit object. The status is one of the following: CLINK_OK Last CameraLink operation was successful. CLINK_ERROR_INIT Last CameraLink operation could not be performed because the CameraLinkInit object was incorrectly initialized. This error may occur if the Create function is called with incorrect parameters. CLINK_ERROR_TIMEOUT Last CameraLink operation has timed out. CLINK_ERROR_INVALID_INPUT Last CameraLink operation was not performed because the input value was incorrect. Create This method is called by other methods of the Proc class. This is an internal method and is not intended to be called by user. Distributed by: MaxxVision GmbH Sigmaringer Str. 121 70567 Stuttgart Tel.: +49 711 997 996 3 Fax: +49 711 997 996 50 www.maxxvision.com [email protected] 11