1
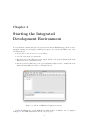
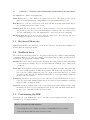
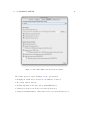
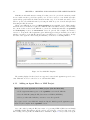
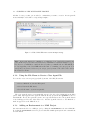
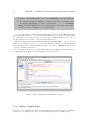
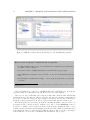
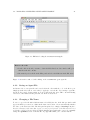
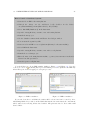
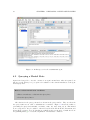
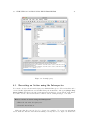
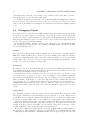
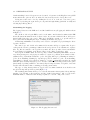
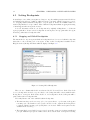
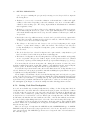
Goal User Manual
Koen V. Hindriks and Wouter Pasman
March 3, 2014
2
Contents
1 Introduction
2 Installing the GOAL Platform
2.1 System Requirements . . . .
2.2 Installation . . . . . . . . . .
2.3 Uninstalling . . . . . . . . . .
2.4 Upgrading . . . . . . . . . . .
2.5 Installation for Admins . . .
5
.
.
.
.
.
7
7
7
7
8
8
3 Starting the Integrated Development Environment
3.1 Keyboard Shortcuts . . . . . . . . . . . . . . . . . . . . . . . . . . . . . . . . . . .
3.2 Feedback Area . . . . . . . . . . . . . . . . . . . . . . . . . . . . . . . . . . . . . .
3.3 Customizing the IDE . . . . . . . . . . . . . . . . . . . . . . . . . . . . . . . . . . .
9
10
10
10
4 Creating and Managing Multi-Agent Projects
4.1 Creating a New Multi-Agent Project . . . . . . . . . . .
4.1.1 Adding an Agent File to a MAS Project . . . . .
4.1.2 Using the File Menu to Create a New Agent File
4.1.3 Adding an Environment to a MAS Project . . .
4.1.4 Adding a Launch Policy . . . . . . . . . . . . . .
4.1.5 Importing Knowledge and Module Files . . . . .
4.2 Managing an Existing Multi-Agent Project . . . . . . .
4.2.1 Editing Files . . . . . . . . . . . . . . . . . . . .
4.2.2 Saving an Agent File . . . . . . . . . . . . . . . .
4.2.3 Changing a File Name . . . . . . . . . . . . . . .
4.2.4 Using the File Menu to Remove a File . . . . . .
4.2.5 Automatic Word Completion . . . . . . . . . . .
.
.
.
.
.
.
.
.
.
.
.
.
.
.
.
.
.
.
.
.
.
.
.
.
.
.
.
.
.
.
.
.
.
.
.
.
.
.
.
.
.
.
.
.
.
.
.
.
.
.
.
.
.
.
.
.
.
.
.
.
.
.
.
.
.
.
.
.
.
.
.
.
.
.
.
.
.
.
.
.
.
.
.
.
.
.
.
.
.
.
.
.
.
.
.
.
.
.
.
.
.
.
.
.
.
.
.
.
.
.
.
.
.
.
.
.
.
.
.
.
.
.
.
.
.
.
.
.
.
.
.
.
.
.
.
.
.
.
.
.
.
.
.
.
.
.
.
.
.
.
.
.
.
.
.
.
.
.
.
.
.
.
.
.
.
.
.
.
.
.
.
.
.
.
.
.
.
.
.
.
13
13
14
15
15
16
17
19
20
21
21
22
22
5 Running a Multi-Agent System
5.1 Launching a Multi-Agent System . . . . .
5.1.1 Initializing an Environment . . . .
5.2 Running a Multi-Agent System . . . . . .
5.3 Terminating a MAS and/or Its Agents . .
5.4 Run Modes of a MAS and Its Agents . . .
5.5 Resetting a MAS and Its Environment . .
5.6 Distributed Running of One or More MAS
5.6.1 Messaging Infrastructures . . . . .
5.6.2 Distributing MAS . . . . . . . . .
.
.
.
.
.
.
.
.
.
.
.
.
.
.
.
.
.
.
.
.
.
.
.
.
.
.
.
.
.
.
.
.
.
.
.
.
.
.
.
.
.
.
.
.
.
.
.
.
.
.
.
.
.
.
.
.
.
.
.
.
.
.
.
.
.
.
.
.
.
.
.
.
.
.
.
.
.
.
.
.
.
.
.
.
.
.
.
.
.
.
.
.
.
.
.
.
.
.
.
.
.
.
.
.
.
.
.
.
.
.
.
.
.
.
.
.
.
.
.
.
.
.
.
.
.
.
.
.
.
.
.
.
.
.
.
23
23
24
25
25
25
26
26
26
26
.
.
.
.
.
.
.
.
.
.
.
.
.
.
.
.
.
.
.
.
.
.
.
.
.
.
.
.
.
.
3
.
.
.
.
.
.
.
.
.
.
.
.
.
.
.
.
.
.
.
.
.
.
.
.
.
.
.
.
.
.
.
.
.
.
.
.
.
.
.
.
.
.
.
.
.
.
.
.
.
.
.
.
.
.
.
.
.
.
.
.
.
.
.
.
.
.
.
.
.
.
.
.
.
.
.
.
.
.
.
.
.
.
.
.
.
.
.
.
.
.
.
.
.
.
.
.
.
.
.
.
.
.
.
.
.
.
.
.
.
.
.
.
.
.
.
.
.
.
.
.
.
.
.
.
.
.
.
.
.
.
.
.
.
.
.
.
.
.
.
.
.
.
.
.
.
.
.
.
.
.
.
.
.
.
.
.
.
.
.
.
.
.
.
.
.
.
.
.
.
.
.
.
.
.
.
.
.
.
.
.
.
.
.
.
.
.
.
4
CONTENTS
6 Debugging a Multi-Agent System
6.1 Introspecting Agents . . . . . . . . . . . . . . . .
6.2 Querying a Mental State . . . . . . . . . . . . . .
6.3 Executing an Action using the Introspector . . .
6.4 Debugging Output . . . . . . . . . . . . . . . . .
Console . . . . . . . . . . . . . . . . . . .
Action Log . . . . . . . . . . . . . . . . .
Debug Tracer . . . . . . . . . . . . . . . .
Customizing the Logging . . . . . . . . .
6.5 Setting Breakpoints . . . . . . . . . . . . . . . .
6.5.1 Stepping and Global Breakpoints . . . . .
6.5.2 Setting Code Line Breakpoints . . . . . .
6.5.3 Switching Between Edit and Debug Mode
6.6 Prolog Level Debugging . . . . . . . . . . . . . .
6.6.1 Exporting a Mental State to a File . . . .
6.6.2 Prolog Exceptions . . . . . . . . . . . . .
6.7 Runtime Preference Settings . . . . . . . . . . . .
6.7.1 Platform Management . . . . . . . . . . .
6.7.2 Warnings . . . . . . . . . . . . . . . . . .
.
.
.
.
.
.
.
.
.
.
.
.
.
.
.
.
.
.
.
.
.
.
.
.
.
.
.
.
.
.
.
.
.
.
.
.
.
.
.
.
.
.
.
.
.
.
.
.
.
.
.
.
.
.
.
.
.
.
.
.
.
.
.
.
.
.
.
.
.
.
.
.
.
.
.
.
.
.
.
.
.
.
.
.
.
.
.
.
.
.
.
.
.
.
.
.
.
.
.
.
.
.
.
.
.
.
.
.
.
.
.
.
.
.
.
.
.
.
.
.
.
.
.
.
.
.
.
.
.
.
.
.
.
.
.
.
.
.
.
.
.
.
.
.
.
.
.
.
.
.
.
.
.
.
.
.
.
.
.
.
.
.
.
.
.
.
.
.
.
.
.
.
.
.
.
.
.
.
.
.
.
.
.
.
.
.
.
.
.
.
.
.
.
.
.
.
.
.
.
.
.
.
.
.
.
.
.
.
.
.
.
.
.
.
.
.
.
.
.
.
.
.
.
.
.
.
.
.
.
.
.
.
.
.
.
.
.
.
.
.
.
.
.
.
.
.
.
.
.
.
.
.
.
.
.
.
.
.
.
.
.
.
.
.
.
.
.
.
.
.
.
.
.
.
.
.
.
.
.
.
.
.
.
.
.
.
.
.
.
.
.
.
.
.
.
.
.
.
.
.
.
.
.
.
.
.
.
.
.
.
.
.
.
.
.
.
.
.
.
.
.
.
.
.
.
.
.
.
.
.
.
.
.
.
.
.
.
.
.
.
.
.
29
29
30
31
32
32
32
32
33
34
34
35
36
37
38
38
39
40
41
7 Running in Stand-Alone Mode
7.1 Setting the JVM environment
7.2 From Java . . . . . . . . . . .
7.3 From the Command Line . .
7.4 Runtime Settings . . . . . . .
7.5 Interaction with Standalone .
7.6 Batch Running . . . . . . . .
.
.
.
.
.
.
.
.
.
.
.
.
.
.
.
.
.
.
.
.
.
.
.
.
.
.
.
.
.
.
.
.
.
.
.
.
.
.
.
.
.
.
.
.
.
.
.
.
.
.
.
.
.
.
.
.
.
.
.
.
.
.
.
.
.
.
.
.
.
.
.
.
.
.
.
.
.
.
.
.
.
.
.
.
.
.
.
.
.
.
.
.
.
.
.
.
.
.
.
.
.
.
.
.
.
.
.
.
.
.
.
.
.
.
43
43
43
43
44
44
44
8 Creating Your Own Environments
8.1 Environments Distributed with GOAL . . . . . . . . . . . . . . . . . . . . . . . . .
8.2 Creating an Environment Interface . . . . . . . . . . . . . . . . . . . . . . . . . . .
45
45
45
9 Known Issues and Workarounds
9.1 Reporting Issues . . . . . . . . . . . . . . . . . . . . . . . . . . . . . . . . . . . . .
47
48
.
.
.
.
.
.
.
.
.
.
.
.
.
.
.
.
.
.
.
.
.
.
.
.
.
.
.
.
.
.
.
.
.
.
.
.
.
.
.
.
.
.
.
.
.
.
.
.
.
.
.
.
.
.
.
.
.
.
.
.
.
.
.
.
.
.
Chapter 1
Introduction
This user manual describes and explains how to:
• Install the Goal platform,
• Start and use the Integrated Development Environment (IDE) that is distributed with Goal,
• Run a MAS in stand-alone mode without the IDE; use this mode, e.g., for running simulations
and running the test framework, and
• Create your own environments that you can connect agents to using the Environment Interface Standard (EIS).
This document does not introduce the agent programming language Goal itself. For this we
refer the reader to the Goal Programming Guide [3] and Goal’s website [4].
5
6
CHAPTER 1. INTRODUCTION
Chapter 2
Installing the GOAL Platform
This chapter explains how to install the Goal platform. We first describe the system requirements
of the platform. Please verify that your system meets the minimal system requirements.
2.1
System Requirements
The Goal platform runs on Windows, Macintosh OSX and the Linux operating system. For information on the exact versions of these OSs please check Goal’s website at http://ii.tudelft.
nl/trac/goal. On this website you can also download the latest version of the installer for the
Goal platform.
The Goal platform requires Java (SUN or OpenJDK) version 1.6 or higher. We recommend
to use Sun Java. (We have found that some other versions of Java fail to run the installer.)
2.2
Installation
Install Goal by using the installer for Goal that you can download from http://ii.tudelft.
nl/trac/goal. Run the installer and follow the instructions.
Run the installer either by:
• Double-clicking on the jar file, or
• Open a Command Line Console and from the folder where the installer is located run
the command java -jar <goalinstaller.jar> where <goalinstaller> is the name
of the installer file.
It is recommended to install all files including, e.g., SWI Prolog by the installer. This will
ensure that the right version of SWI Prolog is available to run Goal.1 Other installations of SWI
Prolog on your machine will not be affected by the installer.
2.3
Uninstalling
For uninstalling Goal, run the uninstaller that is located in the folder where you installed Goal.
1 The installer will automatically detect whether the JVM you use is 32 or 64 bits and will install the corresponding version of SWI Prolog.
7
8
CHAPTER 2. INSTALLING THE GOAL PLATFORM
Warning The uninstaller allows you to select “Force the deletion of <folder>” where
folder is the directory where you installed Goal. If you select this option, then all files
as well as the folder itself are removed from the file system. Note that this will also delete
all changes you made to new MAS and agent files that you created, environments that you
installed, and IDE preferences that you changed.
Note that if Goal was installed with an administrator account, it needs to also be de-installed
using that same administrator account. If you try to de-install without administrator rights the
de-installer will fail without any error message.
2.4
Upgrading
To upgrade the Goal platform to a newer version, first run the uninstaller (see previous section)
but do not select the option to delete the installation folder and reinstall the platform (as explained
above). You can also simply run the Goal installer and select yes when you are asked whether
you want to overwrite old files. Simply running the installer, however, may not properly clean old
settings in the registry on Windows.
2.5
Installation for Admins
Goal can be installed in the Program Files directory (or another shared directory on OSX or
Linux) so that multiple users can share the same installation.
The Goal installer is not fully prepared for installation on Windows 7 in the Program Files
directory (or any other directory with restricted access) because of some limitations of the installer
we use. To install in such a directory, you need to log in as administrator or manually switch to
administrator mode. On Windows 7, this works as follows:
1. Right click on Start menu/All programs/Accessories/Command prompt and select Run as
administrator,
2. Select Yes when Windows asks you Do you want to allow the following program to make
changes to this computer,
3. In the Command Line Console that opened, type cd <installerDirectory> where
<installerDirectory> is the directory where you downloaded the goalxxx.jar installer
and hit Enter,
4. Type in java -jar <goalxxx>.jar, where <goalxxx> is the name of the installer file, and
hit Enter,
5. Perform the steps required for installation. Select the required protected directory as install
directory, e.g., C:\Program Files\GOAL.
Chapter 3
Starting the Integrated
Development Environment
Goal is distributed with an integrated development environment (IDE) that supports the creation,
managing, running, and debugging of multi-agent systems. You can start the IDE by any of the
following methods:
• Double-click on the Goal icon on your desktop.
• Select Goal from the program menu.
• Run the goal.exe file (Windows), goal.app file (OSX), or the goal file (Linux) in the main
GOAL folder where you installed Goal.
• Run the goal.bat (Windows) or the goal.sh (Linux, OSX) from the command line from
within the main GOAL folder where you installed Goal.
Figure 3.1: The Goal IDE window right after start-up.
Starting the IDE should open the IDE window which should look similar to the one displayed
in Figure 3.1. The IDE always first shows the edit perspective.
9
10
CHAPTER 3. STARTING THE INTEGRATED DEVELOPMENT ENVIRONMENT
The IDE window consists of four main parts:
Menu Bar At the top of the window, the menu bar is located. The menu provides various
functions for file management, editing MAS projects, and running MAS projects.
Tool Bar The tool bar is located just below the menu bar. The most important menu items are
also accessible via buttons on the tool bar.
Content Area The area directly below the tool bar is called the content area. On the left-hand
side of this area, the files panel is shown in Figure 3.1 which provides an overview of files
associated with MAS projects. The right-hand side of the area is used for editing files.
Feedback Area The area at the bottom is called the feedback area. Text messages and errors
are displayed in this area, grouped in various tabs.
3.1
Keyboard Shortcuts
Many menu items have associated keyboard shortcuts. The keyboard shortcuts, if available, are
shown behind the items in the menus.
3.2
Feedback Area
The feedback area is an important area to keep track of what is going on while creating, managing,
or running a MAS project. The area consists of several tabs that are always present and some
tabs that are only present when running a MAS:
Console The Console tab provides general feedback but also notifies of major issues with a MAS
or environment, for example. If you do not understand the behaviour you see, always check
out this tab.
Parse Info The Parse Info tab provides information about syntax errors and other issues that
were noticed while parsing your MAS and agent files. The Console also reports that errors
have been noticed while parsing but you need to check out the Parse Info tab to see which
errors were found. The tab also displays warnings that do not prevent running a MAS but
should be fixed nevertheless.
Action Log The Action Log tab keeps a record of the most recent actions that have been performed by agents while running a MAS. The tab in a sense provides a summary of what has
happened while executing the MAS.
Agent The Agent tab (with the name of the corresponding agent as title) displays detailed debug
information about the agent program that is being executed. The information that this tab
provides can be customized via the Preferences menu.
3.3
Customizing the IDE
Various aspects of the IDE interface can be customized (various platform features can also be
customized, e.g., debugging features).
How to customize the IDE interface:
• Select Help/Preferences (Windows, Linux) or GOAL-IDE/Preferences (OSX).
• Select the GUI & Files tab in the Preference menu.
3.3. CUSTOMIZING THE IDE
Figure 3.2: The GUI & Files tab in the Preferences Menu
The default options are depicted in Figure 3.2; the options include:
• Changing the default Java look and feel to the Nimbus look and feel,
• Re-opening of files at start-up,
• Remembering window sizes and position of main IDE window,
• Setting the font size for the Console area in the Feedback area.
• Setting the maximum number of lines in the Console area and in the Introspector.
11
12
CHAPTER 3. STARTING THE INTEGRATED DEVELOPMENT ENVIRONMENT
Chapter 4
Creating and Managing
Multi-Agent Projects
The Integrated Development Environment (IDE) distributed with Goal facilitates creating new,
and managing existing multi-agent projects. This chapter explains how to use the IDE to do this.
4.1
Creating a New Multi-Agent Project
How to create a new multi-agent project:
• Make sure no MAS file is selected in the Files panel; you can do so by selecting the
MAS Projects node in the Files panel.
• Use the File/New menu to create a new MAS file. Choose a name and folder location
for saving the new MAS file.
• Select no when asked whether you want to create the agentfile.goal file.
Figure 4.1: The New MAS File Dialogue Window.
13
14
CHAPTER 4. CREATING AND MANAGING MULTI-AGENT PROJECTS
MAS files are files with extension .mas2g. Note that you need to provide the extension yourself
in case a window in the top-level bar requests you to Provide a name for a new GOAL Agent (the
system will properly handle the MAS extension in that case). You can make sure that you are
asked to provide a new MAS file name by selecting the MAS Projects node in the files panel and
then using the File/New menu.
When a new MAS file is created, a MAS template is automatically loaded. This template
inserts the the sections that are required in a MAS file with some initial content; you should adapt
the content of these sections of the MAS file to your needs. A MAS file must have an agentfiles
and launchpolicy section; an environment section is optional. The template also inserts a
reference to an agent file called agentfile.goal, which triggers a dialogue in which you are asked
whether you want to create this file. In most cases you will select no because you want to modify
the name of the agent file. After saving the MAS file you should see something similar to:
Figure 4.2: New MAS File Template.
The warning displayed in the Console area appears because the file agentfile.goal does not
exist. This issue needs to be fixed before we can launch the MAS.
4.1.1
Adding an Agent File to a MAS Project
How to add a new agent file to a MAS project (edit the MAS file):
• Add "<agentfilename>.goal" to the agentfiles section in the MAS file.
• Save the MAS file (using the File/Save menu or CTRL-S/APPLE-S).
• Select yes when asked whether you want to create the agent file.
If you just created a new MAS file, simply modify the initial agent file agentfile.goal
inserted by the template in the agentfiles section.
Save a file either by using the File/Save menu, or by pressing CTRL-S (Windows and Linux)
or APPLE-S (OSX). This will save the file you have selected in the content area (the active tab).
After adding a new agent file, the IDE should look similar to Figure 4.3. If you add a new agent
4.1. CREATING A NEW MULTI-AGENT PROJECT
15
file that does not yet exist, you are asked to confirm that you want to create it. A new agent file
is automatically loaded with a corresponding template.
Figure 4.3: Edited MAS File Hello World Example.mas2g.
Note Agent environments (e.g. simulators, etc) that have been downloaded separately and
your own Goal projects can be saved wherever you think it is convenient. It may be a good
idea, however, to install these outside the directory where you installed Goal. This will allow
for easy upgrading of the Goal IDE without the risk of overwriting your own projects. You
can specify your preferred folder for your own projects by means of the GUI & Files tab in
the Preferences menu.
4.1.2
Using the File Menu to Create a New Agent File
You can also create a new agent (.goal) file by means of the File/New menu.
• Select a MAS file node in the Files panel,
• Select New in the File menu,
• Provide the name of your new agent file.
The new agent file may not automatically appear below the selected MAS file in the Files
panel. That only happens if the agent file name is already present in the agentfiles section of
that MAS file. In case the agent file reference is not present in that section, the agent file that is
created will appear below the Other Files node. Add the agent file reference to the MAS file to
make it appear below the MAS file node.
4.1.3
Adding an Environment to a MAS Project
An environment is added to a MAS project by editing the environment section in a MAS file.
Note that the environment section is optional and that a multi-agent system can be run without
an environment.
16
CHAPTER 4. CREATING AND MANAGING MULTI-AGENT PROJECTS
• Add env = "<environmentname>.jar" to the environment section in the MAS file.
• If the environment supports initialization parameters (check the documentation that
comes with the environment), add "init = [<key=value>, ...]". to the environment section in the MAS file; here, where key is the name of the parameter and value
the value you choose to initialize the environment with.
Several environments are available in the GOALagents folder in the main GOAL folder where
Goal was installed. References to environments in a MAS file are resolved by checking whether
the environment can be found relative to the folder where the MAS file is located, or else, an
absolute path should be specified to the environment interface file.
The Goal platform supports the Environment Interface Standard (EIS) to connect to environments [2, 1]. See Chapter 8 on how to develop an environment for creating your own environments.
Any environment that is compliant with the most up to date version of EIS that is supported can
be used in combination with Goal.
For connecting your agents to an environment that has been launched by another instance of
the Goal platform, possibly on another machine, check out Section 5.6.
Figure 4.4: Edited Launch Policy in bw2agents.mas2g.
4.1.4
Adding a Launch Policy
In order to create agents when a multi-agent system is launched, a launch policy for creating the
agents is needed. A launch policy is a set of rules which specify when to launch an agent.
4.1. CREATING A NEW MULTI-AGENT PROJECT
17
How to add a launch policy:
• Either, add a launch instruction of the form launch <agentname> :
<agentfile>.
• Or, add a launch rule when entity@env do launch <agentname> :
<agentfile>.
A launch instruction creates and adds a new agent to the MAS when the MAS is launched. A
launch rule only creates an agent when a controllable entity in an environment becomes available
(i.e., when the Goal platform is notified that an entity has been born).
Agent name and agent file name can but do not have to be different.
Tip By using an asterix * instead of an agent name in a launch rule, the name of the agent
that will be created will be determined by the name of the environment entity that the agent
is connected to. This makes it easier to relate agent and entity in an environment. For
example, an agent may be called bot if the entity in the environment is called bot.
Finally, more than one agent can be connected to a single entity. The Goal Programming
Guide [3] provides a comprehensive explanation of launch policies.
4.1.5
Importing Knowledge and Module Files
When you start writing larger agent programs it is often useful to add more structure to the MAS
project. Goal provides the #import command to import contents from other files into an agent
program. An important reason for moving code to separate files and importing those files is to
facilitate reuse.
How to create and import a knowledge file into an agent file:
• Use File/New File menu to create a new <knowledge>.pl file where <knowledge> is a
name for the knowledge file.
• Select and cut all code (Edit/Cut menu) in the knowledge section of the agent program.
• Paste (Edit/Paste menu) the selected code from the knowledge section into the
<knowledge> file and press Save.
• Press the Save button to save the new <knowledge> file
• Insert #import "<knowledge>.pl" . in the knowledge section of the agent program
• Press the Save button to save the agent program and refresh the files panel.
After performing the procedure above, the Files panel should look like Figure 4.5.
A procedure very similar to that for knowledge files can also be used to move complete modules
to separate module files with extension .mod2g.
18
CHAPTER 4. CREATING AND MANAGING MULTI-AGENT PROJECTS
Figure 4.5: IDE after adding a knowledge file import to the stackBuilder.goal file.
How to create and import a module file into an agent file:
• Use File/New File menu to create a new <modulefile>.mod2g file where <modulefile>
is a name for the module file.a
• Select and cut all code (Edit/Cut menu) for a module in the agent program.
• Paste (Edit/Paste menu) the selected module code into the <modulefile> and press
Save.
• Insert #import "<modulefile>.mod2g" . in the agent program at the top-level and
press Save.
a Top-level simply means that the code is not included in any other structure such as a module or other
program section.
After performing the procedure above, the IDE should now look like Figure 4.6. As for knowledge files, a subnode for the imported module file is created below the agent file.
There are two types of files that can be imported: Files that contain modules and files that
contain knowledge. The first are called module files and have the extension .mod2g whereas
the second are called knowledge files. The extension of knowledge files depends on the kind of
knowledge technology that is used; in case Prolog is used these files have the extension .pl.
Even if an agent is not a very large program, it sometimes is useful to put some of the code
in separate module or knowledge files to facilitate reuse. The code in a knowledge section of
an agent, for example, can be (re)used in another agent program. Reusing the same code by
creating a separate file that is used in multiple agent files prevents possible problems introduced
by modifying the same code that appears at different places in only one location. By using a
dedicated file the code is needs to be maintained and modified in only one place.
4.2. MANAGING AN EXISTING MULTI-AGENT PROJECT
19
Figure 4.6: IDE after adding a module file import to the stackBuilder.goal file.
4.2
Managing an Existing Multi-Agent Project
Loading a multi-agent system project simply means opening a .mas2g file. You can do this by
selecting the File/Open menu, locating a .mas2g file, and opening it. Example MAS projects are
provided with the distribution of Goal in the GOALagents directory. This directory is created in
the main GOAL directory when the platform is installed.
The files associated with a MAS project are displayed in the File panel on the left-hand side
of the main IDE window. Figure 4.8 shows the IDE after loading the blocksworld.mas2g file.
Multiple MAS projects can be present at the same time in the files panel.
A MAS file specifies the agent files that are needed to create the agents of the multi-agent
systems. These agent files are listed in the agentfiles section of the mas file. The files present in
this section are listed as subnodes of the mas file in the files panel and are automatically loaded
when the mas file is loaded. Note that the parse info tab indicates when the mas file was loaded
and whether it has been parsed successfully. The only agent file present in the blocksworld.mas2g
file is the stackBuilder.goal as shown in Figure 4.8.
The contents of a mas file can be viewed and edited by loading it into the built-in editor of
the IDE. You can do this by double clicking on the mas file in the files panel. Alternatively, you
can select the mas file in the files panel and selecting File/Edit in the IDE menu. Similarly, the
contents of an agent file can be viewed and edited.
The Goal Programming Guide [3] contains a detailed explanation of the contents of a mas
file. A mas project consists of a main mas file with extension .mas2g, agent files with extension
20
CHAPTER 4. CREATING AND MANAGING MULTI-AGENT PROJECTS
Figure 4.7: IDE with editor window for the stackBuilder.goal file.
.goal, module files with extension .mod2g, and knowledge representation files. The extension of
the latter type of file depends on the knowledge representation that is used. When Prolog is used,
files with extension .pl may be part of a mas project. Module and knowledge representation files
are referenced in agent files.
It is also possible to open existing Goal agent and other files that are not part of any mas
project. Note that you do not need to load agent files that are part of a mas project as these are
added to the files panel automatically. You can do so by using the File/Open menu and selecting
an agent file with extension .goal. This agent file will be added below the Other Files node in
the files panel. Any file that is not identified as part of a mas project will be placed below the
Other Files node.
4.2.1
Editing Files
Editing a file can be done in the editor window.
4.2. MANAGING AN EXISTING MULTI-AGENT PROJECT
21
Figure 4.8: IDE after loading the blocksworld.mas2g file.
How to edit a file:
• Double click on the file you want to edit in the Files Panel; an editor window will open
that shows the file contents.
• Alternatively, select the file in the Files panel and select the Edit item in the File menu.
Figure 4.7 shows the result of double-clicking on the stackBuilder.goal agent file.
4.2.2
Saving an Agent File
As discussed above, an agent file can be saved when the editor with the code of the file is open.
Simply press the Save button or use ctrl-s (or apply-s) to save the file. Upon saving a .goal file,
the file is also parsed. If any syntax errors are found in the file, these will be shown including
references to line numbers in the parse info tab in the feedback area.
4.2.3
Changing a File Name
To save a copy of the file with a different name, select File/Save As. A file dialogue window will
appear in which you can select a different file name and location. Goal automatically switches
the editor to the latest saved file. The files panel is updated accordingly. A warning is in place,
however: Changing a file name that is part of a mas project by means of the File menu does not
modify the contents of the mas file itself. When changing an agent file name, you need to manually
change the agentfiles section of the mas file. A popup will remind you to edit the mas file.
22
CHAPTER 4. CREATING AND MANAGING MULTI-AGENT PROJECTS
4.2.4
Using the File Menu to Remove a File
A file that is a part of a MAS project can be removed from the files panel as follows:
How to remove a file using the File menu:
• Select the file to be removed in the Files panel,
• Select Remove in the File menu, or, alternatively, right-click on the file, and select
remove from the popup menu.
The file itself as well as any child nodes in the Files panel are removed from that panel. Note
that removing a file from the Files panel does not delete the file from the file system. Select Delete
from the File menu to achieve this.
Warning Removing a file from a MAS project does not modify the contents of the MAS
file itself. In order to make sure that the file is not considered part any more of the MAS
project you also have to edit the file that referenced the removed file.
4.2.5
Automatic Word Completion
Automatic word completion is supported for both known keywords as well as for predicates or
other words defined in the program.
Using auto-completion:
• After typing some initial letters of the (key)word, the word can be automatically completed by pressing CTRL-B (Windows, Linux) or APPLE-B (OSX).
• If there is more than one option for completing the word, select an option from the
pop-up menu (otherwise the word is completed right away).
Chapter 5
Running a Multi-Agent System
This chapter explains how to launch, run, and distribute a MAS project across multiple machines.
Running a multi-agent system means launching or connecting to the environment the agents
perform their actions in (if any), and launching the agents when appropriate. As explained in
Section 4.1.4, which environment is launched depends on the environment section of the MAS
file that is being run. Which agents are launched depends on the launch policy specified in the
same MAS file. Section 5.6 explains how to distribute one or more MAS across multiple machines.
Figure 5.1: The IDE after launching bw2agents.mas2g.
5.1
Launching a Multi-Agent System
Launching a MAS means
• Launching an environment referenced in the MAS file, if any, and
• Creating agents in line with the launch policy of the MAS.
23
24
CHAPTER 5. RUNNING A MULTI-AGENT SYSTEM
How to launch a MAS file:
• Select a MAS file in the Files panel.
• Press the Run button
in the tool bar. (Alternatively, select Run in the Run menu.)
The IDE will automatically switch to the debug perspective when a MAS is launched. In this
perspective, instead of the Files panel the Process panel is shown in the main content area
as illustrated in Figure 5.1. The Process panel shows the processes that have been created by
launching the MAS. In the Blocks World example, an environment process is started labelled
Blocks World as well as two agent processes named stackbuilder and tableagent. Also, the Blocks
World GUI shown in Figure 5.2 should appear. All processes that are created are paused initially,
which is indicated by the icon just left of the process names.1
Figure 5.2: The Blocks World GUI after launching bw2agents.mas2g.
Before launching a MAS, make sure to check that the MAS project is clean. That is, check
the Parse info tab in the Feedback area and make sure no warnings or errors have been produced.
When you launch a multi-agent system, Goal will not start the system when one or more program
files contains an error. Apart from the need to remove parsing errors, it is also better to clean up
program files and make sure that no warnings are present.
Note A multi-agent project can only be launched if no other multi-agent system is currently
running. If another MAS is running, the Run button in the tool bar in edit mode is disabled.
In order to start a new MAS, you first need to kill the MAS that is running.
5.1.1
Initializing an Environment
In order to actually run a MAS it may also be necessary to initialize an environment by means of
the environment’s user interface. In the Unreal Tournament environment, for example, you can
create new bots that can be controlled by agents. Please consult the environment documentation
for details. Depending on the configuration and launch rules of your MAS file, new agents are
automatically created when a new bot is added. Refer to the Programming Guide for more
information on this [3]. Note that environments often also have entities that cannot be controlled
by agents such as people taking the elevator in the Elevator environment or Unreal bots that
are controlled by the Unreal engine itself.
1 The
status of the environment as indicated by the icon next to the environment process name may not always
be known. In that case the icon
may be shown to indicate the state is unknown. This icon will be shown with
some environments that do not provide information about their current state.
5.2. RUNNING A MULTI-AGENT SYSTEM
5.2
25
Running a Multi-Agent System
After an environment has been initialized, a multi-agent system can be run.
How to run a MAS:
• Select the MAS node in the Process panel.
• Press the Run button to run the multi-agent system.
All processes, including the environment and the agents, must be in running mode to be able
to run the complete multi-agent system. The symbol
indicates that a process is in running
mode. In running mode, an agent will execute a complete reasoning cycle without pausing.
If the agents in a MAS are paused but the environment is not the environment still may be
changing due to processes that are not controlled by the MAS or simply because actions take time
(durative actions). Vice versa, if an environment is paused but one or more agents in the MAS are
running, typically you will see complaints that the agent was not able to retrieve percepts from
the environment.
5.3
Terminating a MAS and/or Its Agents
In order to be able to terminate a MAS, you must be in the Debug perspective. You can select
this perspective by clicking on the Debug button on the right hand side of the tool bar. This
button is only available if there is a MAS running.
How to terminate a MAS or an Agent:
• Select the MAS or agent you want to kill in the Process panel.
• Press the Kill button
in the tool bar.
Terminating a MAS terminates the environment, all agents, and switches the perspective back
to the Edit perspective. Killing a single agent does not kill the MAS. The
symbol indicates
that a process has been killed. An agent that has been killed is not performing any actions any
more. If a killed agent is put back in running mode, the agent is restarted and initialized using
the initial mental state specified in the agent program. An agent will also be automatically killed
if the entity that it is controlling in an environment has been terminated. Agents that are not
associated with an entity are only killed if the user kills it.
5.4
Run Modes of a MAS and Its Agents
A MAS or agent can be either in the running, stepping, paused, or killed mode. Controlling the
run mode of a process is done with the Run , Step , Pause , and Kill
buttons in the tool
bar. Alternatively, you can either use the Run menu or select a process and right-click (ctrl-click
on OSX) to set the run mode. You can control all processes that are part of the MAS at once by
selecting the mas process node and using the relevant buttons. This is particularly useful when
starting, stepping or killing all agents.
The following symbols are used to indicate the run mode of a process:
•
indicates that the process is paused,
•
indicates that the process is running,
26
CHAPTER 5. RUNNING A MULTI-AGENT SYSTEM
•
indicates that a process is in stepping mode,
•
indicates that the process has been killed.
Note It may happen that an agent tries to perform an action in an environment when the
environment has been paused because the agent process and environment run asynchronously.
In that case, the environment may throw an exception which will be printed as a warning in
the console tab. The agent will proceed as if the action has been succesfully executed.
Finally, note that environments can be in running and paused mode, but not in stepping
mode.
5.5
Resetting a MAS and Its Environment
You can use reset to reset agents and environment. If you select a MAS process node and apply
reset, only the agents are reset but not the environment. To reset the environment, select the
environment and apply reset. Note that reset of the environment keeps the agents connected and
alive, so this is less complete than a kill and restart of the entire MAS.
The Backward stepping button in the tool bar is not yet supported.
5.6
Distributed Running of One or More MAS
The agents in a multi-agent system and the environment to which the agents are connected can
be distributed over different machines. The middleware infrastructure that is used to run the
multi-agent system needs to support distributed processing.
5.6.1
Messaging Infrastructures
The term messaging refers to the communication infrastructure on top of which a multi-agent
system runs. Messaging enables agents to exchange messages between each other. Goal currently
provides two alternative messaging platforms: Local messaging and a messaging based on RMI.
The local middleware is selected by default, since the performance of the local middleware usually
outperforms that of RMI. But to run a truly distributed agent system you need to select RMI
Messaging. Use the Run menu to select one of these.
5.6.2
Distributing MAS
It is possible to connect a MAS to an existing environment that is already running in another
instance of the Goal platform. This can happen, for example, when a second MAS is run (using
a second instance of the Goal platform). To do this, you provide a reference to the name of the
already running environment, e.g.,
env = "elevatorenv".
The name is derived from the jar file name, and gets a serial number added to it if you launch
multiple of them. If you connect multiple MASs to a single environment, the second MAS will
only be able to connect to entities that are still free.
A Goal multi-agent system can be run in a truly distributed fashion, having various agents
running on different JVMs and/or on different machines. In this case there is one main platform
that is the access point for the other platforms. The main platform has to be launched first, after
which the other platforms can join. Currently only RMI supports distributed running.
5.6. DISTRIBUTED RUNNING OF ONE OR MORE MAS
27
How to launch a distributed system:
• Start the Goal IDE on the main platform.
• Uncheck the Always run the middleware locally checkbox
ences/PlatformManager menu (this is already off by default).
in
the
Prefer-
• Select ’Run RMI (Distributed)’ in the Run menu.
• Open the .mas2g file that you want to run on the main platform.
• Launch the mas project.
• Use the default localhost in the middleware host dialogue window.
• You can start the agents if you like
• Start a new Goal IDE on a second platform (this may be the same machine).
• Select RMI in the Run menu.
• Open the .mas2g file that you want to run on the second platform.
• Launch the second mas project.
• Enter the name of the main platform machine, e.g. rmi://130.161.180.1 in the middleware host dialogue window.
• Start the agents on all platforms.
You should have two Goal IDEs running, similar to Figure 5.3 and Figure 5.4. Note the
”remote process” icon indicating that a process is running on a remote platform. The IDE only
allows introspection and debugging of local agent processes.
Figure 5.3: IDE for machine 1.
Figure 5.4: IDE for machine 2
If you take down the second MAS, the entities will be released and can be reused by other,
still running MASs. If you take down the MAS that launched an environment, the environment
will be taken down, removing all associated entities. All agents associated to these entities will
then be killed.
28
CHAPTER 5. RUNNING A MULTI-AGENT SYSTEM
Chapter 6
Debugging a Multi-Agent System
The IDE provides various options for debugging. Some of these tools relate to agent code itself,
such as the warnings and error reports that are output to the Parse Info window in the Feedback
Area and the Static Code Analysis tool provided in the Debug menu. Goal also provides a model
checker to verify whether an agent satisfies desirable properties. While running a mas, the IDE
provides a range of options for debugging which include the following:
1. options for viewing and controlling debug output produced while running a mas,
2. setting general and specific breakpoints to pause an agent on,
3. agent introspectors for inspecting the mental state of an agent, and percepts and messages
received at runtime,
4. a message sniffer for tracing messages that are exchanged between agents (currently, only
when running the JADE middleware).
[TODO: The IDE facilitates debugging of a multi-agent system in various ways. It provides
various forms of feedback in the feedback area at the bottom of the IDE in debug mode, i.e. when
a multi-agent system is running. In addition, for each agent, an introspector can be opened to
inspect the contents of the mental state of an agent. Finally, it is possible to set breakpoints to
pause an agent when it hits such a breakpoint.]
6.1
Introspecting Agents
A useful tool to trace what your agents are up to is the introspector. An introspector allows you
to inspect the mental state of an agent.
How to open an Introspector:
• Open an introspector by double clicking on an agent process in the Process panel, or,
• Alternatively, select the agent process and the Open Introspector item in the Debug
menu.
Introspectors are located in the content area of the debug mode. Figure 6.1 shows an introspector for the stackbuilder agent that is part of the bw2agents.mas2g project.
An agent introspector consists of various tabs that allow you to access the current contents of
the agent’s beliefs, goals, mails, percepts, and knowledge. In the area showing the contents, you
can select text and copy it to somewhere else.
29
30
CHAPTER 6. DEBUGGING A MULTI-AGENT SYSTEM
Figure 6.1: An Introspector for the stackbuilder agent
6.2
Querying a Mental State
Apart from being able to view the contents of an agent’s mental state when it is paused, an
introspector also allows you to pose queries for evaluation on the current mental state of the agent
in the Query Area.
How to evaluate mental state conditions:
• Enter a mental state condition in the Query Area.
• Press the Query button.
All solutions for the query performed are shown in the query window. They are shown in
the query result area as a list of substitutions for variables. Figure 6.2 shows the results of
performing the query bel(clear(X), clear(Y), on(X, Z), not( on(X, Y) )). This mental
atom corresponds to the precondition of the move action in the Blocks World environment and
shows all the options to move blocks that are available in the present state. Consult the Goal
Programming Guide [3] for a detailed explanation of mental state conditions.
6.3. EXECUTING AN ACTION USING THE INTROSPECTOR
31
Figure 6.2: A sample query.
6.3
Executing an Action using the Introspector
You can also execute actions from the Query area within the Introspector. The actions that can be
executed include (i) mental state actions which change the mental state of the agent (adopt, drop,
insert, delete) and (ii) user specified environment actions that are executed in the environment.
You cannot execute other actions such as combined actions, sending messages, or modules.
How to execute an action using the Introspector:
• Enter the action into the Query area.
• Press the Action button.
Make sure that the action is closed, i.e., has no free variables. To execute an environment
action, make sure that the environment is running. You may also need to figure out whether the
32
CHAPTER 6. DEBUGGING A MULTI-AGENT SYSTEM
agent that should execute the action is allowed to perform an action at the time you want to
perform the action, e.g., it is the turn of that agent.
Note that an environment action is sent to the environment without checking its preconditions.
The postcondition of the action also is not processed nor are any percepts related to the action
passed to the agent. Finally, no feedback is provided whether an action was successfully performed
or not.
6.4
Debugging Output
In debug mode the feedback area in the IDE contains various tabs for inspecting agents and the
actions they perform, see Figure 5.1. Besides the console tab, an action log tab is present that
provides an overview of actions that have been performed by all (running) agents. In addition,
when an agent is launched a debug tracer tab is added to the feedback area for inspecting various
aspects of the agent program during runtime.
It is sometimes useful to clean the contents of a tab. This can be done by right-clicking (ctrlclick on OSX) and selecting the Clear option. This is particularly useful for the action log, which
is never automatically cleared.
Console
The console shows all important messages, warnings and errors that may occur while using the
IDE. These messages include those generated by Goal at runtime, but possibly also messages
produced by environments and other components. When something goes wrong, it is always
useful to inspect the console tab for any new messages. If a new message is present in the console
tab, the color of the tab is changed to indicate this.
Action Log
The action log tab shows the actions that have been performed by running agents that are part
of the multi-agent system. These actions include both user-defined actions that are sent to the
environment as well built-in actions provided by Goal.
Apart from an overview of what has been done by agents, the action log can also be used
as a simple means for debugging. It can be used, for example, to check whether a particular
action added for debugging has been performed. The idea is that you can add a dummy action
with a particular content message to a rule and verify in the action log whether that action has
been performed. To do so, include an action in the action specification of your agent named e.g.
debug(<yourMessage>) with true as pre- and post-condition to ensure the action always can be
performed and will not change the state of the agent but still will be printed in the action log
output.
Debug Tracer
Upon launching an agent, a debug tracer tab is added for that agent in the feedback area. This
tab typically contains more detailed information about your agent. To avoid flooding the tab, it
is only filled, however, when the multi-agent system is paused. To be useful, the contents of the
tab need to be analyzed which cannot be done while new content would be added continuously.
The exact contents of the tab can be customized by means of the Help/Preferences/Breakpoints
settings menu. Various items that are part of the reasoning cycle of an agent can be selected for
viewing. If checked, related reports will be produced in the debug tracer of an agent. A more
detailed explanation of these breakpoints can be found in Section 6.5.
If you step a multi-agent system using the Step button , the IDE by default switches to
the debug tracer of the agent that is being stepped. This allows you to automatically keep track
of what happens without having to manually switching between agent debug tracer tabs. The
6.4. DEBUGGING OUTPUT
33
default switching between debug tracers can be turned of by means of the Help/Preferences/GUI
menu; uncheck the option at the bottom labeled Automatically switch to Debug Tracer tab.
Debug tracer tabs can be closed by clicking the close icon on of the tab. You can re-open a
closed tab by selecting the agent in the process panel and righ-clicking (ctrl-click on OSX) and
selecting Open Debug Tracer.
Customizing the Logging
The logging behaviour of the IDE can be modified with Preferences/Logging tab which is shown
in Figure 6.3.
The checkbox ”Show logs in IDE’s console” is the main controller that determines if the IDE
shows all system information in the dedicated tabs. If you turn off this checkbox, all logs are
instead printed directly to the console. This can be helpful if you want to do special actions on
the log text, such as analyzing the steps, or making an extensive bug report.
A timestamp with millisecond accuracy can be added to each printed log by checking the ”Show
log time” checkbox.
The ’write logs to file’ checkbox determines if Goal writes all logs to separate files. Logs for
each agent, the action log, warnings, results from Goal log actions etc are all written to separate
files. Log files are written to the logs directory inside the directory where Goal was installed.
You can change it by clicking on the Browse button of the ”Write log files here” field.
Most logs are in XML format, and each log entry contains a timestamp with millisecond accuracy. Debug messages for each ¡agent¿ are written to <agent>.log. All actions are written to historyOfActions.log. General info is written to goal.tools.logging. InfoLog.log. Warnings are written to
goal.tools.errorhandling. Warning.log. Sytem bug reports are written to goal.tools.errorhandling.
SystemBug.log. Result of log actions are written to <agent> <timestamp>.txt files. Be careful
with this option, as many megabytes per second can be written. A new run generates new log files
(made unique by adding a number to the names). By selecting ’Overwrite old log files’, a new run
uses the same file names, thus overwriting previously generated files.
The type of debug messages that are logged can be determined with the view checkboxes in
the global breakpoints preferences panel (Figure 6.4).
The warnings print format allows you to select the information that is printed along with any
warning. You can turn on the stack trace and the detailed java message. Also you can set the
maximum number of times the same message is printed, to avoid flooding of the console.
Figure 6.3: The Logging Preference tab
34
CHAPTER 6. DEBUGGING A MULTI-AGENT SYSTEM
6.5
Setting Breakpoints
A useful way to trace what your agents are doing is to step the multi-agent system and check how
and which action rules are evaluated, which actions are performed, which percepts are received,
etc. Stepping assumes natural breakpoints to stop an agent at. In the Goal IDE a number of
such breakpoints have been pre-defined. These built-in breakpoints facilitate stepping and tracing
of what happens when an agent is executed.
A second, alternative method to set breakpoints is by explicitly adding them to code lines in
agent program files. A user can set breakpoints at various places in a program where the agent
should stop when such a breakpoint is hit.
6.5.1
Stepping and Global Breakpoints
The first method to step an agent and halt at breakpoints is based on a set of built-in breakpoints
that relate to the reasoning cycle of an agent. A list of these breakpoints is available in the
Help/Preferences/Breakpoints menu which is displayed in Figure 6.4.
Figure 6.4: Setting Global Breakpoints
There are two columns with check boxes that are labeled View and Pause. If the View check
box of a breakpoint is checked, a report related to the breakpoint will be made available in the
Debug Tracer of an agent. If the Pause check box of a breakpoint is checked, all agents will be
paused when such a breakpoint is hit.
We briefly discuss each of the available built-in breakpoints:
• The first item Steps in the reasoning cycle of an agent relates to e.g. the start of the agent’s
reasoning cycle. By default a round separator is added to the output in the Debug Tracer
to indicate which reasoning cycle (round) has been executed. This round separator is also
available in the action log.
• The items Mails received and Percepts received concern the events of receiving new mails and
percepts. Mails and percepts are buffered and collected at the start of an agent’s reasoning
6.5. SETTING BREAKPOINTS
35
cycle. A report containing the percepts and/or messages received is provided as output in
the Debug Tracer.
• Evaluation of action rules concerns the evaluation of the mental state condition and applicability of action rules. Depending on the rule evaluation order, more or less rules will be
evaluated each reasoning cycle. The debug output will show all substutions for which the
rule is applicable, if any.
• Evaluation of action preconditions relates to the evaluation of the preconditions of actions.
In case this breakpoint is selected to pause on, the agent will halt just before executing the
action itself. If this breakpoint is viewed, reports of the evaluation of all action preconditions
are provided.
• Besides the action log, which actions are executed can be provided as debug output in the
Debug Tracer as well by checking the View check box related to either the Built-in actions
or Actions sent to the environment breakpoints.
• The Changes to the belief base and changes to the goal base breakpoints provide output
related to or pause when a change to either base is made. The Changes to the belief base
breakpoint usually is a too finegrained breakpoint to pause on as many changes to a belief
base are made.
• The Goals that have been achieved breakpoint can be quite useful to verify whether a goal
has been achieved, and to halt an agent whenever this happens.
• The last two breakpoints are the most finegrained-level breakpoints available and typically
are not very useful. They provide detailed output on basic queries at the level of mental
atoms and/or queries performed using the knowledge representation language (e.g. Prolog).
You can modify the selections at any time, also during the execution of a mas. If you are
stepping a multi-agent system, agents will continue to run until they hit the next breakpoint
selected to pause on. If such a breakpoint is hit, the agent is switched to pause mode.
Note that the Step button has the same effect as the Run button if no breakpoints have been
selected. In that case, the agent progress will be run without halting the agent, with the exception
of explicitly set breakpoints which we discuss next.
As an example, clear all Pause check boxes in the Breakpoints panel, and only select to pause
on the Goals that have been achieved breakpoint. Launch the [bw2agents.mas2g] mas and press
the Step button (several times to get things started). The agents run until the stackbuilder
agent achieves its goal, which demonstrates the agent is able to achieve it even in the presence of
the tableagent agent. Figure 6.5 shows an example run where this happens in round 20.
6.5.2
Setting Code Line Breakpoints
A second, more flexible way of setting breakpoints is by adding code line breakpoints. In Goal
breakpoints can be associated with four constructs in an agent program: a module, the condition
of an action rule, the action part of an action rule, and an action specification. Breakpoints can
be added to these constructs by opening a mas project file in the editor and adding breakpoints
at the first line associated with the construct. That is, put a breakpoint next to the line with the
module name, the first line associated with an action rule, or the the line with the action name.
You can do this by right-clicking in the left border of the editor and selecting Add breakpoint.
Goal will relocate incorrectly placed breakpoints to their appropriate position when the MAS
is started. This is done by attaching an incorrectly placed breakpoint to the first suitable location
after its current position.
There are two types of breakpoints: the ALWAYS and the CONDITIONAL type. A CONDITIONAL breakpoint shows as an orange tag in the left border. It can only attach to the action
part of an action rule. The ALWAYS type shows as a red tag in the left border and attaches to
the other three types.
36
CHAPTER 6. DEBUGGING A MULTI-AGENT SYSTEM
Figure 6.5: Pausing on Goal Achieved Breakpoint
An example of two breakpoints that were added to the move action specification is illustrated
in Figure 6.6.
Different from the built-in breakpoints, even if a multi-agent system is put in run mode,
the system will halt on any explicit breakpoints that have been set. Figure 6.7 shows that the
stackbuilder is paused when the breakpoint set on the action specification is hit.
Breakpoints that are associated with action specifications and action rules provide useful output
in the Debug Tracer immediately. This is not the case, however, for breakpoints set on modules.
The output produced in this case only provides a clue that the module is about to be evaluated.
Take it from here to step further through the module using the Step button to produce more
relevant debug output.
Explicit breakpoints that have been added to a file are not saved. Upon closing an editor all
breakpoints set are lost. This is an easy way to clear all breakpoints.
6.5.3
Switching Between Edit and Debug Mode
The Goal IDE has two modes: Edit mode and debug mode, see Figure 3.1 and Figure 5.2,
respectively. As explained, in edit mode a files panel is shown that displays the structure of a mas
project, whereas in debug mode a process panel is shown that displays the processes that are part
of a mas that has been launced.
At the far right of the tool bar you find the mode button that facilitates switching between the
two modes of the IDE. Switching between modes is only possible if a mas has been launched.
6.6. PROLOG LEVEL DEBUGGING
37
Figure 6.6: An ALWAYS and a CONDITIONAL Breakpoint added to the elevator
Figure 6.7: The stackbuilder agent paused on an explicit breakpoint
6.6
Prolog Level Debugging
The Goal IDE does not support tracing of Prolog queries inside the Prolog inference engine. If
you need this level of detail while you are debugging an agent, it is useful to be able to export
38
CHAPTER 6. DEBUGGING A MULTI-AGENT SYSTEM
the contents of a mental state to a separate file that can be imported into Prolog. Then use the
Prolog tracer to analyze the code.
6.6.1
Exporting a Mental State to a File
To export the mental state of a Goal agent, select the agent process and then select Debug/Export
mental state. This allows you to save the contents of a mental state as a Prolog file.
The exported file(s)) can then be imported into a Prolog debugger. SWI Prolog can be used
for this, provided that you installed SWI Prolog on your machine. The version of SWI Prolog that
is distributed with Goal cannot be used for this purpose.
A detailed set of instructions on how to do this follows:
1. select and pause the agent just before the point where you would like to debug a call to
Prolog
2. select menu Debug/Export Mental State contents and save the database contents as a .ms
(MentalState) file. You can save beliefs and goals to a separate file and opening the exported
file in the IDE but for opening in Prolog, export to a single file seems most useful. After
clicking OK a file browser appears; select a good place to save the file.
3. Manually edit the .ms files:
(a) They need to have the extension .pl to import in prolog
(b) All predicates that you use but do not have explicit values in the prolog program may
need to be declared dynamic. See the SWI Prolog Manual for details.
(c) Goals are dumped to the .ms files as a conjunct of predicates, and this is not a legal
notation in Prolog; the least you have to do is to replace all commas ’,’ within a single
goal with dots ’.’.
(d) You may need to fix the goals. Several goals may be in conflict when seen from SWI
Prolog and therefore you may have to remove part of the goals.
4. open SWI Prolog (see the SWI Prolog manual) and import the Prolog file (e.g. consult(’<filename>’).)
5. start the SWI Prolog tracer (e.g. type trace. in its console)
6. run and trace the query (see SWI Prolog manual, typically the ’n’, ’a’ and ’enter’ are used
for tracing)
If you selected opening of files while exporting the mental state contents, these files are opened
in edit mode. Switch back to edit mode in order to view the contents. Figure 6.8 shows the results
for the stackbuilder agent.
6.6.2
Prolog Exceptions
When an exception occurs in the Prolog engine (SWI Prolog), error messages may get a bit hard
to decypher. This section explains how to read such messages.
A typical PrologException will show up typically like this:
WARNING: jpl.PrologException: PrologException:
error(instantiation_error, context(:(system, /(>=, 2)), _1425))
query=true,beliefbase6: (openRequestOnRoute(L,D,T))
The first of the two lines indicates the message that Prolog gave us. The second line shows
the query that caused the warning. To read the first line, notice the part error(CAUSE,DETAILS)
inside it.
The CAUSE part gives the reason for the failure, the DETAILS gives the context of the error.
Several types of CAUSE can occur, amongst others:
6.7. RUNTIME PREFERENCE SETTINGS
39
Figure 6.8: Export dialog for mental state contents
1. type error(X,Y): an object of type X was expected but Y was found. For instance, in the
context of arithmetic X can be ’evaluable’ and Y a non-arithmic function.
2. instantiation error: the arguments for an operator are insufficiently instantiated. For example, if we ask X>=8 with X a free variable, we will get an error like the example above. The
context in such a case would be context(:(system, /(>=, 2)), _1425). The first part,
system:>=/2 refers to the >= operator (which has arity 2 and is part of the system module)
and the 1425 refers to the free variable (which apparently was even anonymous hence is
not of much help). Note that these messages commonly contain pure functional notation
where you might be more used to the infix notation. For instance system:X appears as
:(system,X) and >=/2 appears as /(>=,2).
3. representation error: the form of the predicate was not appropriate, for instance a bound
variable was found while an unbound variable was expected
4. permission error: you have insufficient permissions to execute the predicate. Typically this
occurs if you try to redefine system predicates.
5. resource error: there are not enough resources of the given type.
6.7
Runtime Preference Settings
Most settings are selected via a number of preference panels (Figure 6.9). This section discusses
them. The preferences panel is accessed via Help/Preferences (Windows, Linux) or via GOALIDE/Preferences (MacOSX).
40
CHAPTER 6. DEBUGGING A MULTI-AGENT SYSTEM
Figure 6.9: Preferences panel for Platform Manager
6.7.1
Platform Management
The tab ”PlatformManager” in the Help/Preferences menu offer a number of options to set the
base path for the environment and middleware.
This preference window offers the option to always run the middleware locally. This checkbox
is by default disabled and therefore when starting a mas you will always be prompted for the
location of the middleware host. If you turn on this checkbox, the default ”localhost” will be used
as middleware host and the dialog will not be shown.
You can adjust the directory where browsing for .mas2g and .goal files will start, and whether
your last directory should be used as the starting point for browsing.
The ’default KR Language’ selection allows you to choose between the default swiprolog implementation and an alternative swiprolog2 implementation. swiprolog2 attempts to compile mental
state queries into a single query to the underlying swi prolog engine. This implementation is not
fully tested, and it is recommended to use swiprolog.
Selecting the ’sleep agents when they repeat same action’ enables Goal to skip agents that
seem to be idle, which relocates CPU time to other agents that really are working on something.
Goal guesses that an agent is idle if the agent is receiving the same percepts and mails as last step
on the input, and picks the same actions as output. The sleep is cancelled when the percepts/mails
of the agent change. This setting is on by default.
IMPORTANT: with ’sleep agents’ selected, your agent may go to sleep when it is repeating
actions. This may be counterintuitive, and may cause Goal programs to malfunction. In doubt,
you should turn off this option.
To remove agents automatically after they have been killed, select the ”Remove agents when
they are killed” option. To run new agents automatically as their entities appear, select ”Run
agents automatically when the environment is already running” These two options are useful in
environments where large numbers of agents appear and disappear while GOAL is running.
6.7. RUNTIME PREFERENCE SETTINGS
6.7.2
41
Warnings
Warnings and errors are shown depending on how you set the preferences. Warnings generally
appear in the Console area (see Section 6.4).
By default, warnings are plain messages. For development purposes, however, the format of
warnings can be adjusted using the Logging tab in the Preferences menu. Select to Show Java
details to include the Java-specific part of a warning message. In some cases this can help to see
what the platform was attempting to do. Select Show Java stack traces to add a full stack dump
to warning messages. This is mainly intended to aid debugging of the platform itself but in some
cases may also help you to understand what the platform was trying to do.
Reporting Issues:
When reporting an issue, it is very useful if your issue report includes Java details and
stack traces. See Section 9.1 for more about reporting an issue.
When an identical problem re-occurs, a warning message is re-printed only a limited number
of times to prevent the Console from being flushed with identical messages. When the Console
shows the message for the last time, it will add the message “New occurrences of this warning will
not be shown any more”. You can adjust the number of times that a message will be re-printed
in the Logging tab in the Preferences menu.
42
CHAPTER 6. DEBUGGING A MULTI-AGENT SYSTEM
Chapter 7
Running in Stand-Alone Mode
You can run a multi-agent system containing Goal agent programs stand-alone, that is without
starting the IDE. That way you can use Goal from scripting languages like a shell script or bat
script, or from your Java program.
Stand-alone running always involves starting up a Java Virtual Machine (JVM) with the right
environment settings. We first describe the required environment and then describe how to use
this from a Java program or from a script.
7.1
Setting the JVM environment
The variables to be set up properly for the environment are the PATH, the JAVA_LIBRARY_PATH,
CLASSPATH and the SWI_HOME_DIR. Below we use the tag GOALHOME to point to the absolute
directory where you installed Goal. The exact way to do this is machine dependent; we assume
you have the knowledge how to do this on your particular machine. For example, the ’;’ used as
separator in the CLASSPATH below should be replaced with a ’:’ on Linux and OSX.
• on Windows, PATH should be set to include GOALHOME/swifiles/libs. On Linux you should
set LD_LIBRARY_PATH instead, and on OSX you should set DYLD_LIBRARY_PATH.
• SWI_HOME_DIR should be set to point to GOALHOME/swifiles/.
• JAVA_LIBRARY_PATH should be set to include GOALHOME/swifiles/libs.
• CLASSPATH should be set to include GOALHOME/goal.jar and to the (EIS)environment jar
file that you want to use.
You can inspect the goal.bat (Windows) or goal.sh file (Linux, OSX) to see a running example
of the above.
7.2
From Java
Running a stand-alone MAS from Java is very simple: just create the goal.tools.Run object from
Java and start it using this call
new Run(new File(fileName)).run();
where fileName is the MAS file that you want to run.
7.3
From the Command Line
To run Goal stand-alone from the command line, the typical call looks like this:
43
44
CHAPTER 7. RUNNING IN STAND-ALONE MODE
java -cp goal.jar -Djava.library.path=swifiles/libs
goal.tools.Run <filename.mas2g> [wait]
where <filename.mas2g> is the absolute path to the MAS file you want to run. You can add
the wait option so that the runner waits between starting the environment and scheduling the
Goal agents, see Section 7.5 below.
-d,--debug
Display out put from debugger while running agent
-e
Print messages from error
-h,--help
Displays this help
-i
Print messages from info
--license
Shows the license
-p
Print messages from parser
-r,--repeats ¡number¿
Number of times to repeat running all episodes
--recursive
Recursively search for mas files
--rmi ¡host¿
Use RMI messaging middleware. Host is the location of the RMI
server. Using ”localhost” will initialize a RMI server
--timeout ¡seconds¿
Timeout of the multi-agent system.
-v,--verbose
Print all messages
--version
Shows the current version
-w
Print messages from warning
7.4
Runtime Settings
Some settings, e.g. used middleware, are used as set in the preferences. Note that these preferences
can be set using the GOAL IDE, but also by direct calls.
Please refer to the JavaDoc for the various preference settings inside the goal.preferences
directory. There are preference settings for the CorePreferences, PMPreferences, the LoggingPreferences etc. Also notice the -w and -v options of the tool if you are looking for warning
printouts.
7.5
Interaction with Standalone
In some cases, user interaction is still required in a stand-alone run. Usually this is because the
environment needs additional setup actions before it can really be used..
Termination does not always imply reset of the environment. You may have to set init parameters in the MAS to request reset of the environment for the next run.
7.6
Batch Running
The Run command above allows you various variants for batch running. You can specify a directory
containing multiple prepared MAS files, and/or you can request multiple runs of the MAS files.
To enable proper batch running, your setup has to meet two requirements:
• Your MAS terminates at some point. This happens when all agents have terminated, e.g.
exited their main program section or were killed.
• Your environment resets the entities when it is killed and then restarted. This may seem
natural but in some configurations (eg, BW4T2), killing and restarting a local environment
does not necessarily reset the real remote environment.
Chapter 8
Creating Your Own Environments
8.1
Environments Distributed with GOAL
Goal is distributed with several environments for which you can write your own agents. These
environments can be found in the GOALagents folder in the main GOAL folder in which Goal is
installed. Running these environments is explained in Chapter 5.
8.2
Creating an Environment Interface
Environments provide so-called controllable entities. Agents can connect via an interface to these
entities and control their behaviour. The Goal Programming Guide [3] explains in more detail
how this works.
The interface used by Goal is the Environment Interface Standard (EIS; [2, 1]). The current
version of the Goal platform is fully compliant with EIS v0.3. EIS is an Open Source project
and documentation on how to create an interface for your environment such that it can operate
in combination with Goal is available via http://sourceforge.net/projects/apleis. Additional guidelines for creating an environment can be found on the website for Goal: http:
//ii.tudelft.nl/trac/goal/wiki/Developers/Environments/HowToEISifyAnEnvironment.
45
46
CHAPTER 8. CREATING YOUR OWN ENVIRONMENTS
Chapter 9
Known Issues and Workarounds
Below we have listed some known issues and possible workarounds when available.
• Nothing happens when pressing the Step and Run buttons.
There are a number of possible explanations for this you can check.
1. First, make sure that the environment is ready to run. For example, when using the
Elevator environment the environment will respond to Goal only if you selected GOAL
Controller available in this environment.
2. You may be stepping an agent that is suspended somehow, e.g. the environment may
be refusing to serve that agent, or it may be the turn of another agent.
• The environment does not work as expected.
Check the documentation that comes with the environment. Most environments need to be
set up before the agents can connect and perform actions.
• The Wumpus environment hangs when the agent shoots an arrow.
The Wumpus World always has to be enclosed by means of walls. If an agent shoots an
arrow into open space, the arrow will continue forever, causing the system to hang.
• The Reset button does not work.
It is not always possible to reset an environment as an environment may not provide the
support for doing so.
• I do not see an environment after launching a MAS.
The environment may be hidden behind the Goal IDE. This is due to a known bug in Java
for Windows. You need to install java 7 or higher to fix this issue. Java 7 is available from
http://download.java.net/jdk7/binaries/.
47
48
CHAPTER 9. KNOWN ISSUES AND WORKAROUNDS
9.1
Reporting Issues
If you discover anything you believe to be an error or have any other issues you run into, please
report the error or issue to [email protected]. Your help is appreciated!
To facilitate a quick resolution and to help us reproduce and locate the problem, please include
the following information in your error report:
1. A short description of the problem.
2. All relevant source files of the MAS project.
3. Relevant warning or error messages from the Feedback area, especially from the Console
and/or Parse Info tab. Please also include Java details and stack trace information if available (see Section 6.7.2 for adjusting settings to obtain this information).
4. If possible, a screen shot of the situation you ran into.
Bibliography
[1] Tristan Behrens. Environment interface standard project.
projects/apleis/.
http://sourceforge.net/
[2] Tristan Behrens, Koen V. Hindriks, and Jrgen Dix. Towards an environment interface standard
for agent platforms. Annals of Mathematics and Artificial Intelligence, pages 1–35, 2010.
10.1007/s10472-010-9215-9.
[3] Koen V. Hindriks. GOAL Programming Guide. Delft University of Technology, 2014. http:
//ii.tudelft.nl/trac/goal/wiki/WikiStart#Documentation.
[4] Koen V. Hindriks. The Goal Agent Programming Language. http://ii.tudelft.nl/trac/
goal, 2014.
49