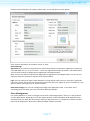
1
Table of Contents Getting started with eZee Configuration ........................................................................................................... 5 Property Setup Tab ............................................................................................................................................ 6 Property Information ..................................................................................................................................... 6 Hotel Information ...................................................................................................................................... 6 Floor Management .................................................................................................................................... 7 Tariff Operation ............................................................................................................................................. 8 Room Type ................................................................................................................................................. 8 Rate Type ................................................................................................................................................. 11 Define Tariff ............................................................................................................................................. 13 Linear Rate Type configuration ................................................................................................................ 13 Non-Linear Rate Type configuration ........................................................................................................ 14 Source/Season ............................................................................................................................................. 15 Season Types ............................................................................................................................................ 15 Season ...................................................................................................................................................... 16 Business Source........................................................................................................................................ 18 Others .......................................................................................................................................................... 20 Room Amenities ....................................................................................................................................... 20 Room Owner ............................................................................................................................................ 21 Room Operation........................................................................................................................................... 22 Room Operation....................................................................................................................................... 22 Auto Arrange ............................................................................................................................................ 25 Save Position ............................................................................................................................................ 25 Configuration Tab ............................................................................................................................................ 25 Tariff Information......................................................................................................................................... 26 Tax Information........................................................................................................................................ 26 Exchange Rate .......................................................................................................................................... 29 Settlement Type ....................................................................................................................................... 30 Extra Charge ................................................................................................................................................. 31 Extra Charges ........................................................................................................................................... 31 Package: ................................................................................................................................................... 33 Deposit ..................................................................................................................................................... 34 User Management ....................................................................................................................................... 35 User .......................................................................................................................................................... 35 User Role/Ability Level: ............................................................................................................................ 38 Others .......................................................................................................................................................... 39 DNR (Do Not Rent) Reason: ..................................................................................................................... 39 Room Status Color ................................................................................................................................... 40 Identity Types........................................................................................................................................... 40 Follow-up Types ....................................................................................................................................... 41 GRM Master ............................................................................................................................................. 42 Revenue Break Down ............................................................................................................................... 43 Meal Plan ................................................................................................................................................. 44 Miscellaneous Tab ........................................................................................................................................... 47 Expense Management ................................................................................................................................. 47 Remerge Pay/Rec ..................................................................................................................................... 47 Account Management ................................................................................................................................. 47 Account Type ........................................................................................................................................... 47 Account .................................................................................................................................................... 48 Market Place ............................................................................................................................................ 50 Business Source........................................................................................................................................ 51 Transport:..................................................................................................................................................... 52 Mode ........................................................................................................................................................ 52 Transport Name ....................................................................................................................................... 52 Stations .................................................................................................................................................... 52 Schedule ................................................................................................................................................... 52 Others .......................................................................................................................................................... 53 Cash Drawer ............................................................................................................................................. 53 Non Rental Object .................................................................................................................................... 53 Language ...................................................................................................................................................... 56 Import Language ...................................................................................................................................... 56 Export Language....................................................................................................................................... 56 Master Language and Other Languages .................................................................................................. 56 Export Master .......................................................................................................................................... 56 Configuration Option ....................................................................................................................................... 56 General Tab .................................................................................................................................................. 57 Report Settings:........................................................................................................................................ 57 Invoice Settings: ....................................................................................................................................... 57 Image Settings:......................................................................................................................................... 58 Night Audit Settings: ................................................................................................................................ 59 Rental Tab .................................................................................................................................................... 60 Rent Option: ............................................................................................................................................. 60 Check In and Check Out Time Settings: ................................................................................................... 61 Check Point Setting: ................................................................................................................................. 61 Weekend Setting ...................................................................................................................................... 61 Identity Setting:........................................................................................................................................ 62 Extra Charge Credit Limit Setting: ............................................................................................................ 62 Meal Plan Setting: .................................................................................................................................... 62 Reservation/Check In Mandatory Setting: ............................................................................................... 63 Purge Guest Data Setting: ........................................................................................................................ 64 Allowance Setting: ................................................................................................................................... 64 City Ledger/ Business Source Mandatory Settings: ................................................................................. 64 Inclusive Tax Settings: .............................................................................................................................. 64 Business Source Wise Room Type Allocation: ......................................................................................... 64 Yield Settings: ........................................................................................................................................... 65 Display Tab ................................................................................................................................................... 65 Localization .............................................................................................................................................. 65 Financial Period ........................................................................................................................................ 65 Room Layout ............................................................................................................................................ 65 Guest Name Setting ................................................................................................................................. 66 View Option ............................................................................................................................................. 66 MyKad Setting .......................................................................................................................................... 66 Extra Charge Setting................................................................................................................................. 67 Forex Module: .......................................................................................................................................... 67 Auto Update: ............................................................................................................................................ 67 Email Tab ...................................................................................................................................................... 68 General Email Settings ............................................................................................................................. 68 Reservation Email Settings....................................................................................................................... 68 Credit Card Tab ............................................................................................................................................ 68 Credit Card Server .................................................................................................................................... 68 Credit Card Charge Method ..................................................................................................................... 69 Mask Credit Card Number ....................................................................................................................... 69 Reservation Settings ................................................................................................................................ 69 Print Option Tab ........................................................................................................................................... 69 Print Invoice At......................................................................................................................................... 69 Print Folio Option: .................................................................................................................................... 70 Print Reservation Option: ........................................................................................................................ 71 Registration Form Setting: ....................................................................................................................... 71 Cashier Report Print Settings: .................................................................................................................. 71 Other Print Option: .................................................................................................................................. 72 Email Template Settings........................................................................................................................... 73 Duplicate Copy Settings ........................................................................................................................... 73 Exchange Rate for Folio: .......................................................................................................................... 73 Receipt Settings: ...................................................................................................................................... 73 Notice Tab .................................................................................................................................................... 73 Miscellaneous Tab ....................................................................................................................................... 74 FTP Settings: ............................................................................................................................................. 74 Module Settings: ...................................................................................................................................... 74 Integration Tab............................................................................................................................................. 76 Call Posting ............................................................................................................................................... 76 Accounting Interface: ............................................................................................................................... 76 Web Reservation ...................................................................................................................................... 76 Electronic Key Lock Interface (Door Lock): .............................................................................................. 76 Report Any Where Settings (RAW): ......................................................................................................... 76 Shomoos Integration................................................................................................................................ 77 Cash Drawer ............................................................................................................................................. 77 Internet Interface: .................................................................................................................................... 77 Notification Tab ........................................................................................................................................... 77 Notification for Guest: ............................................................................................................................. 78 Notification for Users: .............................................................................................................................. 78 Formula Tab ................................................................................................................................................. 78 Getting started with eZee Configuration This is the first important step in using “eZee FrontDesk NextGen”. You will need to configure the software with your property information. Basically you will enter all information like Room Type, Rate Type, Room Information, Tax, Amenities, and Room Rate etc. Depending on the size and amount of information you enter, it may take 30 minutes to 2 hours to configure. To start configuring your property follow the below mentioned steps: To launch “eZee Configuration” Module, click on this icon Desktop. from Start Menu or else launch from your “eZee NextGen Configuration” Login window will appear. Upon successful installation we create Admin user, by default we do not set up any password. Following screen will display: Select the Admin user from ‘User List’ and click on ‘Login’ button. This will Login you to “eZee Configuration Module” to perform various configurations of your property. Once logged in, you will see a screen as below. Note: When you run “eZee Configuration” for the first time, it will bring property configuration wizard. This wizard helps you quickly configure all basic information. Property Setup Tab Property Information Hotel Information Enter your hotel contact information on this screen. This information will be used to print on your reports, guest registration card, folio, receipt and invoice. Click on ‘Hotel Information’ ‘Property Information’ screen will open as shown below: Enter all basic information in the above screen ‘Save’. Special Settings: Registraton1: As a statutory requirement you may need to display your business registration number like VAT, TRN, ABN, CST, etc. on your invoices. - Enter such registration number in this box. You will be able to set such three numbers in Registration1, Registration2 and Registration3. Note: You may set different caption then Registration1, Registration2 and Registration3. You can set this caption to eZee Icon (located on top left corner) Option Notice. Logo: You can upload your logo in eZee database. This logo will be used to print on your folio, registration card, folio, invoice and report. Click on ‘Browse’ button and select your logo from your local machine. If you want to remove your logo, click on ‘Remove’ button. Back Ground Image: You can use a background image to be displayed in eZee Front Desk. This is something similar like what you have as windows desktop wall paper. Floor Management It is used to Add Floor. In order to navigate rooms easily “eZee Configuration” offers you a way by which you can define Floors. Optionally you can also define sections as floors like Beach View, Mountain View, and Street View etc. Normally this setting is helpful for big properties. It is compulsory to define one floor. Floors will be displayed in ‘Room View’ option available in eZee Front Desk. Click on ‘Floor Management’ ‘Floor List’ will open as shown below: In order to define new floor, click on ‘New’ button ‘Add/Edit Floor Information’ screen will open as shown below. Enter all the information such as Alias, Sort Key, Name and Description ‘Save’. Enter all floors and then press ‘Close’ button. You will see all floors listed in ‘Floor List’ screen. Tariff Operation Room Type This option is used to add new ‘Room Types’ to your property. Enter your room type on this screen. Define all room types you have in your property. This room types will be further used to define your rooms. Room type will also be used in feeding room rate into “eZee Configuration”. Click on ‘Room Type’ ‘Room Type’ list will open as shown below: In order to define room type, click on ‘New’ button ‘Add/Edit Room Type Information’ screen will open as shown below. Enter all information such as Alias, Sort Key, Name and Description and press ‘Save’ button. Enter all room types and then press ‘Close’ button. You will see all room types listed in ‘Room Type’ screen. Default Rate Settings: You can define default rate for the room type by entering related information in this fields for Rate, Adult rate and Child rate as per your requirements. Pax Settings: Base Adult: This represents total adult guest who can stay in this type of room at default rate. Base Child: This represents total child who can stay in this type of room at default rate. Max Adult: This represents maximum adult guests this type of room can accommodate. Max Child: This represents maximum child this type of room can accommodate. Web Settings: Contact eZee Support for ‘Default Web Inventory’, this setting is used in ‘eZee FrontDesk’ and ‘eZee Reservation’ integration. Booking Settings: Let’s say you have 100 King rooms and you want to take booking of 110 King rooms, to avoid sales loss due to cancellation you can specify ‘Over Booking Percentage’. Over Booking Percentage: Mention the percentage by which you want to over book this particular room type and the system will remember the same while accepting booking requests. Display Settings: Back Color: If you wish to visually distinguish your room type, then you can set the ‘Back Color’ to your room type by clicking on Back Color i.e. below. box. The Color screen will open as Select the required color and click on ‘OK’ button. We recommend you to select light shaded of color to avoid mix up with ‘Room Status’ color. Options Button: Web Room Type Mapping: This option is used for the integration between eZee Frontdesk and eZee Reservation module, to map the room types to retrieve the reservation from web. You can always contact the eZee Support Live Chat Desk for more information regarding the same. Always Charge Mapping: User can use this option to define the extra charges which are always charged when there is a transaction done on a particular room type. Rate Type Rate Type is used to add new Rate Types to your property. Enter your Tariff Plan/Rate Type on this screen. Define all tariff plans you offer. This rate types will be further used to define your room rate into “eZee Configuration”. Note: You can define different rates for your travel agents, corporate accounts and other business sources. Your rate types can be Rack Rate, Weekly, Monthly, Government etc. Click on ‘Rate Type’ ‘Tariff Plans’ list will open as shown below: In order to define rate type, click on ‘New’ button ‘Add/Edit Tariff Plan’ screen will open as shown below: Enter all information such as Alias, Sort Key, Name and Description ‘Save’. Enter all rate types and then press ‘Close’ button. You will see all rate types listed in ‘Tariff Plans’ screen. Special Settings: Plan Types: Hours: Select this option only if you are having rate plan which is based on hourly charges. Once you click on this option it will show you another option to set how many hours this rate type is applicable for. Days: Let say you have a rate type weekly, which you offer to guest staying for 7 days, then you should set seven in day’s box. When you will select this rate type to Check In/Reserve a guest in ‘eZee FrontDesk’, the guest’s stay will set for seven nights by default. Week Days: Select this option if you want to apply this rate type on week days. So if you have selected this option, this rate type will be applicable to your guest for all his week days stay. Note: Only one rate type can be set as ‘Week Days’. Week End: Select this option if you want to apply this rate type on week end. So if you have selected this option, this rate type will be applicable to your guest for all his week end stay. Note: Only one rate type can be set as Week End. Contact eZee Support for Web Tariff Plan. This setting is used in ‘eZee Front Desk’ and ‘eZee Reservation’ integration. For ‘Week Days’ and ‘Week End’ settings, check Edit Check In/ Edit Reservation: Over Write Seasonal Rate by Week End setting on Configuration Options Rental Rent Option. Options Button: Revenue Break down Settings: We have provided this feature for customers who want to know the breakup of the revenue generated when a room is sold. For that you will have to map the rate type with the revenues. User can create the headings for the breakups of the Revenue as per their requirement, by selecting the revenue break down option from configuration tab. To configure the Revenue Break Down settings, one must select the rate type and click on the down arrow on the ‘Options’ button and select Revenue Break Down Settings. Special Settings: Per Night: User can select this option if revenue break up is to be done based on each night of guest stay. Per Stay: User can select this option if revenue break up is to be done based on full stay of guest stay. On Arrival: User can select this option if per stay option is ticked, if revenue break up is to be done at the time of arrival of guest. On Departure: User can select this option if per stay option is ticked, if revenue break up is to be done at the time of departure of guest. Cost/Adult: User can define the cost that should be calculated per adult. Cost/Child: User can define the cost that should be calculated per child. Day Use Cost/Adult: User can define the cost that should be calculated per adult when it is a day use. Day Use Cost /Child: User can define the cost that should be calculated per child when it is a day use. Amt.: User can define the values entered is amount. Per.: User can define the values entered is percent value. Meal Plan Settings: This option is used to map the meal plans you have created with the rate types. To map a particular meal plan with the rate type, first select the rate type you have created. Now, click on the options button and select ‘Meal Plan Settings’ and select the meal plan that you want to provide with the selected rate type. Save the changes. Define Tariff Configure/set the rates of your rooms that you will rent to guests. There are two types in which you can configure the Tariff for the room types you have created. 1. Linear Rate Type (This is set as the default way of setting Rate type) 2. Non – Linear Rate Type “eZee Configuration” offer you to define your room rates for different room type, seasons and business sources. At this point we have not yet defined seasons and business source. Note: The room rate which you will configure has to be ‘RATE BEFORE TAX’. Also the rate has to be per night, meaning if you have rate type weekly, and total room rate for seven days is 700, and then you will need to configure 100 as a rate. Linear Rate Type configuration Click on ‘Define Tariff’ option ‘Room Rate Definition’ screen will open as shown below: Enter appropriate room rate in ‘Tariff’ column. You can also enter charges for Extra Adults and Extra Child. Press ‘Save’ button once done. Select Option: Use this box if you want to search and edit rates for room type, tariff plans, and season or business source. Note: You will have to define Season and Business Source to define special rate for them. Tariff Inclusive Tax: As per default setting the rates are not including tax. If you want to define the rates with tax then user can check this option and enter the rates. Non-Linear Rate Type configuration Uncheck the liner Rate Type settings from eZee Configuration>> eZee Icon >> configuration settings >> Rental tab >>Rent Option. Save the changes. Now when you click on the Define Tariff option, you will see the below shown screen for configuring tariff for the room types you have created. This screen is same as the one that you get when setting Tariff for Linear Rate Type, except for the fact that you can define rates for up to 4th adult and 4th child. As shown in the above screen shot, for room type – Twins and rate plan – Daily, you can configure tariff for each adult and child to accommodate in the room as per the maximum adult/child setting you have set for that particular room type. This way of configuring the rates helps reducing the rate plan/rate types you have to create in the liner rate type configurations and many hotels prefers this type of configuration as they have different rates for 1 adult + 1 Child, 2 Adult + 1 Child, 2 Adult + 2 Child and so on. For more clarification and guidance on how this works, you can anytime contact our support desk person. P.S.: Users need to define different rates for Week Days and Weekends. This option can be useful, when a property wants to sell room Hotel Rooms for Different rates during the Weekends. Source/Season Season Types As seen in the Hospitality Industry, Hotels offers different rates during different seasons. Using the Season Types options, Users can define different Season types they offer in their Hotels. For example, for seasons like Christmas, Easter, Users can create Season Type as Festivals, for seasons like Summer Vacations, Winter Vacations, Users can create seasons Like Vacations. Users can Click on “New” and create different Season Types as provided in the Hotel, and the same can be Edited or Deleted using the “Edit” or “Delete” Button. Season Many times property offer different rates during different seasons like Peak Season, Low Season, festive Season, etc. You can define all such seasons applicable to your installation and further define rates applicable to these seasons. eZee Front Desk will use this rate automatically for all ‘Check In’ and ‘Reservations’. Note: Season definition is optional information. Click on the ‘Property Setup’ tab and then click on ‘Season’. ‘Seasons’ screen will op en as shown below: In order to define season, click on ‘New’ button ‘Add/Edit Season’ screen will open as shown below: Enter all information such as Season Name, Description and Season Period ‘Save’. Enter all seasons and then press ‘Close’ button. You will see all season listed in ‘Seasons’ screen. Special Settings: Season Period: You can define the Period of the Season from what date the Season Starts and on which date it may end. Note: You define the season period here, whereas the Seasonal Rates would be applicable as per the Duration set below. Duration: If you want your season to start and end between specific date ranges, use this setting. If ‘Start Date’ and ‘End Date’ is not specified, season will be applicable for all years. Business Source Sales and Marketing department would like to do sales analysis of the source of the business. Such information and analysis would be helpful to design promotion campaign, marketing budget or even helpful to determine what rate to offer to which travel agent. You can define all your business sources here and associate this business source with Check In/Reservation. Click on the ‘Business Source’ ‘Business Source’ screen will open as shown below: In order to define new Business Source, click on ‘New’ button ‘Add/Edit Business Source’ screen will open as shown below: Enter all information such as Company Information, Address, Contact Information, Commission Plan and Other Information ’Save’. Enter all Business Source and then press ‘Close’ button. You will see all Business Source listed in ‘Business Source’ screen. Special Settings: Market Place: Select the category of business source such as Travel Agent, Taxi, etc. Highlight the ‘Business Source’ to select. Plan: Select payment commission to be given to the selected ‘Business Source’ from the drop down list. (You can track commissions in reports of business source). Value: You can select either xx% or xx amount in this field; based on the plan selected in Commission Field. Plan → % of all Night: This will give a commission % of room rate based on the full stay of guest. Plan → % of first Night: This will give a commission % of room rate based on the first night stay of guest. Plan → Fixed amount per night: This will give a fixed amount commission based on the whole stay of guest. Plan → Fixed amount per stay: This will give a fixed amount commission based on the first night information of guest. Other Options: Define special Room Rates: If you select this option, it will allow you to set up special rates for this Business Source. You can enter this special rate in Room Rates screen. At the time of check in, system can pick up this rate automatically on selection of appropriate options. Define Special Seasons: Users can use this option if they would like to offers different seasonal rates for a guest checking In through a business Source. Once kept a tick on this option, when going to the Define Tariff option, you can select the Business Source and the Season and define Speacial rates for the Source to be applied during the Seasons as created. Create an Account: Select this option if you are going to offer credit sales for this Business Source. Selecting this option, an Account will be created for this Business Source; same can be used to post credit sales. This account can be found in City Ledger. It will copy all information from Business Source to create an Account. Others Room Amenities Enter your room amenities on this screen. Define all room amenities your room may have. These room amenities will be further used to define your rooms. In “eZee FrontDesk”, on walk in and reservation wizard, you can search room availability on the basis of amenities. Click on ‘Room Amenities’ Room amenities list will open as shown below. In order to define Amenity, click on ‘New’ button ‘Add/Edit Amenity’ screen will open as shown below: Enter all information such as Alias, Name, and Description ’Save’. Enter all amenities and then press ‘Close’ button. You will see all room amenities listed in ‘Amenities’ screen. Room Owner When Management Company manages condominiums and apartments, they would like to enter information of the owner of condominium/apartment. This owner information will be used to generate monthly owner statements. Click on ‘Room Owner’ ‘Room Owner’ list will open as shown below: In order to define Room Owner, click on ‘New Add/Edit Owner’ screen will open as shown below: Enter all information such as Name, Address, Contact Information, Commission Plan and select rooms ‘Save’. Enter all Room owners and then press ‘Close’ button. You will see all Room owners listed in Room owners list. Commission Plan Information: Plan: Select payment commission to be given to the selected Business Source from the drop down list. (You can track commissions in reports of business source). Value: You can select either xx% or xx amount in this field; based on the plan selected in Commission Field. % of all Night: This will give a commission % of room rate based on the full stay of guest. % of first Night: This will give a commission % of room rate based on the first night stay of guest. Fixed amount per night: This will give a fixed amount commission based on the whole stay of guest. Room Operation Room Operation This option is used to create/add rooms to your property. Define all saleable rooms you may have in your property. Do not define those rooms which are not sold to guest. Total rooms defined here will be used to calculate ADR, Occupancy %, RevPar and other statistical figures. Click on ‘Room Operation’ ‘Rooms’ screen will open as shown below: In order to define new Room, click on ‘New’ ‘Add/Edit Room’ screen will open as shown below: Enter all information such as Alias, Sort Key, Name, Room Type, Floor and Remark ‘Save’. Enter all rooms and then press ‘Close’ button. You will see all rooms listed in ‘Rooms’ list. Special Settings: Top: This is top display position of the box representing this room in Room View. Left: This is left display position of the box representing this room in Room View. Height: This is height of the box representing this room in Room View. Width: This is width of the box representing this room in Room View. Room Amenities: Select few/all room amenities available in this room. Connect Room: Sometimes we have connector between rooms and we may sell them together. Select connecting room from a drop down. In “eZee FrontDesk” when we use ‘Suite With’ option such rooms will be checked in together. Room Owner: When Management Company manages condominiums and apartments; they would like to enter information of the owner of apartment/condominium. This owner information will be used to generate monthly owner statements. Phone Extension: Enter phone extension of this room. If you have multiple extensions in this room separate them by comma. This information will be used by eZee Call Logging interface. Data Extension: This is a feature developed for internet usage on computer and is reserved for future purpose. House Keeping: Select days for House Keeping to be done on this room. Inactive Room: Once room is sold, this sale is recorded in reports and has to be kept in record; hence eZee doesn’t allow user to delete the rooms. But in case you are not using this room, then to take it off from the list you can make it active. Room Images: If you wish to enter some of images of room. These images will be available to show to guest from “eZee FrontDesk”. In “eZee FrontDesk”, right click on any room from ‘Room View’ and ‘Room List’, and select ‘Room Property’, these images will be displayed there. Make sure you only use small images; else software performance can be affected. Room Size “eZee Configuration” offer you a way by which you can arrange rooms on your screen. On ‘Room View’ in “eZee FrontDesk”, rooms will be displayed in this order. To arrange rooms you can simply drag and drop rooms to appropriate position. By doing this it will set ‘Top’ and ‘Left’ positions to selected rooms. We suggest you to arrange your rooms as your floor plan, so it becomes very intuitive for user to work on it. You can also modify size of the box which represents room on ‘Room View’. Click on the ‘Property Setup’ menu and then click ‘Room Size’. A ‘Room Size’ screen will open as shown below: Select rooms/floor/room type and set desired size and press ‘Save’ button. Move Room to Floor: This option can be used to move rooms from one floor to other. Auto Arrange If you want to arrange your rooms in rows and columns you can use ‘Auto Arrange’ option. If you have defined multiple floors, you will need to ‘Auto Arrange’ rooms on each floor. Save Position As soon as you arrange rooms manually/auto hit ‘Save Position’. Configuration Tab Tariff Information Tax Information This option is used to Add Tax. As a statutory requirement, you will be collecting tax from your guests as per government rules. You will need to configure your tax structure in “eZee Configuration”. Collect all information about applicable tax in your city/state/country and enter it in “eZee Configuration”. Tax applicable on room rate is referred as ‘Rental Tax’. Rental Tax configuration is different than tax applicable on ‘Extra Charges’. “eZee Configuration” offers three taxes to configure, so if you have only two taxes applicable in your region, keep Tax3 caption as blank. Click on ‘Tax Information’ ‘Tax Information’ screen will open as shown below: General Settings Tab: Tax Caption: As a first step configure your tax name. Exempt After: You can define the number of days after which the tax should be exempted for a stay. Apply Tax on: Keep a tick on the Charges on which the Tax is to be applied on, whether being on the Extra Adult or Extra Child or both staying in the room Tax Information Tab: Enter applicable tax and press ‘Add’ button. This Tax can be either in % or fixed amount. Note: Amendment in tax configuration will reflect from next business day. So if you configure tax for today, new tax structure will be applied only after Night Audit. As a statutory requirement you can further configure tax option to automatically exempt after some days. Advance Settings Options: As shown in the above screen shot, when you click on the Advance Settings button, a small window pops up where you can set advance settings like for – 1. Luxury Tax setting should be applied on rack rate or not. 2. Luxury Tax should be applied after discount or before discount. 3. VAT charges should be applied on Rack Rate or not. 4. VAT charges should be applied after discount or before. 5. VAT charges should be added only after adding Luxury Tax. 6. Service Charge should be applied on Rack Rate or not. 7. Service Charges should be applied after discount or before. 8. Service Charges after applying Luxury Tax. 9. Service Charges after applying VAT charges. Feel free to check with our support desk person for more detailed information on how this settings will affect your taxes. Slab Tax: You can also configure slab wise tax settings if your country laws demands so. Please refer to the below screenshot for an example of the same. Exchange Rate This option is used to add Exchange Rate. Some property accepts multiple currencies from their Guests. In order to allow this you will need to define all such currencies in “eZee Configuration”. At the time of first run, “eZee Configuration Wizard” asks for your base currency. The base currency is normally your local currency. Click on ‘Exchange Rate’ ‘Exchange Rates’ screen will open as shown below: In order to define Exchange Rate, click on ‘New’ button ‘Add/Edit Exchange Rate’ screen will open as shown below: Enter all information such as Country, Currency, Sign and Exchange Rate and press ‘Save’ button. Note: Formula for calculating exchange rate will be base currency (divided or multiplied) by exchange rate of foreign currency. Enter all Exchange Rates and then press ‘Close’ button. You will see all Exchange Rates listed in ‘Exchange Rates’ screen. Note: The Exchange Rate shown in red color is a base currency. All your reports in eZee Front Desk will be in base currency. Please note that you cannot delete base currency. If the base currency is not your local currency, you can edit. The Exchange Rate defined in this section will be used when your Guests makes payment in foreign currencies. The Exchange Rate will also be used if you want to print Folio in foreign currency. More information on foreign currency folio is available in eZee Front Desk user manual. As we all know, currency rates are subject to change frequently, as soon as it is effective for your case, please change it in system. Settlement Type In your hotel you may offer different payment options to your guests. Define all such Payment Types and you can use it when you settle your guest folio. Click on ‘Payment Type’ ‘Payment Types’ screen will open as shown below: In order to define payment type, click on ‘New’ button ‘Add/Edit Payment Type’ screen will open as shown below: Enter all information’s such as Alias and Name and press ‘Save’ button. Enter all payment types and then press ‘Close’ button. You will see all payment types listed in ‘Payment Types’ screen. Payment Options: Credit Card: Select this option if your payment type is a credit card. Process Credit Card: eZee offers integration with credit card payment gateways, if you have availed such integration and if you want this payment type to be processed by your payment gateway, select this option. Open Cash Drawer: eZee offers you integration with cash drawer and if you want to give command of opening cash drawer while taking payment from this payment type, select this option. So in eZee Front Desk whenever payment is taken from this payment type, it will open cash drawer. Surcharge Settings: This setting will help you in scenario where you want to collect surcharge from those guests paying by credit card. Other Charge: The surcharge will be posted to guest folio as this Extra Charge. Receipt No. Generation Details: This setting will allow you to generate receipt number as per selected configuration. You can select either of the option:Generate general voucher number. Generate private/manual voucher number. If you select the manual option, you have the option to check mark “Notify for Blank Receipt No.” to avoid generating receipts without the voucher number. Extra Charge Extra Charges You may offer extra services to your guests like Internet service, Phone Calls, Extra Bed, and Airport Transportation etc. You can define all such services under Extra Charge and you can post them to guest folio/invoice. Click on ‘Extra Charges’ ‘Extra Charges’ screen will open as shown below: In order to define extra charge, click on ‘New’ button and ‘Add/Edit Extra Charge’ screen will open as shown below: Enter all information such as Alias, Sort Key, Name, Description, Rate, Applicable Tax and press ‘Save’ button. Enter all extra charges and then press ‘Close’ button. You will see all extra charges listed in ‘Extra Charges’ list. Other Settings: Reoccuring: Charge like Extra Bed is a charge normally posted for each night of the guest stay. Please select ‘Reoccur’ options for such extra charges so if applied they will be posted automatically for each night. Reoccur charge for the day will be posted during ‘Night Audit’. Always Charge: Let us say you have a flat city tax of 2$ per guest stay. Select ‘Always Charge’ option for such extra charges which are compulsory per guest stay. ‘Always Charge’ Type’ of extra charge will be applied automatically to all guest check in. Phone Call Charge: This option will be useful, if you are using eZee Call Logging – integration between PABX/Call Accounting Software and “eZee Front Desk”. Contact eZee Support for more information’s on eZee Call Logging interface. Payable: This option is useful, to define charges which are to be used as an Account Payable for the Hotel. Please contact eZee Support for information regarding the same. Receivable: This option is useful, to define charges which are to be used as an Account Payable for the Hotel. Please contact eZee Support for information regarding the same. Voucher Number: You can select either of the option: Generate general voucher number. Generate private/manual voucher number. If you select the manual option, you have the option to check mark “Notify for Blank Receipt No.” to avoid generating receipts without the voucher number. Note: If you are using “eZee Burrp” for your restaurant/bar/gift shop, and if you transfer POS bill to Room, they will be posted under ‘Extra Charges’ section of “eZee Front Desk”. A ‘Folio Transfer’ from one room to other room will appear in ‘Extra Charges’ section of “eZee Front Desk”. Package: Package is a collection of extra charges or services or facilities bundled together. The charges of package do not include lodging charges and does not adjust the rate. For example: Sightseeing can be a group of services of Breakfast, travelling fare, Entrance fees to monuments, etc. which can be offered to guest. This package will be posted under Extra Charges section of eZee Front Desk. Click on ‘Package’ ‘Package’ screen will open as shown below: In order to define new Package, click on ‘New’ button ‘Add/Edit Extra Charge Package’ screen will open as shown below: Enter all information such as Alias, Sort Key, Name, Description, select associated extra charges and press ‘Save’ button. Enter all Packages and then press ‘Close’ button. You will see all Packages listed in ‘Packages’ list. Note: To combine extra charges of package, extra charges have to be defined with the rate. Deposit In your property you may collect an advance payment as a deposit for metallic keys, remote control, advance payment, internet, phone calls, etc. Click on ‘Deposit’ ‘Deposit’ screen will open as shown below: In order to define Deposit, click on ‘New’ button ‘Add/Edit Deposit’ screen will open as shown below: Enter all information such as Alias, Name, Description, select associated extra charges and press ‘Save’ button. Enter all Deposits and then press ‘Close’ button. You will see all Deposits listed in Deposits list. User Management User It is important to create separate account for all users who are going to use this software. All users should log in using their username and password. You can give different set of rights to different users depending on their roles. Depending on these rights, different users will have access to different functions of the software. Click on ‘User’ ‘Users’ list will open as shown below: In order to define new User, click on ‘New’ button ‘Add/Edit User’ screen will open as shown below: Enter all information such as User Name, Password, Verify Password and User Role. Select/Unselect Operational Privilege and Report Privilege and press ‘Save’ button. Enter all users and then press ‘Close’ button. You will see all user listed in ‘Users’ screen. Related Settings: User Role: You can group functions for different user role. By default those functions will be available to users who are assigned those ‘User Role’. Click ‘Configuration’ menu ‘User Role’ to modify default user roles. Access POS: If you want to allow this user to work in eZee Point Of Sale Module, check mark this option. Notification Setting: Using this option, Administration can define the contact details of the User, when they are needed to notified regarding any messages. Right to Left Interface: This setting is for users using software in Arabic language. Language: eZee NextGen is operational in any language that is written on planet earth. You can have a set up, where one of your users runs the software with English interface and the other runs with Spanish or any other language. Contact eZee Support for more information. Discount: Enter discount percentage this user can offer to guest (sentence to be changed). User will only be able to offer discount if he has been given “Allow to give discount (General Settings)” and “Change Tariff (General Settings)” rights. Minimum payment required to check in guest: Set this value in percentage, if you want your user to collect minimum payment before doing a check in for any guest. Discount Settings: Administration can use this option to define the maximum amount or percentage Operational Privilege Tab: While using eZee FrontDesk Software many important functions are accessible only if the user has the rights; like payment related all functions, editing back date entry, etc. Checkmark the privileges to give additional privilege than the defined set of privilege.(To be changed) To define the set of privilege go to User Role user can modify default user roles. Report Privilege Tab: eZee Front Desk Software generates many reports. Checkmark the report viewing privileges which you want to assign to this user. User Role/Ability Level: In Hotels, we normally find various groups/levels of users like Front Office Manager, Reservation Manager, and Cashier etc. As you have seen in ‘Add User’ section of this user manual, eZee Front Desk comes with very flexible yet strong user management which allows System Administrator to configure user rights to allow/limit only specific part/function of the system. Normally management gives equal rights to a group of same users, like all Front Desk Clerks should have equal ability level/access of the system. eZee Front Desk comes with predefined User Role, when you can further customize it as per your requirement and can use when you create users. Click on ‘User Role’ ‘User Role’ screen will open as shown below: As per your requirement, please select/unselect any of the user privilege for any of the User Role. Once you are done with all such changes, please click on ‘Save’ button. Note: Changes in User Role will not affect all existing users. When you add new user, as per User Role selected, all applicable user privileges are assigned by default. However, you can further unselect some of the user privileges if you want. Others DNR (Do Not Rent) Reason: In order to offer best Guest Services, when you want to record guest information like contact information, rate offered, birth date, guest history and other. It will be equally important to record information about misbehaving guests whom you don’t want to provide service again in future. eZee offers very simple yet powerful tool as DNR to handle this. Click on DNR Reason Do Not Rent (DNR) List screen will open as shown below: In order to define DNR Reason, click on ‘New’ button ’Add/Edit DNR Reason’ screen will open as shown below. Enter information such as Name and Description and press ‘Save’ button. Enter all DNR reasons and then press ‘Close’ button. You will see all DNR reasons listed in ‘DNR List’ screen. Note: Information on how to use DNR reason is available in eZee FrontDesk user manual guide. Room Status Color eZee FrontDesk uses color codes for easy visual representation of data. Like we have learned in Room Type section, that you can set different back ground color for different room type, allowing the user to easily determine Room Type. Same way, you can also set up different colors of your choice for room status. These colors will be used in eZee FrontDesk section. Click on ‘Status Color’ ‘Room Status Color’ screen will open as shown below: Click on color box, as for example click on to set up room status color for Vacant Room. This will open a color palette screen where you can select color of your choice. Select the color of your choice and press ‘OK’ button. Optionally you can click on ‘Define Custom Colors’ for more choice. Set up colors for each status and press ‘Save’. Special Settings: Default Button: Press Default button to restore room status to system colors. Note: It is recommended to select darker shades of colors for Room Status for better visibility. Identity Types In recent time it is very important (compulsory in most of the countries) to record guest identification. Define all such Identification Types you may record. Click on ‘Identity Type’ ’Identity Types’ screen will open as shown below: In order to define Identity Type, click on ‘New’ button ‘Add/Edit Guest Identity’ screen will open as shown below: Enter information such as Name and Description and press ‘Save’ button. Enter all Identity Types and then press ‘Close’ button. You will see all Identity Types listed in ‘Identity Types’ screen. Note: eZee Front Desk offers a way to scan Passport, Driving License and many such documents directly at the time of check in. Such scanned images will be stored with Guest Record for future reference. More information is available in eZee Front Desk user manual. eZee Front Desk also offers a way by which you can directly read guest information from Passport, Driving License, Business Card and National ID. These options are available for some countries only. Contact eZee Support for more information. Follow-up Types You can add all the follow up types for your staff to be used as Reminder which will alert Front Desk staff or leave a follow-up comment to give instructions to another staff. For Example: Payment. Further these can be used to appear as color bars at the bottom of concerned screens. More information is available in eZee Front Desk user manual. Click on ‘Follow-up Type’ ‘Follow-up Type’ screen will open as shown below: In order to define Follow-up Type, click on ‘New’ button ’Follow-up Type Information’ screen will open as shown below: Enter Type Name and select display color of bar and press ‘Save’ button. Enter all Follow-up Types and then press ‘Close’ button. You will see all Follow-up Types listed in ‘Follow-up Types’ screen. GRM Master eZee Front Desk has a module named “Guest Relationship Module” which is used to handle guest relations. More information on GRM module is available in “Guest Relationship Module” user manual. The information that you configure here will help you to create and maintain your guest’s database easily. For starters, we can configure salutation, which is used when you enter the guest name while checking them in. You can select master option salutation define all the prefixes you will be using before guest name from ‘New’ button. Revenue Break Down This is basically indicative cost (breakdown) for your revenue generated on room tariff. Click on ‘Revenue Break Down’ ‘Revenue Break Downs’ screen will open as shown below: In order to define Revenue Break Down, click on ‘New’ button ‘Add/Edit Revenue Break Down’ screen will open as shown below: Enter Alias, Name and Description and press ‘Save’ button. Enter all Revenues Types and then press ‘Close’ button. You will see all Revenue Break Downs listed in ‘Revenue Break Down’ screen. These Revenue Breakdowns are mapped on Rate Type which is mentioned on page 12 of the manual. Meal Plan Many times property offers Lunch, Breakfast, City tour, Pick up and others with stay. When such offers are applicable; property issues vouchers to guests. Also hotel management needs to print reports for various departments like kitchen, pick up department, city tour department to do needful arrangements. Note: To apply Meal plan you will have to map the ‘Rate Type’ with ‘Meal Plan Settings’. Click on ‘Meal Plan’ ‘Meal Plan’ screen will open as shown below: In order to define Meal Plan, click on ‘New’ button ‘Add/Edit Meal Plan/Package’ screen will open as shown below: Enter Alias, Name and Description and press ‘Save’ button. Enter all Meal Plan and then press ‘Close’ button. You will see all Meal Plans listed in Meal Plan screen. Note: In configuration option we have setting ‘Post Package Charge Separately on folio’, by default it is set to ‘do not post charges separately’. Options Button: Meal Plan Coupon: These are basically vouchers which you can offer your guest to present when they want to consume the meal. You can define the coupon layout to suit your requirement. For the ease we have given 1 default template on installation. Click on ‘Meal Plan Coupon’ ‘Coupon Template’ screen will open as shown below: In order to define Meal Plan Coupon, click on ‘New’ button ‘Coupon Layout Designer’ screen will open as shown below: Drag and drop the fields mentioned in field’s line. You can set the color, font and size of each filed in template. 'Suppress Caption' will clear your Coupon layout. Press ‘Save’ button. Enter all Meal Plan coupons and then press Close button. You will see all Meal Plans coupons listed in Meal Plan screen. Meal Plan Settings: This is to map the extra charges associated with this Meal Plan. You can select the extra charges from the pre configured list (from extra charges) Special Settings: Per Night: This setting will post the meal plan and meal plan charges for each night stay of guest. Per Stay: This setting will post meal plan and meal plan charges once for full stay of guest. Cost: You can also define the cost of meal for adult, child, extra adult and extra child. Print Coupon: This setting will activate to print coupon by default on saving meal plan while Check In. Miscellaneous Tab Expense Management Remerge Pay/Rec As per the recent changes in eZee Configuration taxation updates, Please contact eZee Live Support Desk regarding more information regarding this option. Account Management Account Type For better management account department wants to categorize their City Ledger accounts, Account Types are such categories. Once defined, they can be used at the time of creating City Ledger Account. Click on ‘Account Type’ ‘Account Types’ screen will open as shown below: In order to define Account Type, click on ‘New’ button ‘Add/Edit Account Type’ screen will open as shown below: Enter information such as Alias and Name and press ‘Save’ button. Enter all Account Types and then press ‘Close’ button. You will see all Account Types listed in ‘Account Types’ screen. Account Most of the hotels sign contract with Corporate companies, Travel Agents, and Websites where these accounts gives regular business and these accounts will pay on behalf of the guests staying in the hotel. The Account is offered a specific credit limit for a specific time frame. The city ledger account holder/corporation can clear the dues by the agreed time frame; say for example on monthly basis. The dues are added to the account whenever the corporate employee is provided the service and the company can have the convenience of paying it once every month. Basically these are credit sales. Search Criteria > you can use ‘Search Criteria’ located at the top of the window to quickly locate the account you are looking for if you manage a long list of accounts. After entering filter criteria, hit on search icon. Account List: Allows users to see the list of all the City Ledger Accounts created. User can choose further option to work on it. New: Allows you to define Numerous City Ledger accounts. Click on ‘New’ button ’Add/Edit Account’ screen will open enter all information such as Account Name, Address, Contact Information and Other Information. Credit Limit can be defined to mention the maximum credit to be allowed to this Account. Opening Balance option can be used to define the pending balance as on date. Also, Users can keep a tick on the option “Create a Business Source” option to create a Business Source for this City ledger account. You will see all Accounts listed in Account List. Edit: Allows you to edit the City Ledger. Highlight the City Ledger and hit on ‘Edit’ button. Delete: Deletes the selected City Ledger. Highlight the Business Source and hit on ‘Delete’ button. Options Button: Account Type (Ledger): Select the account type (Ledgers) you want to create. Invoicing: Allows user to print the visible Invoice details. Payment Posting: Allows you to see the history of the guest who stayed under this account. This field is for reference only and not editable in this screen. Explanation of Payment posting form: Number: Displays Folio number. Date: Displays date of stay of the guest. Description: Displays name of the guest. Amount: Displays payment posted in FD against the folio. Paid: it displays actual cash paid amount under this account mentioned against the folios. Open: Balance amount to be taken. Pay: Allows you to pay the actual collected amount from this Account. Merge Profile: If information for one account has been created twice or more by mistake or sometimes the companies merge, then it is possible to merge the Accounts together to combine the statistical information and revenues. Note: This is Irreversible process, so one has to be very sure while you merge. Steps to merge profile: Select two Accounts from the combo box and hit on ‘Merge’ Button. By default sets the first record as master record. You can make any source as Master through ‘Make Master’. Select the Account which you want to make as Master. Master record is displayed in bold font. Hit on Consolidate button. Market Place Some of the hotel may want to keep track of the market place their guest belongs to. Such information can be further used by Sales and Marketing department. Click on ‘Market Place’ ‘Market Codes Types’ screen will open as shown below: In order to define Market Place, click on ‘New’ button ‘Add/Edit Market Place’ screen will open as shown below: Enter Alias and Name and press ‘Save’ button. Enter all Market Segments and then press ‘Close’ button. You will see all Market Segments listed in ‘Market Segments’ screen. Business Source Sales and Marketing department would like to do sales analysis of the source of the business. Such information and analysis would be helpful to design promotion campaign, marketing budget or even helpful to determine what rate to offer to which travel agent. You can define your entire business source here and associate this business source with Check In/Reservation. You can see the commission in ‘Business Source Commission Report’. New: Allows you to create new Business Source. Click on New button Add/Edit Business Source screen will open enter all information such as Company Information, Address, Contact Information, Commission Plan and Other Information press ‘Save’ button. You will see all Business Source listed in Business Source list. Special Settings: Commission Plan Information: Plan: Plan is to define the commission of the Business Source. % of all Night: This will give commission based on the full stay of guest. % of First Night: This will give commission based on the first night rate of guest. Fixed amount per night: This will give a commission based on the whole stay of guest. Fixed amount per stay: This will give a commission based on the first night information of guest. Value: Based on the plan selected in Commission field, you can select either xx% or xx amount in this field; Define Special Rate: To define commissionable/special rate for the source, check mark this option. It will allow you to set up special rates for this Business Source. Steps To Define Special Rate: To make this source visible in the Define Tariff menu, check mark this option. From Define Tariff menu configure Commissionable rate for Business Source. At the time of Check In you can select this special rate. Create an Account: Select this option if you are going to offer credit sales for this Business Source. Selecting this option, an Account will be created for this Business Source; same can be used to post credit sales. This account can be found in City Ledger. It will copy all information from Business Source to create an Account. Print Summary: Allows you to print the Summary of count and finances of Guests coming from that Business Source. To view the summary highlight the account select the Date range hit on ‘Display’ button, which shows the full amount of the stay of the Guest with total Tax. Merge Profile: To combine, incorporate or unite the financial attributes of two or more profiles into a single enterprise is called merging. To merge the sources Check Mark the sources and hit on Merge Profile. Note: This is Irreversible process, so one has to be very sure while you merge. Steps to merge profile: Select two Business Sources from the combo box and hit on ‘Merge’ Button. By default set the first record as master record. You can make any source as Master through Make Master. Select the Account which you want to make as Master. Master record is displayed in bold font. Click on finish button. Edit: Allows you to edit the Business Source. Highlight the Business Source and hit on ‘Edit’ button. Delete: Deletes the selected Business Source. Highlight the Business Source and hit on ‘Delete’ button. Transport: Hotels many a times offer Pick-up and Drop Off facilities to the guest. Using these options, Hoteliers can keep a track of the pickups and drops offs to be done regarding the transportation modes available. Mode This option can be used to define different modes of transportations available for transportation which is offered to the guest for the transportation. Users can click on “New” to define all the modes provided by the hotel. Transport Name Users can use this option to define the different companies providing transportation facilities as per the modes defined. It can be used to provide a list of transportation to the guest as per there convenience. Stations Hoteliers can use this option to define the nearby Station for transportation which can be later used to keep a track of the hotel transport facilities provided for pickup and drop if provided by the hotel. Schedule Users can use this option to define the schedule of the transportation as requested by a guest to keep a track of the facilities being provided. Others Cash Drawer At the time of closing shift, user prints Cashier Report, where they hand over Cash for the shift. The normal practice is to print the denomination of cash. This screen offers you to define such currency denomination which can be used on Cashier Report. Click on ‘Cash Drawer’ ‘Cash Drawer’ screen will open as shown below: In order to define Currency Denomination, click on ‘New’ button ‘Add/Edit Cash Drawer Currency’ screen will open as shown below: Enter Currency and Currency Sign and press ‘Save’ button. Enter all Currency Denomination and then press ‘Close’ button. You will see all Currencies listed in ‘Cash Drawer’ screen. Non Rental Object For better hotel visualization you can define non-rental spaces existing in your property such as Swimming Pool, Garden, Reception, etc. Click on the ‘Non Rental Object’ a screen will open as shown below: In order to define Non-Rental Object, click on ‘New’ ‘Non Rental Object’ screen will open as shown below: Enter all information such as name, description, set placement, alignment, etc., Special Settings: Type: Others: If user wants to create a normal non-rental object user can use this option. Type: Banquet: If user wants to create banquet then user can select this option. Floor: Select the floor on which this object is to be placed. Back Color: You can set the ‘Back Color’ by clicking on box. Select the required color and click on ‘OK’ button. Fore Color: You can set the Font Color by clicking on box. Select the required color and click on ‘OK’ button. Back Image: You can use background image to be displayed in this field. This is something similar like what you have as windows desktop wall paper. Font: You can set the Font that needs to be used to display text. Reason/Remark In eZee Software whenever you perform void action, it compulsorily asks for Void Reason. Define all the reasons here. Click on the Reason/Remark a screen will open as shown below: In order to define Reason/Remark, click on ‘New’ Add/Edit Reason/Remark screen will open as shown below: Enter Alias, reason and select the Category for which this void reason is configured. After saving you will find all the reasons listed in the Reason/Remark list. Language By default eZee FrontDesk Software comes in English language, but eZee Software supports any language. Example: Arabic, Spanish, French, Vietnamese, etc. By simply importing the XML of language, eZee Software will be displayed in your local language. Import Language User can import the language pack and can see the software labels and language in your local language. Click on import language Import language screen will open Browse the path from this icon select the XML file Import. Note: To see other language user language should be selected as ‘Custom language’. To select custom1 language >> go to ‘Configuration’ Tab user edit/new user language setting custom1 save restart application. Export Language After making changes in language user can save a copy of the changed language by exporting the language. Click on ‘Export Language’ ‘Export language’ screen will open Browse the path from this icon and Export. Master Language and Other Languages This option is used to change the language in various screens. The basic purpose of this window is to change the text of the default screen to ‘Changed Language’. Export Master This is to export booking data and is customized for one client. Contact eZee Support desk for further details. Configuration Option eZee Front Desk Configuration provides some features which you can customize and do the settings so that the features function properly as per your requirement. Click on Icon located at top left corner. A drop down menu will display select ‘Configuration Settings’ Menu another screen named Options will display; here users will need to do the customization as per their requirements. General Tab Report Settings: Export Report Path: User can define the path where reports need to be exported. User can click on select the path. Open Report after Export: Activate this setting to open the report automatically after exporting it. to Invoice Settings: Invoice settings option allows defining the number settings for registration, folio, receipt, reservation, cancellation, booking, voucher and bill that will be generated while performing different operations with eZee NextGen at your Hotel and Restaurant. Type of Number: User can specify the number style which can be either eZee FrontDesk default numbering or auto increment. Reset: User can specify the period of reset for the numbering. Clicking allows user to specify the period, it can be none, yearly, monthly or daily. If monthly option is selected the reset will be done on 1st of every month. A prefix will be like first four digits shows year and next two digits shows month, so for July 2010 a number like 201007 will be a prefix. Prefix: User can specify a text which should be kept as a prefix before the number. For example: For Registration Number, one can mention the prefix as RZN. So whenever a reservation is done, the number generated will be RZN1234. This will help you to understand which number was generated from which operation. Start From: User can specify a starting number. The basic reason for this option is that, if a property is using software and also has some data in some other software. For example: previous software had 55 reservations then user can specify the number in starting as 56. Image Settings: Image Path: User can define the path where images need to be stored. User can click on path. to select the Night Audit Settings: Night Audit After: User can select this option if the user wants to define a time after which the night audit process can be done. Show Night Audit Reminder: If you keep a tick on this option, system would give you a pop-up at the start of the software if the Night Audit is not done as per the time mentioned for the Night Audit, so that the user does not do any transaction on the past date. Dirty after Days: This option can be used to define the number of days after which a vacant room is to be shown as dirty, so that the Housekeeping department can take the necessary steps regarding it. Make Occupied Room Dirty at Night Audit: User can keep a tick on this option, so that the Housekeeping department is notified regarding the necessary actions to be taken on an Occupied room each day. Enable Auto Night Audit: User can select this option if the user wants to do night audit quickly and do not want to go through the whole wizard. Settings: User can define the settings for booking and reservation. The step to be executed for booking and reservation which did not arrive is: mark as ‘No Show’, mark as ‘Void’ or mark as ‘Cancel’. Post room Rate for Suspense room: User can specify if the room rate has to be posted for suspense room during night audit. Freeze Data after day close: User can specify if the data need to be freeze after the day close process is completed. Post Mean Plan Charges: Check this option if you want to post the meal plan charges when the night audit is done. Mandatory Post Reoccur Charge: User can keep a tick on this option, so that the Extra Charges applied to a room, which are marked as “Reoccurring” to be posted mandatorily, even if the Night Auditor forgets to do so. Enable Print Report: Using can select this option, if they want to auto print certain reports after the Night Audit has been done. The Settings option can be useful to define the reports which are to be printed, previewed or exported. Upload Report on FTP Host: User can keep a tick on this option to upload the reports on FTP Host, so that they can be accessed by the User from the Internet anytime or anywhere they want. You can contact the eZee Support Live Desk for more information on the same. Auto backup: User can select this option if an automatic backup needs to be done at the time of night audit. User can click on to select the path. Upload Backup on FTP Host: User can select this option to upload the Database Backup to be uploaded on the FTP host, so that even this there is a system crash, and the database can be recovered, Users can download the database from the FTP Host and restore it, so that there is no lose of database. You can always contact the eZee Support Live Desk for more information regarding the same. Rental Tab Rent Option: Round off Type: User can specify the setting that needs to be used to do a round off for the value. A few pre-defined options are available. User can select from those, or can select ‘manual’, if the user wants to do a round off manually. Round off Limit: User can specify a value of the round off type as per their requirement. This setting will convert the folio amount in Round off figures. If you do not want it to be auto rounded off, keep it manual. Minimum rental age: User can specify the age of the guest whom the room should be rented. Age calculations are done based on the date of birth entered at the time of check in. Check In through wizard: User can specify if a wizard (step by step screens to help you take the walk-in) should be displayed when the user directly clicks on the room to do a check in. Reservation through Wizard: User can specify if a wizard (step by step screens to help you take the reservation) should be displayed when the user clicks on New Reservation Button on the Front Office Tab. Default Inclusive rate on Wizard Dialog: User can specify the rate when entered on the first step of check in wizard and that should be considered default as inclusive of rate. Enable Reservation Serializable: This feature if checked; will help to put your reservation on hold and go for some other urgent task if required to be attended and continue entering the details of the same reservation when you return. A window pops up asking to resume the previously saved reservation. If cancelled, you can take a new reservation. Linear Rate Setting: This feature in checked marked by default. When this is de-activated, it will change the way you can configure the rate type and tariff for a room type based on the pax you allow to accommodate in a room while check-in. We will see the detailed explanation of this feature when we learn how to define Tariff under Tariff Operation group of functions. Permit only zero balance check out: Activate this setting if you do not want your users to check out if the folio balance is not zero. Show Checkout Button Before One Day: User can keep a tick on this option, so that the Checkout Button is showed in the Guest Room before one day of the departure date as mentioned while doing the check in. Note: The checkout button in the Guest Room will only show on the departure date, if users want to check out the guest before the departure date, you will first need to change the stay of the guest. Apply Defined Rates on Business Source Selection: Users can keep a tick on this option, if they have defined special rates to be applied for a guest checking in via any business source. Minimum Balance Required to Extend Stay: User can keep a tick on this option is they do not want users to extend the stay of a guest, if there s no minimum balance to extend the stay as defined while doing the check in. Edit check in/edit reservation over write seasonal rate by weekend rate: User can specify if the seasonal rate should be replaced by weekend rate. Considering that the property has a different rate for weekdays and weekend. Remarks is Mandatory For Payment: Administration can keep a tick on this option if they want user to mention remarks on doing any payment in the software. Check In and Check Out Time Settings: Note: If 24 Hours Check out Time option is unchecked then the user can specify the ‘Check In’ and ‘Check Out’ time. Check In Time: User can specify what should be the standard check in time. Check Out Time: User can specify what should be the standard check out time. 24 Hours Check out Time: User can specify if the check out time should be calculated as 24 hours from the time of check in. When this setting is activated, system time will be taken as the check in time. Enable day use feature: User can specify if the system should allow hourly rentals. Night posting for day used: User can specify that posting of rent should be done for day use. Hence room will be available for same day check in and check out. Consider same day check in check out day use: User can specify if same day check in and checkout should be termed as day used. Grace period: User can specify the time in hours that should be given extra when checking out. The system will show the late checkout message only after the grace period is exceeded. Check Point Setting: Use check point feature: User can specify which options should be considered in check point. The options available are mini bar, laundry, House Keeping, POS, Zero Balance. If you activate this feature, the system will verify with the heads of all the checked departments if anything is due for the checking out client. This empowers the front desk to hold the check out procedure if anything is due from any of the department. Weekend Setting User can specify the days that need to be considered as weekend. Identity Setting: Check In only when ID exist: User can specify that a check in is possible only after the ID information is entered. This feature is useful in regions/countries where id information is mandatory for check in procedure. Extra Charge Credit Limit Setting: Extra charge posting type: User can specify the limit for the extra charges. Available options are ‘unlimited’, ‘up to folio balance’ and ‘up to credit limit’. Extra charge credit limit: User can specify the credit limit; this option is useful if the above option is selected as ‘up to credit limit’. Daily Credit: User can specify if the value should be considered as credit on daily basis or for the full stay. POS posting type: User can specify the limit for the charge from POS. Available options is ‘unlimited’, ‘up to folio balance’ and ‘up to credit limit’. POS credit limit: User can specify the credit limit; this option is useful if the above option is selected as ‘up to credit limit’. Meal Plan Setting: Posting Settings: Post meal plan charge separately: User can specify if the meal plan charge should be calculated separately from rent or should be part of rent. Move Check In date charges to Check Out: Enabling this option will move the charges posted on Check In date to Check Out date for the meal plan offered. Enable Meal Plan Settlement: When you check mark this option, you will be able to settle the meal plan charges (if offered) from the extra charge tab of the room. You will see a ‘Settle Meal Plan’ button in the bottom of the extra charge tab which when clicked will give you more options to settle the meal plan. Allow Check Out with pending posting: As it mentions, if you check mark this option, the system will allow you to check out the guest even if the Meal Plan posting is not done on the room. Bifurcate Meal Plan and Tariff On Wizard: If any meal plan is assigned to a room type, when a user does a new checkin and mention the Room Rate while doing the Checkin through the Checkin Wizard, keeping a tick on this option bifurcates, the room rate with the meal plan rate extensively. Show Default Meal Plan settings to add: Keeping a tick on this option shows pop up to the users to add the default meal plan configuration to a guest. Printing Settings: Print Duplicate Caption on Coupon: Check mark this option if you want to print the duplicate caption on the duplicate coupon that you print. Duplicate Caption: Mention the caption that you want to print on the coupon when you print a duplicate copy. Print only one coupon for all guest: If there is more than one PAX staying in the room, keeping a tick on this option, print only one meal plan coupon for all the guests. Reservation/Check In Mandatory Setting: You can specify if the first name, last name, business source, Phone and or Email information is suppose to be mandatory or not from here for Reservation, Check In and Booking. This means, if the detail of the type specified is not given then the Reservation, Check In and Bookings won’t be possible. Purge Guest Data Setting: Purge guest data after: User can specify the number of days after which the guest data should be deleted completely from the system. Allowance Setting: Allowance as extra charge: User can specify the heading under which the allowance should be considered as extra charge. City Ledger/ Business Source Mandatory Settings: User can specify the details to be mandatorily mentioned while creating a Business Source or City Ledger account in the software. Inclusive Tax Settings: User can define the Taxes which are inclusive in the Room Rate using this option Business Source Wise Room Type Allocation: Keeping a tick on this option, allows user to allocate Room types to a business Source, which can be allocated from the eZee Configuration Business Source option. This can be useful, if a hotel has more Transaction done via any Business Source. Yield Settings: Please contact eZee Live Support desk for more information regarding it. Display Tab Localization User can specify the details about country name, currency, country alias, state province caption and zip/postal code caption. Enable city/state auto lookup: User can enable the city and state lookup based on available country and state. Text alignment right to left: User can specify the orientation of text; this is of help for Arabic, Hebrew and many other languages which are written right to left, if user wants to use that language in the software then the user can use this option. Auto Backup Settings: User can use this option to define a Windows scheduled task so that the system takes an Auto Backup of the software database automatically. Financial Period User can specify the setting based on which financial period is counted. User can specify ’From Date’ and month and ‘To Date’ and month. Room Layout User can specify the setting to display room type on the room. User can also specify the setting to display guest name on the room. Guest Name Setting User can specify the setting in what way the guest name should be displayed in Folios. User can specify either first name or the last name should be displayed first. View Option User can specify the number of days that needs to be displayed in grid view. User can also specify the number of digits to be displayed after decimal point. You can keep a tick on the options mentioned as to Notify the user if there is balance due for a guest on the stay view, or change the Stay View Date Format, and or to show the checkout status color after the checkout of a guest. MyKad Setting Please contact eZee support to get this setting done. This setting enables you to read the MyKad card. MyKad is the compulsory identity document for Malaysian citizens aged 12 and above. Introduced by the National Registration Department of Malaysia, besides the main purpose of the card as a validation tool and proof of citizenship other than the birth certificate, MyKad also serves as a valid driver's license, an ATM card, an electronic purse, and a public key, among other applications, as part of the Malaysian Government Multipurpose Card (GMPC) initiative. Extra Charge Setting User can specify the captions for Tax1, Tax2 and Tax3. Forex Module: Enable this to see Forex tab along with others in eZee Front Desk. Note: Forex Module is an Add-on which is not available with the Basic eZee Frontdesk software. It is to be0020purchased additionally and can be used to deal in Multiple currencies. Auto Update: Keeping a tick on this option, enables system to automatically check for any new version of the software and update the version. Auto Reminder on Reservation/Booking: Administration can set reminders for User’s for a booking or reservation arriving at the hotel. Frontdesk User Message Box Setting: This option can be used to define the period after which a message for a user can be marked as read Screen Saver: This option can be used to define the period after which the screen saver can be turned on, so that when a user is not around the computer screen, it locks the software, and no other can operate the software as it requires User password to re-login. Registration no. Caption: This option can be used to define the caption of the Registration Numbers to be printed on Guest Folio’s/Bill’s. Email Tab General Email Settings User can get these details from the internet service provider. Reservation Email Settings User can specify the subject and message to be used in the outgoing reservation confirmation email. User can find more option on Email Template Settings under ‘Print ‘option tab. Credit Card Tab Credit Card Server Please contact eZee support to get this setting done. Currently eZee supports 2 card processors – X Charge and Mercury payment system. Please contact eZee Support to know if this can work for your region. Credit Card Charge Method User can specify the way credit card should be considered, it can first authorize the payment and then do a sale or a direct sale at the first swipe. Mask Credit Card Number User can specify the number of digits to be displayed; system has kept this feature to ensure security of credit card numbers. Reservation Settings User can specify if the credit card option for payment should be kept compulsory for reservations. Print Option Tab Print Invoice At Print at check in: User can specify if a print should be done automatic at time of check in. User can also specify the template that should be used for printing. Print at check out: User can specify if a print should be done automatic at time of check out. User can also specify the template that should be used for printing. Don’t Print, I will press print button: If user select this option then both first and second options will be disabled and there won’t be any automatic printing. Custom Invoice: This option can be used to select the Invoice specially customized on the property requirement. Print Folio in Default Currency: Check mark this option if you want the folio in default currency you have set. Print Bill No on invoice: User can specify if bill number should be displayed on invoice. Don’t Print close folio on Checkout time: If there are multiple folios on a room, out of which one has been thoroughly paid and has been closed, so keeping a tick on this option does ot print the closed folio at the time of checkout. Show Print Button After Check out only: Keeping a tick on this option, would not show the print option in a checked in room, until the time of checkout. Print gate pass at check out: User can specify if gate pass should be printed at check out. Show print button after check out only: User can specify if the print button should be displayed only after check out. Include Complimentary room in ADR: Keeping a tick on this option enables including the complimentary room to be included in the Average Daily Revenue of the hotel to be shown in the reports. Print Folio Option: Folio Print: User can specify which template should be used for printing folio. User can also specify number of copies that should be considered for default print. Preview option helps user to view the styles and orientation of fields on the template. ABC allows user to change the text that appear on the folio. Detail Folio Print: User can specify which template should be used for printing detail folio. User can also specify number of copies that should be considered for default printing. Preview option helps user to view the styles and orientation of fields on the template. ABC button allows user to change the text that appear on the folio. Custom Folio: If a property has requested for a folio customization, they can select their customized folio using this option Print Reservation Option: Print at Reservation: User can specify if a print should be done automatic at time of reservation. User can also specify the template that should be used for printing. Don’t Print, I will press print button: If user selects this option then the Reservation Voucher will be displayed and there won’t be any automatic printing. Top Margin (In Inch): User can specify a top margin when printing reservation; this can be used when printing is done on letterhead. Preview option helps user to view the styles and orientation of fields on the template. ABC button allows user to change the text that appear on the folio. Custom Folio: If a property has requested for a folio customization, they can select their customized folio using this option Registration Form Setting: Reg. Form: User can specify which template should be used for printing registration form. User can also specify number of copies that should be considered for default print. Preview option helps user to view the styles and orientation of fields on the template. ABC button allows user to change the text that appear on the folio. Custom Folio: If a property has requested for a folio customization, they can select their customized folio using this option Cashier Report Print Settings: Administration can use this option to define the template in which the cashier report at the end of shift is to be printed. Other Print Option: Print Reg. Form at check in: User can select this option if a registration card needs to be printed at the time of check in. Print Property Info. On folio: User can select this option if property information should be printed on folios. If property uses printing on letter head property can turn this option ‘OFF’. Print receipt at settlement: User can select this option if a receipt is to be printed automatically each time any payment is done. Show check out time on folio: User can select this option if check out time should be displayed on folio. Show Phone no on folio: User can select this option if phone number should be displayed on folio. Show Credit card no: User can select this option if credit card number should be displayed on folio. Show rate type on folio: User can select this option if rate type should be displayed on folio. Display Room Alias on Report: User can select this option, if they want the Room Alias to be shown on the reports Show Notice on folio: User can select this option if notice should be displayed on folio. Show Thank you message: User can select this option if thank you message should be displayed on folio. Show desk clerk on folio: User can select this option if name of desk clerk should be displayed on folio. Show guest signature: User can select this option if space to have guest do a signature should be displayed on folio. Show room type on folio: User can select this option if room type should be displayed on folio. Show Room No. on folio: User can select this option if room number should be displayed on folio. Print Two receipts: User can select this option if two receipts should be printed. Print Two vouchers: User can select this option if two vouchers should be printed. Print Voucher on Post Extra Charge: User can select this option if a voucher should be printed automatically each time an extra charge is added. Show currency sign on folio: User can select this option if currency symbol should be displayed on folio. Show DB posting in folio: User can select this option if direct billing details should be displayed on folio. Show folio transfer in folio: Enable this to show if there was a folio transfer done. Show bill to in folio: Check mark this option to show ‘Bill To’ info in the folio. Show Folio Transfer in Folio: Check mark this option to show if the folio is transferred. Show Voucher No. on Folio: Check Mark this option if the voucher number is to be showed on the Folio. Show Checkout Time on Folio: Check Mark this option if the Checkout Time is to be showed on the Guest Folio. Show Folio Data Till as on Date: Keeping a tick on this option, enables the print of charges on the folio only till the current date when the folio is printed. Email Template Settings User can specify what email template should be used while sending emails from group, reservation and folio. To create a template user will have to open eZee Front Desk and under GRM menu select option letter template. Duplicate Copy Settings User can specify if a label ’Duplicate Copy’ should be displayed on folio, receipt and voucher. User can also specify the number of copy to be considered as original and should not have the text ’Duplicate Copy’ on it. Exchange Rate for Folio: Select the appropriate option as per your requirement. Check In Date: If this option is selected, the exchange rate will be applied as per the date when check in happened. The exchange rate changes (if increased or decreased) will not affect the rent of the stay. Check Out Date: If this option is selected, the exchange rate will be applicable as per the date when check out is happening. Receipt Settings: Print Property Info. On Receipt: Keep a tick on this option, if you want the property information to be printed on the payment receipt. Top Margin: You can define the space of the margin to be left blank in the receipt. Show Pay / Rec Remark in Detail: Keeping a tick on this options enables the print of the full remark as mentioned while taking the payment, no matter how long it maybe. Notice Tab User can specify the notice that needs to be displayed in footer under various categories. Options are folio, reservation, group notice, cancellation, reservation greetings, direct billing folio, reg. form, and email @ check out, voucher / receipt notice and unassigned booking remark. Miscellaneous Tab FTP Settings: Administration can configure the FTP detail settings of their website to be configured here. Module Settings: Note: Type of Number, Prefix and Start From are same for all options given below except the housekeeping tab. Type of Number: User can specify the number style which can be either eZee FrontDesk default numbering or auto increment. Prefix: User can specify a text which should be kept as a prefix before the number. Example: If eZee is kept as prefix the number generates as eZee1, eZee2 and so on. Start From: User can specify a starting number. The basic reason for this option is that if a property is using software and also has some data in some other software. Example: previous software had 55 reservations then user can specify the number in start from as 56. Minibar Minibar POS Outlet: User can specify the name of the POS outlet to be used for the module. Auto Number Setting: Explained above in the start of this tab under Module Settings. Fields used are issue voucher #, audit voucher # and return voucher #. Laundry Post to Room: User can specify the extra charge account who should handle the charge. Direct Payment: User can specify the misc. sales type account who should handle the charge. Auto Number Setting: Explained above in the start of this tab under Module Settings. Fields used are guest laundry #, hotel laundry # and daily linen #. Banquet Auto Number Setting: Explained above in the start of this tab under Module Settings. Fields used are cancellation #, reservation # and voucher #. GRM Auto Number Setting: Explained above in the start of this tab under Module Settings. Fields used are incident #, response #, inquiry # and follow up #. House Keeping POS Item Store: User can specify the name of the POS store to be used for the module. Recent check in time from current: User can specify the time in hours and minutes for the operation. Recent check out time from current: User can specify the time in hours and minutes for the operation. Notify status on Front Desk at check in: User can specify if the Front Desk should be notified with the status of the room at the time of check in. Notify status on Front Desk at check out: User can specify if the Front Desk should be notified with the status of the room at the time of check out. Show maids remarks on Front Desk rooms: User can specify if the maid’s remarks should be shown on the Front Desk room. Payroll Auto Number Setting: Explained above in the start of this tab under Module Settings. Fields used are pay slip #, payment # and loan #. Integration Tab Note: These are some integration provided by eZee Software which is customized on case to case basis. Hence user is requested to contact eZee support to get the settings done. These integrations will not work in demo version, as it has to be customized on individual basis. Call Posting: This integration will acts as a bridge between a call accounting software and eZee NextGen software. It will read the call charge information from call accounting software and post it to eZee NextGen. Calls will be directly posted to room folios. All calls that are made from rooms not rented are posted in a special location for your review. Accounting Interface: This integration works as a bridge between eZee NextGen and your Financial Accounting software. This interface transfers financial transactions like Sales, Purchase, Account Receivable, Accounts Payable, Receipt, Vouchers etc. from eZee NextGen to Financial Accounting Software. Interface to Quick Books, Sage Accounting (Peach Tree) and Tally are readily available. However, we can write interface to any other financial accounting software provided that the technical information is available from the Vendor. Web Reservation: eZee Reservation enables your website to offer web based reservation. Further we offer integration between eZee Reservation and eZee Front Desk NextGen. Having this interface all Reservation you receive on your website will be directly fetched to eZee Front Desk NextGen. Optionally you can also upload your room inventory and room rate from eZee Front Desk NextGen to eZee Reservation database. Electronic Key Lock Interface (Door Lock): Typically, all door locks come with a software so when a guest checks in, desk clerk checks in guest in Hotel Software and Door Lock software. Having this interface in place, you only have to check in guest in eZee Front Desk NextGen and it will send necessary signals to Key Card encoder to make Room Key for the guest for given check in and checkout date. This further adds control to the hotel operation. As such, eZee Front Desk NextGen can be integrated with any door locks, provided that their technical information are available from Vendor. Interfaces to INHOVA System, VingCard Vision System, Digicard Mifare System, Digicard Temic System, CISA System, Smart Card System, RF Lock, Hune Lock, BT Lock, Saf Lok, etc are readily available. Report Any Where Settings (RAW): Report Any Where is an add-on which allows the top level management to look at all important report over internet using a simple web browser in real time. Data from Hotel Database is uploaded to Web Server in real time, and reports can be accessed using an internet connection from any corner of the world. You do not need expensive broadband connection to upload data from Hotel to Web; it can work even on a dial up connection. Shomoos Integration: Shomoos is a unique and modern web based electronic service that is designed and offered by Al-Elm to link all tourist companies with each other as well as provide a centralized database on tourist information. Tourist companies can use and share information with each other for statistical and business cooperation purposes. This integration is available only for customers from Middle East region. Cash Drawer: Play safe by integrating your cash drawers with eZee NextGen. Upon integration, the cash drawer can be accessed only when cash related transaction happens in the software. Cash Drawer remains locked in all other cases. Internet Interface: This interface will act as a bridge between your internet billing software and eZee FrontDesk. It will seamlessly transfer and post the charges from the internet billing software to guest rooms for the time and bandwidth usage made by the guests. Notification Tab Notification is a module which helps the admin with email and sms notifications of various predefined actions. There are two types of notifications predefined in this module; One for Guests and the other for the user of this software. The admin has to simply set the email server settings to send email notifications and select the service provider and set the user name and password details for sending SMS notifications. Once these settings are set, you simply need to check mark the notification that you want to send. Below listed are the notifications that are currently available. Notification for Guest: 1. 2. 3. 4. 5. 6. Reservation Confirmation Booking Confirmation Cancel Reservation Confirmation Cancel Booking Confirmation Welcome message on Check in Thanks Message on Check out Notification for Users: 1. 2. 3. 4. 5. 6. 7. 8. 9. Administrative Data on Day Close New Reservation / Booking And Room Position Void Booking Void Reservation Void Check in/Check out Void Folio Void Payment Void Extra Charge Discount given Formula Tab Administration can use this tab to define the formula of their revenue as to be calculated to be shown in the reports. Please contact eZee Live Chat Support Desk if any query on this. Congratulations and thank you very much for all your patience. We have successfully gone through all the minimal required settings and information to use “eZee Front Desk” at your property. You can now start using eZee Front Desk and explore it to its full potential. Feel free to contact eZee support anytime if you need further assistance while using eZee Front Desk.