1
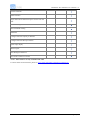
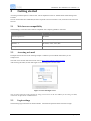
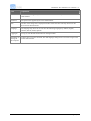
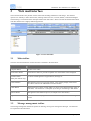
MailEnable Web Mail End User Manual v 2.x
MailEnable Web Mail
End User Manual V 2.x
MailEnable Messaging Services
for Microsoft Windows NT/2000/2003
MailEnable Pty. Ltd.
486 Neerim Road
Murrumbeena
VIC 3163
Australia
t: +61 3 9569 0772
f: +61 3 9530 4066
www.mailenable.com
Date last modified 12/04/2006 4:49 PM
Page 1 of 24
MailEnable Web Mail End User Manual v 2.x
Table of Contents
1
2
Introduction to web mail ........................................................................... 3
Getting started ........................................................................................... 5
2.1
2.2
2.3
3
Web mail interface..................................................................................... 7
3.1
3.2
3.3
3.4
3.5
3.6
4
Creating a folder ...................................................................................................17
Editing a folder .....................................................................................................17
Deleting a folder ...................................................................................................17
Folders view .........................................................................................................17
Calendar Management ............................................................................ 18
8.1
8.2
8.3
9
Receiving messages ..............................................................................................16
Displaying messages .............................................................................................16
Receiving attachments...........................................................................................16
Folders ...................................................................................................... 17
7.1
7.2
7.3
7.4
8
View contacts........................................................................................................15
Edit contacts .........................................................................................................15
Add to contacts .....................................................................................................15
Receiving and reading messages ............................................................. 16
6.1
6.2
6.3
7
Create a new message ...........................................................................................11
Adding attachment to new message.......................................................................12
Selecting a contact from address book...................................................................12
Selecting a contact from the Global Address List ..................................................13
Spell checker.........................................................................................................13
Sending a message ................................................................................................13
Contact management ............................................................................... 15
5.1
5.2
5.3
6
Main toolbar ...........................................................................................................7
Message management toolbar..................................................................................7
Search toolbar .........................................................................................................8
Message list ............................................................................................................8
Message view..........................................................................................................9
Usage Display .......................................................................................................10
Composing and sending messages........................................................... 11
4.1
4.2
4.3
4.4
4.5
4.6
5
Web browser compatibility .....................................................................................5
Accessing web mail ................................................................................................5
Login settings..........................................................................................................5
Creating an appointment .......................................................................................18
Saving or cancelling an appointment .....................................................................18
Appointment editing..............................................................................................19
Main toolbar options................................................................................ 20
9.1
9.2
9.3
9.4
9.5
9.6
Login tab...............................................................................................................20
Pop retrieval tab ....................................................................................................20
Redirection tab......................................................................................................21
Auto response .......................................................................................................21
Filtering ................................................................................................................22
Settings tab ...........................................................................................................23
Page 2 of 24
MailEnable Web Mail End User Manual v 2.x
1
Introduction to web mail
Web mail is an email service that uses a web browser as an interface allowing the viewing, sending, receiving,
editing and deleting of email, just as you would with your standard email clients such as Outlook or Eudora.
Web mail is ideal for mobile users because it permits access to email from anywhere, anytime with any computer
connected to the Internet.
The MailEnable web mail service is similar to clients such as Hotmail, Yahoo and other web mail services that
are available on the Internet. With easy access, emails can be viewed while on a remote server instead of having
to download messages with each account login, as would occur with a POP service.
Both MailEnable Professional Edition and Enterprise Edition include the web mail service. Below is a list of
features that are included in each product.
Feature Availability
Standard
Professional
Edition v 1.0 Edition v 2.0
Enterprise
Edition v 2.0
Web mail client
Personal Folders
POP Retrieval
Multi Character Sets
Print Messages from web mail
View Message Headers in web mail
Mailbox Redirection
Auto signature
HTML E-Mail Editor
Personal Contacts
Skins/re-branding
Allow users to change passwords through web mail
*NEW! .NET web mail
*NEW! Search by subject, sender and content
*NEW! Multi-lingual
*NEW! Spell checking (including multiple dictionaries)
*NEW! Multiple select from Address Book
*NEW! Lightweight HTML editor
Page 3 of 24
MailEnable Web Mail End User Manual v 2.x
Personal Calendar
Global Contacts
Import Outlook and Outlook Express contacts into web
mail
Mailbox message filters
Rich text/HTML editing
Subfolders
Configure web mail Layout per Domain
Configure web mail Skin per Domain
Quota usage display
Multi-Lingual
New Message Notification
Save Items as Draft in web mail
*Note: These features are only available with .NET
For more details on these features please see: http://www.mailenable.com/features/webmail.asp
Page 4 of 24
MailEnable Web Mail End User Manual v 2.x
2
Getting started
Accessing web mail requires a mail account. The IT department or Server Administrator should arrange mail
accounts.
Once an account has been established, all that is required to access web mail is a PC, Internet access and a web
browser.
2.1
Web browser compatibility
The following is a list of browsers that are compatible with composing HTML in web mail.
Browser
Operating System
Internet Explorer 5.5 +
Windows
Firefox
Windows, Linux, Unix, Mac
Mozilla 1.7+
Windows, Linux, Unix, Mac
Netscape 7.1+
Windows, Linux, Unix, Mac
2.2
Accessing web mail
Example.com will be used as the working example. Substitute your own DNS name where you see
example.com
The URL access for web mail will in most cases be http://www.example.com/mewebmail
After entering this URL, the web mail login screen should appear as shown below:
Figure 2-1 Web mail login screen
Note: If unsure about accessing the Internet, using a web browser or the web address for accessing web mail,
contact the IT department or Administrator.
2.3
Login settings
The following login selections are made available. Username and password must be entered to login.
Page 5 of 24
MailEnable Web Mail End User Manual v 2.x
Field
Explanation
Username
The username is supplied by the server administrator and is usually the first section of the
email address.
Password
The password is supplied by the server administrator.
Skin
The skin is the design of the displayed interface within web mail. The drop down box will
show various skin selections.
Language
The language drop down arrow will show the following languages by default; English,
German, French, Italian, Spanish.
Logging In
To log in, click the left mouse button on the login button.
Remember my
settings for
this computer
Tick this box to save the username, skin and language settings for the next time a login occurs
on the same machine.
Page 6 of 24
MailEnable Web Mail End User Manual v 2.x
3
Web mail interface
The web mail interface can perform various email tasks including maintenance and storage. The interface
operates in a similarly to other email clients, allowing email to be sent, received, deleted, created and managed.
The following is a screenshot of the Enterprise Edition web mail inbox. Please note that the Professional Edition
web mail interface has a slightly different appearance.
Figure 3-1 Web mail inbox
3.1
Main toolbar
The main web mail toolbar has various functions as detailed in the table below.
Feature Button
Explanation
Compose Button
Creates a new email.
Check Inbox Button
Each time this button is pressed an updated view of the folder will be displayed.
Calendar Button
Creation and management of appointments, meetings etc.
(Enterprise Edition only)
Contacts Button
Management of server level stored contacts. This will only display contacts that
have been created in the MailEnable web mail interface.
Folder Button
Management and creation of mail folders (as shown in the left hand display panel of
web mail). The folders list is collapsible by clicking on the heading to hide details.
Options Button
Management of the mailbox options (see Chapter 9 for more details)
Log Off Button
This will automatically log of the current mailbox securely and return to the log in
screen.
3.2
Message management toolbar
The message management toolbar has options for deleting, moving and viewing mail messages. The functions
are explained in the table below.
Page 7 of 24
MailEnable Web Mail End User Manual v 2.x
Field
Explanation
Current Folder
This is a display of the folder that is currently being accessed. This is relevant to
the messages that are being displayed in the message list.
Delete Selected
To the left hand side of each message there is a tick box. Each time you place a
tick in the box by clicking the email is classed as being selected. After a tick is
placed in the box(es) the options Delete Selected or Move Items to Folder are
made available.
Move Items to Folder
To move items from the current folder to another folder select the item in the
display screen by placing a tick in the selection box beside any email(s). Then
select the drop down box adjacent to the Move Items to Folder heading and
select a folder to move the messages to by clicking on it. Select the Go button.
Page
If there are a large number of emails in the current display folder, the list will be
divided into pages. Navigate between these pages by using this Go to Page feature.
Select a page number by selecting the drop down box adjacent to the number and
select the number of the page to navigate to.
3.3
Search toolbar
Search the message list for messages that contain specific words OR sentences (enclosed in double quotes, e.g.
this is a test message ). The search can be done on the From field, Subject or the actual Body (message
content). The result of the search will be a new list of messages that contains those words/sentences. The list of
matching messages can be navigated through as if it were just any other list of messages from either the Inbox or
other folders.
When doing a word search, the search words must be separated by spaces. The results list will contain any
message that has any of those words in the specified search field (i.e. From , Subject or Body).
When doing a hard search (i.e. searching for whole sentences), the search string must be enclosed inside double
quotes. The search will only return a list of messages that contain that entire sentence (enclosed in double
quotes).
3.4
Message list
Selecting Check Inbox or the Inbox folder from the left hand menu will display the message list. The
message lists displays email summary details such as sender, subject, the date of delivery and the size of the
message. Clicking the heading items in the list will sort by priority, attachments, sender, subject, date and size.
Click the heading item twice to reverse order of the list. The following table describes options for the message
list.
Field
Explanation
Select Checkbox
To the left hand side of each message there is a tick box. Each time you place a
tick in the box by selecting the email is classed as being selected. After a tick is
placed in the box(s) you can then use the options Delete Selected or Move Items
to Folder. In the message display heading line you will also see a tick box. If you
place a tick in this box it will select every message in the current folder on the
current page.
Open Message
Select the mail icon to open the message and the message display window will be
shown.
Page 8 of 24
MailEnable Web Mail End User Manual v 2.x
View Attachment
When a message contains an attachment, select the attachment icon in the
message list to open or run the file.
Read Message (Open in
same page display view)
To view a message in the message display window a select either the from
address, subject, date or size to open.
3.5
Message view
When a mail message is selected in the message list, the message details and body of the message is displayed.
From here you can Reply, Reply All, Forward or Delete a particular message. Message attachments and
message headers can be viewed. The message can also be printed.
There is also a setting to open/compose a message in a new window. This is described in section 9.6. The table
below describes the various options available in message view mode.
Field
Explanation
Reply
To reply to a sender select the reply button. This will invoke a reply message window
that acts similar to a compose new message window except the address of the
recipient and sender are automatically entered.
Reply all
The Reply all button is used when to reply to a message when the message was sent to
several users and the reply is required to be sent to all original recipients. These users
are automatically entered in the To field of a reply when Reply All is used. The
Reply All button will also include the senders address in the new message.
Forward
When an email is received and the message is to be sent on to another email address,
the forward button can be used. This is similar to replying to a message, however
instead of a blank window, a new window already containing the original message to
be sent on is displayed. From here, enter any recipients that are to receive the message
in the TO, CC or BCC text boxes.
Delete
If a message is to be deleted or moved to the Deleted Items folder, select the delete
button to remove the file from the current folder list.
Attachments
Selecting this button will allow the viewing and saving of attachments.
Print
The printing of an email can be done through this screen as long as a working printer
and driver are installed. After selecting the button a print preview screen is displayed.
To continue to print this message, select the Print link in the top right hand corner of
the print preview screen.
View Headers
This button will allow the header properties of the current message to be seen. This
can assist with the detection of forged email and spam messages.
Headers show the message receipt details and more advanced details such as;
Message-ID this is the message number or name of file stored on the server in the
mailbox inbox.
X-Mailer
This is the client that the current message is being viewed with.
MIME-Version
This is the version of the MIME encoding method.
Content-Type This is the format of the message and outlines what boundaries can be
expected to be found within the message.
X-Read: 1
X-Read: 1" indicates that a message has been read
Page 9 of 24
MailEnable Web Mail End User Manual v 2.x
Back to messages
3.6
This button will return to the inbox message list display of the current mailbox.
Usage Display
The usage display (on left-hand panel) shows the size of the mailbox and how much space has been used. The
usage display is collapsible by clicking the heading.
Page 10 of 24
MailEnable Web Mail End User Manual v 2.x
4
Composing and sending messages
4.1
Create a new message
To compose a new email, select the Compose button in the main toolbar. After selecting this button a new
message window will be displayed, allowing an email to be created, addressed and sent. The following diagram
shows the new message window.
Figure 4-1 New message window (Enterprise Edition)
The only requirement for sending a message is at least one recipient in the To: entry box. The body of the
message can be written in the large text box at the bottom of the screen as shown in Figure 4-1. The table below
describes the message fields in detail.
Field
Explanation
From
Once an email address is selected here it will be displayed in the From address at the recipients
address. Some mailboxes will simply have one address, not allowing this to be changed. If
several mailboxes are linked to an account the From address of the email can be changed by
selecting the drop down arrow.
To
The TO entry box is where a destination email address is entered. It is important that the address
is correctly typed as one incorrect keystroke of a letter or number in this combo box will mean
that an email may not reach its destination. You can select an email address(es) from your
contacts list by clicking on the To..: link.
Cc
The CC entry box works similar and has the same functionality as the To: text box, in that any
email address entered here will receive the email message along with any attachments. Cc: is an
abbreviation of Carbon Copy and in business terms is usually equated to For Your Inclusion
or For Your Perusal .
Bcc
The BCC text box has the same functionality as the Cc: combo box and any address entered
here will again receive the message. The fundamental difference between the CC: and Bcc: is
any recipient of a message in the To: or Cc: text boxes will not know the recipients in the Bcc:
address have received the email message. Bcc: is an abbreviation of Blind Carbon Copy and
when a person receives a message from the Bcc: box they can see all other people that received
the message however no other recipient except for the sender knows that the email addresses in
the Bcc: box have received the email.
Page 11 of 24
MailEnable Web Mail End User Manual v 2.x
Subject
The subject text box is where a short description of what the message to be sent is about or what
it contains.
Attachments
The attachments text box simply displays what attachments are associated or are attached to the
message. After clicking the attachments, a further screen will appear where you can browse
your computer in a Windows Explorer window for files to attach (one at a time).
4.2
Adding attachment to new message
After clicking on the Attachments link as previously mentioned, a window will be shown to allow attachments to
be added. Click on Browse in the window and using the Windows file browser, select the file to add as an
attachment (one at a time).
Once a file has been selected the Attachments window will contain the filename of the document chosen. Select
the add button and the file attachment will be complete.
If, after selecting a file to attach, it is required to be removed, click the Delete button in main display window.
4.3
Selecting a contact from address book
Within the compose new message screen, a contact can be selected from the personal contacts address book. At
the beginning of each text box in the compose screen you can see the links To:, CC: and BCC: click on these
items to bring up the address book as shown below.
It is important that the Contacts address book is selected in the top right hand corner as highlighted below in
orange.
Figure 4-2 Adding contacts from Personal Address book
Select the contact name of the person to send the email to and then select the Add button. When the Add button
has been selected the name will be shown in the right hand recipient s panel.
It is also possible to select multiple entries from the address book (hold down CTRL or SHIFT while selecting
addresses) and use the Add button to add all the selected entries to the Recipients list.
If you add recipient(s) by mistake they can be removed by clicking in the right hand Recipients panel to select
the recipient you would like to remove then clicking the Remove button.
Once you have selected all the required email recipients click on the update button and you will be returned to
the compose window with all the recipients in the text box that was selected i.e. TO:, CC, BCC.
Page 12 of 24
MailEnable Web Mail End User Manual v 2.x
If you change you mind or clicked the text box button in error you can select the Cancel button to be returned
back to the compose screen with no recipients added.
4.4
Selecting a contact from the Global Address List
MailEnable Enterprise Edition has the option to select contacts from a Global Address List. Global Address Lists
are configured by the manager or server operator. The Global Address list can be seen by all of the mailboxes
within the post office that it is configured for.
The selection of contacts in this list is the same as the personal contact address book except that the selection box
on the top right hand side has Global Address List Selected (as shown below circled in orange). You can swap
between both personal contact lists and the Global Address List by clicking on this combo box.
Figure 4-3 Global Address List Selection
4.5
Spell checker
Web mail has a comprehensive spell checker that supports all five languages (English, German, Spanish, French
and Italian). This spell checker is integrated into all the different message editors, i.e. plain text editor, and the 2
HTML editors Lightweight HTML & Heavyweight HTML, see section 9.6 for more details on selecting
message editors.
4.6
Sending a message
Once the previous steps are completed, as outlined in this chapter, the message is ready to be sent. Above the
message, the compose screen will have the compose toolbar.
There are email sending or delivery options displayed after the compose button has been pressed. The options
are outlined in the table below.
Field
Explanation
Send
When you are ready for an email to be sent, click on the send button and the
email will be delivered.
Cancel
Clears all that has been created and returns back to the Inbox. There is no
way to return to message you were working on so exercise caution when
using the Cancel button.
Page 13 of 24
MailEnable Web Mail End User Manual v 2.x
Attachments
Allows the user to enter the attachment screen and enable addition and
deletion of attachments.
Message Priority
This is where a message priority tag can be set. This setting is displayed to a
recipient and allows them to see the priority you have assigned to the email.
Priority settings are High, Medium and Low.
Notify me when message is read
An email will be auto replied when a recipient reads the message. Please
note that the recipient is able to prevent this from happening, if they have
their client verify whether to send notification.
Page 14 of 24
MailEnable Web Mail End User Manual v 2.x
5
Contact management
The Contacts feature stores contact details (e.g. name, phone number, email address) of people and/or
organisations.
5.1
View contacts
To view all contacts that have been added, enter the contacts directory by selecting the Contacts button on the
main toolbar. After the Contacts button has been selected, a list of contacts will be shown in summary format.
Both private contacts and the Global Address List can be viewed by selecting either item from the drop-down list
at the top of the Contacts page.
Selecting a contact line will show a complete listing of information that has been entered about a particular
contact.
5.2
Edit contacts
Contact details can be edited from the contact list screen. To open this screen click the edit button, which is
located to the right of the checkbox in the contact list.
The contact details displayed in the subsequent screen can be edited by selecting a text box and adding or editing
the text. To keep changes, select Save.
5.3
Add to contacts
Using the Add to Contacts link (as shown below) will add the sender of an email to the Contacts folder.
Figure 5-1 Add to contacts link
Once this link is clicked, the Add Contact entry form will be displayed with the fields of Full Name, Nickname
and email address automatically entered as below. The Add To Contact link checks to see whether a contact
with the same e-mail address already exists. If one already exists then it will load the details of that contact for
modifications. Information can be edited by selecting the relevant text boxes. When changes are completed,
select Save to keep them.
Page 15 of 24
MailEnable Web Mail End User Manual v 2.x
6
Receiving and reading messages
6.1
Receiving messages
After logging into an email account all mailboxes assigned to the login will be viewable. Selecting the inbox
will display all received emails. A check for new email can be performed by selecting Check Inbox within the
main toolbar. Web mail also has an automatic polling interval set by the system administrator and this check
instantly updates the inbox.
6.2
Displaying messages
Once emails have been received into the inbox of an account holder, select a message to read by clicking on the
email address or subject of an email. This will display the message content and message details. Message details
include subject, sender s details, recipient address and the date and time the message was received. This
information is all displayed within the header and underneath this header the written text is located.
6.3
Receiving attachments
An attachment is a file or document that is sent through with a message. To view, execute or view message
attachments select the attachments icon as displayed in the message details. In the screen that follows, the name,
type and size of the attachment file(s) appear. The attachment filename will appear as a download link. Select
the link to either save the file to a directory or run the file in the relevant program.
Page 16 of 24
MailEnable Web Mail End User Manual v 2.x
7
Folders
Folders allow messages to be sorted into categories (e.g. junk, personal) to make storing and locating messages
easier. To create a folder, click the Folders button on the main toolbar. This will generate the following screen:
Figure 7-1 Folder management window
7.1
Creating a folder
To add a new Folder, click the Add button. Select a name for the folder and where the folder is to appear (i.e. in
the Root folder, or as a subfolder of an already existing Parent folder). Select OK.
The Folders list is scrollable if there are a large number of folders, then a scrollbar will appear in the list box.
7.2
Editing a folder
In the folder management window, select a folder to edit. Select the Edit button. This will only permit you to
change the name of a folder (not alter the folders directory i.e. to root folder or subfolder).
7.3
Deleting a folder
In the folder management window, select a folder to delete. Select the Delete button and on the following
screen, click OK to confirm. Note: Deleting a folder deletes all contents of the folder, including subfolders.
7.4
Folders view
The folders view appears on the left hand side of the screen. The folders list displays the number of unread
messages in brackets next to the folder name (bold text). Holding the mouse over the folder name shows the total
number of messages in the selected folder.
Page 17 of 24
MailEnable Web Mail End User Manual v 2.x
8
Calendar Management
MailEnable Enterprise Edition incorporates a calendar feature that allows users to schedule appointments. This
calendar can be used to navigate between days, weeks, months or years so that a user can view scheduled
appointments.
Figure 8-1 Calendar week view
8.1
Creating an appointment
To create new appointments, simply click the new appointment button located under the calendar month view.
Once the New Appointment button has been clicked the new appointment entry screen is shown. The entry
options are as follows:
Field
Explanation
From
This setting is used to select the address of the individual who created the appointment or who is
hosting the appointment. Use the dropdown menu to select a different contact.
Description
This text box is used to give the appointment an appropriate name. This description is used in
the scheduled time slots.
Attendees
This text box is used to input peoples email addresses that will be attending the appointment.
(Please note that when an attendee is specified in the attendee s text box, an email notification
can optionally be sent to each of the attendees.) To quickly choose attendees, click the Edit
button and select attendees from the contacts window.
Date
Set the appointment date.
Start and
Finish Time
These two dropdown menus are used to set the start and finish time for the appointment.
Location
This is where you input the location of the appointment e.g. Board Room
Notes
This section is used to include any additional information regarding the appointment.
8.2
Saving or cancelling an appointment
After the appointment configuration is complete, click on the Save button to save the appointment settings, or
click Cancel to return to the Calendar page.
Page 18 of 24
MailEnable Web Mail End User Manual v 2.x
8.3
Appointment editing
Once an appointment has been created, it can also be edited if there is any additional information to be added.
Click on the scheduled appointment window to edit it.
(Please note: If an appointment is created and there were no attendees in the original appointment, you
are not able to add any attendees in the appointment editing screen.)
Field
Explanation
Status
If the appointment has been created and attendees have received a confirmation note regarding the
appointment the status will be confirmed. To once again save changes made to the existing
appointment you click the Update button. To delete an existing appointment you click the Delete
button, and it takes you back to the Calendar page.
Update
To once again save changes made to the existing appointment you click the Update button.
Delete
To delete an existing appointment you click the Delete button, and it takes you back to the daily
calendar view.
Page 19 of 24
MailEnable Web Mail End User Manual v 2.x
9
Main toolbar options
The main toolbar options include the ability to change log in password, create an auto response or change
generic settings of the web mail program. Generic settings in this example include, time zone, displayed
language characters and a signature that can be created to be inserted automatically on all sent messages.
When the Options button is clicked the following tab options will appear: Login, Pop Retrieval, Redirection,
Auto Response and Settings. Note: Depending on how web mail has been configured by the server
administrator, some of these tab options may not appear.
9.1
Login tab
The login tab allows for account passwords to be changed. The following table describes the options.
Field
Explanation
Login
The mailbox name for the currently logged in account.
Current Password
The current password text box field is required to change the password. To change the
password, enter the current password in this text box.
New Password
Type the new password into this text box ensuring it is a secure password (i.e. not easy to
guess, should include letters and numbers).
Confirm New
Password
Type the new password into this text box to confirm that the correct password has been
entered and no typing errors exist.
Update Button
Once the old and new password text boxes have been entered, select the Update button. To
confirm the password change, a subsequent message will be displayed.
9.2
Pop retrieval tab
The POP Retrieval Service will download mail via POP from a remote POP server and deliver to the one
mailbox. One or more POP mail accounts to be retrieved into this one central mailbox. Selecting Add button
generates the following screen:
Figure 9-1 Adding POP retrieval account
When this screen is displayed it is simply a case of entering the name of the mail server, the username and
password of the POP mail account into their respective text boxes.
Page 20 of 24
MailEnable Web Mail End User Manual v 2.x
Once this is done there are three settings that have to be entered, a tick in the small white text box has a setting of
yes into any of the above settings. The setting descriptions for each of the POP settings are below.
Note: If unsure of any following settings contact the IT department or Administrator of your account
Field
Explanation
APOP Authentication
Enable this setting if the server that the mail is stored on uses APOP
Authentication.
Download new messages only
Enabling this setting will keep track of messages that have been
downloaded from the remote server, and will not download a message
twice.
Enabled
If enabled the email will be retrieved from the remote server.
Once these configurations are all set and correct, select the Add button to finalize the POP account setting. This
will be displayed in the POP Retrieval accounts view screen as below.
The next time mail is received after the POP retrieval account has been configured, mail from the POP account
and download to the inbox of the MailEnable mailbox.
9.2.1
Editing a POP retrieval account
To edit the POP retrieval account settings that are configured, select the Edit button. The edit screen will appear
in the same format as a new account creation. Click Update to confirm the changes.
9.2.2
Deleting a POP retrieval account
To delete a POP retrieval account, select the Delete button. A window will appear asking to confirm deletion.
Confirm by left clicking the Delete button.
9.3
Redirection tab
Redirection allows email that is received into web mail account to be transferred to any another email account.
To set up a redirection for an account, select Redirection in the Options toolbar. The following options will be
presented.
Field
Explanation
Redirect mail to
Place a tick in the check box adjacent to the Redirect mail to text box, then enter the
email address that is to receive the redirected mail.
Keep a copy in mailbox
Tick this box to keep a copy of the redirected messages in the original mailbox. If
this box is not ticked, then the mail will be moved from the mailbox to the account
selected for redirection.
9.4
Auto response
Auto response is a function that automatically replies to any email address that sends an email to a user. Often
used when a staff member goes on holidays, this utility can write an auto-response message letting everyone who
sends mail to the person on holidays that he/she is away.
To enable, place a tick into the Auto Response Enabled check box by clicking the left mouse button on the
check box. To disable the function a removal of the tick from the Auto Response Check box will ensure the
Auto Response is no longer generated.
Page 21 of 24
MailEnable Web Mail End User Manual v 2.x
Field
Explanation
Subject
It is simply then a requirement to type in the subject of the message by replacing
[AUTORESPONSE] Automatic Mailbox Response or leave for the default then
enter the body of text that is required to be sent automatically to the sender.
Message Contents
The text is entered into the text box shown below under the Subject text box. Once the
text is entered a left button click of the mouse on the Update button will confirm the
Auto Response.
9.5
Filtering
Enable the filtering feature by placing a tick in the Enable Mailbox Filtering tick box adjacent to the update
button. Add a filter into the list, by selecting the Add button.
The filter management options are also available in this screen including the editing of currently configured
filters and the deletion of any filters.
9.5.1
Filtering Criteria
To enable filtering criteria, tick the appropriate filtering criteria box. If multiple email addresses are used then
they are to be separated by a semi-colon. Multiple attachments are separated using commas. (Please refer to the
Action dropdown menu for moving filtered emails)
Field
Explanation
Filter
Description
Within this text box a name or a description is given to the filter being created. E.g.:
Spamming Filter .
Message From
A filtering criteria preventing delivery from specific email addresses or creating ways to handle
a specific email from a Sender.
Message To
Similar to From:, the To: address field allows the creation of criteria, based on the delivery to
an email address or a group of receiving email addresses.
Message CC
The Cc: criteria line is the same as the To: criteria line in that any email address entered here
the filter will identify. Cc: is an abbreviation of Carbon Copy and in business terms is usually
equated to For Your Inclusion or For Your Perusal .
Message TO
or CC
Message To or Cc: This filtering criteria is a combination of To: and Cc: . This is useful
when messages contain a specific email address, that could be in the To and in the CC
fields of the message.
Attachments
This filtering criteria is used to filter out specific attachments inputted into the text box. The
correct syntax for specifying a file format is *.(file format). This useful for detecting viruses.
The filter pickups the file extension. If an antivirus utility is installed it will clean the infected
file.
Message
Subject
Contains
This filtering criteria is used to block emails that contain specific subject contents.
Message
Contains
This filtering criteria is used to block emails that contain any type of text entered into the text
box. Most spam is blocked by filtering the email contents.
e.g.: An email contains sexual content, then in the filtering criteria Message Contains: we
can input the word sex and all emails with content sex will be filtered.
Page 22 of 24
MailEnable Web Mail End User Manual v 2.x
Action
9.5.2
The action conditions in the dropdown menu are the actions the filter takes when the filtering
criteria is met.
Filtering Actions
Field
Explanation
Delete the message
The message will be deleted and sent to the Deleted Items folder.
Move message to
Quarantine folder
Moves the filtered message to a created folder called Quarantine in the folders
tree.
Move message to folder
The message is moved to a folder that is created to a specified folder
Copy message to folder
Makes a copy of the filtered message and puts a copy in the specified folder.
Move message to Junk
E-mail folder
Moves the filtered message to a created folder called Junk in the folders tree.
9.6
Settings tab
Settings tab has options to change of Character sets for alternate languages, selection of the senders/users Time
Zone and also allows a Friendly Name to be entered that will be sent along with an email address. These settings
are explained in the table below.
Field
Explanation
Friendly Name
This name is delivered along with the email address. Sometimes a nickname or
abbreviated name is used in this field.
Default Address
If there are many accounts configured for a mailbox, one mailbox address can be set to
be the default sender address. This default address will appear in the From address
when a new message is composed.
Character Set
Allows different languages and different language characters to be sent in an email.
To change the Character set, select the drop down arrow to display the available
languages and select the desired language setting.
Time Zone
This setting is used in message headers to correctly display local times of email sent
and received. To change the Time Zone, select the drop down arrow and select the
desired time zone setting.
Auto Signature
Enabled
An auto signature is a body of text that is sent on the bottom of emails, which may
contain location, contact details etc. The auto signature can be enabled by ticking the
Auto Signature Enabled box and typing the details of the auto signature within the text
box.
Compose my messages
in the following format
The choice of editors here are plain text, lightweight HTML, and heavyweight HTML
formats. Plain text will allow the users to only enter text emails this can help reduce
server load. The HTML option will allow links, pictures and HTML encoding of the
composed message. The lightweight HTML is much faster when loading up than the
heavyweight HTML editor.
Number of messages
displayed in list view
Sets the number of messages that will be displayed in the inbox or folder list view.
Page 23 of 24
MailEnable Web Mail End User Manual v 2.x
Move Deleted
Messages to Deleted
Items Folder
Enables any deleted messages to be copied to the Deleted items folder before deletion.
Clear Deleted Items on
Log Off
Permanently deletes the messages in the Deleted items folder when a mailbox logs off.
Compose and view
messages in a new
window.
This setting will open a new window for every new email and message view.
After these settings have been configured select the Update button to confirm the settings.
Page 24 of 24