1
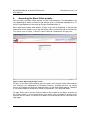
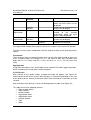
BACKOFFICE WEBSITE V5.0 FOR APX POWER NL
User manual
Document version: 1.0
BackOffice Website v5.0 for APX Power NL
User Manual
Document version: 1.0
Table of Contents
1.
2.
3.
Introduction..............................................................................................................3
Accessing the Back Office website ..........................................................................4
Interface description ................................................................................................6
3.1
Header.............................................................................................................6
3.2
Side bar ...........................................................................................................6
3.3
Main area.........................................................................................................6
4. Sections ..................................................................................................................7
4.1
Home ...............................................................................................................7
4.2
Invoices ...........................................................................................................7
4.2.1
Side bar....................................................................................................7
4.2.2
Main area .................................................................................................8
4.2.2.1 Summary Statement.............................................................................8
4.2.2.2 Invoice and Self-bill ............................................................................10
4.2.2.3 Charge line details..............................................................................12
4.2.2.4 Monthly invoice list .............................................................................13
4.3
Charge codes ................................................................................................15
4.4
Collateral .......................................................................................................16
4.5
Reports ..........................................................................................................18
4.5.1
Excel export (CSV).................................................................................18
4.5.2
Tickerdata ..............................................................................................19
4.5.2.1 Filters .................................................................................................19
4.5.2.2 Results ...............................................................................................19
4.5.3
Chargeline report ...................................................................................21
4.5.3.1 Filters .................................................................................................21
4.5.3.2 Results ...............................................................................................21
4.5.4
Historical Contract book .........................................................................23
4.5.4.1 Filters .................................................................................................23
4.5.4.2 Results ...............................................................................................24
4.5.5
Historical Order book..............................................................................26
4.5.5.1 Filters .................................................................................................26
4.5.5.2 Results ...............................................................................................27
4.5.5.3 Order status column ...........................................................................28
4.5.5.4 Order details.......................................................................................29
4.5.6
Historical Matching Results ....................................................................30
4.5.6.1 Filters .................................................................................................30
4.5.6.2 Results ...............................................................................................31
4.5.7
General Matching Results ......................................................................33
4.5.7.1 Filters .................................................................................................33
4.5.7.2 Results ...............................................................................................33
4.5.8
Settlement Summary..............................................................................35
4.5.8.1 Filters .................................................................................................35
4.5.8.2 Results ...............................................................................................36
4.6
Profile ............................................................................................................38
4.6.1
Settings ..................................................................................................38
4.6.2
Change password ..................................................................................39
4.7
Logout............................................................................................................40
Page 2
BackOffice Website v5.0 for APX Power NL
User Manual
1.
Document version: 1.0
Introduction
The Back Office website supports the main EuroLight trading system.
To improve performance, data in the EuroLight application itself is limited to three days.
In the Back Office website you can view your invoices and query the APX trading
database for your historical order, contract, invoice and settlement information.
The Back Office website is intended for analysts, back office employees and financial
officers.
This document is designed as an operational guide to the Back Office website. You will
find that in some of the chapters processes are repeated. The repetition of information in
some places ensures that all chapters are complete, giving you the opportunity to extract
the information you deem necessary.
Page 3
BackOffice Website v5.0 for APX Power NL
User Manual
2.
Document version: 1.0
Accessing the Back Office website
You can access the Back Office website via your Internet browser. The web address will
vary depending on which environment you want to access (Production, Member test). To
access the production environment go to https://backoffice.apx.nl/.
When opening the above web address a login screen will be displayed. In the top right
hand corner of the header a message will display which environment you are accessing.
This can be seen in Figure 1, where it shows Power NL Production 5.0 in grey text.
Figure 1: Back Office website login screen
To log in to the Back Office website you first need a user account. Back Office website
user accounts are independent of EuroLight accounts, therefore persons not having
access to EuroLight can be given separate access to the Back Office website. To obtain
a user account please contact APX Power NL Operations (+31-(0)20 305 4042).
To login: Enter your username and password in the respective text boxes and click on
the “Login” button. If you entered correct user details you are logged in and the main
interface will be shown. If incorrect user details are entered you will be returned to the
login page.
Page 4
BackOffice Website v5.0 for APX Power NL
User Manual
Document version: 1.0
In the case that the Back Office website is not available, you will be notified via a
message under the login box. See Figure 2 for an example.
Figure 2: Back Office website unavailable
Page 5
BackOffice Website v5.0 for APX Power NL
User Manual
3.
Document version: 1.0
Interface description
The interface of the Back Office website is divided into three parts, the Header, the Side
bar and the Main area (See Figure 3).
Figure 3: Back Office website interface
3.1
Header
In the header information is displayed regarding the environment you are accessing
(Production/member test). By using the items in the menu bar at the bottom of the
header you can select the various sections of the Back Office website.
3.2
Side bar
The content of the Side bar is different for each section. On the top of the Side bar the
current user is displayed. Underneath an additional menu, dependent on which section,
will be shown giving you access to the content of the sections. More details can be found
in Chapter 4 on page 7.
3.3
Main area
This is where data like invoices and reports will be shown, dependent on which section
you are in.
Page 6
BackOffice Website v5.0 for APX Power NL
User Manual
4.
Document version: 1.0
Sections
The various sections of the Back Office website can be accessed via the menu items in
the header. See chapter 3 on page 6 for more details. The screenshots in this chapter
will only include the side bar and main area as these are the only parts that differ
between the sections.
4.1
Home
When logging into the Back Office website you start in the Home section. This section
shows a box in which a message can be displayed set by APX. In Figure 4 for example a
welcome message is displayed.
Figure 4: Home section
4.2
Invoices
In the Invoices section you are able to view all your preliminary and final summary
statements, invoices and self-bills. To access this section you need user rights to at least
one invoice group. APX Power NL Operations can setup this access.
4.2.1 Side bar
The Side bar in the Invoices section contains five groups of data. These are, from top to
bottom:
• Invoice group: The invoice group selection menu. If you have user rights to
more than one invoice group you can select the desired invoice group by using a
pull down menu.
• Final Invoices: Displays a list of the latest final invoices for the selected invoice
group. Upon selection of an individual invoice it will be displayed in the main
screen.
• Preliminary Invoices: Displays a list of all preliminary invoices for the selected
invoice group. Upon selection of an individual invoice it will be displayed in the
main screen.
• Invoice History: Allows you access to all historic invoices. The invoice history
shows a list of years for which it has invoices. If you select a year, a sub menu
with individual months appears; only months with invoices are displayed. If you
select a month, a list containing all final invoices for selected month appears.
• Invoice Quick Finder: Allows you to quickly jump to a specific invoice by
entering the invoice number.
Page 7
BackOffice Website v5.0 for APX Power NL
User Manual
Document version: 1.0
Figure 5: Invoices section
4.2.2 Main area
The main area for the Invoices sections can display several items, depending on the
chosen selection. These are:
•
•
•
Final or preliminary summary statements, invoices or self-bills.
Charge line details for selected invoice or self-bill.
Monthly invoice list
When you select the Invoices section from the Header, the latest final invoice is
automatically displayed.
4.2.2.1 Summary Statement
A Summary statement offers an easy overview of the invoice and self-bill for the selected
period and the net amount that results from that. The summary statement can be
selected from the side bar, by selecting the slightly out-dented date lines from the Final
Invoices or Preliminary Invoices list:
Page 8
BackOffice Website v5.0 for APX Power NL
User Manual
Document version: 1.0
Figure 6: The side bar
The dates relate to the invoice or self-bill dates.
After selection, the summary statement is displayed in the main area.
A summary statement is built up of several parts (See Figure 7):
• The header
• The invoice total
• The invoice number (only on final summary statements)
• The self-bill total
• The self-bill number (only on final summary statements)
• The net amount payable/receivable
• The footer (only on final invoice summaries)
Figure 7: The summary statement parts
4.2.2.1.1
The header
The header contains the following information:
On the left:
• Organization information (name & address)
• VAT registration number
In the middle:
• Type of the invoice (Summary Statement, Final or preliminary)
• Settlement period the summary statement refers to
On the right
• Print button
• Date the summary statement was issued (only on final summary statements)
Page 9
BackOffice Website v5.0 for APX Power NL
User Manual
Document version: 1.0
4.2.2.1.2
The totals
The totals part shows the total amount of the invoice and the total amount of the self-bill,
and a net amount payable/receivable. The hyperlinks will take you to either the self-bill or
invoice depending on your selection. Invoice/self-bill numbers are displayed (only on
final summary statements).
4.2.2.1.3
The footer
On preliminary invoices the footer is empty. On final invoices the footer states some
general APX contact information.
4.2.2.2 Invoice and Self-bill
Invoices and self-bills can be selected using several options:
• Directly from the Side bar from the Final Invoices or Preliminary Invoices list
• Indirectly via the hyperlink in the Summary Statement
• Indirectly via the monthly invoice list (in the Invoice History)
• Directly via the quick-finder
After selection, the invoice or self-bill (depending on your selection) is displayed in the
main area.
Invoices and self-bills are built up of several parts (See Figure 8):
• The header
• The totals
• The Charge Summary
• The Account Summary
• The VAT Summary (only on final invoices)
• The footer (only on final invoices)
Page 10
BackOffice Website v5.0 for APX Power NL
User Manual
Document version: 1.0
Figure 8: The invoice and self-bill parts
4.2.2.2.1
The header
The header contains the following information:
On the left:
• Invoice/self-bill number (only on final invoices/self-bills)
• Organization information (name & address)
• VAT registration number
In the middle:
• Type of the invoice (Final or preliminary, an invoice or self-bill)
• Date of the invoice/self-bill
On the right
• Print button
• Paid indicator (A stamp-like image is shown when the invoice/self-bill has been
paid.
• Date the invoice/self-bill was issued (only on final invoices)
4.2.2.2.2
The totals
The totals part shows the total amount due or owed, including and excluding VAT.
Page 11
BackOffice Website v5.0 for APX Power NL
User Manual
Document version: 1.0
4.2.2.2.3
Charge Summary
The Charge Summary shows the amount of the charge lines, grouped and totalled by
charge code and charge type (Energy, Fee, VAT), giving you an easy view on the
amounts that form the total amount of the invoice.
4.2.2.2.4
Account Summary
The Account Summary shows the amounts of the charge lines, grouped and totalled by
settlement account and charge type (Energy, Fee, VAT), giving you an alternate view on
the amounts that form the total amount of the invoice. The amounts in this summary
function as links to the Charge line details drill down screens (Figure 9 and chapter
4.2.2.3).
4.2.2.2.5
VAT Summary
The VAT Summary shows the amount of VAT on this invoice, grouped by input and
output tax. Input tax is the VAT calculated over amounts you have to pay (i.e. energy
purchases, fees). Output tax is the VAT calculated over amounts you receive (i.e. energy
sales).
4.2.2.2.6
The footer
On preliminary invoices and self-bills the footer is empty. On final invoices the footer
states the bank account number and other general APX information.
4.2.2.3 Charge line details
Upon selecting an amount in the Account Summary of an invoice, the charge line details
screen for the selected account/charge type is displayed.
The Charge line details screen is built up of three parts; the header, the sub header and
the charge lines.
Figure 9: Charge line details
Page 12
BackOffice Website v5.0 for APX Power NL
User Manual
Document version: 1.0
4.2.2.3.1
The header
The header contains information about the invoice these details belong to.
On the left:
• Invoice number. You can click on the invoice number to go back to the invoice.
Since preliminary invoices do not yet have an invoice number, a back to the
invoice link is shown here.
• Organization information (name & address)
• VAT registration number
In the middle:
• Type of the invoice (Final or preliminary) these charge lines belong to
• Date of the invoice these charge lines belong to
On the right:
• Print button
4.2.2.3.2
The sub header
The sub header shows the settlement account and the group of charge lines you
selected.
4.2.2.3.3
The charge lines
All charge lines for this invoice that are related to the selected settlement account and
charge type are displayed here in a table. Depending on the charge type you selected
the exact columns that are displayed will vary. (For example the VAT column is only
shown when you select the VAT charge type).
4.2.2.3.4
Footer
The footer contains an “Export to CSV” option which allows you to display the
chargelines in a CSV formatted output. More about this can be found in chapter: Excel
export (CSV).
4.2.2.4 Monthly invoice list
The monthly invoice list can be accessed by using the invoice history menu in the side
bar (see Figure 5). This list shows all final invoices for the selected month. For each
invoice the following is displayed:
• invoice period
• the invoice number
• the subtotals of all charge lines grouped by charge type
• the total amount of the invoice
• whether the invoice has been paid or not
Via the monthly invoice list you can access any invoice by first selecting the appropriate
year and month in the invoice history menu. On the left of all invoices in the list a
magnifying glass is shown. By clicking on this button you can zoom in on this particular
invoice.
Page 13
BackOffice Website v5.0 for APX Power NL
User Manual
Document version: 1.0
Figure 10: List of invoices for the selected month
Page 14
BackOffice Website v5.0 for APX Power NL
User Manual
4.3
Document version: 1.0
Charge codes
The Charge codes section displays an overview of all charge codes used in EuroLight.
Using this screen you can see which charge codes exist in the system, and what they
mean.
Figure 11: Charge code section
Page 15
BackOffice Website v5.0 for APX Power NL
User Manual
4.4
Document version: 1.0
Collateral
The collateral requirement for the Dutch Day Ahead Market is calculated weekly based
on the trading done in the last 28 days. See Rules and Regulations APX Power Market,
appendix H Guide to bank payments, collaterals and margining for details on the exact
calculation done.
The Collateral section of the BackOffice website gives you an insight in the intermediate
results of this calculation.
Figure 12: Collateral section
Per underlying day the following information is shown:
o Purchase value
o Sale value
o Net value
o Net purchase or net sale
Below this, the average & standard deviation of the net purchase & net sale are shown.
Finally the initial, individual & mutual collateral are shown, which are summed up to the
required collateral.
Page 16
BackOffice Website v5.0 for APX Power NL
User Manual
Document version: 1.0
Only the results of the last collateral calculation are visible. It is not possible to browse to
the results of previous weeks.
The results will be available on the website almost immediately after they have been
calculated.
Page 17
BackOffice Website v5.0 for APX Power NL
User Manual
4.5
Document version: 1.0
Reports
In the reports section of the Back Office website several reports can be queried.
Individual user permissions govern your access to reports.
The Side bar of the Reports section shows a list of all reports available to you, while the
main area shows the currently selected report.
For most reports you have to select one or more dates. These dates can either be typed
in directly, or selected by using a popup calendar. In case of manual entry the date has
to be in the following format: YYYY-MM-DD. To open the popup calendar, click on the
"Open popup calendar"-button located on the right side of the date field (see Figure 13).
Some reports allow you to enter a from and to time, allowing data to be returned that
relates to specific times of the day. This should be entered in the following format:
HH:MM:SS. Behind the time field you’ll see the timezone in which the time is interpreted.
This can be changed in your Settings.
Figure 13: Popup calendar
4.5.1 Excel export (CSV)
All reports have an export to CSV functionality triggered via the button “Export to CSV”
located directly below the displayed results. When using this button the results are
displayed in a CSV formatted output, which can then be imported into another
application (for example Excel).
Additionally, all reports can be opened directly in Excel. If you select this option a file
download dialogue box will ask if you wish to open or save the file. Opening will open the
file directly in Excel, and save will allow you to choose a location on your network to save
the file. N.B. the file opens/saves as a CSV. To convert this to a standard Excel file with
the file open in Excel you may need to select Data -> Text to columns and follow the
wizard. If this is not done automatically you need to change the profile settings, more
about this can be found in the chapter: Settings.
If you're using Internet Explorer and you can't save the file to disk, make sure the
following option is disabled: Tools -> Internet options -> Advanced Tab -> Security -> Do
not save encrypted pages to disk
Page 18
BackOffice Website v5.0 for APX Power NL
User Manual
Document version: 1.0
4.5.2 Tickerdata
The Tickerdata report allows you to monitor public trade information.
To retrieve information set the filters to define your criteria and then click on the “Query”
button. In order to prevent timeouts and other problems, the number of lines you can
query in one request is limited to 1,000. If your request would return more then this a
warning message is shown.
Figure 14: Tickerdata
4.5.2.1 Filters
The Tickerdata screen offers several filters with which you can set the criteria by which
results should be selected and displayed.
Market segment
Using this menu you can filter on market segment. Selecting a market segment will result
in displaying information for the selected market segment only.
Instruments
The instruments filter is a powerful field in which you can filter orders based on part or all
of the instrument code. For example “NL 1H *” will return all rows with instruments that
begin with NL 1H. Please note this is case sensitive (i.e. “nl 1h*” will not return any
rows).
From/To
The report can be filtered by applying date or trade time. Using these two fields a fromand to-date and time can be specified. If applying date is selected all orders which
deliver between the selected dates and times will be displayed. If trade time is selected
all orders traded between the selected dates and times will be displayed.
4.5.2.2 Results
After clicking on the “Query” button a popup will be appear (see Figure 15) informing you
to wait for the results while the query is executed. Depending on the size of the query
and the amount of data that needs to be returned this could take up to 30 seconds.
Page 19
BackOffice Website v5.0 for APX Power NL
User Manual
Document version: 1.0
Figure 15: Please wait while we process your request
After execution of the query the results will be displayed in a table (See Figure 16).
Figure 16: Tickerdata results
This table will have the following columns:
• Contract ID
• Instrument
• Side
• Volume
• Price
• Trade time
You can sort this table by clicking on the table headers. A triangle next to the header title
signifies on which column the table is currently sorted (see Figure 17). By default the
results are sorted by trade time.
Triangle indicating active
sorted column.
Figure 17: Sort rows by column applying date
Page 20
BackOffice Website v5.0 for APX Power NL
User Manual
Document version: 1.0
4.5.3 Chargeline report
The chargeline report allows you to filter data based on the chargeline(s) you wish to
analyse.
To retrieve information set the filters to define your criteria and then click on the “Query”
button. In order to prevent timeouts and other problems, the number of lines you can
query in one request is limited to 1,000. If your request would return more then this a
warning message is shown.
Figure 25: Chargeline report
4.5.3.1 Filters
The chargeline screen offers several filters with which you can set the criteria by which
results should be selected and displayed.
Charge codes
Here you can select the charge codes that you would like to report on.
Type
You can further refine your search to include daily, weekly, monthly or all settlement
period types.
Status
Via this option you select whether to retrieve information regarding preliminary or final
invoices or both.
Show
Via this option you can select whether the information displayed should include
individual charge lines or only the total of all applicable charge lines.
From/To
Using these two fields a from- and to-date can be specified. Information from all
settlement periods that start within the selected date range will be included.
4.5.3.2 Results
After clicking on the “Query” button a popup will be appear (see Figure 15) informing you
to wait for the results while the query is executed. Depending on the size of the query
and the amount of data that needs to be returned this could take up to 30 seconds.
After execution of the query the results will be displayed in a table (See Figure 18).
Page 21
BackOffice Website v5.0 for APX Power NL
User Manual
Document version: 1.0
Figure 18: Chargeline report results
This table will have the following columns:
• Charge ID
• Statement ID
• Type
• Invoice number
• Period
• Contract ID
• Position account
• Invoice group
• Charge code
• Instrument
• Volume
• Total volume
• Price
• Fee
• VAT
• Amount
• Side
Depending on the charge code in the request, some of these columns might be blank.
You can sort this table by clicking on the table headers. A triangle next to the header title
signifies on which column the table is currently sorted (see Figure 17). By default the
results are sorted by charge ID.
Page 22
BackOffice Website v5.0 for APX Power NL
User Manual
Document version: 1.0
4.5.4 Historical Contract book
Via the Historical Contract book it is possible to retrieve information on all your contracts.
Please note in EuroLight, only the past 3 days of data can be queried.
To retrieve your contracts set the filters to define your criteria and then click on the
“Query” button. In order to prevent timeouts and other possible problems, the number of
lines you can query is in one request currently set to 1,000. If your request would return
more then this a warning message is shown.
Figure 19: Historical contract book
4.5.4.1 Filters
The historical order book offers several filters with which you can set the criteria on
which orders should be selected.
Organization, Position account, Platform & Market segment
Via these four menus organizations, position accounts and market segments can be
filtered. These menus function according to the “one or all principle”, signified with an
asterisk, resulting in the following possible examples:
Organization Position
account
*
*
Market
segment
*
*
Specific
account
*
*
Specific
account
*
*
Specific
organization
Specific
organization
*
*
Result
Contracts for all position accounts
which you have access to are
displayed
Contracts for the selected position
account are displayed
Contracts for all position accounts
related to the selected organization
which you have access to are
displayed
Contracts for the selected position
account are displayed
Contracts for the selected market
segment are displayed
Specific
market
segment
You can only select organizations and position accounts you have access to.
Page 23
BackOffice Website v5.0 for APX Power NL
User Manual
Document version: 1.0
Instruments
The instruments filter is a powerful field in which you can filter orders based on part or all
of the instrument code. For example “NL 1H *” will return all rows with instruments that
begin with NL 1H. Please note this is case sensitive (i.e. “nl 1h*” will not return any
rows).
From/To
The report can be filtered by applying date or trade time. Using these two fields a fromand to-date and time can be specified. If applying date is selected all contracts which
deliver between the selected dates and times will be displayed. If trade time is selected
all contracts traded between the selected dates and times will be displayed.
4.5.4.2 Results
After clicking on the “Query” button a popup will appear (see Figure 15) informing you to
wait for the results while the query is executed. Depending on the size of the query and
the amount of data that needs to be returned this could take up to 30 seconds.
After execution of the query the results will be displayed in a table (see Figure 20).
Figure 20: Historical Contract book results
This table will contain the following columns:
• Contract Id
• Organization code
• Organization name
• Position account
• Instrument
• Side
• Order number
• Order header number
• Order header type
• Order price
• Contract price
• Volume
• Contract value
• User
• Rectification status
• Reverse contract ID
• Lead time
• Location
Page 24
BackOffice Website v5.0 for APX Power NL
User Manual
•
•
•
Document version: 1.0
Meter no.
Reason code
Trade time
This table can be sorted by clicking on the table headers. A triangle next to the header
title signifies on which column the table is currently sorted (see Figure 17). By default the
results are sorted by Trade time.
Page 25
BackOffice Website v5.0 for APX Power NL
User Manual
Document version: 1.0
4.5.5 Historical Order book
Via the Historical Order book section it is possible to retrieve information on all your
orders stored in the EuroLight database, including orders in the market that have not yet
been matched.
Please note in EuroLight, only the past 3 days of data can be queried.
To retrieve your orders you can set the filters to define your criteria, and when you click
on the “Query” button the information is displayed. In order to prevent timeouts and other
possible problems, the number of lines you can query in one request is currently set to
1,000. If your request would return more then this a warning message is shown.
Figure 21: Historical order book
4.5.5.1 Filters
The historical order book offers several filters with which you can set the criteria on
which orders should be selected.
Organization, Position account & Market segment
Via these four menus organizations, position accounts and market segments can be
filtered. These menus function according to the “one or all principle”, signified with an
asterisk, resulting in the following possible examples:
Page 26
BackOffice Website v5.0 for APX Power NL
User Manual
Organization
*
*
Specific
organization
Specific
organization
*
Document version: 1.0
Position
account
*
Market segment
Specific
account
*
*
Specific
account
*
*
*
*
Specific
segment
Result
Orders for all position accounts
which you have access to are
displayed
Orders for the selected position
account are displayed
Orders for all position accounts
related
to
the
selected
organization which you have
access to are displayed
Orders for the selected position
account are displayed
market Orders for the selected market
segment are displayed
Only organization and position accounts you have user permissions for can be queried.
The filters can be used in combination with one another to allow you to generate precise
reports.
Instruments
The instruments filter is a powerful field in which you can filter orders based on part or all
of the instrument code. For example “NL 1H *” will return all rows with instruments that
begin with NL 1H. Please note this is case sensitive (i.e. “nl 1h*” will not return any
rows).
Applying date
Using these two fields a from- and to-date can be specified. All orders applying for dates,
which lie between these two dates, will be displayed.
4.5.5.2 Results
After clicking on the “query” button a popup message will appear (see Figure 15)
informing you to wait for the results while the query is executed. Depending on the size
of the query and the amount of data that needs to be returned this could take up to 30
seconds.
After execution of the query the results will be displayed in a table. (See Figure 22)
This table will have the following columns:
• Zoom to order details
• Order number
• Header number
• Organization code
• Organization name
• Position account
• Type
• Status
Page 27
BackOffice Website v5.0 for APX Power NL
User Manual
•
•
•
•
•
•
•
•
•
•
•
•
•
•
•
Document version: 1.0
Applying date
Instrument
Side
Price
Unmatched volume
Contracted volume
Total volume
Cash value
User
Lead time
Location
Meter no.
Reason code
Submit time
Last modified
Figure 22: Historical Order book results
This table can be sorted by clicking on the table headers. A triangle next to the header
title signifies on which column the table is currently sorted (see Figure 17). By default the
results are sorted by applying date.
4.5.5.3 Order status column
Orders can have different statuses, represented by the following key:
M
Filled (Fulled contracted)
AM
Open (Accepted by Market Operator)
PM
Open (Partially matched)
O
Open (Pending)
RF
Rejected (Instrument Frozen)
RIP
Rejected (Invalid entry in Phase)
RNP
Rejected (No permission)
RM
Rejected (Rejected by Market Operator)
RW
Rejected (Sent to watchlist, not complying to
collateral)
R
Rejected (Trading closed)
WW
Watched (Order withdrawn to Watchlist)
RS
Watched (Sent to watchlist, max side exceeded)
WX
Withdrawn (Order expiration date is expired)
WBM
Withdrawn (Withdrawn by Block Modify)
W
Withdrawn (Withdrawn by Participant)
WM
Withdrawn (Withdrawn by Market Operator)
Page 28
BackOffice Website v5.0 for APX Power NL
User Manual
Document version: 1.0
4.5.5.4 Order details
The historical orderbook allows you to zoom in on the details of a specific order by
clicking on the magnifying glass icon in the first column of the results. (see Figure 23)
Figure 23: Magnifying glass icon to zoom in on order details
When the icon is clicked a popup window1 will appear showing the order details of the
selected order (see Figure 24). The order details show the complete history of the
selected order.
Figure 24: Order details
1
If you are using a popup blocker, make sure you allow popups for the Back Office website in
order to be able to access the order details.
Page 29
BackOffice Website v5.0 for APX Power NL
User Manual
Document version: 1.0
4.5.6 Historical Matching Results
Via the Historical Matching Results section it is possible to retrieve information about
your matching results.
To retrieve your matching results you can set the filters to define your criteria followed by
clicking on the “Query” button. In order to prevent timeouts and other possible problems,
the number of lines you can query in one request is currently set to 1,000. If your request
would return more then this a warning message is shown.
Figure 25: Historical Matching Results
4.5.6.1 Filters
The Historical Matching Results book offers several filters with which you can set the
criteria on which results should be selected and displayed.
Market
Here you can select the market you wish to see the results of.
Organization & Position account
With these two menus you can filter the organization and position account. These menus
work using a “one or all principle”, all signified with an asterisk, resulting in the following
possible combinations.
Page 30
BackOffice Website v5.0 for APX Power NL
User Manual
Group by
Organization Position
account
Organization *
Disabled
Organization Specific
organization
Position
*
account
Disabled
*
Position
account
*
Specific
account
Position
account
Specific
organization
*
Position
account
Specific
organization
Specific
account
Document version: 1.0
Result
Matching results for all organizations
which you have access to, grouped by
organization
Matching results for the selected
organization, grouped by organization
Matching results for all position
accounts which you have access to,
grouped by position account
Matching results for the selected
position account, grouped by position
account
Matching results for all position
accounts related to the selected
organization which you have access
to, grouped by position account
Matching results for the selected
position account, grouped by position
account
You can only select organization and position accounts for which you have user rights.
Group by
With this option you can select whether the matching results are grouped/summed by
position account or by organization. Please note that if you are grouping the results by
organization, the Position Account filter menu will be disabled.
Applying date
With these two fields a from- and to-date and time can be specified. The matching
results for all instruments which start delivery between these two date and time will be
displayed.
4.5.6.2 Results
After clicking on the “Query” button a popup will be appear (see Figure 15) informing you
to wait for the results while the query is executed. Depending on the size of the query
and the amount of data that needs to be returned this could take up to 30 seconds.
Page 31
BackOffice Website v5.0 for APX Power NL
User Manual
Document version: 1.0
After execution of the query the results will be displayed in a table (see Figure 26). The
first 3 columns of this table will by default display the applying date, instrument and
MCP. Depending on your filter settings three additional columns for each
organization/position account are displayed, showing the volumes bought, sold and the
net volume.
Figure 26: Historical matching results output
Page 32
BackOffice Website v5.0 for APX Power NL
User Manual
Document version: 1.0
4.5.7 General Matching Results
Via the General Matching Results report you can retrieve the MCP and MCV for each
instrument for a specific applying date.
Upon selecting an applying date followed by clicking the “Query” button, a table with the
general matching results will be displayed.
Figure 27: General Matching Results report
4.5.7.1 Filters
The General Matching Results report offers two filtering option. Before requesting the
report you have to specify a market and an applying date. The report will return general
matching results for all instruments within the market that have the specified applying
date.
4.5.7.2 Results
For each particular matching process a separate table will be shown with the applicable
matching results. The date and time of that specific matching process is displayed above
the columns.
The table has the following fields:
• Applying date
Page 33
BackOffice Website v5.0 for APX Power NL
User Manual
•
•
•
Document version: 1.0
Instrument
MCP
MCV
Page 34
BackOffice Website v5.0 for APX Power NL
User Manual
Document version: 1.0
4.5.8 Settlement Summary
Via the Settlement Summary section it is possible to retrieve information regarding the
settlement of your contracts. The data displayed in the Settlement Summary report is
based on the charge lines of the individual invoices.
Figure 28: Settlement Summary
4.5.8.1 Filters
The Settlement Summary screen offers several filters with which you can set the criteria
by which results should be selected and displayed.
Organization & Invoice group
Using these two menus you can filter on organization and invoice group. Depending on
the Group By settings, the Invoice group field might not be available.
These menus work using a “one or all” principle, all signified with an asterisk, resulting in
the following possible combinations:
Group by
Organization Invoice group
Organization *
Disabled
Organization Specific
organization
Invoice
*
group
Disabled
*
Invoice
group
Invoice
group
*
Specific group
Specific
organization
*
Invoice
group
Specific
organization
Specific group
Result
Information for all organizations which
you have access to, grouped by
organization
Information
for
the
selected
organization, grouped by organization
Information for all invoice groups which
you have access to, grouped by invoice
group
Information for the selected invoice
group, grouped by invoice group
Information for all invoice groups
related to the selected organization
which you have access to, grouped by
invoice group
Information for the selected invoice
group, grouped by invoice group
You can only select organizations and invoice groups for which you have user rights.
Market
Via this field you can select the Market for which you require the settlement information.
Page 35
BackOffice Website v5.0 for APX Power NL
User Manual
Document version: 1.0
Settlement period
Using these two fields a from- and to-date can be specified. Settlement information of all
invoices that have been settled between these two dates will be included.
Invoice status
Via this option you select whether to retrieve information regarding preliminary or final
invoices. It is not possible to retrieve information regarding preliminary and final invoices
in one request.
Group by
Via this option you can select whether the information should be grouped/summed by
invoice group or by organization. Please note that if you are grouping the results by
organization, the Invoice group filter menu will be disabled.
Interval
Using this option you can select whether the information should be grouped by
Instrument, Invoice or Settlement period.
4.5.8.2 Results
After clicking on the “Query” button a popup will be appear (see Figure 15) informing you
to wait for the results while the query is executed. Depending on the size of the query
and the amount of data that needs to be returned this could take up to 30 seconds.
After execution of the query the results will be displayed in a table (See Figure 29).
Figure 29: Settlement Summary results
This table will have the following columns:
• Organization
• Invoice group
• Settlement period
• Invoice nr
• Instrument
• MCP
• Sale volume
• Sale value
• Purchase volume
• Purchase value
• Fee value
• Netto excl. VAT
• VAT
• Total value
Page 36
BackOffice Website v5.0 for APX Power NL
User Manual
Document version: 1.0
Depending on the Group by and Interval setting in the request, some of these columns
might be blank.
You can sort this table by clicking on the table headers. A triangle next to the header title
signifies on which column the table is currently sorted (see Figure 17). By default the
results are sorted by Organization and Settlement period.
Page 37
BackOffice Website v5.0 for APX Power NL
User Manual
4.6
Document version: 1.0
Profile
In the profile section you can make a number of settings regarding how the information
you wish to see throughout the Back Office website is displayed, and you can also
change the password for your Back Office website account.
Figure 30: Profile
4.6.1 Settings
The Back Office website is designed to service multiple platforms across multiple
geographies. You can set your preferred timezone and formatting settings here so the
information is shown in accordingly.
Timezone
Use this option to select the timezone the Back Office website uses to interpret the input
time fields. Options:
• GMT: Greenwich Mean Time
• GB: Greenwich Mean Time with daylight saving time
• CET: Central European Time with daylight saving time
Decimal separator
Use this option to select between a space, a comma or a full stop.
Thousand separator
Use this option to select between no separation, a space, a comma or a full stop.
CSV separator
Use this option to select between a tab, a semicolon or a comma. Please note that
whichever option you select here will be the option that you must use when importing
any Back Office website files you have exported to CSV files into Excel, using the Text to
columns wizard. If the List separator set in Windows is the same as specified here Excel
will automatically perform the Text to columns conversion.
Please note that a separator cannot have the same value as on of the other separators.
Any settings that are changed will require you to input your password to confirm the
changes.
Page 38
BackOffice Website v5.0 for APX Power NL
User Manual
Document version: 1.0
A typical profile for Back Office website users in the Netherlands would be:
Timezone
Decimal separator
Thousand separator
CSV separator
CET
Comma
None
Semicolon
4.6.2 Change password
To change your password, first tick the Change Password box. This activates the New
Password field. Enter your new password in the "New password" field. Dots will be
displayed for every character you type. Then confirm the new password by repeating it in
the “Confirm password” field. To confirm the change, enter your current password, which
you used to login to the Back Office website, and click on the Save changes button.
Figure 31: Profile updated successfully
If the password is changed successfully the Profile form should return a message
confirming the successful change (see Figure 31: Profile updated successfully). If the
change was unsuccessful the profile form will also inform you of this via a message (see
Figure 32).
Figure 32: Error while saving changes to the profile
Page 39
BackOffice Website v5.0 for APX Power NL
User Manual
4.7
Document version: 1.0
Logout
We recommend that you logout correctly at the end of each Back Office website session.
Simply click Logout on the menu bar.
For security reasons the Back Office website will automatically log out after a period of
inactivity of 10 minutes. When you next need to access the Back Office website you will
automatically be returned to the Login screen (see Figure 1).
Page 40