1
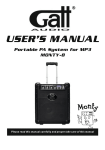
USER'S MANUAL
Portable PA System for MP3 and DSP
3 3
C HC H
2H 2
CH C
CCH
H 1
1
EFF CONTROL
B
C
USB
E
F
0
1
7
0
0 10
EFF
10 0
LEVEL
10
00
10
10
6
R
R
EFF
0
LEVEL
10 0
0 10
2
5
4
SD
3
0 Plate 2
1 Plate 3
2 Room 3
3 Plate 1
4 Delay 1
5 Delay 2
6 Chorus
7 Flange
8 Vocal Cancel
9 Rotary Speaker
A Chorus/Room 1
B Chorus/Room 2
C Room 1
D Room 2
E Hall 1
F Hall 2
TREBLE
GAIN
GAIN
GAIN
LEVEL
L
CD/TAPE IN
UNBAL
BAL
10
USB
D
A
9
8
L
CD/TAPE IN
2
INSTRUMENT/MIC
INS/MIC 2 IN
MIC 1 BALANCED
MIC 1 IN
MASTER 0
EFF
0 15
10+15
USB/SD DIGITAL PLAYER
USB/SD DIGITAL PLAYER
SD
V+
EQ USB/SD
V-
V+
15 15 +15 +15
MIDDLE
0
15
15+15
EQ USB/SD
V-
POWER
MASTER VOL
BASS
MIDDLE
TREBLE 0
0
BASS
0
0
+15
15
0
+15
MASTER VOL
10
0
POWER
10
Please read this manual carefully and proper take care of this manual
1. IMPORTANT SAFETY INSTRUCTIONS
CAUTION:
To reduce the risk of electric shock, do not remove the top cover (or the rear section).
No user serviceable parts inside; refer servicing to qualified personnel.
WARNING: To reduce the risk of fire or electric shock, do not expose this appliance to rain and
moisture.
This symbol, wherever it appears, alerts you to the presence of uninsulated dangerous
voltage inside the enclosure-voltage that may be sufficient to constitute a risk of shock.
This symbol, wherever it appears, alerts you to important operating and maintenance
instructions in the accompanying literature. Please read the manual.
6. IMPORTANT NOTE
Use this troubleshooting guide if : The sound is distorted at high volumes.
Input is clipping: Try lowering the input gain or the volume control on your sound source or music instrument.
Output is clipping: Lower the main volume level.
There is too much bass: Try adjusting the tone or EQ control on your sound source to
lower bass level. This will allow you to play the music louder
before clipping (distortion) occurs.
The link cable: is being plugged into the instrument or MIC input instead of the RCA line
input.
7. SPECIFICATIONS
Input Voltage:
AC 110-120V/60Hz 220-240V/50Hz
Output Wattage:
10"
(peak)
Output Wattage:
10"
(RMS) 30W, 1% THD
50W
Frequency Response: 70~50kHz +/-3dB
(1) Read these instructions.
Bottom pole mount specifications: Standard Pole Mount found at professional audio
retailer.
Depth 97mm(3.819")
Diameter 37mm(1.457")
(2) Keep these instructions.
Battery life: Over 6 hours* at full volume of the system when fully charged.
(3) Heed all warnings.
dimensions
(W x D x H)
2. DETAILED SAFETY INSTRUCTIONS:
10"
437x340x507mm
17.205"x 13.386"x 19.961"
(4) Follow all instructions.
Weight:
10"
22.5 kg
(5) Do not use this device near water.
(6) Clean only with a dry cloth.
(7) Do not block any ventilation openings. Install in accordance with the manufacturer s instructions.
NOTE: Battery life may vary based on temperature, age and volume usage of product.
(8) Do not install near any heat sources such as radiators, heat registers, stoves, or other apparatus (including amplifiers) that produce heat.
(9) Do not defeat the safety purpose of the polarized or grounding-type plug. A polarized plug
has two blades with one wider than the other. A grounding type plug has two blades and a
third grounding prong. The wide blade or the third prong are provided for your safety. If the
provided plug does not fit into your outlet, consult an electrician for replacement of the obsolete outlet.
(1)
(5)
(10) Protect the power cord from being walked on or pinched particularly at plugs, extension
cords, and the point at which they exit the unit.
5. CONNECTION EXAMPLES
Important: with all large speakers, an initial “break-in” period is needed to perform at optimal
levels. To properly “break-in” your system, play an audio source at medium volume for a few
hours.
(11) Only use attachments/accessories specified by the manufacturer.
(12) Use only with the cart, stand, tripod, bracket, or table specified by the manufacturer, or
sold with the device. When a cart is used, use caution when moving the cart/ device
combination to avoid injury from stumbling over it.
3
CHARGE
2
ON
1
OFF
POWER INPUT
AC 230V 50/60Hz
T0.5A/250V
LOW
LINK
OUTPUT
POWER
To other AMP
SOUND SYSTEM
BATTERY LEVEL
L
R
3 3
C HC H
2H 2
CH C
CCH
H 1
1
EFF CONTROL
B
C
USB
E
F
0
1
7
L
0 10
LEVEL
10
00
10
10
L
6
R
R
EFF
0
LEVEL
10 0
0 10
2
5
4
SD
3
0 Plate 2
1 Plate 3
2 Room 3
3 Plate 1
4 Delay 1
5 Delay 2
6 Chorus
7 Flange
8 Vocal Cancel
9 Rotary Speaker
A Chorus/Room 1
B Chorus/Room 2
C Room 1
D Room 2
E Hall 1
F Hall 2
TREBLE
GAIN
GAIN
EFF
10 0
CD/TAPE IN
UNBAL
BAL
GAIN
LEVEL
CD/TAPE IN
2
INSTRUMENT/MIC
INS/MIC 2 IN
MIC 1 BALANCED
MIC 1 IN
0
10
USB
D
A
9
8
MASTER 0
EFF
0 15
10+15
USB/SD
DIGITAL
V+
PLAYER
USB/SD DIGITAL PLAYER
SD
EQ USB/SD
V-
V+
MIDDLE
0
15
15+15
EQ USB/SD
V-
POWER
MASTER VOL
BASS
MIDDLE
TREBLE 0
0
15 15 +15 +15
BASS
0
0
+15
15
0
+15
MASTER VOL
10
0
POWER
10
(13) Unplug this device during lightning storms or when not used for long periods of time.
CH 1
CH 2
CH 3
EFF CONTROL
B
C
D
A
E
6
2
9
F
8
0
1
7
L
INS/MIC 2 IN
UNBAL
MIC 1 IN
BAL
R
5
0
2
4
6
8
9
A
B
C
E
CD/TAPE IN
L
4
3
Plate 2
1 Plate 3
Room 3
3 Plate 1
Delay 1
5 Delay 2
Chorus
7 Flange
Vocal Cancel
Rotary Speaker
Chorus/Room 1
Chorus/Room 2
Room 1
D Room 2
Hall 1
F Hall 2
R
OR
4
2
6
8
1
ENO
1
3
5
7
9
0T
Cable sold separately
OV
6
8
1
2
4
1
3
5
7
9
0
EMUL
OT
6
8
1
2
4
1
3
5
7
9
0
EN
(5)
(14) Refer all servicing to qualified service personnel. Servicing is required when the unit has
been damaged in any way, such as power supply cord or plug is damaged, liquid has been spilled or objects have fallen into the device, the unit has been exposed to rain or
moisture, does not operate normally, or has been dropped.
3. INTRODUCTION
FULLY CHARGE THE BATTERY BEFORE FIRST USE FOR MAXIMUM BATTERY LIFE
1.
2.
3.
4.
5.
6.
Make sure all items.
READ SAFETY INSTRUCTION BOOKLET BEFORE USING THE PRODUCT.
MAKE SURE THAT YOU HAVE COMPLETELY CHARGED THE BATTERY.
Study this setup diagram.
Place product in an appropriate position for operation.
Make sure all input devices such as microphones, CD or SD players, USB players, MP3
players, and linked amplifiers/PAS are turned off and volume settings are set at “zero”
7. Connect all devices as shown above.
8. Connect the outputs to the power amplifier(s), tape decks, and / or audio sources.
9. Switch everything on in the following order.
* audio input sources (i.e. Microphones, instruments, CD players,USB or SD players,MP3
players)
* last, any amplifiers.
10. When turning off ,always reverse this operation by ,
* turning off amplifiers
* last, any input devices.
(2)
4. FEATURES
CH 1
CH 2
CH 3
EFF CONTROL
B
C
USB
D
A
E
9
F
8
0
1
7
6
L
INS/MIC 2 IN
UNBAL
MIC 1 IN
BAL
EFF
LEVEL
EFF
LEVEL
2
R
CD/TAPE IN
5
0
2
4
6
8
9
A
B
C
E
4
3
MASTER EFF
LEVEL
USB/SD DIGITAL PLAYER
SD
Plate 2
1 Plate 3
Room 3
3 Plate 1
Delay 1
5 Delay 2
Chorus
7 Flange
Vocal Cancel
Rotary Speaker
Chorus/Room 1
Chorus/Room 2
Room 1
D Room 2
Hall 1
F Hall 2
V+
TREBLE
0
10
0
(1)
10
0
(2)
10
(3)
0
10
(4)
0
10
(5)
0
10
15
+15
BASS
0
0
15
(6) (7)
EQ USB/SD
V-
MIDDLE
0
+15
(8)
15
+15
MASTER VOL
0
POWER
10
(9)
(10)
3
CHARGE
2
ON
(9). Master Volume Control:
This knob controls the master volume of the system.
(10). MP3 player
It has two input mode, USB and SD input. LCD display for the correspond input.
NOTE: SD: 32MB-8G, U disk : 32MB-8G (FAT16/32)
(11). Power Adapter (IEC)
Insert the included power cable here to charge the unit. Note that the system can run off
the power adapter while it simultaneously charges the battery. The charge indicator illuminates when the battery is charging.
(12). Power Switch:
Turns this apparatus ON/OFF.
(13). Link Output:
This 1/4” jack can be connected to the system input of an amplifier or amplified loudspeaker
such as another system.
(14). Battery level indicator:
while the unit is powered ON, these four lights indicate the power left in the battery. Battery
life varies based on volume and usage.
1
OFF
LOW
POWER INPUT
AC 230V 50/60Hz - T0.8A/250V
Power Consumption: 50W
POWER
LINK
OUTPUT
SOUND SYSTEM
BATTERY LEVEL
(11)
(12)
(13)
(14)
(1). Microphone 1 Balanced Input with Level Control (1/4” and XLR):
This jack can either take a 1/4” balanced or a XLR balanced cable. An XLR Cable is included with the microphone.
(2). EFFECT CONTROL (EFF)
This controls the amount of signal that is sent to EFFECT bus for Mic 1 channel.
(3). Instrument/Microphone 2 Input with Level Control (1/4”):
This mono input accepts a 1/4” input such as a microphone, guitar, or other musical instrument.
(4). EFFECT CONTROL (EFF)
This controls the amount of signal that is sent to EFFECT bus for Mic 2 channel.
(5). CD/Tape input with Level Control (Stereo RCA):
This knob controls the level of the CD and the RCA input. This stereo RCA input can be
used to connect a CD, MP3, or other audio source. To connect to a portable device with
a 1/8” headphone jack, you need a standard (1/8” to RCA) adapter which is NOT included.
(6). MASTER EFF
This adjusts the level of the master effect signal.
(7). Effect select switch
Select the effect type for the built-in digital effect.
(8). EQUALIZATION CONTROL(EQUALIZATION)
This is a 3-band equalizer that allows you to adjust the frequency response of the MAIN
bus signal.
(3)
(4)