1
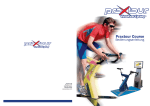
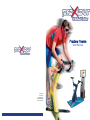
User Manual
Praxtour BV
PO Box 197
3940 AD Doorn
THE NETHERLANDS
www.praxtour.com
As if you are there for real…
With the Praxtour Course you cycle like on a real racing
bike. The monitor shows real movies of routes for your
extreme challenge. Alpe d’Huez, Mont Ventoux, Ardeche,
Cauberg or Galibier? With Praxtour they are always within
range. Saddle up and experience; a ride on Praxtour
stands up right to a real cycling trip!
SingleRiding, the ultimate bicycle trip
Ride your own bike. At the bottom of the screen speed,
gradient, distance, etc. are displayed. Riding fast will let
the film run fast. If you stop pedaling the film will stop as
well. A steep gradient? You will feel it with the stronger
resistance. But… in a descent you cycle down easily
without resistance!
TimeRiding, the time trial function
Safety and Health
Technical Specifications
This device simulates reality and is not a toy! It must be used
only for its intended use as described in this user manual.
You are responsible for all users being informed of safety precautions and warnings.
Bike:
1. Saddle height-adjustable
2. Handlebars height-adjustable
3. Stem forward/backwards adjustable (clamp 3a)
4. Brake/shifters Shimano 105, see description on page 4
5. Combi/click pedals for cycling shoes and ordinary sports
shoes
6. Mains power supply 220V
7. USB cable to connect to PowerConsole (15)
Keep children away from the device. However, if children are
permitted to use this device they must be instructed with
regard to the correct use..
We recommend consulting your general practitioner before
using this device. Do not over-estimate yourself: the VirtuReal
Cycling may cause excessive strain. Excessive training can be
harmful for your health. When feeling chest pain, shortness of
breath, irregular heart beat, drowsiness, dizziness or nausea
immediately stop cycling.
Check before starting that all connections are executed properly. Especially check all mounting bolts, saddle and handlebar clamps.
You can do a time trial against results you have previously
saved. In a separate column you see the time and possibly
the interim times, which others or yourself have already
achieved on this bike on a certain route. A motivation to
achieve optimum results! See page TimeRiding for more
information.
Ensure that the device stands level and on stable ground.
MultiRiding, the competition function
Do not use the device when malfunctioning or with damaged
components. Use only after the problem has been solved.
Minimum two, maximum 4 Praxtours are linked via a
network router. In this way you can compete against
others. You see each other’s time and the distance gap in
a separate window on the left of the screen. Meet each
other after the competition and compare who is fastest;
the results are stored. See page MultiRiding for more
information.
Praxtour® and VirtuReal Cycling® are registered trademarks.
Industrial property rights and copyrights of the Praxtour
design, operating system and the VirtuReal Cycling software
belong to Praxtour BV. Duplicating the software is only
permitted for backup.
Praxtour BV reserves the right to modify features, materials
and software without prior notice.
August 2010
Ensure that your Praxtour is always in good condition. Clean
the device after each use with a wet cloth and some mild
detergent, if necessary. Perspiration damages the device. We
recommend expressly attaching the optional Praxcare perspiration protection to protect Praxtour against damages due to
perspiration.
Move the device carefully and with a helper. The device is too
heavy to be lifted by one person.
- Ensure that never more than one user uses the device.
- Only use components recommended and supplied
by Praxtour.
- Praxtour must come to a complete standstill before
dismounting.
2
3a
4
PowerConsole:
Front panel:
9. System ON/OFF button
10. DVD drive
Rear panel:
11. Main switch
12. Connector for supplied mains cable
13. USB ports (4x)
14. Network port
5
Connections
Feed power cable (6) and USB cable (7)
through the slot in the floor mat, so that
the cables lie protected under the mat.
Place the PowerConsole at short distance in front of the
bike, so that you can touch and operate the screen in cycling
position.
Connect the USB cable to one of four USB ports (13) at the
back of the PowerConsole. Connect the mains cable to
mains power supply.
If more than one bike, connect the network cable to the
network port (14) and to the router.
Connect the supplied mains cable to the connector at the
rear panel of the PowerConsole (12) and connect to mains
power supply.
Turn the main switch (11) at the rear panel of the PowerConsole to 1 (= ON).
Warning:
The Praxtour bike has been tested under extreme conditions
and manages very heavy strains. However, during excessive,
long-term strain the device can get very warm.
On the outside the heat may be noticeable around and under
the pedals.
Overheating can cause damage to the device.
BE CAREFUL WHEN TOUCHING THESE PARTS.
Press button (9) on the front panel of the PowerConsole to
turn the system on.
All information in this user manual has been compiled with the
greatest care. Praxtour BV does not accept liability for direct
or indirect damages as a result of the use of both equipment
and this user manual. Praxtour BV is not responsible for health
troubles as a result of incorrect use of the equipment. The use
of Praxtour is entirely at own risk.
1
Monitor:
8. Touch screen
Preferably wear cycling wear during use, such as trousers with
leather bottom. A sweatshirt and headband catch much of
your perspiration, bicycle shoes with SPD click system offer
stable and firm fit on the click pedals. Cycling gloves ensure
that less perspiration gets to the handlebar grips and reduce
irritation to the hands (RSI).
Liability
3
3
6
4
7
3a
2
8
Please note: The Praxtour bike does not work when not connected to the system program VirtuReal Cycling, which is
installed on the PowerConsole. The PowerConsole does not
work if no Praxtour bike is connected.
11
Attach the Praxcare perspiration protection with elastic band
to the seat post and the Velcro for handlebar protection
against the impact of sweat.
12
Adjust saddle and handlebars to the correct height and fix
well with clamps 2, 3a and 4.
The equipment is now ready-for-use.
10
13
14
9
2
3
Z
Bike Functions
Gears
The Praxtour Course is equipped with professional Shimano
105 brake levers to change gears just like on a racing bike
between 3 front and 10 rear sprockets. The difference compared to a racing bike is that gears are not shifted via cables
and sprockets, but electronically. Therefore you cannot engage
the wrong gear. In standstill, like at the start, you effortlessly
select a different gear. The selected gear is shown in the information bar on the monitor.
Right levers (simulation rear sprockets)
The right hand levers simulate changing gears with rear cassette (10 gears).
Pushing lever c to the inside changes to an easier acceleration
(on a racing bike: larger rear sprocket). Lever d goes along
automatically; you do not have to push it.
Route Selection and Input of Personal Data
Start
Press POWER on the PowerConsole front panel to start the system. The program VirtuReal Cycling is pre-installed and starts
automatically. The following window is displayed:
The touch screen
monitor responds to
finger contact. In this
window you can select
a different language,
find information about
Praxtour and you can exit the system. Touch the START button
on the screen to display the route selection window:
Personal data
Enter your personal details, so that the system can calculate
the real values and your results are correctly stored.
You have two dual-function brake levers. The left levers a and
b simulate changing gears with the front derailleur, right c
and d levers change the rear cassette. The information bar displays this as shown in the illustration below: The longer lines
show the larger sprockets, the shorter lines show the smaller
ones. The selected sprocket is marked in red.
Name: Touch the screen beside NAME to display a virtual
keyboard to enter your name. Touch CAPS to write in capital
letters. After entering your name touch OK to continue with the
input window. Your name and personal details are saved in the
memory and can be recalled later with the arrow buttons next
to the NAME window.
Pushing the levers further you can skip two or three gears and
so select more rapidly a much lower or higher gear. You hear
and feel a double-click. You cannot change gears beyond the
available gears.
Tips:
1. The large levers change gear to a larger sprocket.
2. Easiest gear: both indicators in left position.
Gender: Select M or F for male or female.
Route selection
This window displays all information regarding the routes.
ALPE D’HUEZ HELLING GEARS AFSTANDSNELHEIDTOT EINDEHELLING NIVEAU AFSTAND NAAM TOT EINDEHARTSLAGNIVEAU WATT NAAM
SNELHEID
The HARTSLAG
small block shows inWATT
which
<- Lightest
M
M
front - rear
KM/H
%
M
M
KM/H
%
21.2resistance
KM
RENNER
1
RENNER
1
000
000
000
000
000
000
country
and
where
exactly
the
By pushing only lever d inside and not lever c, you change to
Strongest resistance ->
selected
route
is
located.
The
TIJD
a more difficult gear (on a racing bike this is GEWICHT
a smallerKG
rear
CAL/MIN
RPM
CAL/MIN
RPMGEWICHT KG
yellow area shows the activated route. Use the green arrows to
sprocket).
MEDIUM
0.36.14.28
66
000
000
66
000MEDIUM
000
select a different route. The larger image window displays the
different route.
Left levers (simulation front sprockets)
The left hand levers simulate changing gears with the 3 front
The second yellow area offers the alternasprockets.
tive to select a route from DVD and not from
HDD. Insert the desired Praxtour route DVD
in the DVD drive in the front panel of the
console. Only Praxtour route DVDs work with this system.
GEARS
front - rear
12
8
680612 6145 8
6806
6145
You can change gears during the entire ride at will. The selected gear is displayed in the information bar at the bottom of
the screen. The active gear is marked in red.
Pushing lever a at your left to the inside changes to a more
difficult gear (on a racing bike: larger front sprocket). When
hearing or feeling a click, the bike changes gears. Lever b goes
along automatically; you do not have to push it.
Brakes
Due to the very realistic route movie it can happen that you
come to a slope and have to slow down (for example in a hairpin turn). Pull the brakes, just like on a racing bike to reduce
the speed and to stop. However, you cannot get carried out or
a curve, this is not provided for in the system.
(Shifter illustrations: Shimano)
By pushing only lever b inside and not lever a, you change to
an easier gear (on a racing bike: smaller front sprocket).
4
The right yellow block displays the total
length of the route. The larger image
shows details of the route, such as the
altitude profile, distance, route location and 5 intermediate
time measurement points, which divide each route into six
sections.
Age: Enter your age with the + and - arrows. Please note: This
is important to calculate the maximum heartbeat (220 minus
age).
Heartbeat: Adjust the heartbeat up or down depending on your
condition. By default the heartbeat is linked to the age.
Weight: Enter your weight with the + and - arrows. Please note:
This is important to calculate the realistic resistance.
Level: In LEVEL you can adjust the difficulty of the route with
the green arrows. There are 4 levels available: REAL, SPORT,
MEDIUM and LIGHT. REAL corresponds with reality. LIGHT is
very easy. The lighter the selected resistance, the easier is the
cycling. Please note: You select the resistance for the entire
ride by selecting the value. This value cannot be modified
during the ride, not even in PAUSE mode.
All data are displayed in the information bar during the biking
tour. Your name and personal details are stored in the memory
as soon as the results are known and can later be recalled by
touching the arrow buttons next to the NAME window.
Results: The window RESULTS shows your top 10 results and
the results of other users of this device, including intermediate
measuring points.
By default the entire route is activated but by touching the
photo buttons 1 to 6 at the bottom you can deactivate parts of
the route. These buttons also show the location of the intermediate time measurement points. In this way you reduce
the total length of the route. However, the selected parts are
always joined into one movie. Only the warm-up does not have
this alternative. Touch the deactivated button again to change
your selection.
Touch NEXT to navigate to the personal data window. This
takes the system a few seconds.
SHUT DOWN
Touch STOP PROGRAM to exit the program. You return to the
first start window. Touch SHUT DOWN to exit the system.
You can also turn off the system by pressing down the POWER
button on the console front panel.
5
Information Display
Start - SingleRiding
The information bar below at the bottom of the screen displays
the following information:
After selecting a route and filling in the personal details correctly follows the selection between SINGLERIDING, TIMERIDING and MULTIRIDING. TimeRiding and MultiRiding are
covered further down in this user manual. Ensure that SINGLERIDING is activated (= green) and touch NEXT to start.
1
ALPE D’HUEZ
21.2 KM
3
4
5
6
7
8
9
10
GEARS
SPEED
SLOPE
DISTANCE
TO FINISH
LEVEL
NAME
RENNER 1
12
8
000 000
000
000
000
front - rear
TIME
0.36.14.28
KM/H
%
M
M
6806 6145
MEDIUM
WEIGHT KG
66
PULSE
CAL. P/MIN
11
WATT
RPM
The following warning is displayed:
2
1. Name and distance of the activated route
The name of the selected route is displayed.
2. Time measurement
During the first meters movie and time run automatically. If
you do not ride the entire route the data of the passed intermediate measurement points are displayed in the result
window, while no end time is shown.
Touch OK after reaching the finish. This automatically displays
the result list, so that you can directly compare your own data
with your previous results or those of others.
3. Selected gears
The length of the lines relates to the smaller/larger sprockets:
3 front and 10 rear sprockets. The active gears are marked in
red. Good to know: The red lines the furthest to the left are the
easiest gears.
12
7. Distance still to be covered
Distance to the finishing line. The intermediate measurement
points are not displayed. Find this information on the rear of
the DVD cover.
8. Resistance
These values have been entered in the input window.
10. Heartbeat and calorie consumption
CANCEL: Return to the start window.
9. Personal data
Your current bicycle speed in kilometers per hour.
5. Gradient/slope in percent
11. Wattage and RPM
The real resistance that you feel is displayed in percent. In accordance with the gradient the resistance gets greater or less.
On a downward slope you feel no resistance. However, you
must continue cycling to move the film.
6. Covered distance
Distance from the start.
OK: The starting position of the route is displayed:
Result
The result window can be accessed if you are not cycling. A
result list of the most recent and ten fastest rides is displayed.
Every route has its own result list. It is only accessible for the
selected route or selected part thereof.
These values help you training systematically.
Please note: Only in the REAL resistance the wattage can be
measured accurately. In levels SPORT, MEDIUM and LIGHT the
resistance does not correspond to reality. For this reason the
wattage measuring is not realistic.
12. Progress bar
At a single glance you can see how far you have progressed.
If you ride slower than 4 km/h the program goes into PAUSE
mode. When you stop pedaling to pause, a pause window is
displayed, in which you have to select between:
• NEXT: Carry on cycling (you do not have to touch the button,
just starting to pedal again is sufficient). If the film is interrupted or stops just carry on pedaling to make it move
forward;
• STOP: Navigate to the result list;
• EXIT: Stop program, turn off Praxtour.
The program stops the ride automatically if the route is not
continued within 30 minutes.
Finish
Touch OK after reaching the FINISH to display the RESULT
window.
PLEASE NOTE: Do not immediately select a difficult resistance if you are not certain or not well trained. This device is no
child’s play; it gets close to the reality! Develop your performance slowly. Return to the personal data input window and
change the data accordingly.
This level has been selected in the input window; displays your
selected level of difficulty for the route.
Praxtour is set for automatic reception of heartbeat and calorie signals. Each sensor transmitter on 5 MHz is suitable to be
displayed in the information bar.
The Polar T31C chest band is available in our web shop.
Your current heartbeat is displayed in white. For comparison
the maximum heartbeat (from the input window) is displayed
in red. Below the calorie consumption per minute is displayed.
4. Speed
Pause
When pedaling the film moves ahead according to reality. If
you pedal slowly in a low gear the film moves slowly. You pedal
harder if you select a high gear and this moves the film more
rapidly. You can see the current gear of the Praxtour in the
information bar at the bottom of the screen. With your gear
shifters you change your gears, just like on a modern racing
bike. Your selected gear and the number of revolutions of your
pedals determine the speed with which you cover the route.
• Erase: The own selected result is deleted.
• Erase all: All own results are deleted.
• Save USB: Connect your USB stick to the console,
touch “Save USB” and save the data to (E:\).
• Load USB: Connect your USB stick to the console,
touch “Load USB” and obtains the data from (E:\).
The entered names stay saved in the memory after cycling.
When cycling again you only need to touch your name. Your
personal details are automatically displayed, together with
your last selected difficulty level. These data can be adjusted
at any time.
Exit
Touch RETURN to exit the program. Turn off the entire system
by touching SHUT DOWN. You can also turn off the system by
pressing down the POWER button on the console front panel.
During longer periods of non-use set the main switch at the
rear of the PowerConsole to (O).
6
7
TimeRiding
With the function TIMERIDING you cycle like in a time trial
against yourself or against other cyclists. Only competitors
who have cycled your selected route (section) are select. Enter
TIMERIDING in the personal input window (the button changes
from yellow to green).
SingleRiding
M1/T1:
1296m
eigen tijd:
0.06.55.36
real
Touch NEXT to display the TIMERIDING window:
- naam 2 medium
M 1:
0.07.39.53
finish:
0.40.11.04
- naam 3 pro
M 1:
0.06.42.31
finish:
0.38.44.12
- naam 4 light
M 1:
0.08.08.33
finish:
Select up to 3 competitors and their different results from the
result list. This can be your own performances, but also the
performance of others who have used this device. You can
also select competitors who have not reached the finishing
line, but registered their intermediate times.
Touch SELECT COMPETITOR to select your competitor. Then
select his/her results in SELECT TIMES.
Alternatively return to SELECT COMPETITOR to select another
person for the second time selection. Now select the time of
that other person in the second SELECT TIME block. For the
third competitor the same applies. For TIMERIDING it is not
necessary to select more than one competitor.
Touch NEXT to start the route.
After touching NEXT the corresponding route with the information bar at the bottom of the screen and a window on the
left with the name(s) of the selected competitor(s) with his/
her intermediate and finishing time(s) is displayed. Compare
your own intermediate times with these results and motivate
yourself for even better performances.
If the finishing time of a competitor corresponds with his
interim times (see in this example cyclist 4), then the route
has not been completely cycled. The last passed intermediate
measuring point is displayed as the finishing time.
0.08.08.33
MultiRiding
In the first 2 fields in the bar is displayed
that at measuring -point
the first
naam13(M1)
time check (T1) takespro
place. In this
example this is donetijd:/sec
1295 m after the
- 20,4
start.
afstand/m:
Your own time for the
respective interme- 56
diate measuring point
is displayed here.
- naam 1 -
The data of the cyclistreal
with the fastest
tijd/sec: If you were
time is displayed in YELLOW.
0 ride, then your
the fastest cyclist for this
afstand/m:
own time is displayed
in red.
0
- naam
2 - met de
De gegevens van de
renner
snelste tijd worden medium
in GEEL weergegeven.
tijd/sec:
Wanneer je tijdens deze
rit zelf de snelste
38,5
bent wordt je eigen tijd
in rood
afstand/m:
weergegeven.
126
4If the finishing time- naam
of a competitor
matlight
ches one of his intermediate times (see in
: the route was
this example cyclist tijd/sec
4), then
212,1
not finished. The last passed intermediate
measuring point isafstand/m:
then displayed as his
666
finishing time.
MultiRiding
With MultiRiding 2 to 4 Praxtours can compete against each
other. You see the differences in time and the distance gap
to your competitor(s) in a separate column on the left of the
screen. Compare the covered distance and the time difference with your competitors. Your own data are displayed in
yellow, your competitor(s) in white. Your own time and distance are displayed with 0 values. There is no difference between
that time and the time in the information bar at the bottom of
the screen. The fastest competitor is displayed on top of the
column, the slowest at the bottom. Motivation to catch up with
your competitors: stand at the top! The competitors do not
come on screen.
Required are at least 2 Praxtours Course de Luxe and one N+
or NT network router. The Praxtours must be linked with the
network router via RJ45 cable at the rear of the console. For
connection specifications and functions see the user manual
of the router.
1. Route selection (all users):
Select the route or part thereof to be cycled.
Touch NEXT.
5. 5. Other users: In the window with active competitions the
name of the route selected by the host is displayed on the
right. Select by touching. Now select “Register Competition”.
6. User 1 is prompted to accept the other cyclists. Touch “Accept”. This is repeated with each registration.
7. User 1 touches “Give Start Signal”. Do not start pedaling yet
until an internal signal in the computer activates the competition. Wait until the other users are ready.
8. The other users touch “Touch START when you are ready”.
This indicates that you are ready for the start.
2. Personal details (all users):
Navigate to the input window of the VirtuReal Cycling program
and fill in the data. For an honest competition every cyclist
selects the same resistance/level of difficulty.
Please note: Do not use two exactly same names.
3. Select function (all users):
Select the option MultiRiding. This block changes from yellow
to green. Touch NEXT.
4. User 1 (after selection) selects “Create Competition”. He
becomes the “host”. User 1 now waits until the other users
have registered.
9. User 1 touches the green starting bar and gives the final
starting signal.
SingleRiding
MultiRiding
1296m
M1/T1:
- naam 3 pro
eigen tijd:
- 20,4
10. The time is reset to 0. START.
0.06.55.36
realleft side of the
11. In the window on the
screen your own data- naam
are displayed
in yellow
2and the data of your competitor
in white.
medium
M 1: The data of the
This column is interactive:
0.07.39.53
fastest are displayed
on top (on all connecfinish:
ted systems), the slowest
are displayed at
0.40.11.04
the bottom. The order
of the table changes
as the positions change. Differences in time
- naam 3 and distance are measured
pro against your
own time, which remains
in this column in
M 1:
0 values.
0.06.42.31
finish:
Please note: If there are more than 2 users, another user can
also create a new competition. The other users can now select
between the two hosts.
8
The results of each0.38.44.12
competitor are only
stored in the own system.
- naam 4 light
M 1:
0.08.08.33
tijd:/sec
afstand/m:
- 56
- naam 1 real
tijd/sec:
0
afstand/m:
0
- naam 2 medium
tijd/sec:
38,5
afstand/m:
126
- naam 4 light
tijd/sec:
212,1
finish:
afstand/m:
0.08.08.33
666
9
Maintenance
Warranty
Controls
Check regularly if all connections are in order. Pay special
attention to the mounting bolts. These must be tightened, if
necessary. Especially check the crank bolts.
Software detection
Your device has been carefully tested and checked for malfunctions. The software detects possible malfunctions and
repairs most of them immediately. Simply restarting already
sufficiently solves most problems.
Cleaning
Clean the Praxtour and the console, except the touch screen,
after every use with a wet cloth and some mild detergent, if
necessary. Clean the touch screen at the beginning of the day
with a dry cloth, or breathe on it, if necessary.
Change handlebar grips
In the course of time the handlebar grips will have to be replaced. This is very simple. You can order the handlebar band
from Praxtour. Follow these steps to change the handlebar
grips.
• Remove the old handlebar grips. Do not remove them too
fast: check how they are fastened.
• Clean the handlebars well with benzene. The cleaner, the
longer the handlebar grips will last.
• Make sure the wiring runs properly - not bent - through
the hole in the steering tube.
• Move the rubbers of the brake levers up.
• Place a piece of handlebar band (approx. 7cm) over the
mounting clamps of the brake levers.
• After that you place the handlebar tape. Remove the
adhesive strip and start at the lower end of the steering
tube. Wrap the ribbon completely around the tube once,
wrap it at the upper side to the outside. Let the ribbon
extend over the edge a few millimeters.
Notes
Debugging
Ask your distributor for help in case more serious problems
arise.
Warranty
The Praxtour Course including provided components, (touch
screen) monitor, computer and labor costs is warranted for 1
year.
Excluded from this warranty:
• Normal wear and tear (for example chains and sprockets);
• Damage caused by unauthorized modifications;
• Damage due to improper use, for example by external
mechanical load of moving parts.
The warranty also expires if you try to repair the Praxtour
yourself.
Service
We recommend for professional use a 2-year service contract
directly with the purchase. This contract includes:
• Software updates;
• Annual supply of 1 box with 6 new route films;
• Helpdesk support - > by phone and e-mail;
• Service within max. 72 hours;
• Labor costs;
• Traveling expenses.
• Now slowly wrap the band around the handlebars. Hold
the handlebar band tight while wrapping. Remove the
rubberized part while attaching the band.
• Cross the band at the brake levers, so that the handlebar
is entirely covered. Then replace the rubbers of the brake
levers.
• WWrap the ribbon until the steering block and cut
diagonally to suit the block. Seal it by wrapping the
sticker over the ribbon around the steering tube along the
steering block.
• Finally attach the sealing stoppers, in this way you fix the
band in place.
10
11