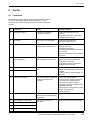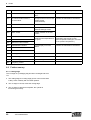
1
User manual
JASA 250/350/450
I
CE-Mark
This machine displays the CE-Mark. This means that it conforms with all European directives relating to health
and safety. A summary of these directives is included in the Declaration of Conformity supplied.
Liability
JASA packaging systems is not liable for any hazardous situations, accidents or damage resulting from:
■
The warnings or regulations shown on the machine or in the documentation being ignored.
■
Use of other applications or under conditions other than those described in this documentation.
■
■
Modifications to the machine. This also includes the use of any replacement parts other than the original
and alterations to the control program.
Inadequate maintenance.
JASA packaging systems cannot be held responsible for any damage resulting from faults in the machinery (e.g.
damage to products, operational delays).
All rights reserved - The duplication or passing of this information to third parties in whatever form without written
permission from Pannekeet Machinetechniek bv is forbidden.
Conditions - All descriptions, diagrams, illustrations and specifications apply to the machinery at the moment of
delivery. Pannekeet Machinetechniek bv reserves the right to carry out modifications at any time without having
to adapt this documentation.
© 2003 Pannekeet Machinetechniek bv
JASA 250/350/450 EN Rev. 0
II
JASA 250/350/450
Table of contents
Table of contents
Table of contents . . . . . . . . . . . . . . . . . . . . . . . . . . . . . . . III
1 Foreword . . . . . . . . . . . . . . . . . . . . . . . . . . . . . . . . . . . . . . 1
1.1 Aim . . . . . . . . . . . . . . . . . . . . . . . . . . . . . . . . . . . . . . . 1
1.2 Machine documentation and user . . . . . . . . . . . . . . . . 1
2 Safety . . . . . . . . . . . . . . . . . . . . . . . . . . . . . . . . . . . . . . . . .
2.1 Introduction . . . . . . . . . . . . . . . . . . . . . . . . . . . . . . . . .
2.2 Scope . . . . . . . . . . . . . . . . . . . . . . . . . . . . . . . . . . . . .
2.3 Safety provisions . . . . . . . . . . . . . . . . . . . . . . . . . . . .
2.4 Safety regulations . . . . . . . . . . . . . . . . . . . . . . . . . . . .
2.5 Emission of hazardous substances . . . . . . . . . . . . . .
2.6 Disasters . . . . . . . . . . . . . . . . . . . . . . . . . . . . . . . . . . .
2.7 End of lifespan . . . . . . . . . . . . . . . . . . . . . . . . . . . . . .
3
3
4
4
6
7
8
8
3 General description . . . . . . . . . . . . . . . . . . . . . . . . . . . . . 9
3.1 Machine description . . . . . . . . . . . . . . . . . . . . . . . . . . 9
3.2 Options . . . . . . . . . . . . . . . . . . . . . . . . . . . . . . . . . . . 10
4 Controls . . . . . . . . . . . . . . . . . . . . . . . . . . . . . . . . . . . . . .
4.1 Controls . . . . . . . . . . . . . . . . . . . . . . . . . . . . . . . . . .
4.2 Operation . . . . . . . . . . . . . . . . . . . . . . . . . . . . . . . . .
4.3 Main menu screen . . . . . . . . . . . . . . . . . . . . . . . . . .
4.4 Submenu screens . . . . . . . . . . . . . . . . . . . . . . . . . . .
4.5 User menu screen . . . . . . . . . . . . . . . . . . . . . . . . . .
4.6 Overview menu . . . . . . . . . . . . . . . . . . . . . . . . . . . . .
4.7 Test menu . . . . . . . . . . . . . . . . . . . . . . . . . . . . . . . . .
4.8 Film belt menu . . . . . . . . . . . . . . . . . . . . . . . . . . . . .
4.9 Components menu . . . . . . . . . . . . . . . . . . . . . . . . . .
4.10 Password menu . . . . . . . . . . . . . . . . . . . . . . . . . . . .
13
13
15
16
16
16
20
22
23
23
23
5 Preparation procedures . . . . . . . . . . . . . . . . . . . . . . . . .
5.1 Installation and operation . . . . . . . . . . . . . . . . . . . . .
5.2 Select format and seal bar . . . . . . . . . . . . . . . . . . . .
5.3 Turning on machine . . . . . . . . . . . . . . . . . . . . . . . . .
5.4 Film transport . . . . . . . . . . . . . . . . . . . . . . . . . . . . . .
5.5 Setting the mark scanner . . . . . . . . . . . . . . . . . . . . .
5.6 Change format or type overlap . . . . . . . . . . . . . . . . .
5.7 Replacing horizontal seal bar . . . . . . . . . . . . . . . . . .
25
25
26
27
29
35
41
45
6 Operating procedures . . . . . . . . . . . . . . . . . . . . . . . . . .
6.1 Starting and checking production introduction . . . . .
6.2 Checking production . . . . . . . . . . . . . . . . . . . . . . . . .
6.3 Checking the seal connection . . . . . . . . . . . . . . . . . .
6.4 Check fumigation time . . . . . . . . . . . . . . . . . . . . . . .
6.5 Changing film roll . . . . . . . . . . . . . . . . . . . . . . . . . . .
6.6 Adjusting the film control . . . . . . . . . . . . . . . . . . . . . .
6.7 Turning the machine off . . . . . . . . . . . . . . . . . . . . . .
6.8 Cleaning . . . . . . . . . . . . . . . . . . . . . . . . . . . . . . . . . .
47
47
48
48
49
49
51
54
55
7 Maintenance . . . . . . . . . . . . . . . . . . . . . . . . . . . . . . . . . .
7.1 Checking . . . . . . . . . . . . . . . . . . . . . . . . . . . . . . . . . .
7.2 Changing the knife . . . . . . . . . . . . . . . . . . . . . . . . . .
7.3 Changing film belts . . . . . . . . . . . . . . . . . . . . . . . . . .
7.4 Adjusting film belts . . . . . . . . . . . . . . . . . . . . . . . . . .
57
57
57
58
58
User manual JASA 250/350/450 EN Rev. 0, 18-4-2005
III
Table of contents
8 Faults . . . . . . . . . . . . . . . . . . . . . . . . . . . . . . . . . . . . . . . . .59
8.1 Fault alerts . . . . . . . . . . . . . . . . . . . . . . . . . . . . . . . . .59
8.2 Faults summary . . . . . . . . . . . . . . . . . . . . . . . . . . . . .60
9 Appendix . . . . . . . . . . . . . . . . . . . . . . . . . . . . . . . . . . . . . . 63
9.1 Technical details . . . . . . . . . . . . . . . . . . . . . . . . . . . .63
9.2 Film requirements . . . . . . . . . . . . . . . . . . . . . . . . . . .64
9.3 Liability and guarantee . . . . . . . . . . . . . . . . . . . . . . . .64
10 Index . . . . . . . . . . . . . . . . . . . . . . . . . . . . . . . . . . . . . . . . .65
IV
JASA 250/350/450
1
1
Foreword
Foreword
1.1 Aim
This manual explains important procedures and gives practical
tips for enabling safe, efficient and reliable use of the packaging
machine.
Should this manual fail to offer a solution for any technical faults,
please do not hesitate to contact the service department of
Pannekeet Machinetechniek bv. When doing so, please mention
the machine number (1) and the number shown on this manual.
Work that must be carried out by JASA packaging systems
personnel is not included in this manual.
Keep this documetation in a safe place.
Pannekeet Machinetechniek bv will be referred to as JASA
packaging systems hereafter.
Hazenkoog 14,
1822 BS Alkmaar (Netherlands),
1
Telephone: +31 (0)72 - 56 12 700,
7 days a week, 24 hours a day.
0001
Telefax: +31 (0)72 - 56 25 407
E-mail: [email protected]
1.2 Machine documentation and user
The machine documentation comprises:
■
■
User manual for the user. Information is also given on the
procedures to follow in the event of faults.
Spare parts manual with diagrams for the maintenance
technician and purchaser.
Subjects can be located using the table of contents or by
referring to the word index which gives the subjects in
alphabetical order.
User manual JASA 250/350/450 EN Rev. 0, 18-4-2005
1
1
2
Foreword
JASA 250/350/450
2
2
Safety
Safety
2.1 Introduction
This machine has been designed and built in such a way as to
allow its safe operation and maintenance. This applies to the
application, conditions and regulations as described in this
documentation.
It is therefore essential for any individual working on the
machinery to read this documentation.
Any works not addressed in these instructions should only be
carried out by the appropriate expert personnel.
2.1.1 Warning symbol
WARNING!!!
When the above warning symbol is displayed together with an
accompanying text, it indicates that the information is vital for the
health and safety of personnel.
Ignoring these warnings may result in serious injury or even have
fatal consequences.
User manual JASA 250/350/450 EN Rev. 0, 18-4-2005
3
2
Safety
2.2 Scope
The JASA 250/350/450 has been developed for packing
products in a flexible film packing.
This packing is formed by the machine from a film roll (1).
This film packing may consist of a printed film of polyethene,
polypropylene or laminate. It is also possible to permit fumigation
so that the oxygen is expelled from the bag and replaced by a
protective atmosphere (a gas mixture suitable for preservation).
This machine is not intended for any other use.
1
0002
2.3 Safety provisions
2.3.1 Emergency stop button
To stop the machine as quickly as possible in emergencies and
switch it to a safe mode (a number of components are not under
presure), an emergency stop switch (1) is fitted on the machine.
The button is easily identified by its red colour.
After the switch is actuated it remains mechanically locked and
the machine cannot restart.
Assistance can now be given immediately to personnel in the
event of an accident. Other urgent actions should also be carried
out forthwith.
E-STOP
1
RESET
After the danger has been removed the emergency switch can
be released by rotating the button in the direction of the arrow.
The machine will not start yet but can now be started in the
normal way.
The emergency button can also be used in the event of any
hazardous threats, e.g. faulty operation or the jamming of
material.
Recommendations
■
Compel new users to practise using the emergency stop
several times.
■
■
■
4
Do not use the emergency stop button as an alternative to
turning the machine off normally.
Test the emergency stop button regularly.
Do not reset the emergency stop button until it has been
established who has pressed it and why.
JASA 250/350/450
ST0P
START
0003
2.3
Safety provisions
2.3.2 Door break contacts
The door (2) is fitted with protective break contacts. When a door
is open the seal bars remain at temperature.
WARNING!!!
The machine's seal bars are hot.
2
0004
2.3.3 Protective break contacts of the transverse seal unit
The cylinder on the transverse seal unit (3) has protective break
contacts. If the transverse seal unit does not or cannot close
correctly, the protective system comes into operation, which
opens the transverse seal unit.
WARNING!!!
The transverse seal unit is fitted with a knife and closes
very positively.
3
0005
2.3.4 Electrical motors
The electric motors are thermally protected against overloading.
The electrical motor switches off automatically when overloaded.
2.3.5 Warning stickers
A variety of warning stickers are displayed on the machine.
Never remove the warning stickers.
Any sticker that becomes loose or illegible should be replaced
immediately.
Caution: Rotating or moving machine parts.
Stay clear of these parts.
Caution: High voltage.
The electricity supply should be switched off and
locked before any maintenance or repair work is
carried out.
The control box may only be opened after the main
switch has been turned off and locked.
User manual JASA 250/350/450 EN Rev. 0, 18-4-2005
5
2
Safety
Caution: Personal injury!
Never place any parts of the body between moving
machine parts.
Caution: Hot parts.
Never touch the seal bars.
2.4 Safety regulations
2.4.1 Technical condition
■
The machine has been built according to the most recent
state of the art and meets the safety regulations.
The use of this machine can still, however, be hazardous
for the user, third parties or to material objects. This
packaging machine should therefore only be used for its
intended purpose when observing all relevant guidelines
and when it is in perfect technical condition.
■
■
■
Faults identified automatically by the control system
should be rectified immediately.
It is not permitted to make modifications to the packaging
machine without first obtaining written permission from
JASA packaging systems.
Ensure that there is adequate ambient lighting.
2.4.2 Management
■
The management is obliged to train operatives to observe
the guidelines.
■
■
■
■
Any work to be carried out on the packaging machine
should only be carried out by authorised personnel.
Temporary personnel and personnel undergoing training
may only work on the packing machine under supervision
(and responsibility) of personnel authorised for this
purpose.
Functions, authorisations and responsibilities of the
personnel should be clearly defined.
Regular checks should be made to ensure that work is
being carried out in accordance with the regulations.
2.4.3 Operation and maintenance
■
Operate and maintain the machine in accordance with the
machine documentation supplied.
This manual should be clearly visible at the packaging
machine site.
■
■
■
6
Observe all JASA packaging systems' safety regulations
when working with the packaging machine. All local
regulations should also be observed.
Safety provisions may not be removed or rendered
inactive.
Always wear protective clothing and industrial shoes.
JASA 250/350/450
2.5
■
Do not wear any rings, watches or loosely fitting articles of
clothing. These may become entangled in moving
machine parts.
■
Never carry loose objects in clothing pockets.
■
Long hair should be tied back.
■
■
■
■
■
■
■
■
Emission of hazardous substances
Use products, such as cleaning solution, according to the
manufacturer's instructions.
Before turning the machine on:
•
Make sure all unauthorised personnel are well away
from the machine.
•
Inform authorised personnel in the vicinity of the
machine, and ensure that all personnel are well away
from any moving parts.
•
Make sure all safety provisions are present and
working.
Production should remain within the confines described in
the technical specifications.
Maintenance work should only be carried out after the
work area has been clearly marked.
Maintenance should only be carried out on a machine that
is:
•
Switched off, with the main switch locked.
•
Disconnected from the compressed air supply and
depressurised.
Never use defective tools.
Tools should be used only for their intended purpose.
Wear safety glasses and take extra care when working
with compressed air.
Caution is required for lifting work: only use reliable and
approved lifting apparatus and fittings.
On completion of lifting activities, check that all tools,
cloths, etc. have been removed from the machine and the
work area.
2.5 Emission of hazardous substances
The machine itself does not contain any materials that could be
hazardous to individuals.
The products to be processed do not emit hazardous substances
either.
The machine is not designed to limit risks presented by the
emission of hazardous substances. If products are used that may
contain hazardous substances, additional measures should be
taken.
User manual JASA 250/350/450 EN Rev. 0, 18-4-2005
7
2
Safety
2.6 Disasters
There are no special guidelines for disasters.
The usual extinguishing systems can be used.
2.7 End of lifespan
If the machine is to be dismantled at the end of its lifespan, the
regulations that apply to waste disposal at the time of dismantling
should be observed.
Only common materials have been used in the machine's
manufacture.
At the time of manufacture there were waste processing options
in place and there were no recognised risks to any personnel
involved in the dismantling work.
8
JASA 250/350/450
3
3
General description
General description
3.1 Machine description
The machine packs products in flexible film packing made from a
strip of film. The film is supplied from a roll (2) to the film
accumulator (1). The film accumulator (1) ensures that the
unrolling of the film (2) is controlled and is supplied at a constant
tension to the form shoulder (3).
1
2
0006
The form shoulder (3) surrounds the product infeed (4), which
supplies the product to be packaged. The form shoulder (3) and
product infeed (4) together form one module. The shape and size
of the module determine the bag width.
3
4
0007
The two driven film belts (5), which press against the product
infeed, provide the film feed.
The film is guided by the form shoulder around the product
infeed. The film overlap is sealed down by means of the vertical
seal bar so that a bag is produced. The transverse seal unit then
seals the top of the packing and at the same time forms the base
of the new packing.
5
5
0008
User manual JASA 250/350/450 EN Rev. 0, 18-4-2005
9
3
General description
The horizontal seal bars (6) seal together the top of the bag and
the base of the new bag. In the centre there is a knife which cuts
off the film.
The size and shape of the seal bar depend on the bags to be
processed.
The machine is operated and monitored by a digital control
system.
6
0009
3.2 Options
This machine can be extended with a number of options.
3.2.1 Stand by/night position
To increase the lifetime of seal bars in a cold and/or wet
environment, a program can be run on a machine which keeps
the temperature of the seal bars at 15-20 °C when the machine
is switched off. This means the seal bars are not exposed to
drastic changes in temperature.
3.2.2 Printer
The printer is used for printing information onto the packing (such
as "use by" dates and barcodes). The printer is fitted into a holder
that can be adjusted in two directions. The holder is symmetrical
and is fitted underneath the film.
0010
3.2.3 Perforator
Holes in the film are made by the perforator. A cold perforator is
used for a PE film. A heated perforator is used for polypropylene
or laminate bags to prevent tearing of the film.
3.2.4 Plunger
When the bag is being filled, a profile moves up and down the
tube once to prevent products being left in the product infeed.
3.2.5 Fumigation
To package products oxygen-free, a fumigation system can be
used on the machine. During pouring of the products the oxygen
is expelled from the bag by means of a gas mixture suitable for
preservation.
3.2.6 Vacuum unit
When tightly sealing the bag, vacuum is drawn with the vacuum
unit so that the products are vacuum packed.
10
JASA 250/350/450
3.2
Options
3.2.7 Labelling system
A label is stuck onto the bag during its production with the
labelling system.
3.2.8 Moistening
A liquid can be added to the packing with the moistening option.
For this purpose the production infeed should be fitted with
injection tubes, and the valve is fitted and the connections made
to the machine itself. This option can be turned on and off in the
program.
3.2.9 Folding-in uniit
The packaging can be provided with an in-fold at the bottom and/
or top with the in-fold option.
For this purpose the production infeed should be provided with
indentations on the base.
3.2.10 Block base
Using the block base option the packing can be provided with a
sharp in-fold at the bottom and/or top.
The production infeed should be specially designed for this
purpose.
3.2.11 Bag vibrator / tilter
With the bag vibrator / tilter option the machine is able to continue
vibrating the product so that a shorter packing unit can be
produced. The product is poured from the infeed onto to the seal
jaw of the JASA, whereupon it opens and feeds the film. The
bottom of the packing enters a vibration plate which shakes in the
product. After the product is shaken in this plate tilts and slides
the packing to the export belt.
For this purpose the machine should have sufficient height under
the vibrator / tilter to be able to export the packing.
3.2.12 Hand / foot pedal
The JASA can run stand-alone with the hand / foot pedal option.
By operating this pedal the JASA produces a packing unit.
3.2.13 Film seal unit
The start of a new film strip is sealed to the end of the strip in the
machine using the film seal unit.
0011
User manual JASA 250/350/450 EN Rev. 0, 18-4-2005
11
3
General description
3.2.14 Import buffer belt - export belt
Import buffer belt
The import buffer belt collects the product and introduces it
horizontally into the product infeed.
0012
Export belt
With an export belt the packing units are fed underneath the seal
jaw. It can go to a collector belt or a export unit with turntable.
Both belts are driven by the packaging machine.
0013
12
JASA 250/350/450
4
4
Controls
Controls
4.1 Controls
Main switch with locking option
The feed is switched on or off with the main switch.
0014
Control module with emergency stop button
The emergency stop button interrupts an electrical circuit when it
is pressed. This will also cause an emergency stop relay if there
is a break in the circuit.
During the activation of an emergency stop circuit:
■
■
The compressed air system is decompressed on the brake
cylinders and the pressure vessel.
All voltages in excess of 24VDC are switched off.
E-STOP
ST0P
RESET
START
0015
Mark scanner
The mark scanner can detect a mark that has been applied to the
film and in doing so produce bags to the correct length. The film
feed stops after the mark has been detected.
B
A
A MARK is determined using the contrast value of the mark.
B BKGD is determined using the contrast value of the
background.
(For setting the mark scanner see Chapter 5.5)
0016
User manual JASA 250/350/450 EN Rev. 0, 18-4-2005
13
4
Controls
Film seal unit (option)
If the old roll of film has been used up the new roll can be fitted
and the film fed through. (See film loop, page 29). By allowing the
old film to overlap the new film they can be sealed together by
means of the seal unit
C
A Sealing time.
Adjustable between .... and .... seconds by pressing button A.
B Cooling time.
Adjustable between ... and .... seconds by pressing button B.
C Starting: By pressing the bar (c) in the direction of the arrow it
continues sealing and cooling for the set times and is then
automatically raised.
B
A
0017
Photocell adjustment
The readings are used for setting the:
Loop length of the film strip for cutting on the mark.
0018
Printer setting.
By allowing a mark strip to be printed on the preprinted film, the
Jasa packaging machine can cut through the packing unit in the
correct position.
this position is determined with the adjustable roll (D)
The position of the print on the film can be adjusted with the
same roll
0019
Cleaning filter.
The pneumatic feed of the MC is coinnected to the conditioning
unit (or reducing valve). The adjustable reducing valve filters
moisture from the air present and also regulates the pressure.
Regularly remove the moisture with a button on the bottom of the
filter. This prevents damage to components.
0021
14
JASA 250/350/450
4.2
Operation
4.2 Operation
The control module comprises:
■
An emergency stop button (1)
■
A touch screen display (2)
■
Power indicator (3),
■
Three buttons (4 - 6)
4.2.1 Control indicators
Power indicator (3)
Main switch activated.
2
3
E-STOP
ST0P
1
RESET
START
4.2.2 Buttons
Reset button (4)
Resets the controls.
0022
5
Stop button (5)
Stops the selected function.
Start button (6)
Starts the selected function.
E-STOP
ST0P
RESET
START
4
6
0023
User manual JASA 250/350/450 EN Rev. 0, 18-4-2005
15
4
Controls
4.3 Main menu screen
After starting the machine, the main menu is displayed on the
screen.
From the main menu, a choice can be made from the following
sub-menus by touching the appropriate text on the screen.
The main menu consists of 6 sub-menus.
These are:
■
USER SETTINGS (see paragraph 4.5 on page 16).
■
OVERVIEW (see paragraph 4.6 on page 20).
■
TEST (see paragraph 4.7 on page 22).
■
FILM BELTS (see paragraph 4.8 on page 23)
■
COMPONENTS (see paragraph 4.9 on page 23).
■
PASSWORD (see paragraph 4.10 on page 23).
BC0102
The composition of the sub-menus is described below.
4.4 Submenu screens
Press the desired submenu (e.g. user menu).
Touch the word "CHANGE" to change the settings on the user
menu. If the word "CHANGE" is not displayed, touch the value
itself to remove it. On the numeric screen that opens, type in the
new desired value and activate this value with "ENT". The
selected value appears in the display bar. Close the menu using
the square in the top left-hand corner of the numeric screen.
The previous menu can be selected by pressing "ESC".
4.5 User menu screen
BC0103
16
JASA 250/350/450
4.5
User menu screen
4.5.1 TIMES AND LENGTHS MENU
Changing the time of the different processes performed by the
packaging machine.
BC0106
BI0107
SEALING TIME HORIZONTAL
The time for the horizontal seal jaws to close.
SEALING TIME VERTICAL
The time the vertical seal bars are pressed against the film.
This time display stops when the horizontal seal jaws are
opened. The vertical seal bar is opened.
COOLING TIME
For opening the horizontal seal jaws cooling air is blown in during
this period to cool the horizontal seal.
FILM LENGTH
Adjust the length of the packing unit.
WAITING TIME FOR FILM TRANSPORT
Waiting time from the opening of the horizontal seal jaws until the
start of the film transport.
WAITING TIME AFTER PACKAGING
Waiting time between the end of one packaging operation and
the start of the next packaging operation.
ADVANCE DEPOSIT MOMENT
If this time is at 0.00 the product is poured the moment the
horizontal seal jaw is closed. If a time is set here, the product will
be deposited earlier.
User manual JASA 250/350/450 EN Rev. 0, 18-4-2005
17
4
Controls
NUMBER OF DEPOSITS PER BAG
The desired number of deposits in one packaging.
FUMIGATION TIME
Depending on the use of the fumigation installation for the
addition of gas, the following times can be set:
■
Single fumigation time: Continuous fumigation
■
Double fumigation time
•
Pre-fumigation time
•
Pulse-fumigation time
BI0107
Single fumigation
With continuous fumigation, gas is added whenever the machine
is started / restarted. During production, gas is added
continuously. If the production stops for longer than the set
continuous fumigation time, the continuous gasflow will be
stopped.
Before the machine is restarted pre-fumigation takes place for a
few seconds to expel the air from the product infeed. The system
can be switched on or off separately with the keyboard.
Double fumigation
In the case of a lower machine capacity the consumption of the
protective gas may be limited by making use of double
fumigation
The pre-fumigation time is used to develop a column of gas in the
product infeed in order to expel the oxygen present.
The moment the product falls into the product infeed an extra
pulse of gas is supplied during the pulse fumigation time and is
used to expel the ambient air between the product. This means
the packings have as little surplus oxygen as possible.
After a long waiting time or during a machine stop, the gas valves
are closed. Before restarting, pre-fumigation takes place for a
few seconds in order to expel the air from the filling pipe. The
system may be switched separately by means of the keyboard.
The correct settings must be found experimentally.
More gas usage does not always produce less surplus oxygen.
The amount of surplus oxygen can only be checked with a
surplus oxygen meter.
FILM ADJUSTMENT CONTROL TIME
The film adjustment is used for film control. When the film
transport is started, a check is performed to see whether the film
position is set correctly. If there are any deviations the film is
corrected relative to the shoulder/format during film transport.
18
JASA 250/350/450
4.5
User menu screen
PERFORATION TIME
The time in which the holes are made in the film. The perforator
valve is actuated during this time.
0023
4.5.2 TEMPERATURE SETTINGS
The settings for the temperatures of the different seals can be
made in this menu.
BC0150
The temperature can be changed by pressing the temperature
value.
BC0151
■
■
Type in the temperature on the numeric screen and
activate this value with “ENT”.
Close the numeric screen by pressing the small square in
the top left-hand corner of the numeric screen. An
incorrectly entered value can be cleared by pressing CLR.
0024
User manual JASA 250/350/450 EN Rev. 0, 18-4-2005
19
4
Controls
4.5.3 LOAD SETTINGS
Press program number for a different program.
BC0104
4.5.4 SAVE SETTINGS
Save selected settings.
Enter a number (not yet used) and confirm with OK.
BC0105
4.6 Overview menu
BC0159
4.6.1 MAIN OVERVIEW
The different values of the machine are displayed here.
BC0160
20
JASA 250/350/450
4.6
Overview menu
4.6.2 TEMPERATURE OVERVIEW
A list of the temperaures of the various machine components.
BC0161
4.6.3 PRODUCTION SPEED
The production capacity in bags/min. is displayed.
BC0162
4.6.4 STATISTICS
The production values are displayed.
Press "RESET" to reset the day counter on the menu. (the total
number of packings cannot be reset)
The PLC and display program are shown at the bottom of the
screen.
BC0163
Press "yes" to confirm or reject the value.
BC0164
User manual JASA 250/350/450 EN Rev. 0, 18-4-2005
21
4
Controls
4.7 Test menu
4.7.1 SINGLE BAG CYCLE TEST
One cycle is activated with the single test cycle. The test starts
after you also press the start button (Section 4.4.2).
4.7.2 CONTINUOUS BAG CYCLE TEST
A number of test cycles are performed when continuous test
cycle is selected. The test starts after you press the start button
(Section 4.2.2).
The present capacity is also displayed here.
BC0146
4.7.3 MANUAL OPERATION FOR FILM CONTROL
The position of the film can be adjusted to the form shoulder with
the manual operation for film control.
The film can be manually corrected here. If the control lies
outside the range, it stops and one of the two "end sensor"
warning lights comes on.
FILM CONTROL TEST
The film roll is moved left or right by hand with the film control
test. If its working range is exceeded it will stop and one of two
"end sensors" will be illuminated.
BC0149
4.7.4 OUTPUT TESTING
The outputs of the machine control unit can be tested separately
in this submenu.
4.7.5
0025
22
JASA 250/350/450
4.8
Film belt menu
4.8 Film belt menu
FILM BELTS
The belt can be opened for manual feed of the film with "OPEN"
on the "FILM BELTS" menu. The "MANUAL FILM TRANSPORT"
allows the belt to be operated by hand.
If the belts are "open", the display indicates "close".
The belts can be closed by this method.
BI0166
4.9 Components menu
COMPONENTS
The components can be switched on or off with the
"COMPONENTS" submenu.
BI0165
4.10 Password menu
PASSWORD
Level 2 of the menu will open on entry of a password in the
"PASSWORD" menu.
The password menu is intended for qualified maintenance
personnel and is not dealt with further in this manual.
BC0176
User manual JASA 250/350/450 EN Rev. 0, 18-4-2005
23
4
24
Controls
JASA 250/350/450
5
5
Preparation procedures
Preparation procedures
5.1 Installation and operation
5.1.1 Installation
Condition
The machine packaging should be undamaged on delivery.
Procedure
1 Install the machine on a sturdy base, e.g. concrete.
2 Position the machine according to the position drawing.
Make use of the lifting eye (if provided), or a fork lift truck.
WARNING!!!
Take care when using block and tackle equipment.
Use only suitable and approved lifting gear and
attachments.
Do not stand under a raised load, and keep a safe
distance from it.
3 Adjust the machine using the adjustable feet:
■
■
Level.
A machine with liquid waste pipe: sloping towards the
waste gulley, maximum 5 mm/m.
0025
4 Connect the compressed air so that the supply can be shut off
and the packing machine can be decompressed. e.g. with a
quick-coupler.
5 Connect the machine in accordance with the electrical
diagram.
5.1.2 Operation
6 Check that the feed has been correctly connected.
Measure the voltage between neutral and:
•
phase 1
•
phase 2
•
phase 3
•
interphase
•
Check earth connection
Switch on the film transport (see Section 4.7.3) and check the
direction of rotation
User manual JASA 250/350/450 EN Rev. 0, 20-9-2005
0026
25
5
Preparation procedures
7 Check that the installed options are operational.
BC0265
8 Go to level 1.
BC0102
5.2 Select format and seal bar
5.2.1 Vertical seal bar implementations
■
PE or laminate - 6 mm.
■
Laminate or PP - 8 mm.
5.2.2 Selecting film width
Select the correct width if several formats are available.
5.2.3 Seal bar
Check the horizontal and vertical seal bars for their scope of
application.
26
JASA 250/350/450
5.3
Turning on machine
5.3 Turning on machine
Tools
Soft cloth.
Procedure
1 Check the following before the machine is used for the first
time:
■
Is there any damage?
■
Are all parts and accessories present?
■
Do all controls operate correctly?
2 Check that the seal bars fitted are suitable for the type of film
used.
3 Check the teflon (A) for damage and wear.
The fibres of the protective layers may not be visible and
there should be no evidence of loose teflon particles. Inspect
the rubber base layer for damage and identical thickness.
4 Inspect the teflon in the case of the vertical seal bar. Make the
necessary adjustments if there are signs of wear.
A
5 Close the doors.
0027
6 Clean the photocell lens with a soft cloth.
0028
7 Turn on the power.
0029
User manual JASA 250/350/450 EN Rev. 0, 20-9-2005
27
5
Preparation procedures
8 Reset the machine: unlock the emergency switch (B), then
press “reset” and “OK”.
E-STOP
ST0P
B
RESET
START
0030
28
JASA 250/350/450
5.4
Film transport
5.4 Film transport
Condition
The machine is on.
The film roll is changed.
Tools
Scissors.
Procedure
1 Press “FILM BELTS” in the main menu.
2 Open the doors.
3 Remove any remaining film from the machine.
BC0266
4 Transport the film through the machine until it is past the form
shoulder.
A
See: Film loop (A).
0031
5 Pull the film through about 1 metre.
0032
User manual JASA 250/350/450 EN Rev. 0, 20-9-2005
29
5
Preparation procedures
6 Cut a point of the film (45º and from left to right).
0033
0033
0033
7 Place the film point behind the shoulder.
0034
30
JASA 250/350/450
5.4
Film transport
0034
8 Pull the film through to just under the edge.
9 Hold the film straight and fold it back.
10 Place the folded part of the film between the shoulder and the
product infeed. And push the film through tightly and and
carefully until the point appears.
0034
11 Take hold of the point, pull it through carefully until film
appears at top right.
0034
User manual JASA 250/350/450 EN Rev. 0, 20-9-2005
31
5
Preparation procedures
12 Pull the film carefully down along the product infeed - carefully
to the left - right - left - right and so on.
0036
13 Guide the film down along the product infeed.
0037
14 Check that the film makes the correct (overlap/fin) seal. If this
is not correct, push the film out whilst test bags are running.
0038
OVERLAP-seal
SEAL
FINN-seal
SEAL
0038
32
JASA 250/350/450
5.4
Film transport
15 Set the vertical seal bars 4 mm from the product infeed. Guide
the film between the seal bars.
16 Check the infeed angle of the film, from the last roll B in front
and above the shoulder. The film may make a slight angle so
that it lies well over the format/shoulder.
B
CORRECT
0037
BC0146
17 Close the doors.
18 Press "TEST" on the menu.
BC0146
User manual JASA 250/350/450 EN Rev. 0, 20-9-2005
33
5
Preparation procedures
19 Press “SINGLE TEST CYCLE”.
BC0146
20 Press the start button to start the test cycle.
E-STOP
ST0P
RESET
START
21 Check the length of the film of a number of test bags.
0039
22 Press "ESC” or adapt the data as required.
BC0146
23 If the bag length is determined on the mark, the cutoff point
can be corrected by means of the rotary knob A.
0040
34
JASA 250/350/450
5.5
Setting the mark scanner
0041
5.5 Setting the mark scanner
The mark scanner is used to determine the length of the film by
using the marks that are printed on the film. Because both printed
and unprinted film can run on the machine, a choice may be
made from three different settings.
5.5.1 Counter
If the machine is run with an unprinted film (or printed film wihtout
mark), the length of the packing may be determined by means of
the "optional" counter.
The counter measures the length of the transported film and the
set film length is determined by the control system. In
"COMPONENTS", indicate that a counter is running.
5.5.2 Mark scanner
If the mark scanner is selected, the length is determined by the
marks on the film. If the set film length (converted to time), plus a
margin, has been covered without a mark having been detected
by the mark scanner, the packing machine stops and a fault
message is transmitted.
5.5.3 Mark scanner with counter
If the machine is provided with a mark scanner and a counter, it
can be run in the following manner.
Both components should be switched on in the control system (in
components, see 4.9, page 22). The length is determined by the
marks on the film, [provided that the mark scanner is able to
"read" the marks. The location of the mark on the film is
determined more accurately by the presence of the counters.
Therefore the printing in the intervening area between the marks
has no effect.
User manual JASA 250/350/450 EN Rev. 0, 20-9-2005
35
5
Preparation procedures
5.5.4 Mark reader setting procedure
1 Check that the light window of the mark scanner is located in
the path of the marks. Adjust as required.
0042
2 Transport the film (manually) until the light window appears
on the mark.
0043
3 Without moving the film, press the "MARK" button under the
green indicator (ready) until it goes out.
4 Twist the film until the light window appears outside the mark.
5 Without moving the film, press the "BCKGRND" button under
the red indicator (out) until the green indicator comes on and
then goes out again.
The green indicator will be continuously illuminated when the
mark scanner is set correctly.
0044
If the indicator flashes slowly, the setting procedure has
failed.
A rapid flashing indicator is an indication that the photocell
has short-circuited or is overloaded.
An indicator that does not come on means that the photocell
is not energised or that the grey value has been achieved.
6 Turning the mark scanner on.
36
JASA 250/350/450
5.5
■
Setting the mark scanner
Press “COMPONENTS” on the main menu screen.
BC0102
■
Press "OUT" adjacent to “MARK SCANNER”. The mark
scanner is turned on and the indication "ON" appears after
this component.
BC0265
■
Press “ESC” to close the components menu.
BC0265
7 Film length (not printed).
■
Press “USER SETTINGS”.
BC0102
User manual JASA 250/350/450 EN Rev. 0, 20-9-2005
37
5
Preparation procedures
■
Press “SET TIMES AND LENGTHS”.
BC0103
■
Press "CHANGE" adjacent to "FILM LENGTH".
BC0106
■
Press the value to be changed.
BC0119
■
■
Type in the film length on the numeric screen + 10 mm and
activate this value by pressing “ENT”.
Close the numeric screen by pressing the small square in
the top left-hand corner of the numeric screen.
0045
38
JASA 250/350/450
5.5
■
Setting the mark scanner
Press “ESC” until the main menu is displayed.
BC0119
8 Making bags.
■
Press "TEST" on the menu.
BC0102
■
Press “SINGLE TEST CYCLE”.
BC0146
■
Press the start button to start the test cycle.
■
Check the film length.
E-STOP
ST0P
RESET
START
0046
User manual JASA 250/350/450 EN Rev. 0, 20-9-2005
39
5
Preparation procedures
■
Press "ESC” or adapt the data as required.
BC0146
9 Save program.
■
Press “USER SETTINGS”.
BC0102
■
Press “SAVE SETTINGS”.
BC0103
■
Press the program number.
■
Type in the required program number and press “ENT”.
■
■
Close the numeric screen by pressing the small square in
the top left-hand corner of the numeric screen.
Close the ”SAVE SETTINGS" screen by pressing “ESC”.
BC0105
40
JASA 250/350/450
5.6
■
Change format or type overlap
Press “ESC” once again.
BC0103
5.6 Change format or type overlap
To change the format the following procedures should be
followed:
OVERLAP-seal
FINN-seal
The format (or form shoulder) determines the type of overlap. We
may distinguish the following formats/overlaps:
■
Overlap (inside is sealed on the outside)
■
Finseal (inside is sealed on the inside)
■
Combiseal (both an overlap and a Finseal are possible).
SEAL
SEAL
0037
The seal can be left over right or right over left. This affects the
printing of the film.
The overlap may vary for film which can be sealed on one side.
Procedure
1 Press the emergency stop button (the film belts open).
2 Turn the vertical seal bar away by removing the star knob (a).
3 With a larger product infeed: Move the parts back far enough!
0047
User manual JASA 250/350/450 EN Rev. 0, 20-9-2005
41
5
Preparation procedures
Replacing a format:
WARNING!!!
Avoid damage from jolts and careless handling.
A format is very heavy to be lifted by one person!
(With model 350 and 450)
■
■
Remove the format by means of the 2 star buttons.
Place the new format in the machine, slide it as far as the
stops and secure it with the 2 star buttons.
0048
4 Visually check to ensure that the product infeed is parallel to
the film belts. If not, contact the maintenance technician.
5 Feed the film through the machine.
6 Reset the emergency stop.
0049
5.6.1 Setting vertical seal bars
The correct place can be determined when the film is fed through
(see paragraph 5.4 on page 29).
7 Guide the film between the horizontal seal jaws.
8 Set the vertical seal bar so that there is a gap of about 4 mm
between the seal bars and the product infeed. Make sure that
the film runs behind the guide.
9 Adjust the seal bar in the centre of the desired seal.
0037
5.6.2 Setting block base
10 Adjust the block base in the middle or centre of the transverse
seal the moment the transverse seal jaws are closed. Make
sure that both in-folders fold in the same distance.
Make sure that the vertical seal does not push the product
infeed away from the middle. If necessary, also set the
vertical seal. Setting the vertical seal is possible in two ways
depending on the version:
■
42
using the star button behind the product infeed.
JASA 250/350/450
0037
5.6
■
Change format or type overlap
using a cylinder which is behind the product infeed and
which is controlled at the same time as the vertical seal.
11 Set the reduction of the closing speed for the block base. This
must be set in such a way that the block base fold reaches the
end of its range when the transverse seal is closed.
5.6.3 Setting film position sensors
a
b
0037
12 The film position sensors ensure that the overlap remains
constant when the machine is in operation.
Photocells or ultrasonic sensors are used, depending on the
conditions in which the machine is to operate.
0050
5.6.4 Setting the photocells for film control
• The sensors must be installed approximately 10 mm
from the film.(A)
•
If no film is present there must be at least a 50 mm
clearance between the sensor and the nearest
object.(B)
•
The sensors must be mounted at an angle of 90°.
•
The film must be taut at the edges. If the film "flaps" it
will not reflect the light well, resulting in control errors.
User manual JASA 250/350/450 EN Rev. 0, 20-9-2005
43
5
Preparation procedures
Adjustment of the machine
1 Go to the fitter menu and there set the "Film control" option to
"PRESENT".
2 Make sure that the film control in the "Component" menu is off
("OFF").
3 Use the "Manual operation film control" to steer the film film
bar toward the centre of the machine.
4 Feed the film into the machine.
5 Position the film on the film shaft so that the film runs centrally
over the machine.
6 Make a number of test bags and use the "Manual operation
film control" to position the film correctly for the format.
7 Make a minimum of 100 correct bags wihout using the film
control.
8 Make sure that both sensors see no film.
9 Setting the sensors.
Method 1
Determine the switch threshold using the sensor.
Set the sensor to “Set”. Ensure that there is no film in front of
the sensor and press once on “Teach”. Hold the film in front of
the sensor and press “Teach” again. The sensor will then
determine the switch threshold by itself. Set the sensor to
“Run”.
Method 2
Setting the switch threshold manually.
Set the sensor to “Run”. First check the reading on the sensor
without film. Then check the reading on the sensor with film
(also check what happens when the film is moved along the
front of the sensor). Select the lowest obtained value as the
value with film.
When the sensor is set to “Adjust”, the switch threshold can
be set with the aid of 2 switches. If the value with film, for
example, is 110, and the value without film is 3765, then the
switch threshold should lie between these two values.
To sensitize the sensor, the switch threshold may be set to
200. This selection depends on the environment. In a dustfree environment, the switch threshold in this example could
be set to 700. Allowing for fouling of the sensor, the value may
be set to 1500 in a dusty environment.
Next, set the sensor again to “Run”. Ensure that the [L – D]
switch on the sensor is at [L].
10 Switch on the film controller in the “Components Menu”.
44
JASA 250/350/450
5.7
Replacing horizontal seal bar
11 Carry out several test cases to check that the film controller is
working properly.
5.6.5 Setting the ultrasonic sensors for film control
• The sensors must be installed about 30 to 40 mm from
the film.(A)
•
If no film is present there must a clearance of at least
80 mm between the sensor and the nearest object.(B)
•
The sensors must be installed at an angle of 90° (if the
angle is not 90° the sound will not be correctly
reflected).
•
The film must be taut at the edges. If the film "flaps" this
will not reflect the sound correctly, resulting in control
errors.
a
Adjustment of the machine
1 Use the "Manual operatoin film control" to steer the film bar
toward the centre of the machine.
2 Turn the film control off in the "Component" menu.
b
3 Feed the film into the machine.
4 Position the film so that the film shaft runs just to the right over
the machine without using the flim control.
0037
5 Make a number of test bags and use the "Manual operation
film control" to position the film correctly over the format.
6 Make a minimum of 100 correct bags without using the film
control.
7 Position the sensors so that the film is only detected by the
sensor which is most centrally located.
8 Turn on the film control in the "Component" menu.
9 Make a number of test bags to check that the film control is
operating correctly. Reset the sensors if necessary.
5.7 Replacing horizontal seal bar
Material
Heat conducting paste, clean cloth.
Procedure
WARNING!!!
Even after the machine is switched off, the seal bars
are still hot.
User manual JASA 250/350/450 EN Rev. 0, 20-9-2005
45
5
Preparation procedures
WARNING!!!
One of the seal bars is equipped with a cutting edge.
The horizontal seal bar is available in the following versions:
■
■
heatseal (1 fixed bark)
multiseal (1 bar holder in which several types of seal
elements can be inserted).
In the case of heatseal bar
1 Dismantle the knife from the horizontal seal bar.
■
Hook the springs from the knife over the ridge. These
springs can be found on the back of the seal bar.
0051
In the case of a multiseal bar
2 Dismantle the seal bar:
■
Load the spring symmetrically, use the supplied aid!
■
Lift the spring carefully over the lip.
■
Remove the seal bar from its holder.
■
■
Pull away the knife. (Check for damage and replace if
necessary).
The seal bar can now be replaced.
Always make sure that there is no dirt on the inside of the
bar!
0052
3 Apply a thin even layer of heat conducting paste to the inside
of the new seal bar.
4 Attach the seal bar:
■
Place the seal bar in the seal unit against the laying
surface.
■
Return the spring symmetrically to its place by hand.
■
If this requires some force, repeat the procedure.
■
Fit the knife in the seal bar.
0053
46
JASA 250/350/450
6
6
Operating procedures
Operating procedures
6.1 Starting and checking production introduction
Conditions
The machine is turned on and the user settings have been
entered.
The film is transported through.
The product feed is ready for production.
Procedure
1 Check that the film roll is properly fixed to the spindle (A).
When fitted, the pinion locks as the film is unrolled.
A
0054
2 Starting production: push the start button.
E-STOP
ST0P
RESET
START
0055
3 Check the film overlap at the transverse seal unit. Adjust the
film sensors if necessary.
0056
4 Check the seal, see paragraph 6.3 on page 48.
User manual JASA 250/350/450 EN Rev. 0, 23-6-2005
47
6
Operating procedures
5 Check that:
■
■
The deposits are ready when the seal jaws close. This can
be adjusted by changing the value behind "WAIT AFTER
PACKAGE”.
The product is received by the seal jaws. This can be
adjusted by changing the value behind “ADVANCE
DEPOSIT MOMENT”.
BC0106
6.2 Checking production
Procedure
Check at least once a day:
WARNING!!!
Even after the machine is switched off, the seal bars
are still hot.
WARNING!!!
Caution: One of the seal bars is equipped with a cutting
edge.
1 Check the horizontal seal bar for damage and contamination.
■
■
Change any damaged seal bars, see paragraph 5.7 on
page 45.
If the seal bar is dirty:
Clean the hot horizontal seal bars and cutting edge groove
with a wooden spatula.
2 Check the seal connection, see paragraph 6.3 on page 48.
0057
6.3 Checking the seal connection
Procedure
1 The seal connection should be of adequate strength. If this is
not the case:
■
Increase the seal time.
■
And/or increase the cooling time.
■
And/or increase the seal temperature.
■
■
48
And / or check the system air pressure (min. 6 bars, check
during running using the "dip" during operation.
If the film does not seal well, load a new roll.
JASA 250/350/450
6.4
Check fumigation time
2 The seal surface must not be too hot, otherwise the seal
seam is deformed.
The seal seam will deform if too high a seal temperature is
used.
Possible causes are problems with seal connections:
■
The seal time is too long / too short.
■
And / or the seal temperature is too high / too low.
■
And / or the teflon coating of the seal bar is worn or the
teflon film of the longitudnal or adhesive seal bar is worn
(heatseal bar has no teflon coating).
6.4 Check fumigation time
Check the residual oxygen content. Only do this during a
continuous production run, and measure several packings.
Checking the surplus oxygen content can only be done with an
oxygen meter.
Carry out this check in very secure conditions.
6.5 Changing film roll
Material
Single-sided tape.
Procedure
1 The machine stops automatically when the roll is empty or
you can stop the production by pressing the stop button.
E-STOP
ST0P
RESET
START
0058
2 Set the film holder by turning the handle (A) (see also point
10).
3 Lift the film balance and brake belt.
0059
User manual JASA 250/350/450 EN Rev. 0, 23-6-2005
49
6
Operating procedures
4 Lift up the catch and remove the spindle from the machine.
5 Slacken the case fastening and turn the clamp loose.
0060
6 Slide the spindle out of the old tube and place into the tube of
the new roll. Place the new roll complete with spindle into the
machine.
Make sure that the roll is located in the centre of the machine.
7 Tighten the latches.
8 Assemble the brake in reverse order, see point 4.
9 Attach the film lengths to each other: tape of film seal unit
(option):
Tape
Film seal unit
Attach 3 lengths of adhesive
tape lengthways to the inside
of the new film.
Put the old belt on the film seal
unit, cut off the excess overlap.
Take the belt in the film
accumulator and lay it in
position over the adhesive
tapes.
Take the film from the roll and
lay it into position (overlapping
the old film).
Stick three strips of adhesive
tape on the outside of the film
joint and secure firmly.
Push the seal arm down and
then release it.
10 Loosen the film holder by turning the handle (A).
11 Turn back the film roll until the film is taut and the film balance
is in the middle.
A
0061
50
JASA 250/350/450
6.6
Adjusting the film control
6.6 Adjusting the film control
Conditions
The automatic film control is on.
Procedure
6.6.1 Adjusting film track
A setting
After a format change, and hence also a film change, the sensors
should be adjusted.
1 Feed the film fully through the machine and make a number
of test bags. Make sure that the film is running in the centre of
the machine.
2 Check the overlap. If it is correct, set the sensors in the centre
(check this in the display).
E-STOP
ST0P
RESET
START
3 Make a number of test packings and make sure that the film
control is set to "ON" in the "Components" menu.
0062
B Adjustment
If the overlap of the film on the long seal is incorrect, it can be
corrected by adjusting the film track sensors.
(Check that the roll is firmly seated on the shaft).
User manual JASA 250/350/450 EN Rev. 0, 23-6-2005
51
6
Operating procedures
1 Move the sensors to the correct position by means of the star
knob and make a number of test packings.
2 Repeat this step if the overlap is not yet correct.
0063
6.6.2 Setting tracking time
1 Check during production or control.
■
■
Changes direction frequently: reduce the tracking time.
During production of a number of bags, they are sent in the
same direction while the film almost doesn't pass the
inlets: increase the tracking time.
P.S. The film is only tracked during film transport.
2 Changing tracking time:
■
Press "USER SETTINGS" on the main menu, then press
“ADJUST TIMES AND LENGTHS”.
BC0103
52
JASA 250/350/450
6.6
■
Adjusting the film control
Press “ADDITIONAL SETTINGS”.
BC0106
■
Press "CHANGE" adjacent to "FILM tracking time".
BI0107
■
Press the value to be changed.
BC0124
■
■
Type the desired value in the numeric screen and press
“ENT”.
Close the numeric screen by pressing the small square in
the top left-hand corner of the numeric screen.
0064
User manual JASA 250/350/450 EN Rev. 0, 23-6-2005
53
6
Operating procedures
3 Press “ESC” until the main menu is displayed.
BC0106
6.7 Turning the machine off
Material
Wooden spatula
Procedure
WARNING!!!
Even after the machine is switched off, the seal bars
are still hot.
WARNING!!!
Caution: One of the seal bars is equipped with a cutting
edge.
1 Stop the production by pushing the stop button.
E-STOP
ST0P
RESET
START
0065
2 Turn off the power supply.
3 Check that the horizontal seal bars, the knife and the knife
slot are clean. Carefully clean dirty seal bars while they are
still hot using a wooden spatula.
0066
54
JASA 250/350/450
6.8
Cleaning
6.8 Cleaning
WARNING!!!
Turn the machine off using the main switch before
carrying out any cleaning.
A General
The Jasa is constructed mainly of materials such as plastic
and stainless steel, the emphasis being placed on a hygienic
design and and on the legally prescribed HACCP
requirements.
The cleaning work required should be determined according
to the operating and production conditions.
Generally speaking the packer should be cleaned once a day.
The cleaning interval depends, among other things, on the
type of product and the frequency with which products are
changed.
When a product is changed, only the product contact
surfaces, such as the hoppers and format, are changed.
The legal provisions regarding the prescribed and permitted
cleaning and/or disinfecting equipment should be complied
with at all times.
B Cleaning parts which come into contact with the product
Parts which come into contact with the product must be
removed for cleaning purposes. Cleaned parts may only be
refitted if measures have been taken to ensure that no
remains of cleaning agents and/or chemicals have been left
behind on the surface. All parts should be completely dry.
Never remove product residues with objects which could
damage the surface of the machine.
C Cleaning with water
If you clean the packaging machine with water from water
hoses, ensure that you do not add any cleaning agents to the
water which are aggressive or react with stainless steel. All
parts should be flushed thoroughly with clean tap water within
the set time (time set by the supplier of the cleaning agent).
Cleaning may only be carried out with a water jet at a
maximum pressure of 3 bars. No power must be supplied to
the machine during cleaning, and the switchbox, motor and
other electrical components must not be exposed to water.
The body of the machine falls under protection degree IP55.
The switchbox for the 350 and 450 models is protected
according to IP66, whereas the display falls under IP67.
User manual JASA 250/350/450 EN Rev. 0, 23-6-2005
55
6
Operating procedures
D Cleaning removable parts with water
You should clean removable parts with cleaning agents, then
flush well with clean tap water within the set time (time set by
the supplier of the cleaning agent). Depending on the product
processed, you should make sure that you do not leave any
product residues on the contact surfaces Before you refit the
parts you must dry them thoroughly.
You should use disinfectants, depending on the conditions.
WARNING!!!
After the machine has been switched off the seal bars
remain hot.
WARNING!!!
One of the seal bars is equipped with a cutting edge.
56
JASA 250/350/450
7
7
Maintenance
Maintenance
7.1 Checking
Regularly check the teflon on the product infeed. When
damaged, the teflon on the product infeed must be replaced.
Clean regularly with a steel brush and transverse seal. The steel
brush should be suitable for stainless steel (heatseal version
only).
Check the working of the brake flap regularly. If a brake flap is not
working properly, it must be replaced.
Check the bronze layer of the film spindle. If the block is worn, it
must be replaced.
0067
7.2 Changing the knife
1 Dismantle the knife from the horizontal seal bar.
WARNING!!!
Even after the machine is switched off, the seal bars
are still hot.
WARNING!!!
One of the seal bars is equipped with a cutting edge.
2 Take the springs off the back side of the assembly plate. The
springs are fixed to a hooked peg (A).
3 Fit the knife.
■
■
First make sure that the sloping side of the knife is in the
heart of the reverse groove.
A
Feed the springs through the assembly plate and hook it
behind the hooked peg.
0068
User manual JASA 250/350/450 EN Rev. 0, 18-4-2005
57
7
Maintenance
7.3 Changing film belts
The film belts are changed by loosening the top guide roll.
When fitting the new film belt, make a note of the direction of
rotation of the belt (indicated by an arrow).
0069
7.4 Adjusting film belts
The film belts for the packing machine are already adjusted by
the manufacturer. If further adjustment is necessary:
1 Make sure that the product infeed is vertical, and adjust it if
necessary.
2 Undo the securing bolt at A.
3 Press the whole construction with a pressure (look on the
presure for the film belts) of approx. 1.5-2.0 bar against
product infeed.
4 Turn the bolt at A so that the plastic plate B is not pushed off
from the infeed.
5 Tighten the lock nut.
A
B
0070
0037
58
JASA 250/350/450
8
8
Faults
Faults
8.1 Fault alerts
A fault detected by the operating control system will be shown as
an alert on the display and the reset LED will be on. The
operating control system will terminate the process (production
or start).
No.
Fault alert
Cause
Operator solution
201
Emergency stop in.
• Machine switched on.
• Emergency stop in.
• Follow the instructions on the
screen.
• If the fault continues, contact the
maintenance technician.
202
Door open.
Door relay is not energised.
Close doors and follow the
instructions on the screen.
203
Horizontal seal unit blocked
The horizontal seal unit is not
closed within a certain time.
The product to be packaged in
horizontal seal unit:
• Remove any products.
• The bag length setting on the screen
is too small.
• Deposit time setting on the screen is
incorrect.
204
Horizontal seal unit does not
open completely
The horizontal seal unit is not
opened within a certain time.
Product to be packaged between
machine and horizontal seal unit:
• Remove any products.
• If the fault continues contact the
maintenance technician.
205
Film end
The film accumulator is at the
top.
• Roll finished, change the roll.
• Check the fixing of the film roll to the
spindle.
• If fault continues, see paragraph on
page 61.
208
Mark on film missed.
The mark scanner has failed to • Clean eye of mark reader.
detect a mark during film
• Change screen setting bag length.
transport.
• Film belts have slipped due to
increased resistance during
transport, check film transport, is the
format and film dry.
• With counter: empty space for mark
not or incorrectly set.
• Close film belts.
209
Film transport – protection.
The motor protection for the
film belts or the auxiliary drive
is activated.
Contact the maintenance technician.
211
Film transport – motor fault
The motor protection is
activated.
Contact the maintenance technician.
213
Export belt – protection.
214
Automatic film control – securing
User manual JASA 250/350/450 EN Rev. 0, 18-4-2005
59
8
Faults
215
Automatic film control – fault
Detected by an end sensor.
Check film roll on the spindle.
216
Printer fault.
The printer displays a fault
alert.
Refer to the printer manual.
218
No communication with the
PT100 module.
No response from the PT100
module (serial
communication).
Contact the maintenance technician.
226
TEST EXITS.
227
MACHINE SETTINGS screen.
START pressed on the
Machine Settings screen.
229
TEST screen.
START pressed on the test
screen.
230
HORIZONTAL FRONT
231
HORIZONTAL REAR
The difference between the
actual and set temperature is
too great.
232
VERTICAL LEFT FRONT
Seal bars are not sufficiently
preheated, wait at least 10 min.
(See temperature settings or overview
of the present temperature.)
240
HORIZONTAL FRONT
Contact the maintenance technician.
241
HORIZONTAL REAR
PT100 displays incorrect
values.
242
VERTICAL LEFT FRONT
254
Discharge belt/ metal detector
255
Film unrolling motor
Motor fault
Contact the maintenance technician.
256
Film unrolling motor
Speed too high
Contact the maintenance technician.
257
Frequency control
START with the main menu screen.
Contact the maintenance technician.
8.2 Faults summary
8.2.1 Cutting edge
The cut edge on a packaging bag should be a straight and even
cut:
1 The cutting edge, the cutting edge groove or the reverse side
is dirty. Clean carefully with a wooden spatula.
2 The cut edge is curved, renew the cutting edge.
3 The cut edge is clean but incomplete; the cylinder is
functioning incorrectly.
60
JASA 250/350/450
8.2
Faults summary
8.2.2 Film transport
4 The bag length in the user settings is set to zero.
5 The film belts are tight against the product infeed (pressure
set to approx. 2 bar.).
6 The film belts are free of the product infeed.
In the "Components" menu select: “FILM BELTS”.
Press "CLOSE"
7 The film belts are worn or are not against the product infeed.
8 The motor is faulty.
8.2.3 Bag length variation
9 The format is wet due to cleaning or condensation, causing
the film to stick to the format.
User manual JASA 250/350/450 EN Rev. 0, 18-4-2005
61
8
62
Faults
JASA 250/350/450
9
9
Appendix
Appendix
9.1 Technical details
Product identification
Name
JASA packaging systems
Type number
250/350/450
Manufacturer
Pannekeet Machinetechniek bv
Dimensions
JASA250
Length
on application, depending on version and options
Width
on application, depending on version and options
Height including funnel
on application, depending on version and options
Weight
ca. 900 kg (depending on type)
JASA350
JASA450
Electrical details
Electrical details
3 phase 400 V 50/60 Hz. + N + PE, 16A
Capacity
2,5/3,5/4,5 kW (depending on type)
Pneumatic details
Diameter feed pipe
Inside Ø12 mm (minimum)
Air pressure
6 bar (minimum)
Air consumption
Greatly depends on cooling time, up to 400? l/min
Additional details
Bag width
250mm
350mm
450mm
Capacity
Max. 80 p/min. Max. 50 p/min. Max. 35 p/min.
Depends on the type of film, product to be packed, bag
length etc.
Operating control system
PLC
Memory
30 programs with user settings
User manual JASA 250/350/450 EN Rev. 0, 18-4-2005
63
9
Appendix
9.2 Film requirements
Products can be packed with film types having a maximum seal
temperature of 250°C.
However, JASA packaging systems cannot guarantee the
correct functioning of the packaging machine if film types are
used that have not been tested and approved by JASA
packaging systems.
9.3 Liability and guarantee
The Metaalunie (Employers' Organisation for Small and Medium
Sized Companies in the Metal Industry in The Netherlands)
Conditions of Delivery and Payment as supplied with the order
confirmation apply to this packaging machine.
The Metaalunie conditions also include the guarantee and
liability requirements.
9.3.1 Liability
JASA packaging systems or your dealer will not be liable:
■
■
■
■
If the installation is not carried out by the manufacturer
without taking the recommended guidelines into account
or if it is carried out by unqualified personnel.
If the packaging machine is not maintained or used in
accordance with its intended use, see paragraph 2.2 on
page 4.
If the safety regulations are ignored or the instructions
contained in this document are not followed.
For any situations that arise as a consequence of incorrect
translation of the text contained in the original instruction
manual supplied.
9.3.2 Guarantee conditions
The guarantee does not cover normal wear and tear. The
guarantee does not cover labour costs and travelling expenses
that arise from carrying out any claim on the guarantee.
The guarantee will be void if:
■
■
■
64
Unauthorised personnel have operated or maintained the
packaging machine.
The operation, service and maintenance are not carried
out in accordance with the regulations.
Any spare parts are used for maintenance or repair other
than the original spare parts.
JASA 250/350/450
10
Index
10 Index
A
M
Aim . . . . . . . . . . . . . . . . . . . . . . . . . . . . . . . . . . . . . .1
Appendix . . . . . . . . . . . . . . . . . . . . . . . . . . . . . . . .63
Machine
turning off . . . . . . . . . . . . . . . . . . . . . . . . . . . . 54
turning on . . . . . . . . . . . . . . . . . . . . . . . . . . . . 27
Machine documentation and user . . . . . . . . . . . . . 1
Main switch . . . . . . . . . . . . . . . . . . . . . . . . . . . . . 13
Maintenance
before turning on the machine . . . . . . . . . . . . 27
checking production . . . . . . . . . . . . . . . . . . . . 48
checking production introduction . . . . . . . . . . 47
immediately after turning the machine off . . . 54
Manual controls of the connection seal . . . . . . . . 13
Mark scanner . . . . . . . . . . . . . . . . . . . . . . . . . . . . 13
setting . . . . . . . . . . . . . . . . . . . . . . . . . . . . . . 35
B
Basic film control (option)
film adjustment . . . . . . . . . . . . . . . . . . . . . . . .51
setting tracking time . . . . . . . . . . . . . . . . . . . . .52
Basic film roll
changing . . . . . . . . . . . . . . . . . . . . . . . . . . . . .49
Basic film seal unit (option) . . . . . . . . . . . . . . . . . .11
Basic film, transport . . . . . . . . . . . . . . . . . . . . . . . .29
C
Changing a format . . . . . . . . . . . . . . . . . . . . . . . . .41
Checking production . . . . . . . . . . . . . . . . . . . . . . .48
Checking production introduction . . . . . . . . . . . . . .47
Checking the seal connection . . . . . . . . . . . . . . . .48
Connection seal bar implementations (option) . . . .26
Control module . . . . . . . . . . . . . . . . . . . . . . . . . . . .15
Controls . . . . . . . . . . . . . . . . . . . . . . . . . . . . . . . . .13
E
Emergency stop button . . . . . . . . . . . . . . . . . . . . .13
Export belt (option) . . . . . . . . . . . . . . . . . . . . . . . . .12
F
Fault alerts . . . . . . . . . . . . . . . . . . . . . . . . . . . . . . .59
Faults . . . . . . . . . . . . . . . . . . . . . . . . . . . . . . . . . . .59
Faults summary . . . . . . . . . . . . . . . . . . . . . . . . . . .60
Film requirements, net . . . . . . . . . . . . . . . . . . . . . .64
Foreword . . . . . . . . . . . . . . . . . . . . . . . . . . . . . . . . .1
G
General description . . . . . . . . . . . . . . . . . . . . . . . . .9
Guarantee . . . . . . . . . . . . . . . . . . . . . . . . . . . . . . .64
H
Horizontal seal bar
replacing . . . . . . . . . . . . . . . . . . . . . . . . . . . . .45
I
Import buffer belt (option) . . . . . . . . . . . . . . . . . . . .12
Installation . . . . . . . . . . . . . . . . . . . . . . . . . . . . . . .25
O
Operating procedures . . . . . . . . . . . . . . . . . . 47, 57
Operation . . . . . . . . . . . . . . . . . . . . . . . . . . . . . . . 25
P
Perforator (option) . . . . . . . . . . . . . . . . . . . . . . . . 10
Preparation procedures . . . . . . . . . . . . . . . . . . . . 25
Printer (option) . . . . . . . . . . . . . . . . . . . . . . . . . . . 10
S
Safety . . . . . . . . . . . . . . . . . . . . . . . . . . . . . . . . . . . 3
Safety provisions . . . . . . . . . . . . . . . . . . . . . . . . . . 4
Safety regulations . . . . . . . . . . . . . . . . . . . . . . . . . 6
maintenance . . . . . . . . . . . . . . . . . . . . . . . . . . 6
management . . . . . . . . . . . . . . . . . . . . . . . . . . 6
operation . . . . . . . . . . . . . . . . . . . . . . . . . . . . . 6
Technical condition . . . . . . . . . . . . . . . . . . . . . 6
Screen
main menu . . . . . . . . . . . . . . . . . . . . . . . . . . . 16
summary menu . . . . . . . . . . . . . . . . . . . . . . . 20
test menu . . . . . . . . . . . . . . . . . . . . . . . . . . . . 22
time-length-number menu . . . . . . . . . . . . . . . 17
user menu . . . . . . . . . . . . . . . . . . . . . . . . . . . 16
Starting production . . . . . . . . . . . . . . . . . . . . . . . . 47
T
Technical details . . . . . . . . . . . . . . . . . . . . . . . . . 63
U
Use as intended . . . . . . . . . . . . . . . . . . . . . . . . . . . 4
V
L
Label film catch . . . . . . . . . . . . . . . . . . . . . . . . . . .14
Liability . . . . . . . . . . . . . . . . . . . . . . . . . . . . . . . . . .64
Vertical seal bar implementations (option) . . . . . . 26
W
Warning stickers . . . . . . . . . . . . . . . . . . . . . . . . . . . 5
User manual JASA 250/350/450 EN Rev. 0, 18-4-2005
65