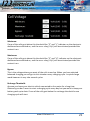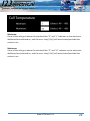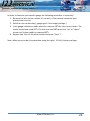
1
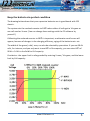
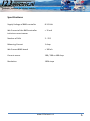
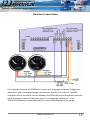
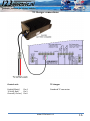
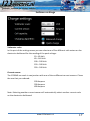
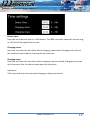
User Manual 123Electric Battery management system Electric Vehicle Revision 1.0 www.123electric.nl Table of contents Introduction ..................................................................................................................... 3 System structure .............................................................................................................. 3 Keep the batteries in perfect condition ............................................................................ 5 Specifications ................................................................................................................... 6 BMS Board mounting ....................................................................................................... 7 Wiring Diagram Overview ................................................................................................ 9 Split pack wiring overview.............................................................................................. 10 Controller connections ................................................................................................... 11 Boardnet connections .................................................................................................... 13 Current sensor connections ........................................................................................... 14 TC Charger connections ................................................................................................. 16 Software settings ........................................................................................................... 17 Software Dashboard ...................................................................................................... 25 www.123electric.nl 2 Introduction After the introduction of affordable Lithium-Ferro-Phosphate batteries, electric cars, boats, and motorcycles became feasible. It is vital that such batteries are charged very carefully. In other words, they can easily be over-charged, or over-discharged. Celltemperature and -current are also very important, in order to guarantee a long life. The 123electric Battery Management System ( or : BMS ) is primarily intended for prismatic LiFePO4-cells, but can also be adapted by the end-user for other cells like LiIon and LiPo, provided the cell-voltage is in the range of 2V to 5V. System structure The 123electric BMS is designed for battery-packs that have many cells in series, to form a high voltage battery-pack. Each cell is equipped with a small BMS-board, that monitors cell parameters like current, voltage and bypass-current and communicates over a onewire interface with the BMS-controller. This BMS-controller collects this data, and displays that via a USB-interface on a Windows Computer. The electronic dashboard tells you in the blink of an eye, what the status of your battery-pack is. In the 'settingsmenu' the user can adapt the system to his requirements : - Voltmeter ( 5 choices ) - Current Sensor used ( 3 choices ) - Cell Capacity ( 10 - 999 Ah ) - Charging Algorithm ( balanced- or quick-charge ) - Real Time Clock ( 24 h ) - Charging starts - Charging stops - Minimum Charging Current ( depending on charger used ) - Maximum Charging Current ( depending on charger used ) - Minimum Cell Voltage ( error-level ) - Maximum Cell Voltage ( error-level ) - Bypass Voltage ( balancing voltage ) www.123electric.nl 3 - Recharge Voltage - Minimum Cell Temperature ( error-level ) - Maximum Cell Temperature ( error-level ) - Gauge linearization ( for current- and capacity- gauge ) - Current-scale selection The BMS-controller can be connected with most chargers from the TC-range, via the three-wire control-connector. ( No CAN option required ) To indicate an error-condition, two relay-outputs are present, that can be wired to the motor-controller and/or to a dashboard indicator. www.123electric.nl 4 Keep the batteries in perfect condition The drawing below shows that your expensive batteries are in good hands with 123 electric. The system sets the coulomb counter to 100% when either all cells get to V-bypass or one cell reaches V-max. (You can change these settings with the PC software by yourself.) Calibrating the coulomb counter to 100% is important, as otherwise small errors will appear, because of changes in the charging efficiency, aging of the batteries etc. etc. The width of the green ( safe ) area, can also be selected by yourselves. If you use 90 Ah cells, for instance, and you only want to use 60% of the capacity, you can enter 60% of 90 Ah = 54 Ah in the field for Cell-capacity. Conclusion : the upper limit is safe-guarded by entering V-max / V-bypass, and the lower limit by Cell-capacity. www.123electric.nl 5 Specifications Supply Voltage of BMS-controller 8-15 Volt Idle Current of the BMS-controller inclusive current sensor < 15 mA Number of Cells 2 - 255 Balancing Current 1 Amp. Idle Current BMS-board < 100 uA Current-sensor 100 / 200 or 400 Amp. Resolution 1024 steps www.123electric.nl 6 BMS Board mounting WARNING : be aware that your battery-pack contains a large amount of energy, which can be potentially lethal. Use isolated spanners, to prevent any short circuits. High inrush currents, causing arc-ing ( sparks ) and ultra-high electro magnetic levels, can easily damage electronic circuits. We therefore strongly recommend to always FIRST connect the so called "large current connections" in a new setup, and THEN separately connect the BMS-boards. A good way of doing this is indicated on photo number one. Standard M8-bolts are modified with an M4 threaded hole in the top. After thorough cleaning of the cell-poles, the copper strips are bolted-on. Don't forget to also attach wires to the first and last cell in the same way, and connect these to the charger and the motor-controller. www.123electric.nl 7 Now, prepare the BMS-boards as shown on photo number two. Use thick solid-copper wire for this. Use the right length so that the end-result looks good. Connect all the boards as shown in photo number three. The BMS-board always to be mounted on the 'plus'-pole of the cell. This '+' is also indicated on the board. Remember to use an 'IN'-board for the first cell, and an 'OUT'-board for the last cell. ( see "wiring diagram overview" ) Might you have two battery packs, like one in front and the other in the back of a car, you will have to equip each pack with its own 'IN' and 'OUT'-board. ( see "split pack wiring overview" ) For optimum noise-immunity the wiring from- and to- the "IN" and "OUT" boards, will have to be so called "twisted-pair". ( see "wiring diagram overview" and/or "split pack wiring overview" ) It speaks for itself, that if you would plan to use for instance three packs, that you will have to order three "IN"-boards, and three "OUT"-boards. For optimum reliability, the one-wire interconnect should be soldered as indicated in the diagrams. Use a small soldering-iron, and take your time to do this job VERY carefully. NOTE: Make sure the BMS boards are located in a dry and dust free area, otherwise we advise to use a special PCB coating. www.123electric.nl 8 Wiring Diagram Overview www.123electric.nl 9 Split pack wiring overview www.123electric.nl 10 Controller connections Charger: 1. Relay output 1 (only for on/off charger) 2. Relay output 1 (only for on/off charger) 3. Not connected 4. Analog out (for analog controlled charger) 5. 12 Volt In (for analog controlled charger) 6. Ground (for analog controlled charger) 7. Bus out 8. Bus out + 9. Bus in 10.Bus in + www.123electric.nl 11 BMS: 1. 2. 3. 4. BMS out BMS out BMS in BMS in Current Sensor: 1. 2. 3. 4. Ground Analog in 5 Volt power Not connected Control: 1. Ground 2. Not connected 3. Relay output 2 ( Close if one cell voltage is too low ) 4. Relay output 2 ( Close if one cell voltage is too low ) 5. Analog coulombcounter output 6. Relay output 3 ( Close if mains connected ) 7. Relay output 3 ( Close if mains connected ) 8. Analog current output 9. Switched 12 Volt power (contact) 10.12 Volt power (always on) www.123electric.nl 12 Boardnet connections In the above schematic the 123Electirc current en fuel gauges are drawn. Might you want to use your existing fuel gauges for instance, you are free to do so. The BMS controller mimics a variable resistor between 0 and 240 Ohms and therefore practically any fuel gauge can be used. With the help of “analog gauge calibration” in the 123Electirc software you should be able to linearize the reading of your gauge. www.123electric.nl 13 Current sensor connections Control Unit: Current sensor: 1. 2. 3. 4. 1. 2. 3. 4. Ground Analog Output +5 Volt Power Not Connected www.123electric.nl +5 Volt Power Not Connected Analog Output Ground 14 Notes: Connect the power source and output correctly, never make a wrong connection. Two potentiometers can be adjusted by turning slowly to the required accuracy with a small screwdriver. Normally factory calibrated ,only necessary if the idle current isn’t zero. www.123electric.nl 15 TC Charger connections Control unit: TC charger: Enable( Black ) Pin 4 12 Volt( Red ) Pin 5 Ground ( Green ) Pin 6 Standard TC connector www.123electric.nl 16 Software settings Voltmeter scale: In this part of the settings menu you can select one of five different volt meters on the electronic dashboard for the reading of the pack voltage: 10 – 60 Volt 40 – 140 Volt 100 – 200 Volt 150 – 300 Volt 250 – 500 Volt Current sensor: The 123BMS can work in conjunction with one of three different current sensors. Chose the one that you ordered: 100 Ampere 200 Ampere 400 Ampere Note: Selecting another current sensor will automatically select another current scale on the electronic dashboard. www.123electric.nl 17 Cell capacity: The cell capacity can of course be set to the capacity of the cells used. We advise however to take only 70% of the rated capacity, to comply with cell aging and temperature effects. Example: if you have 90 Ah cells, enter 65 Ah in the capacity field. Charging algorithm: Balanced charge: After the charging-process begins, the current slowly increases to the maximum charging current, until one of the cells reaches the bypass-voltage. At that point the charging-current will ultimately be reduced to the minimum charging current. Charging ends when one of the cells reaches the maximum cell voltage OR when all cells reach the bypass-voltage. Quick charge: After the charging-process begins, the current slowly increases to the maximum charging current, until one of the cells reaches the maximum-voltage OR all cells reach the bypass-voltage. At that point the charging ends. Note: We advise to use balanced charge at least regularly but certainly when the battery pack is new. When you replace one of the cells in a pack, or for priming balanced charge may come in handy. www.123electric.nl 18 Device time: Here you can enter the time in a 24h fashion. The BMS controller keeps this time as long as 12 Volt will be supplied to the unit. Charging starts: Here you can enter the time after which charging is permitted. Charging only starts at the moment that the device time equals the start time. Charging stops: Here you can enter the time after which charging is not permitted. Charging only stops at the moment that the device time equals the stop time. Important: If the start and stop time are equal charging is always permitted. www.123electric.nl 19 Minimum: The final current after balanced charging should approach the 1 ampere bypass-current of the BMS boards. The minimum can be set from 2% to 17% of the maximum charging current supplied by your charger. Example: Maximum charging current is 30 Ampere. 1 Ampere would be 3.3% Select 4% as minimum charging current. Maximum: The maximum charging current can be set to 20%, 40%, 60%, 80% and 100%. This feature may come in handy when you are on a camping and they only supply reduced current. Example: assume that you have only 230 Volt, 6 Ampere available ( 1380 Watt ) and you have a 3000 Watt charger. If you set the maximum current to 40% you will only use 1200 Watt. Take into account that charging time will increase! www.123electric.nl 20 Minimum: If one of the cells gets below this threshold the “E” and “L“ indicator on the electronic dashboard are switched on, and the error relay ( Ry3 ) will be activated provided the contact is on. Maximum: If one of the cells gets above this threshold the “E” and “H“ indicator on the electronic dashboard are switched on, and the error relay ( Ry3 ) will be activated provided the contact is on. Bypass: This is the voltage where you want all the cells to end up. When you have selected balanced charging you will get to this situation every charging cycle. In quick charge mode however it may take several cycles. Recharge Threshold: Assume you leave your electric vehicle connected to the mains for a long time. Obviously you don’t want to start a charging cycle every day but you want to keep your battery pack up to date: If one of the cells gets below the recharge threshold a new charging cycle will start. www.123electric.nl 21 Minimum: If one of the cells gets below this threshold the “E” and “L“ indicator on the electronic dashboard are switched on, and the error relay ( Ry3 ) will be activated provided the contact is on. Maximum: If one of the cells gets above this threshold the “E” and “H“ indicator on the electronic dashboard are switched on, and the error relay ( Ry3 ) will be activated provided the contact is on. www.123electric.nl 22 Analog Gauge Calibration: By pressing the Gauge Calibration button in the settings menu you will see the above calibration window. After having selected the proper current sensor in the settings menu you can now select the scale of the current meter on the car dashboard. The pulldown menu will speak for itself, the first five options do not display regenerative current, whilst the last five do. Note that the regenerative current will be displayed as a positive current. www.123electric.nl 23 In order to linearize your specific gauge the following procedure is necessary: 1. Remove the wire to pin number 9 ( contact ) of the control connector and prevent short circuit. 2. Switch on the contact key ( gauges get 12 Volt supply voltage ) 3. From gauge calibration mode select for instance 50% for the current meter. The meter should now read 50%; if it does not read 50% press the “up” or “down” arrow until it does read the required 50%. 4. Repeat step 3 for all the other values and press “Save”! Note: Make sure you do this procedure using the right ( 12 Volt ) battery voltage. www.123electric.nl 24 Software Dashboard www.123electric.nl 25