1
Technical
Note: 111
Automatic Resampling Using Chromeleon
AutoDilution, Two Injection Loops, and the
Dionex AS-DV Autosampler
Barbara Shao, Kris Bahten, John Madden, Terri Christison, Fei Pang, and Frank Hoefler
Introduction
• Environmental
• Water
• Wastewater
• Automation
• Dilution
• Sample
Preparation
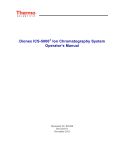
Column:
Thermo Scientific Dionex IonPac AS25,
2 × 250 mm
Eluent Source: Dionex EGC KOH Cartridge
Eluent:
37 mM KOH
Flow Rate:
0.25 mL/min
Inj. Volume:
A) 25 µL
B) 2.5 µL
Column Temp.: 30 °C
Detection:
Suppressed conductivity, Thermo
Scientific Dionex ASRS 300 Suppressor,
2 mm, recycle, 23 mA
Chromatograms: A) Original sample
B) AutoDilution of Sample A
In environmental water analysis, it is often necessary to
establish multiple calibration curves to accommodate samples
varying in concentration or to dilute concentrated samples to
fit the standard curve. AutoDilution, an important feature of
Thermo Scientific Dionex Chromeleon software, provides a
less time-consuming approach to analyzing out-of-calibrationrange samples by utilizing a smaller sample loop compared to
the one used for standards.
Operating AutoDilution using the Thermo Scientific
Dionex AS Autosampler was previously demonstrated in
Thermo Fisher Scientific, Inc. (formerly Dionex Corp.)
Technical Notes (TN) 81, 83, and 84.1–3 However, some
customers prefer the Dionex AS-DV Autosampler which
requires additional commands in the instrument program.
Here, AutoDilution is demonstrated using the Dionex
AS-DV. In AutoDilution, samples are first analyzed
using a full-loop injection from a large loop while the
Chromeleon™ software monitors the sample concentration.
If the sample concentration is outside the specified range,
AutoDilution will automatically reinject the sample
using a smaller loop. All dilution runs can be stored in
either the original sequence or a separate sequence for easy
identification of reanalysis results.
The Chromeleon software’s AutoDilution using the Dionex
AS-DV Autosampler with two sample loops of different
size offers a quick, easy, reliable, and economical method
to perform sample analysis, thereby eliminating laborintensive sample dilution. The Dionex AS-DV Autosampler
in combination with a Thermo Scientific Dionex ICS-900,
ICS-1100, ICS-1600, or ICS-2100 system is the costeffective solution for environmental water and wastewater
analysis. The use of AutoDilution requires the Chromeleon
AutoDilution license (P/N 069725).
Peaks:
900
1. Chloride
2. Sulfate
97 mg/L
50
1
µS
2
A
B
-0.50
0
10
Minutes
20
30
29104
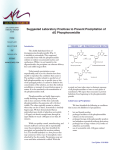
Figure 1: AutoDilution of a San Jose municipal water sample using two loops
with the Dionex AS-DV Autosampler.
This study presents an example of automatic reinjection
utilizing a smaller secondary loop fill and injection using
an optional 10-port valve available on the Dionex
AS-DV Autosampler and Dionex ICS-2100 system (Figure 1).
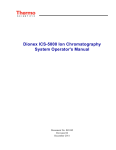
Sample Results
from Large Loop
Target
Compound
over Threshold
No
Next Sample
Yes
Add Sample to New
Sequence using Small Loop
PGM
Reanalyze Sample
Using Small Loop
PGM
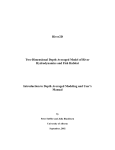
Figure 2: Flow chart of the AutoDilution process.
Process Overview
Figure 2 shows the flow chart of the AutoDilution process.
First the sample is injected using the large loop.
The Chromeleon software automatically determines if any
of the target compounds are above the specified threshold
level, then automatically reinjects the sample using the
small loop at the end of the sequence. The diluted injections
can be stored in either the original sequence or a separate
sequence, for easy identification of reanalysis results. The
Chromeleon software automatically specifies the sequence
parameters programmed by the conditionals in the Create
Purification Samples wizard.
Equipment
Dionex ICS-2100 system (or any Dionex ICS series system)
Dionex AS-DV Autosampler equipped with a 10-port
valve (P/N 068921)
Chromeleon 6.8 AutoDilution License (P/N 069725)
Dionex AS-DV Autosampler Operation
Specific procedures to operate the Dionex
AS-DV Autosampler with AutoDilution are described here.
For detailed operations, refer to the Thermo Fisher
Scientific, Inc. (formerly Dionex Corp.) AS-DV
Autosampler Operator’s Manual.4
Sampling
The Dionex AS-DV carousel holds 50 vials from which the
Dionex AS-DV Autosampler samples in any order, with single or multiple injections from each vial. Before loading the
carousel, always press Carousel Release button to reset the
vial memory. After loading the vials in the carousel, press
the Carousel Release button again to engage the carousel.
Specifying a Rinse
The Rinse command delivers rinse liquid from a vial to the
10-port valve through the open valve position and then to
waste. In AutoDilution, the Rinse function is used to rinse
any residual sample from the small loop when injecting
through the large loop, or vice versa.
To perform a rinse cycle, the Dionex AS-DV Autosampler
needs the position of the vial containing the rinse liquid,
the rinse volume, and the time specified to start the rinse.
In the Chromeleon Server Configuration program, first
specify the position of the vials containing water for
rinsing, such as Vials 45 to 50. In the Program Wizard for
the Dionex AS-DV Autosampler, rinsing is programmed
through the Basic Edit or Advanced Edit modes.
To use the Basic Edit mode, first select the mode, then
select the Rinse check box, and enter the Volume. Using
Basic Edit mode, the rinse is always delivered from the
vials in the range specified in the Chromeleon Server
Configuration program. Always enter the rinse commands
at the end of the program so that both loops will be rinsed
prior to the next injection, as shown in the Creating
Program (PGM) Files section. If the first vial is empty,
the rinse solution will be withdrawn from the next vial
specified in the range, until all rinse vials are empty.
To use the Advanced Edit mode, manually add the
InjectPosition and DeliverRinse commands to the
Command/Parameters table. Use this mode to define the
volume and position where the rinse comes from, e.g.,
DeliverRinse Volume = 100, Position = 10. Enter these
rinse commands at the end of the program, as shown.
Estimating the Delivery Volume
The Dionex AS-DV Autosampler calculates the delivery
volume using the formula shown in the Total Volume
Delivered Estimator:
Total Volume =
(Loop volume 25 µL + Delay Volume 125 µL) × Flush
Factor 8 = 1200 µL
The large loop (25 µL) volume is used to estimate the
delivery volume in both cases.
Sample Loops
Dilutions Using Both Large and Small Injection Loops
and a 10-Port Valve
In this method, two sample loops on a 10-port valve are
used for AutoDilution (Table 1). The original sample is
loaded through Valve 2 in State B and injected through the
large loop (25 µL) at State A using the Large Loop Program
(PGM). The smaller injection volumes are achieved using a
small loop (2.5 µL injection) in reverse, loading in State A
and injecting in State B. The Chromeleon software monitors
the sample concentration while injecting the sample using
Large Loop PGM, and reinjects the samples using the Small
Loop PGM (2.5 µL loop) if the concentration is over the
specified threshold limit.
PGM
Position A Function Valve_2.
StateA
Position B Function Valve_2.
StateB
Large Loop
Injects Large Loop contents
to column
Loads Large Loop
Small Loop
Loads Small Loop
Injects Small Loop
contents to column
Table 1: Functions of the 10-Port Valve Positions
Detector
AutoSampler
Pump
1
10
9
3
4
•Rename the current PGM to Large Loop. This PGM will
contain the postacquisition step and will be used on all
initial runs using the large loop (25 µL injection volume).
Analytical
Column
•Create a copy of this file named Small Loop (see the
Chromeleon User’s Manual for instructions on how to
create a copy of a file). This PGM will reinject any samples
that are above the threshold limit using a small sample
loop (2.5 µL injection volume).
8
Guard
Column
7
5
6
Waste
Small Loop
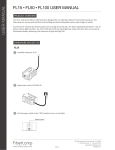
Figure 3A: Valve position B: load Large Loop or inject Small Loop.
Detector
AutoSampler
Pump
Suppressor
Large Loop
2
Analytical
Column
10
1
Examples of Large Loop and Small Loop PGM commands
(Figures 4 and 5) show the program commands used in this
application. The following examples use a 10-port valve on
the Dionex ICS-2100 system. To create the program file:
Suppressor
Large Loop
2
Creating Program (PGM) Files
•On the first line in the Large Loop PGM (Figure 4), add
the command Valve_2.StateB. This command will rotate
the 10-port injection valve to the LOAD position for the
large loop.
•At time 0.000, after the AcqOn statement, enter the
command Valve_2.StateA. This command will flip the
10-port valve to the INJECT position and transfer the
contents of the large loop onto the column.
•To the first line in the Small Loop PGM (Figure 5), add
the command Valve_2.StateA. This is the opposite of the
Large Loop PGM command and will rotate the 10-port
injection valve to the LOAD position for the small loop.
•At time 0.000, after the AcqOn statement, enter the
command Valve_2.StateB. This again is the opposite of
the Large Loop PGM and will flip the 10-port valve to the
INJECT position for the small loop and transfer the contents
of the small loop onto the column.
•Connect the Small Loop to Ports 4 and 8
Pressure.LowerLimit = 200 [psi]
Pressure.UpperLimit = 3000 [psi]
%A.Equate = "%A"
CR_TC = On
DeliverSpeed = 4.0 [ml/min]
DelayVolume = 125 [µl]
FlushFactor = 10
DeliverSample
EndSamplePrep
Valve_2.State
B
Data_Collection_Rate = 5.0 [Hz]
CellTemperature.Nominal = 35.0 [°C]
ColumnTemperature.Nominal = 30.0 [°C]
Suppressor_Type = ASRS_2mm
Suppressor_Current = 23 [mA]
ECD_Total.Step = 0.20 [s]
ECD_Total.Average = Off
Channel_Pressure.Step = 0.20 [s]
Channel_Pressure.Average = Off
Concentration = 37.00 [mM]
Curve = 5
Flow = 0.25 [ml/min]
•Connect Ports 2 and 3 together with a short piece of
tubing
0.000 Wait
Autozero
CycleTimeState
•Connect the Large Loop to Ports 6 and 10
Valve_2.State
A
9
3
4
7
5
8
Guard
Column
6
Small Loop
Waste
Figure 3B: Valve position A: load Small Loop or inject Large Loop.
Plumbing the 10-Port High-Pressure Valve
Figures 3A and 3B show the detailed plumbing connections
for the 10-port valve
•Connect the line from the pump to Port 1
•Connect the sample line from the autosampler to Port 5
•Connect the column line to Port 7
•Connect the green PEEK™ tubing waste line to Port 9
ECD_1.AcqOn
ECD_Total.AcqOn
Channel_Pressure.AcqOn
30.000 ECD_1.AcqOff
DeliverRinseVolume=1000
Valve_2.State
B
ECD_Total.AcqOff
Channel_Pressure.AcqOff
End
Figure 4: Example of Large Loop PGM commands.
Pressure.LowerLimit = 200 [psi]
Pressure.UpperLimit = 3000 [psi]
%A.Equate = "%A"
CR_TC = On
DeliverSpeed = 4.0 [ml/min]
DelayVolume = 125 [µl]
FlushFactor = 10
Valve_2.state A
DeliverSample
EndSamplePrep
Data_Collection_Rate = 5.0 [Hz]
CellTemperature.Nominal = 35.0 [°C]
ColumnTemperature.Nominal = 30.0 [°C]
Suppressor_Type = ASRS_2mm
Suppressor_Current = 23 [mA]
ECD_Total.Step = 0.20 [s]
ECD_Total.Average = Off
Channel_Pressure.Step = 0.20 [s]
Channel_Pressure.Average = Off
Concentration = 37.00 [mM]
Curve = 5
Flow = 0.25 [ml/min]
0.000 Wait
Autozero
CycleTimeState
The dialogs used in the wizard are shown below:
•Number of Target Compounds
•Target Compound X
•Target Compound X Tests
•Special Options
•Conditional Program Selection
•Sequence Properties
•Sample Properties
•Extended Sample Properties
Valve_2.state B
Number of Target Compounds
ECD_1.AcqOn
ECD_Total.AcqOn
Channel_Pressure.AcqOn
30.000 ECD_1.AcqOff
DeliverRinse
Valve_2.state A
ECD_Total.AcqOff
Channel_Pressure.AcqOff
The program for AutoDilution is created using a built-in
wizard that guides users through the main steps required to
create an AutoDilution program. The wizard automatically
shows dialogs needed to create the program. To create the
conditionals for the AutoDilution program, open the Large
Loop PGM and click on the postacquisition steps icon to
add a postacquisition step. Click on Click on this line to
add a new step and select Create Purification Samples to
start the wizard program.
Volume=1000
End
Figure 5: Example of Small Loop PGM commands.
•When using a Dionex AS-DV Autosampler, use a rinse
step to remove the residual sample from both sample
loops. Without the rinse, sample carryover will occur
in the sample run. Add the command DeliverRinse
Volume = 1000 to the end of the run, which does not
increase the overall run time.
•The AutoDilution commands and conditionals are created
in the Large Loop PGM using postacquisition steps and
the Create Purification Samples wizard, which is described
in detail in the following section.
•Create the sequence as the original run using the Large
Loop PGM for all the samples. Reminder: Any reruns that
are needed will be run from the same vial as the original
run using the Small Loop PGM.
Using the Create Purification Samples Wizard
The AutoDilution process is added to the Large Loop
PGM file by adding a postacquisition step. The Create
Purification Samples postacquisition step is available only
if the timebase is connected to the related server, the server
is running, and an AutoDilution license is installed.
Figure 6: Number of target compounds dialog box.
In the first dialog, enter the number of target compounds
that are searched in the AutoDilution process, up to a
maximum of 10 target compounds (Figure 6).
Target Compound X
On the second wizard page, Target Compound X
(shown in Figure 7) defines how the target compounds
are identified. Any connected detector can be selected
from the drop-down list. Peaks may be selected by name
(if operators have already defined and entered the QNT
method in the sample list, the names entered in the QNT
Method are listed for selection), retention time, greatest
height, or greatest area. The Mass Spectrometry Settings
are not used for this application.
Figure 8: Target Compound X Test dialog box.
Special Options
Figure 7: Target Compound X dialog box.
Use of a conditional program (Figure 9) is optional. If multiple dilution levels will be used (each in a separate PGM),
they can be specified in the conditional program dialog.
Checking this box will open the Conditional Program
wizard page on which operators can define which PGM
files will be used with the sample in the dilution sequence.
Because all reruns will use only a single PGM file (Small
Loop.pgm), a conditional program is not needed. Uncheck
both boxes.
Target Compound X Tests
The Target Compound X Tests dialog in Figure 8 defines
the test used to determine if the sample is rerun (at a
dilution). Custom tests can also be created using many of
the standard Chromeleon software variables, but are not
covered in this document. For AutoDilution, the Amount
Check is selected. This test checks whether the amount
of the target compound is above the threshold amount.
Double-clicking on the test name will open the Amount
Check Test dialog box. This dialog box allows operators
to select the channel, from which they can then check the
amount of the target compound from a drop-down list.
The threshold is the concentration value limit for the target
compound. Any samples that have a target compound
reported result (report units are ignored) above this
concentration will be added to the dilution sequence.
If, for example, chloride is selected as a target compound
and 10 is selected as the threshold, any samples that have
reported results above 10 (ppm or any concentration units
from the QNT file) will fulfill this test and be added to the
dilution sequence.
Figure 9: Special Options dialog box.
Sequence Properties
The Sequence Properties dialog box (Figure 10) is where the
name of the dilution sequence is entered. Enter a name that
will be readily recognized as containing the diluted samples
for the original run. A new sequence can be created for the
rerun samples, or they can be appended to the end of the
current sequence. If operators use the variable without an
extension, e.g. {seq.name}, the Chromeleon software will not
create a new sequence, but append the newly created samples
to the existing samples in the current sequence instead. The
Sequence Properties dialog is also used to specify running
a previously created sequence containing standards that
need to run before the dilutions. The sequence an operator
selects will automatically run before the dilution sequence. If
desired, standards can be selected to run before or after the
diluted samples.
Figure 11: Sample Properties dialog box.
Extended Sample Properties
The last wizard dialog box is the Extended Sample
Properties (Figure 12). In the Extended Sample Properties
dialog, select the tray and vial locations for the diluted
samples. For this method, the small loop injections are
made from the same vial as the Large Loop undiluted
run. Select Use analytic sample tray and Same as analytic
sample vial. The number of preparative injections for both
methods is one. The postacquisition step creation is now
complete and ready to run.
Figure 10: Sequence Properties dialog box.
Sample Properties
In the Program box on the Sample Properties dialog
(Figure 11), enter the PGM file to be used for the rerun
samples. Open the dialog box and select the Small Loop
PGM file that was created earlier. Also enter the QNT
method, which is generally the same QNT method used
for the original samples. Enter the dilution factor in the
sequence if the same QNT method is used to quantitate
the dilution samples. Dilution factors are discussed in the
Confirming the Loop Volumes section. If the operator
has run a calibration for the Small Loop, select this
QNT file here. The Type field indicates the Sample Type
of the samples to be created. The sample type is always
Unknown. The entry cannot be edited. The Status field
indicates the status of the samples to be created. The
sample type is always Single. The entry cannot be edited.
If a dilution factor is used, it can be entered in the Sample
field list by double-clicking the respective line.
Figure 12: Extended Sample Properties dialog box.
Loop Calibration
It is important to calibrate both loops or to run calibration
standards on both loops to produce the most accurate
dilution results. A calibration curve can be created for both
loop sizes by running a calibration for each PGM (Large
Loop and Small Loop). Two QNT files will need to be
generated: one for the Large Loop (used in the original run)
and one for the Small Loop (used with the rerun samples).
Optionally, a calibration can be run for the Large Loop
and a dilution factor of 10 (operators need to confirm the
loop volumes) can be entered for the dilution samples in
the sequence. If a dilution factor is used, the loop volumes
should be confirmed in the following procedure.
Confirming the Loop Volumes
•Obtain a 1000 mg/L (ppm) bromide standard (for anion
determinations) or a 1000 mg/L (ppm) lithium standard
(for cation determinations)
•Prepare a 10 mg/L (ppm) stock standard
•Create a sequence using the Large Loop PGM file and run
four injections of the 10 mg/L (ppm) standard
•Verify that the %RSD is 5% or better
•Create a sequence using the Small Loop PGM file and run
four injections of the 10 mg/L (ppm) standard
•Use this equation for the dilution factor:
Dilution Factor =
Average Area Large Loop
Average Area Small Loop
•Use this equation to calculate the injection volume, and
enter it in the sequence in the Sample Properties dialog:
Volume of the Large Loop
Volume of the Small Loop =
Dilution Factor
Benefits of Chromeleon AutoDilution
The Chromeleon software’s AutoDilution offers a quick,
easy, and reliable method to deliver samples in the calibrated range of the instrument.
•Automated check for samples that exceed threshold
•Automated rerun of samples with a small injection loop
•All dilution runs can be stored in a separate sequence for
easy identification
For more information on methods to automate dilution
using the Dionex AS Autosampler, refer to Dionex
TN 81, TN 83, and TN 84.1–3 In Dionex TN 84,
AutoDilution by the Dionex AS Autosampler is discussed
using two loops with the Dionex ICS-1100/1600/2100
systems and in the Automation Manager for the Dionex
ICS-5000 and ICS-3000 DC Detector/Chromatography
Compartment.3 In Dionex TN 81, AutoDilution by the
Dionex AS Autosampler is achieved by injecting smaller
amounts in the existing loop using partial-loop injections.1
In Dionex TN 83, the Dionex AS Autosampler performs
vial-to-vial dilutions using the Sample Prep module.2
References
1.Automated Dilutions Using Chromeleon AutoDilution
and the Partial Loop Injection Capability of the
ICS-3000 AS Autosampler. 2009, Thermo Fisher
Scientific, Inc. (formerly Dionex Corp.) Technical Note
81, LPN 2205. www.dionex.com/en-us/webdocs/70792TN81-Chromeleon-AutoDilution-06Mar09-LPN2205.pdf
(accessed Nov 28, 2011).
2.Automatic Vial-to-Vial Dilutions Using Chromeleon
AutoDilution and the Partial Loop Injection Capability
of the ICS-3000 AS Autosampler with the Sample Prep
Option. 2009, Thermo Fisher Scientific, Inc. (formerly
Dionex Corp.) Technical Note 83, LPN 2245.
www.dionex.com/en-us/webdocs/70900-TN83Automatic-Dilutions-17Mar09-LPN2245.pdf
(accessed Nov 28, 2011).
3.Automated Dilutions Using Chromeleon AutoDilution and
Two Injection Loops. 2011, Thermo Fisher Scientific, Inc.
(formerly Dionex Corp.) Technical Note 84, LPN 2255.
www.dionex.com/en-us/webdocs/73254-TN84ChromeleonAutodilution-05May2010-LPN2255-01.pdf
(accessed Nov 28, 2011).
4.AS-DV Operator’s Manual. 2009, Thermo Fisher
Scientific, Inc. (formerly Dionex Corp.) Document No
065259. www.dionex.com/en-us/webdocs/73226-ManIC-AS-DVoperators-May2010-DOC065259-03.pdf
(accessed Nov 28, 2011).
• Increased productivity, saved time, and reduced cost
In addition to these
offices, Thermo Fisher
Scientific maintains
a network of represen
tative organizations
throughout the world.
Dionex Products:
(408) 737-0700
North America:
U.S./Canada
(847) 295-7500
South America:
Brazil
(55) 11 3731 5140
Europe:
Austria
(43) 616 51 25
Benelux
(31) 20 683 9768
(32) 3 353 4294
Denmark
(45) 36 36 90 90
France
(33) 1 39 30 01 10
Germany
(49) 6126 991 0
Ireland
(353) 1 644 0064
Italy
(39) 02 51 62 1267
Sweden
(46) 8 473 3380
Switzerland
(41) 62 205 9966
United Kingdom
(44) 1276 691722
Asia Pacific:
Australia
(61) 2 9420 5233
China
(852) 2428 3282
India
(91) 22 2764 2735
Japan
(81) 6 6885 1213
Korea
(82) 2 2653 2580
Singapore
(65) 6289 1190
Taiwan
(886) 2 8751 6655
www.thermoscientific.com
Legal Notices: ©2011 Thermo Fisher Scientific Inc. All rights reserved. PEEK is a trademark of Victrex PLC. All other trademarks are the property of Thermo
Fisher Scientific Inc. and its subsidiaries. This information is presented as an example of the capabilities of Thermo Fisher Scientific Inc. products. It is not intended
to encourage use of these products in any manners that might infringe the intellectual property rights of others. Specifications, terms and pricing are subject to
change. Not all products are available in all countries. Please consult your local sales representative for details.
Part of Thermo Fisher Scientific
Thermo Fisher Scientific,
San Jose, CA USA is ISO Certified.
TN111_E 12/11SV LPN2961