1
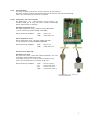
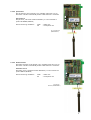
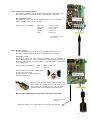
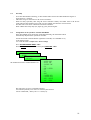
PREVENT A DISASTER FOR YOUR KOI POND User Manual Sensor Controller KOIGUARD KG-SC100 SENSOR CONTROLLER Important! Please read! This User Manual is an integral part of your purchase and use of this product. It contains important instructions regarding the start-up and use of the KoiGuard pond monitoring system. Read this user manual carefully! The product’s guarantee is no longer valid should the product become damaged as a result of the failure to observe these operating instructions. We do not assume any liability for any resulting damage! Nor do we assume liability for damage to property or personal injury caused by the improper use or failure to observe the safety instructions for the product. Improper use or failure to follow instructions will invalidate the product guarantee! PREVENT A DISASTER FOR YOUR KOI POND Inhoudsopgave Pagina 1. 2. 3. 4. 3 3 3 4 Recommended use Components included Technical specifications and features Safety instructions 5. Installation 5.1 Mounting the sensor controller 5.2 Installation of the electrical parts 5.2.1 Connections 5.2.1.1 230VAC Mains connections 5.2.1.2 KoiGuard NET1.00 / RS485 network connection 5.2.2 Sensor interfaces 5.2.2.1 Temperature / UV / Float interface 5.2.2.2 pH Interface 5.2.2.3 Redox Interface 5.2.2.4 Conductivity Interface 5.2.2.5 Oxygen Interface 5.3 Assembly 5.4 Configuration in the operations controller KG-MC001 5 5 6 6 6 7 7 8 8 9 9 10 10 6. 6.1 6.2 Indicators Power lamp Alarm lamp 10 10 10 7. 7.1 7.2 7.3 7.3.1 7.3.2 7.3.3 7.3.4 Calibration Calibration on installation Calibration during maintenance Calibration of the sensors pH sensor calibration ORP/Redox sensor calibration Conductivity sensor calibration Oxygen sensor calibration 10 10 10 11 12 13 13 14 8. 9. 10. 11. Preservation Maintenance and cleaning Removal Declaration of Conformity (DOC) 14 15 15 15 fig. 1 fig. 2 fig. 3 fig. 4 fig. 5 fig. 6 fig. 7 fig. 8 external connections internal connections Temperature / UV / Float interface pH Interface ORP/ Redox Interface Conductivity Interface Oxygen Interface Indicators 5 6 7 8 8 9 9 10 1 Introduction Dear Customer, Thank you for purchasing this product. This product meets the requirements of both current national and European standards. In order to ensure the continued fulfilment of legal requirements and safe operation of this product, we kindly ask you to carefully follow the instructions in this user manual! All company and product names contained herein are trademarks of their respective owners. All rights reserved. Should you have any further questions, please contact our technical services department: KoiGuard De Hoek 42 1601 MR Enkhuizen The Netherlands [email protected] www.koiguard.nl 2 1. Recommended use This product, the sensor controller KG-SC100, is designed for the interface function of the KoiGuard pond system. It is possible to connect all available KoiGuard sensors (sold separately) to maintain the water quality and other processes in the garden pond, or to control them. No part of the product may be modified or adapted, otherwise the guarantee/warrantee as well as the licence (CE) will become invalid. Any use other than the one described above may damage the product and can also increase the risk of short-circuit, fire, electric shock etc. Take careful note of all the safety instructions in this user manual! 2. Components included • Sensor Controller KoiGuard KG-SC100 • Temperature Interface KG-INTT001 • pH Interface KG-INTPH001 • Redox /ORP Interface KG-INTRX001 • Oxygen Interface KG-INTO2 • User manual 3. Technical specifications and features • Power supply: • Power consumption: • Protection class: • Front keyboard • Display • Network connection: KoiGuard communication 230V~/50Hz approx. 5W IP41 / DIN EN60529 polycarbonate LCD illuminated 4*20 characters Serial RS-485 Interface possibilities: - Temperature interface Water temperature sensor Air temperature sensor UV-C sensor 2 float switches (article KG-INTT001) (article KG-WT001) (article KG-LT001) (article KG-UVC001) (article KG-SW001) - pH interface pH sensor (article KG-INTT001) (article KG-PH001) - Redox interface Redox sensor (article KG-INTT001) (article KG-RX001) - Oxygen interface Oxygen sensor (article KG-INT02) (article KG-O2001) - Conductivity interface Conductivity sensor (article KG-INTCO001) (article KG-CO001) - Ammonium NH3 interface Ammonium NH3 sensor (article KG-INTION001) (article KG-NH401) - Free chlorine interface Free chlorine sensor (article KG-INTFRCHL) (article KG-FRCHL) - Nitrate NO3 interface Nitrate NO3 sensor (article KG-INTNO3) (article KG-NO3) - Nitrite NO2 interface Nitrite NO2 sensor (article KG-INTNO2) (article KG-NO2) 3 4. Safety instructions The product’s guarantee becomes invalid if the product is damaged as a result of the failure to observe these operating instructions. We do not assume any liability for any resulting damage! Nor do we assume liability for damage to property or personal injury caused by the improper use or failure to observe the safety instructions. In such cases the product’s guarantee becomes invalid! • • • • • • • • • • • For safety and licensing (CE) reasons any unauthorised alterations to and/or modification of the product are not permitted. The product is designed in accordance with protection class I. Voltage/power may only be supplied via the public power supply (230V~/50Hz). This product is not a toy. Devices operated via the supply voltage should be kept out of the reach of children. Therefore, take particular care when children are around. Never dismantle the product! There is danger of a fatal electric shock! Do not leave packaging material lying around. This may become a dangerous plaything in the hands of children. The device is manufactured according to protection class IP41. The product is designed to be used indoors but can be used outdoors when protected from rain and dust. The accident-prevention regulations, established by the Employer’s Liability Insurance Association for electrical equipment and facilities, must be adhered to in commercial facilities. Make sure you only load the product up to the capacity indicated. An overload may lead to the destruction of the device, a fire or an electrical accident. Do not use inadequate power cords. These should be sized according to the load to be connected. Handle the product with care. Any blow or impact to the product, or if it falls, even a short distance, can contribute to it becoming damaged. The approved ambient temperature may not be exceeded during operation (minimum of -20°C and maximum of +55°C) 4 5. Installation 5.1 Mounting the Sensor Controller Before assembling and using the device, make sure you take note of all the safety and assembly instructions in this user manual. Only people who are appropriately trained are permitted to carry out work on voltage-carrying parts. If you are not properly trained, please consult a qualified electrician who is authorised to carry out such work. Any incorrect work carried out on the supply voltage may lead to a fatal electric shock. You endanger not only your own life but also the lives of others! Before we can determine a suitable installation location, we must be sure of: a suitable and solid installation location no danger for immersion of the housing when the pond floods or leaks When you have found a suitable installation location, proceed with the installation as follows: • Disconnect the sensor controller completely from the supply voltage (all poles)! • Open the sensor controller’s casing by removing the four screws on the top surface of the device using a suitable screwdriver. Disconnect the flat cable connector of the green board on the bottom (Fig. 2.1). • There is one hole in each of the device’s four corners. You can use a suitable pencil to mark the position of the main controller through the four holes in order to drill holes in a wall for inserting dowels, for example. The space between the holes is 188 x 88 mm. • Make sure that the drill holes or screws do not damage any cables, power supply lines, gas pipes, or similar! Life-threatening danger! • Now use the appropriate screws/dowels to attach the controller housing in the desired installation location. The openings/plastic cable glands must face downward towards the ground. (fig 1) • You will find several screw able clamping terminals on the circuit board in the main controller’s casing. The installation cables are attached to these. • Before any external communication or sensors are connected to the sensor controller, the sensor controller must be disconnected from the main power supply! (1.1) Fig.1 : external connections (1.2) (1.1) (1.2) Cable lead-through M12 for the sensor wires and external communication Cable lead-through M16 for mains 230V / 50Hz 5.2 Installation of the electrical parts Please note: The power supply connection in the main controller (2.3) only serves as the power supply for the main controller. When in operation, hazardous voltage is present on the circuit board! 5 5.2.1 Connections 2.1 2.2 2.3 2.4 2.5 2.6 2.7 2.8 2.9 2.10 Fig.2 Internal connections KG-SC100 (2.1) (2.2) (2.3) (2.4) (2.5) (2.6) (2.7) (2.8) (2.9) (2.10) Connection for front indicators Fuse 6.3A slow clamping terminal communication IN 230VAC mains connection clamping terminal communication OUT Socket 1 : sensor interface Socket 2 : sensor interface Socket 3 : sensor interface Socket 4 : sensor interface Socket 5 : default unused 5.2.1.1 230VAC Mains connection (2.4) For the electric power supply of the sensor module only the approved mains cords provided with earth connection are to be used. Please note during installation: PE N L = = = Green / Yellow wire Blue wire Brown wire 5.2.1.2 Communication connection To enable the sensor controller to communicate with the control unit of Koiguard, the controller needs to be connected. (2.3 + 2.5). Communication is running with the RS_485 protocol. Make sure that the special 4 wire cable is exclusively used when making the connection. This cable is available in different lengths, under article number COMM X.0 The letter X indicates the length of the cable. Please note during installation: GND A B +12V = = = = Green wire White wire Brown wire Yellow wire Fig.3 picture wire communication cable 6 5.2.2 Sensor Interfaces Per Sensor Controller a maximum of 5 sensor interfaces can be connected. The Sensor Controller arranges communication between all interfaces and detects automatically when a new Sensor interface with sensor is connected. 5.2.2.1 Temperature / UV / Float interface The Temperature / UV / Float interface can be placed in any available socket (2.6 to 2.10). The Sensor controller automatically detects which Interface is connected. The Water temperature sensor The Water temperature sensor, with article number KG-WT001 , is to be connected to position WATER ( GND TEMP) Please note during installation: GND TEMP = brown wire = white/blue wire The Air temperature sensor The Air temperature sensor, with article number KG-LT001, is to be connected to position AMBIENT (GND TEMP) Please note during installation: GND TEMP = brown wire = white/blue wire The UV-C sensor (Not used) The Water Level sensor The water level sensors, with article number KG-SW001, are to be connected to position ANALOG (IN1 IN2). It is possible to connect 1 or 2 sensors. It doesn’t matter how the sensors are connected, there is no polarity on the wires. Please note during installation: GND IN1 IN2 GND = first wire sensor 1 = second wire sensor 1 = first wire sensor 2 = second wire sensor 2 Fig.3 Temperature / UV / water level Interface (KG-INTPH001) 7 5.2.2.2 pH Interface The pH Interface can be placed in any available socket (2.6 to 2.10). The Sensor controller automatically detects which Interface is connected. The pH Sensor The pH sensor, with article number KG-PH001, is to be connected to position PH METER (GND PH) Please note during installation: GND PH = black wire = transparent wire Fig.4 pH Interface (KG-INTPH001) 5.2.2.3 Redox Interface The Redox Interface can be placed in any available socket (2.6 to 2.10). The Sensor controller automatically detects which Interface is connected. The Redox sensor The Redox sensor, with article number KG-RX001, is to be connected to position REDOX (GND RX) Please note during installation: GND RX = black wire = transparent wire Fig.5 Redox Interface (KG-INTRX001) 8 5.2.2.4 Conductivity Interface (optional) The Conductivity Interface can be placed in any available socket (2.6 to 2.10). The Sensor controller automatically detects which Interface is connected. The Conductivity sensor The Conductivity sensor, with article number KG-CO001, is to be connected to Position CONDUCTIVITY (PROBE 1 2 GND) Please note during installation: NTC-10K 1 NTC-10K 2 PROBE 1 PROBE 2 GND = factory default = factory default = brown wire = white wire = black wire Fig.6 Conductivity Interface (KG-INTCO001) 5.2.2.5 Oxygen Interface The Oxygen Interface can be placed in any available socket (2.6 to 2.10). The Sensor controller automatically detects which Interface is connected. The Oxygen sensor The Oxygen sensor, with article number KG-O2001, is to be connected to position REDOX (GND RX) . Other connections have already been placed during production, these can only be removed when a special temperature compensation sensor is being used. Please note during installation: GND RX = black or white wire = red wire The completed sensor contains a sensor house and the active sensor head. The blue connector should be installed as instructed on the picture. Please note that the black rubber seal is mounted on the sensor head and greased, than turn the cover on the sensor housing till it sturdily am stuck. Now the sensor is waterproof and can be installed in the probe holder. Do not remove the plastic transparent seal of the sensor top! Fig.7 Oxygen Interface (KG-INTO2) Calibration tuning screw for the benefit of Oxygen open air (optional) 9 5.3 Assembly - 5.4 Screw the cable sheaths connecting, so that with the rubber seals in the cable sheaths the degree of protection IP41 is restored. Check the wiring one more time for the correct connections. Make sure that, especially when using the sensor controller outdoors, the rubber seals of the lid are neatly placed in the intended groove and won’t be wedged when the lid is screwed closed. Now the mains cord can be connected to the mains connection. Check whether the safety lamp (8.1) lights up green, when doing this. Configuration in the operations controller KG-MC001 After all available sensors have been connected electrically, this information will be automatically adjusted in the operations controller. Consult the manual of the KG-MC001 (operations controller) for a detailed survey of the menu structure! You will be directed to chapter 7.5.1 Sensor settings Go to SYSTEM SETTINGS MENU <OK> Choose SENSOR <OK> and select subsequently INSTALLED <OK> → settings sensor installed All installed sensors have a filled check box water level water temp outside temp ph orp / redox ec o2 nh3 floatsw (int) floatsw (ext) no3 _ Nitrate nh2 _ Nitrite The LCD screen now shows connected Interfaces. If an interface placed, but no sensor is connected, this interface can be switched ON / OFF by the <+> switch (3.4). 10 6. Indicators (8.1) (8.2) Fig 8: Indicators (8.1) (8.2) controle lamp ON controle lamp ALARM 6.1 Power lamp When all safety regulations have been attended to and the present sensors have been connected, the sensor can be connected to the 230VAC mains connection. After a few seconds, the sensor module will start up and subsequently the green power lamp ON will be on (8.1). 6.2 Alarm lamp The sensor controller communicates with the control module during normal operations to transmit the current measured values. While doing this, these current measured values are being compared to the desired, set values. When it is found that the current measured values and the desired set values do not correspond, the control module will take action. This action has been set in the ALARM SETTINGS menu of the control module. When it is found that the current measured values are rising outside of the boundaries of the alarm settings, the control module will execute the desired action and the red blinking light on the front of the sensor controller will be activated. 7 Calibration. 7.1 Calibration on installation The sensor controller has been calibrated during production already. Still certain sensors need to be recalibrated before use to achieve a greater accuracy. For the calibration of the sensors see chapter 7.3 7.2 Calibration during maintenance In spite of the used particle filter in the PROBE HOLDER SET3 the sensors can still experience disruption by algal growth. Algal growth influences the values of the sensors and therefore needs to be prevented. Algal growth can simply be removed by cleaning the sensor head with a soft brush and rinsing it carefully. If the sensor was indeed filthy, the current value will change immediately. To be certain that the current values are correct, the sensors need to be calibrated during maintenance. Maintenance as well as calibration depends largely of the degree of filthiness and the age of the sensors. Advice for cleaning and maintenance is once a month. For the calibration of the sensors see chapter 7.3 Remark : Make sure that the buffer liquid remains clean. Prevent pollution of the buffer liquids amongst each other. Rinse the sensor, before it is placed in another buffer! 7.3 Calibration of the sensors Before calibration of the individual sensors can begin, first you need to determine which type of sensor controller you have at your disposal. 11 The now clarified method is meant for type KG-SC001. If interfaces with the optional tuning screw are being used, you need to choose manual calibration! For all other interfaces you need automatic calibration. Make sure when using the PROBE HOLDER SET3, that the input as well as the output is closed. Than take the transparent jar away from the pot subsequently. Consult the manual of the KG-MC001 (operations controller) for a detailed survey of the menu structure! You will be directed to chapter 7.5.1 Sensor settings Go to the SETTINGS MENU and press Choose SENSOR and select subsequently CALIBRATION → settings SEnsor calibration 7.3.1 pH sensor calibration calibration ph → buffer ph = 4.01 buffer ph = 7.00 Adjust 0.00 Select pH Take the movable pH sensor and place this subsequently in a Buffer liquid pH 7.00 (article number REFPH7.0) When the sensor has been placed in the buffer liquid, select the correct buffer in the menu. On the ADJUST line the current value of the sensor will be indicated. This must be the same value as the buffer liquid. If this is not the same value, the sensor needs to be calibrated on both buffer liquids. Please note during calibration that the sensor is stirred in the buffer liquid. Adjustable using device buttons The adjusted value will be increased or decreased on he smallest significant. This must be repeated till the value at the ADJUST line is the same as the buffer value. When the sensor is calibrated on the pH 7.00 buffer liquid, it must be repeated for the pH 4.01 buffer liquid. After this procedure there can be a final check. Rinse and dry the sensor once more, and place it again in the buffer liquid 7.00. When the value is equal, the calibration procedure is completed. When there is a difference, the value can be adjusted till the value is the same. 12 7.3.2 ORP / Redox sensor calibration calibration ORP / Redox → buffer +468 mv Adjust 000 reset Select ORP / REDOX Take the movable Redox sensor and place it subsequently in a suitable buffer liquid. Standard Koiguard buffer +468 mVolt. (article number REFRX468) When the sensor has been placed in the buffer liquid, select the correct buffer in the menu. On the ADJUST line the current value of the sensor will be indicated. This must be the same value as the buffer liquid. If this is not the same value, the sensor needs to be calibrated. Please note during calibration that the sensor is stirred in the buffer liquid. Adjustable using device buttons The adjusted value will be increased or decreased on he smallest significant. This must be repeated till the value at the ADJUST line is the same as the buffer value. RESET will delete all adjusted values, and changes the sensor settings to the factory defaults (zero). Rinse the sensor after calibration and place it back in the holder. 7.3.3 Conductivity sensor calibration calibration conductivity → buffer buffer buffer Adjust 1413 us 3.0 ms 5.0 ms 0000 Select CONDUCTIVITY <OK> Take the movable Conductivity sensor and place it subsequently in a suitable buffer liquid. Standard Koiguard buffer 1413 µSiemens. (article number REFCO1413) When the sensor has been placed in the buffer liquid, select the correct buffer in the menu. On the ADJUST line the current value of the sensor will be indicated. This must be the same value as the buffer liquid. If this is not the same value, the sensor needs to be calibrated. Please note during calibration that the sensor is stirred in the buffer liquid. Adjustable using device button 3.4 <+> or 3.7 <-> The adjusted value will be increased or decreased on he smallest significant. This must be repeated till the value at the ADJUST line is the same as the buffer value. RESET will delete all adjusted values, and changes the sensor settings to the factory defaults (zero). Rinse the sensor after calibration and place it back in the holder. 13 7.3.4 Oxygen sensor calibration calibration oxygen disconnect → dry (09.1 mg/l) Adjust 00.0 Select OXYGEN <OK> Take the movable Oxygen out of the probe holder and dry it with a clean dry cloth. When the sensor is all dry, select DRY (09.1 mg/-1) in the menu. On the ADJUST line the current value of the sensor is indicated now. Make sure there is always sufficient ventilation while calibrating. Do not calibrate in poky and musty spaces (basement, provision room, attic etcetera) and not in spaces with unfavorable environmental conditions, in which / where flammable gasses, fumes or dust particles are or can be present. Wait until the value 09.1 mg/l appears in the display. This value coincides with the fact that there is ca. 20.9% oxygen in the air. When after about 5 minutes the value indicated at ADJUST is not equal to 09.1 mg/l the sensor needs to be calibrated. Adjustable using device button The adjusted value will be increased or decreased on he smallest significant. This must be repeated till the value at the ADJUST line is the same as the buffer value. If the value of ADJUST exceeds the limit of the digital calibration electronics, the trimmer on the interface must me set manually. Please note, the oxygen sensor is changing it’s value for several minutes. Wait till it’s stable before placing the sensor back into the probe holder. 14 8. Preservation - - This product is exclusively meant to be used indoors or in outdoor spaces covered from rain. Do not use the product immediately after bringing it from a cold into a warm space. The water from condensation can destroy the device under certain circumstances! Take some time to allow the device to assume the temperature of the environment, before using it. This can possibly take several hours. The switch socket and the plug of the device to be connected must never be touched with moist or wet hands. Please make sure that the insulation of the entire product is not damaged or destroyed. Check the product for damages each time before it is used. If the product is damaged it is NOT allowed to connect it on mains voltage! Highly dangerous! If the product will not be used for a prolonged period of time, it must be disconnect from mains voltage. Avoid unfavorable environmental conditions during transport and on the location of use: - Wetness and an high level of atmospheric humidity - extreme high or low temperatures - dust or inflammable gasses, fumes or solvents - strong vibrations - strong magnetic fields, like near engines or loudspeakers 15 9. Maintenance and cleaning The product is free of maintenance. Clean the sensor module with a soft, clean, dry and non-fluffy cloth. To remove stronger filthiness the cloth can be moistened with lukewarm water. Under no circumstances should aggressive detergents or chemical solvents be used, because these could damage the surface of the casing and the letterings. After cleaning make sure the sensor module is completely dry before plugging the device back in the socket. 10. Removal Remove the no longer to be used device according to the applicable statutory regulations. 11. Declaration of Conformity (DOC) DECLARATION OF CONFORMITY R & TTED 99 / 5 / EEC EMC directive 89/336/EEC 0700 Manufacturer: Koiguard BV Report number : 06C00765RPT01 Licence Holder: Koiguard BV Address: De Hoek 42 NL-1601MR Enkhuizen (The Netherlands) We declare on our own responsibility, that the product: Kind of product: KoiGuard KG-MC100 Is in compliance with the following norm(s) and documents: EN 50081 – 1 : 1992 EN 50082 – 1 : 1997 EN 61000-3-3 (1995)+A1(2001) EN 61000-6-3(2001+A11(2004) EN 61000-3-2 (2000) EN 61000-6-2 (2001) Enkhuizen, 16 september 2006 Manufacturer / Authorised representative, M.G.B. Stroet Managing Director 16